• Modelers Alliance has updated the forum software on our website. We have migrated all post, content and user accounts but we could not migrate the passwords.
    This requires that you manually reset your password.
    Please click here, http://modelersalliance.org/forums/login to go to logon page and use the "Forgot your Password" option.

All Righty ... What's on the bench today?

A quick word from me ;)

My whole modeling thing shuts down for the summer, business takes over with the good weather..... .but

I have an alert set for this thread and i always look in when Mad Dog posts :) Bob is spot on it's just great to see someone getting so much fun from his hobby and his updates reflect this. :)
 
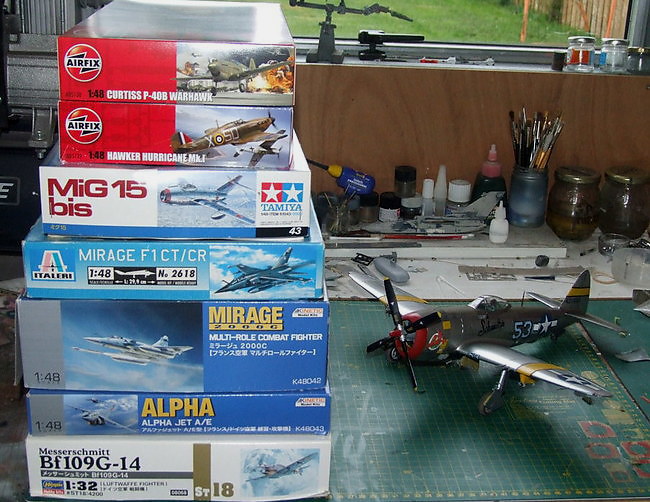
One of these will hit the bench next...


h9715705.jpg


...no idea as yet which of them !!

:idonno


Ian.
 
Excellent Ian! I'm looking forward to seeing which one it will be!


Okay, now I have everything uploaded so here it goes. There's a lot of pics for not so much work, so bear with me. This is all the work I managed to get done over the past two or three days.

I'll start with my aircraft.

The first thing I did was to mask the windows for the F-102 Delta Dagger:

WIP_CDS_Meng_F-102_Dagger_XVII.jpg


Then I shot a primer over the whole thing when the masking dried:

WIP_CDS_Meng_F-102_Dagger_XVIII.jpg


I did the same thing with the Boeing 737; I masked the windows first:

WIP_Boeing_737_XI.jpg


As that was drying, I shot a primer coat on the wings:

WIP_Boeing_737_X.jpg


Later on, I also primed the fuselage:

WIP_Boeing_737_XII.jpg


Simple and easy, all that was put aside to set up properly. Later on, I'll try to see if I can apply a nice smooth coat of paint on them.


Moving on, I was getting sick and tired of the VW bus sitting around taking up space. I decided to get to work on that and see how far I needed to go before I had to stop due to lost parts and such. From the get-go, I screwed up. As I was getting ready to add one of the windshield windows to this, it got messed up. My attempts to clean it turned out thusly:

WIP_VW_Van_XiI.jpg


I don't even know whether to try to clear that up or just try and add some different windows or something....

Moving on, I finished up the interior of this bus:

WIP_VW_Van_XiII.jpg


While trying to add the side doors to the one panel, I broke both the hinges and lost them; making me have to glue this door in:

WIP_VW_Van_XIV.jpg


The other one I was able to install properly so that it opens and closes. Oh well, our VW bus in my youth had the same problem with a stuck door so...

I went on and finished gluing all the side panels on to the chassis of the bus. Then I installed the one door on the front panel; this opens up too. Here are the two 'subassemblies' sitting side by side:

WIP_VW_Van_XV.jpg


In putting this all together, I found out about two more parts that disappeared with the front door, the back window and the lower body panel below the engine door:

WIP_VW_Van_XVI.jpg


Later on I snapped the front end onto the model to check alignment of the doors and such:

WIP_VW_Van_XVII.jpg


It was actually still pretty flimsy and misaligned, so I snapped the roof on top to help the sides to all glue into place properly:

WIP_VW_Van_XVIII.jpg


WIP_VW_Van_XIX.jpg


I could add the wheels to this, but I'll wait. Beyond the wheels, this is as far as I can get on this until I find the missing parts. Back to the Shelf of Shame for this one until further developments.....


Moving on to something that I can finish, I got more work done on three of the armor models I'm working on.

First off, I shot flat black over the tires of all the USAAF vehicles so I could move on with them when I could:

WIP_USAAF_Resupply_Set_XIX.jpg


I also detail painted some parts on some of those vehicles but did not take pics of them.

On my Merkava, it is really hard to see in these pics; but I shot a mist coat of Israeli Sand Grey over this model. I modulated the color a bit too, and also dry-brushed the highlights; not that you can tell here:

WIP_Merkava_IV_MBT_VII.jpg


WIP_Merkava_IV_MBT_VIII.jpg


Later on I painted the tarps on the back of this with Olive Drab. Again, these pics make it hard to see the difference:

WIP_Merkava_IV_MBT_IX.jpg


These effects are much more visible to the naked eye. Oh well, maybe later I'll be able to take pics that show this off to good effect.

Finally, on my armor, I got more done on the Vauxhall staff car. To start, I built the roof for this car:

WIP_Roden_Vauxhall_VI.jpg


Later after sanding the hood too much, I re-added the hinge line across the top:

WIP_Roden_Vauxhall_VII.jpg


This might be slightly out of scale, but I stretched the sprue to get this and I was afraid of stretching it too thin and snapping it.

I then finished adding all the parts to the chassis. I had to re-make the parking brake as it snapped off some time ago and disappeared:

WIP_Roden_Vauxhall_VIII.jpg


After drying, this model was ready for paint. So I masked off the bottom where the two sub-assemblies are supposed to join:

WIP_Roden_Vauxhall_IX.jpg


I then shot the first color on this car; the 'deep green' that the instructions said to paint it:

WIP_Roden_Vauxhall_X.jpg


That is a flat color so I'll be glossing that up later on.

In getting this far, I realized that the clear parts are missing for this kit as well. I do believe I have them in a different box somewhere; I just need to see if I can find them. Otherwise, I'm facing some difficult scratchbuilding ahead....


Finally, I joined a Star Wars Group Build on another Forums, thanks to the generosity of a good friend who sent me the Revell Imperial Star Destroyer. This is a well engineered snap together kit that surprisingly needed very little glue to seal seams and went together very quickly. It is also a 'motorized' kit with lights and sounds which are all controlled in this little module:

WIP_SPAM_Star_Wars_GB_I.jpg


That clear pull tab will activate the batteries allowing this to work. I'll pull that when I am done with this.

Here it sits all nestled in place right in front of where the engines go:

WIP_SPAM_Star_Wars_GB_Ib.jpg


There are openings in the back that will light up some clear blue parts in the engines.

Once the rear and engines were assembled and installed, the top hull was added to this lower hull. Easy peasy:

WIP_SPAM_Star_Wars_GB_IV.jpg


Here's a shot of the engines with the clear blue inserts that light up:

WIP_SPAM_Star_Wars_GB_V.jpg


And yes, that gap is supposed to be there.

Next is the lower superstructure. You can see how they engineered this kit to go together without seams:

WIP_SPAM_Star_Wars_GB_VI.jpg


WIP_SPAM_Star_Wars_GB_VIa.jpg


Next I added the upper superstructure to this assembly:

WIP_SPAM_Star_Wars_GB_VII.jpg


I then installed it on the main hull and slid the bridge neck into place:

WIP_SPAM_Star_Wars_GB_VIII.jpg


Building the bridge itself required a bit of glue to close the seams adequately:

WIP_SPAM_Star_Wars_GB_IX.jpg


Finally, here she is in all her finished glory:

WIP_SPAM_Star_Wars_GB_X.jpg


WIP_SPAM_Star_Wars_GB_XI.jpg


Finished assembly, that is. I still need to paint and detail this. To start that, I shot a coat of light grey primer over this whole thing:

WIP_SPAM_Star_Wars_GB_XIII.jpg


With all the detail on this, it is screaming for some washes and dry-brushes of color!


That is all I have for now. That Star Destroyer was a real fun and relaxing model to build; it really helped bring me down from some of the more frustrating models I was working on. *cough*VW BUS!*cough*

I don't know how much more I'll be able to do for the next few days, but stay tuned, I'll be working on some of this hopefully soon. Thanks for looking in, comments are welcome.
 
Hey Mark, I have found that things like the window mistake are really excellent learning experiences, when you figure out how to fix them.

WIP_VW_Van_XiI.jpg


To me this looks like something that you should try and fix it. If it is slightly etched, wet sand it with 1000+ grit to work through the etch. Then some Novus 2 plastic polish on a soft buffer on your Dremel to get rid of those scratches. Follow that with some 409 to remove all the oils and waxes from the Novus and finally a Future dip.

As this is a flat panel, with a little care you could end up with a better window than you started out with.

Some of my biggest mistakes turned into some of the best builds.
 
Thanks Dave! That Star Destroyer was a blast.

Paul, thanks for the excellent advice. I do believe I will give all that a try. I appreciate the tips.

Thanks Bob, now to actually finish some of all this going on...
 
Hey there Duke.

Regsrding the window. You have two choices that are both fairly easy.

#1 is to find piece of clear plastic such as box that some chocolates come in. Then you simply paint a section of that with acrylic white and then trace the windo pattern onto it and cut out a new window. This works too where kit windows are too small forthe openings on the model.

#2. Is to get some ultra fine sanding films and polish the existing kit window. I thinned down a very thick Hobby Craft 1/48 scale CF-100 Mk.IV canopy doing that. I have two pieces of sanding film/cloth here and one is 12,000 grite and the other is 24,000 grit. I got mine at a hobby store but you might find them in the auto body repair section of a car detailing place or store.

You start with something like 600 grit wet/dry paper then work to the finer and finally the ultra fine stuff. it'll leave a high gloss finish too.

If you need some clear plastic drop me a PM with your addy and i'll send you some.

Good luck and cheers
 
NOT my build...


h6e11273.jpg


hdf90713.jpg


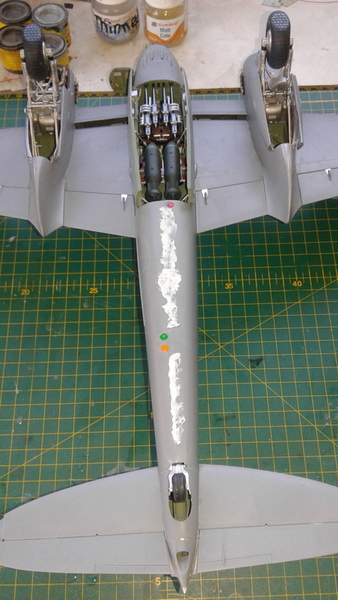
Filling, sanding & painting a Tamiya 1:32 Mosquito for a fellow NZ modeller... He wants it overall 'silver' Think he's planning on doing it as this one...

https://www.youtube.com/watch?v=uZEfVFT4__Y


Ian.
 
Quite a variety going there Mark-- love the Star Destroyer!

Ian-- looking forward to seeing what you do with this one bud!

Took the day off from the bench today to make a bench with my boy for his garden plot...it's pressure treated wood so we will need to wait a few months for it to dry before we get to stain it...tomorrow we will sand it down a bit and get all the stamps off...
IMG_20170709_223808.jpg

IMG_20170709_223744.jpg

19875123_10213972007918136_5041506631952868375_n.jpg
 
...also on taking-up residence my bench just now:


hc012334.jpg


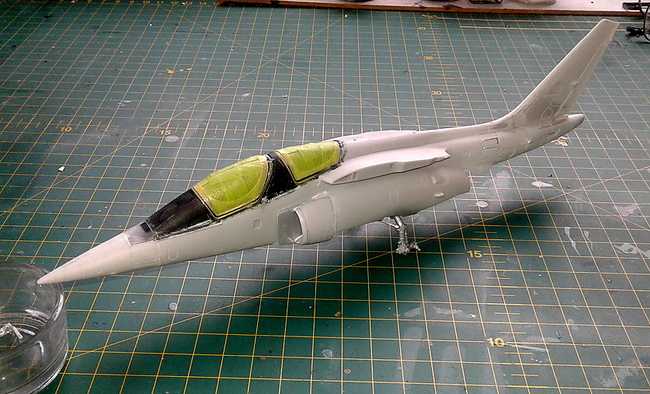
For a GB elsewhere on t'interweb. Kinetic kit, will have Wingman decals. Interesting build because of the complex shapes of the little Alpha Jet. Goes together more like a limited run kit than a mainstream kit, but that's OK, I really like these Kinetic kits.

Ian.
 
Quite a variety going there Mark-- love the Star Destroyer!

Ian-- looking forward to seeing what you do with this one bud!

Took the day off from the bench today to make a bench with my boy for his garden plot...it's pressure treated wood so we will need to wait a few months for it to dry before we get to stain it...tomorrow we will sand it down a bit and get all the stamps off...
IMG_20170709_223808.jpg

IMG_20170709_223744.jpg

19875123_10213972007918136_5041506631952868375_n.jpg

Great job Mike, very realistic. Nailed the wood grain. :rotf
 
Here is my latest progress on some of the models I was working on during Hobby Day.

I'll start with my aircraft. I got the decals on the C-118. Everything went on well surprisingly. Too well as I ran into another major issues after re-coating the model with a clearcoat to seal the decals:

WIP_CargoHaulersCampaign_XXXIXa.jpg


WIP_CargoHaulersCampaign_XXXIX.jpg


These are the pre-clearcoat shots. After spraying the second clearcoat to seal these, the silver on the wings crackled. I'm working on fixing that now....

I also added decals to the F/A-18 Hornet that has been sitting on the bench forever. This is another of my Modeling New Year's Resolution builds:

WIP_Modern_Aircraft_GB_XX.jpg


Some of the decals broke up, but I was able to fix them adequately. Later I shot this with the same clearcoat as the C-118 to no ill effect. Go figure. Later, I added the landing gear and gear doors to this:

WIP_Modern_Aircraft_GB_XXI.jpg


After this dried sufficiently, I added the white paint to the interior of the gear bays as well as the gear. I then glued on the wheels and added the underwing pylons:

WIP_Modern_Aircraft_GB_XXII.jpg


She's almost done (knock on wood!); all I need to do now is shoot a dullcoat; remove the masking and then add underwing stores:

WIP_Modern_Aircraft_GB_XXIII.jpg


Man this will feel good to finally get finished!

Speaking of almost finished; I also added the decals to the A-37A Dragonfly:

WIP_A_37A_Dragonfly_XVII.jpg


I later added the (already painted) stubby landing gear, gear doors and wheels to this model:

WIP_A_37A_Dragonfly_XVIII.jpg


Now this one is also almost finished. She just needs a dullcoat, mask removal and underwing stores as well:

WIP_A_37A_Dragonfly_XIX.jpg


This will be the first ever Dragonfly I ever built when it's done. Now to go find some underwing stores for this....

My final aircraft for the day was the old skool Airfix Jetstream I had started some time ago. I pulled this out and painted the interior and the pilots:

WIP_USAF_Jetstream_III.jpg


I later added the rest of the interior and added the fuselage doors to this:

WIP_USAF_Jetstream_IV.jpg


I need to finish painting this interior, but I couldn't resist dry-fitting everything together to see how it is going to look:

WIP_USAF_Jetstream_V.jpg


This will be interesting. I still have to paint it like the C-118...


Moving on to my armor, I didn't get much done here. I did pull out the Type 89 Late and tried to get it caught up to the Type 89 Early. That meant tackling those tiny roadwheels again; all 32 of them, plus the sprockets:

WIP_Japanese_Type_89_Late_II.jpg


Later I added the upper sponsons and the fenders to this:

WIP_Japanese_Type_89_Late_III.jpg


I then looked at the Type 89 Early and saw that it also needed the upper sponsons and fenders and the exhaust pipe; along with some other details, so on they went:

WIP_Japanese_Type_89_Late_IV.jpg


WIP_Japanese_Type_89_Late_V.jpg


I went back to the Type 89 Late and brought it up to the same level with the exhaust pipe and added details. I also added the rear ditching tail. I tried to do the same to the Early, but I lost one of the skid pieces for the unditching tail on the Early. I hope to find it soon so I can complete the early too. Meanwhile, the Type 89 Late is ready for paint:

WIP_Japanese_Type_89_Late_VI.jpg


Just for fun, here's a shot of the two of them side by side; showing the differences between them. The Exacto blade shows the relative size of these two tanks too:

WIP_Japanese_Type_89_Late_VIII.jpg


Beyond that, I didn't do too much except to start a couple of the new Aerosans I got. The first small one was fairly easy to assemble so far but there are some gaps to fill:

WIP_Game_Sleds_I.jpg


Later I got most of the assembly of the main body done and started on the engine:

WIP_Game_Sleds_II.jpg


While that was drying, I started the larger one, getting it this far before I had to stop for the day:

WIP_Game_Sleds_III.jpg


That's all I have so far. I hope to get more done soon. Meanwhile, stay tuned and thanks for any and all comments.
 
Good stuff :)
Your A37 is very similar layout to our Jet Provost , same sort of era i suppose.

I think MP is right, if you put a top coat on too thick it will activate the under coat which swells a little, the top coat dries hard and the undercoat then dries and as it contracts it cracks the hard top coat.
 
What silver paint did you use? That generally means it had not cured I think.

I used Tamiya Bare Metal Silver in a spray can and it had been sitting for a little more than a month and a half before I pulled it down to decal it. I can't see how it would not have cured. Still, this is a point I need to consider.

Good stuff :)
Your A37 is very similar layout to our Jet Provost , same sort of era I suppose.

I think MP is right, if you put a top coat on too thick it will activate the under coat which swells a little, the top coat dries hard and the undercoat then dries and as it contracts it cracks the hard top coat.

This may be the case. I shot a coat of Testor's Gloss Coat on the model. I tried to keep it thin to build it up slowly, but it still cracked. I either didn't make it thin and misty enough, or these two coats react regardless. Lesson learned. I'm gonna try to mask off the wings again and see if I can't restore this.


Thanks again for the great advice guys. This is why I keep coming back here and posting. Everyone here is so great at helping out.
 
Back
Top