
-
Modelers Alliance has updated the forum software on our website. We have migrated all post, content and user accounts but we could not migrate the passwords.
This requires that you manually reset your password.
Please click here, http://modelersalliance.org/forums/login to go to logon page and use the "Forgot your Password" option.
You are using an out of date browser. It may not display this or other websites correctly.
You should upgrade or use an alternative browser.
You should upgrade or use an alternative browser.
All Righty ... What's on the bench today?
- Thread starter panzerace007
- Start date
Skinny_Mike
Well-known member
Big future plans! I think I need to just break down and start an assembly line! :frantic
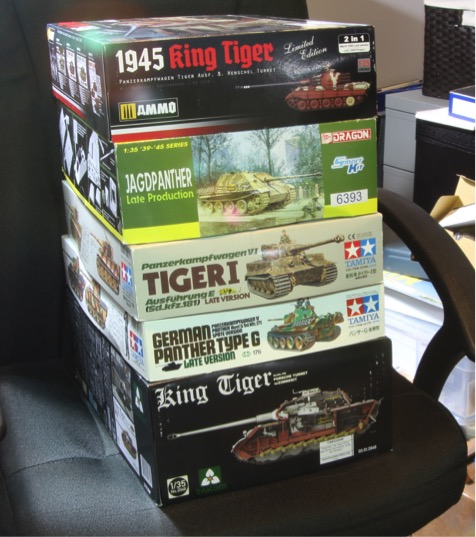
The JadgPanther and the Tiger 1 are languishing on the shelf of doom...
Inspiration just seems to come out of no where! :evil:
The JadgPanther and the Tiger 1 are languishing on the shelf of doom...
Inspiration just seems to come out of no where! :evil:
Heavens Eagle
Well-known member
I have spent all weekend working on the instrument panel for the Ju87A. Getting all the Airscale PE parts and instrument decals picked out and sorted to the correct places. The guy with Airscale needs to do a little more research on his stuff the decals are a bit pricey for what you actually get in the Luftwaffe sheet. As to the sizing, I think they might be a touch on the large size. Going to be a tight panel but am going to try and lay out all the PE instrument rings in place before building it. Will then go from there.
Photo holding double sided tape is a wonderful thing. It's tacky but not a hard tack. It is about as sticky as a post it note.")
Photo holding double sided tape is a wonderful thing. It's tacky but not a hard tack. It is about as sticky as a post it note.
I got a Jug on the bench that has occupied my thoughts all day. Sweet ain't it? :love :love :kiss: :coolio
ij001
Well-known member
Following at some distance in the footsteps of Henry Ford, I've started a wee production line of my own...
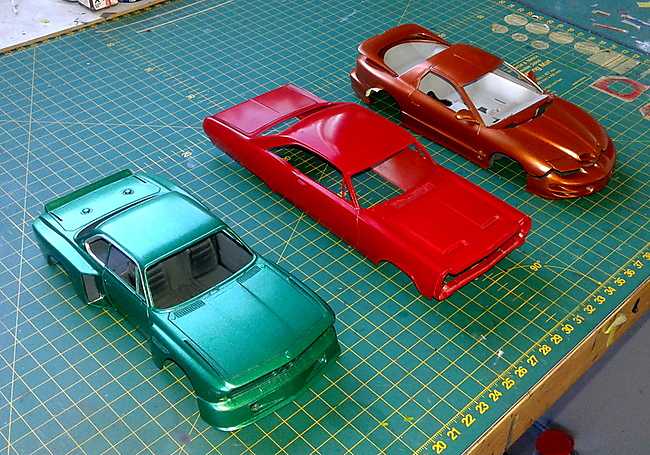
None of these are 'new starts' but they are all freshly painted (with 'rattle cans'), this week. HUGE bonus points to anybody who can guess all three and your choice of my children if you can tell which kit manufacturers...
Stay tuned.
Ian.
None of these are 'new starts' but they are all freshly painted (with 'rattle cans'), this week. HUGE bonus points to anybody who can guess all three and your choice of my children if you can tell which kit manufacturers...
Stay tuned.
Ian.
Heavens Eagle
Well-known member
Following at some distance in the footsteps of Henry Ford, I've started a wee production line of my own...
None of these are 'new starts' but they are all freshly painted (with 'rattle cans'), this week. HUGE bonus points to anybody who can guess all three and your choice of my children if you can tell which kit manufacturers...
Stay tuned.
Ian.
Looks to me that you have a BMW 5 racing type, a Dodge (something) and a Pontic Firebird. As to your kids I'd go bankrupt with a kid in Memphis, (and you wouldn't want them here anyway) :pinch:
ij001
Well-known member
Looks to me that you have a BMW 5 racing type, a Dodge (something) and a Pontic Firebird. As to your kids I'd go bankrupt with a kid in Memphis, (and you wouldn't want them here anyway) :pinch:
One-out-of-three, matey
, but you've been a great contestant, thanks for playing-along. We'll be right-back after these messages from your local station.Ian.
Tankbuilder
Active member
A bit of masochism struck here. I bought a few 1/35 scale Eastern Express kits of Russian vehicles in WW2 knowing that Eastern Express did not have a great reputation. One of the kits is the ZIS-42 halftrack.
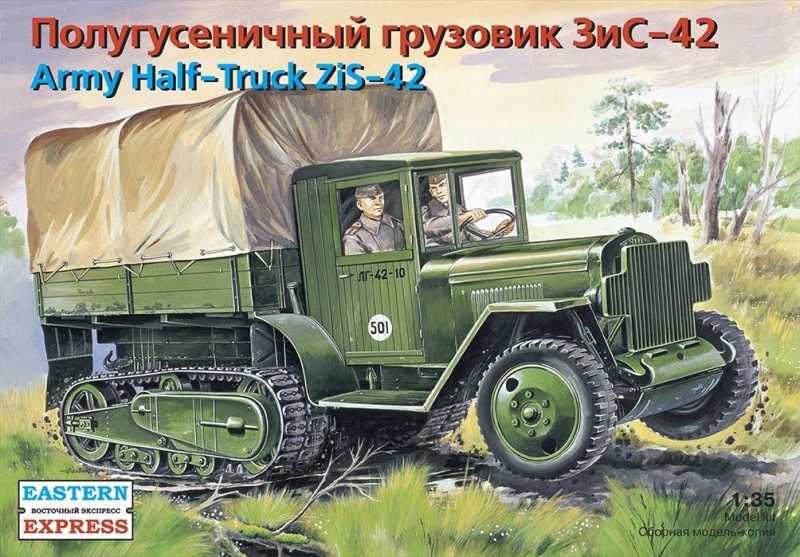
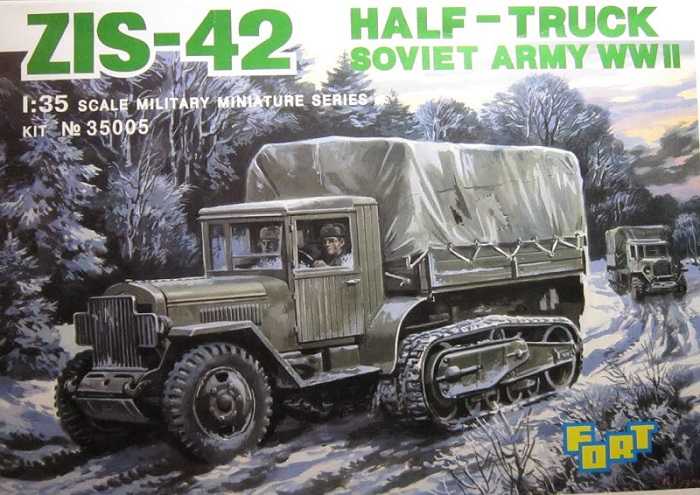
There are a LOT of fit isues. That's not helped by the fact that the instructions appear to be photocopy of a photocopy of a photocopy with the result that the parts numbers are illegible. The tilt cover for the cargo box is not included in the kit either but that's okay because it had 5 hoops instead of the proper 3 hoops. Turns out that this is a rebox of the even older FORt kit.
The bogies are a nightmare to get together properly. The cab is also a nightmare. I tried building it with the rear piece between the cab side pieces but then the cab would be too wide. I tried assembling it with the rear piece ofthe cab bridging the rear of the side pieces but then the cab would be too long. i ended up putting a 45 degree chamfer on the rear of the side pieces and the sides ofthe rear piece and that worked.
Here are the parts laid out after the base coat was put on them.

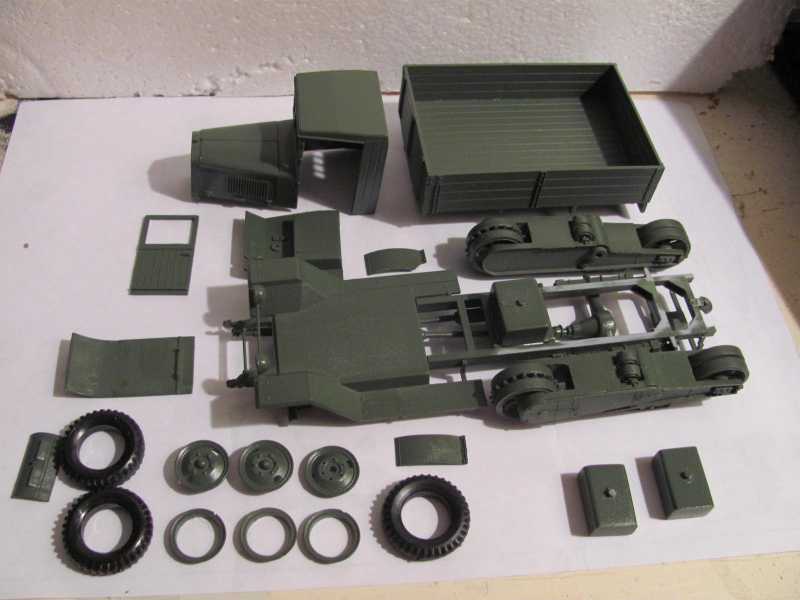
Here is the model with the sub-assemblies dry fitted.
The 2 rectangular items on the very right of IMG_4342 are fuel tanks modified from the fuel tanks of an Italeri Commando Car. In real life this thing was a real fuel hog and thus extra fuel tanks were added under the cargo bed to increase the total fuel capacity to 300 litres for a range fully loaded of 200 kilometers at @ 150 litres of fuel per 100 kilometers.
The spare tire holder under the chassis had to be modified to get the spare wheel to fit.
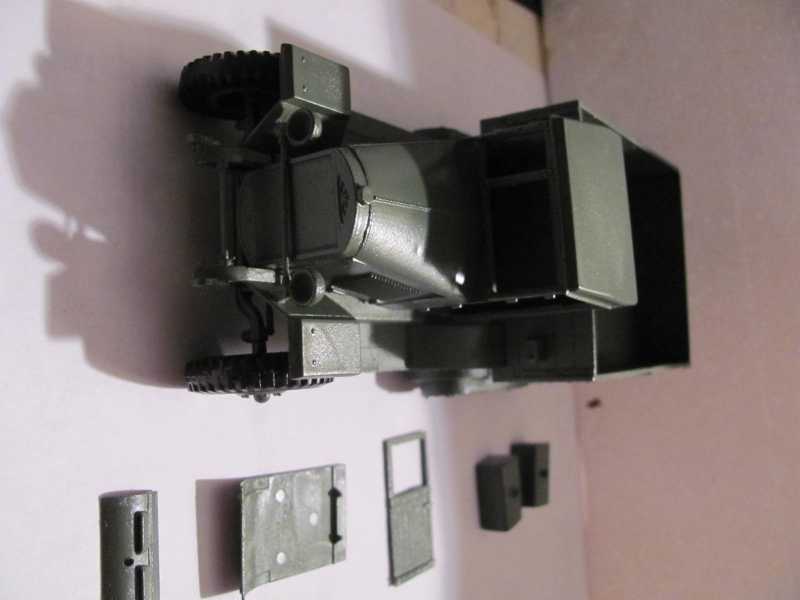
If the instructions were decent and showed where the parts actually go rather than just pointing to the general area, this would be a lot better kit. However it is an interesting vehicle and the ZIS-42 is the ONLY WW2 Russian halftrack.
Oh, I forgot. The tires in this kit and also in the ZIS-44 Ambulance are plastic nit vinyl and thus are sandable to remove any seams.
Cheers
There are a LOT of fit isues. That's not helped by the fact that the instructions appear to be photocopy of a photocopy of a photocopy with the result that the parts numbers are illegible. The tilt cover for the cargo box is not included in the kit either but that's okay because it had 5 hoops instead of the proper 3 hoops. Turns out that this is a rebox of the even older FORt kit.
The bogies are a nightmare to get together properly. The cab is also a nightmare. I tried building it with the rear piece between the cab side pieces but then the cab would be too wide. I tried assembling it with the rear piece ofthe cab bridging the rear of the side pieces but then the cab would be too long. i ended up putting a 45 degree chamfer on the rear of the side pieces and the sides ofthe rear piece and that worked.
Here are the parts laid out after the base coat was put on them.
Here is the model with the sub-assemblies dry fitted.
The 2 rectangular items on the very right of IMG_4342 are fuel tanks modified from the fuel tanks of an Italeri Commando Car. In real life this thing was a real fuel hog and thus extra fuel tanks were added under the cargo bed to increase the total fuel capacity to 300 litres for a range fully loaded of 200 kilometers at @ 150 litres of fuel per 100 kilometers.
The spare tire holder under the chassis had to be modified to get the spare wheel to fit.
If the instructions were decent and showed where the parts actually go rather than just pointing to the general area, this would be a lot better kit. However it is an interesting vehicle and the ZIS-42 is the ONLY WW2 Russian halftrack.
Oh, I forgot. The tires in this kit and also in the ZIS-44 Ambulance are plastic nit vinyl and thus are sandable to remove any seams.
Cheers
Duke Maddog
Well-known member
Tankbuilder, I can relate to the issues you're having with that kit. I've built a few of Eastern Express's 1/72 scale models. What bears those are. You can do it though; you have too much talent to let this one win.
Okay, here's a nice long update on all I've been working on the last two or three days.
I went to Hobby Day weekend this past Friday and Saturday and was able to get a considerable amount of progress done on some of my models while finding time to start a few more. I'll start with my aircraft that I've been working on.
First up is my pair of Tomcats that I'm doing the review on. It was time to finally build the burner cans for these models. If I hadn't said it before, I'll say it now: Always pay attention to the I and 2 symbols shown in the instruction sheet to be sure you are using the correct parts for the version you are building!
Here are the two burner cans for the F-14B. They were very easy to assemble as it was all plastic parts:

The inside of the F-14A burner cans had photo-etch parts. These were fairly easy to add and were a tremendous improvement on the appearance of these cans:

Once assembled, however, they were almost invisible:

If you look straight in, they are still visible.
Next it was time to assemble the wings. These are all the parts that are needed for the wing assembly. You can see I needed to do a lot of cleanup first:

Afterward I assembled almost all the wing. The little protrusions you see all need to be cut off if you intend to make these models with the wings swept:

I will be assembling both of these with swept wings due to my limited space for display when these are done. I did cut all those off and assembled the leading edge to each wing.
As the wing was drying, I installed the vertical stabilizers and dry-fit the horizontal stabilizers. It is a good thing I did this since when I first snapped the horizontal stabilizers in, I got this:

Rather than try and re-shape the holes or anything to make these more horizontal, I pulled them out; switched them to the opposite sides of the fuselage and then re-inserted them:

Perfect! So, when you build these models; pay close attention to where you are inserting the tail surfaces to make sure you are putting them on the correct sides before you try to level them out. This will save you a ton of frustrating work.
Moving on, I had to install the forward canards on the front of the main fuselage. For the -A Tomcat I installed them extended:

I installed them retracted on the -B model Tomcat:

This certainly helps to make it easy to tell the two apart.
Here are the two of them side by side:

I apologize that I did not get any pics of some of the speed brake door installation or the installation of the engine burner cans. Everything went together fairly smoothly so I continued to move on. I also installed all the speed brake doors closed since I know I will break them multiple times during the paint stage if I left them open. One thing to note: make sure you line up the burner cans so that the tab on the end inserts into the slot provided. Press in the burner cans close to eliminate any gaps. I did have a couple small gaps on the -A model Tomcat which I filled with the AV putty that I have. Interestingly enough, the -B model Tomcat burner cans went in far easier than the -A model Tomcat.
Finally I got around to installing the wings. These are actually only pressed in and lightly glued:

Later on, I made some effort at carving out some of the inside opening on the main fuselage where the cockpit module goes. This thinning of the front of the main fuselage seemed to fix the issue with the step between the cockpit and main fuselage. It's not too easy to see here as these are just dry-fit together, but they do look far better now:

Okay that is as far as I got on this for now. A few more steps to do and I'll be able to shoot some paint on these.
After all that, I decided to start a simple kit and pulled out my Boeing 737 kit:

So simple, so basic; it doesn't even have a cockpit! So, I added a couple nose weights to this to be sure it sits properly on all wheels:

Later I shot the interior with flat black:

Once that was dry, I started to glue the two fuselage halves together. I ran into some problems on the front of this:

...so I started gluing the tail and moved forward until I had two-thirds of this glued. When it dries sufficiently, I'll adjust this front section until it glues together properly. Meanwhile, I set this aside to dry:

While that was drying, I cemented together the two halves of the tail surfaces:

And then I cemented together the two halves of the wings:

Before I closed them up though, I had to shoot a pic of this:

Finally, I assembled the two engines for this:

Wow, that was fast and easy work! Later on I'll go back and close up the nose and then clean everything up.
Meanwhile, I wanted to get further on another large aircraft so I re-masked and re-shot the white on the top of the C-118 for the sixth time ever. Five coats of white later, I shot four more coats of gloss over that. After all that re-shooting of the white and gloss; I think I might be finally ready to apply the decals:

The next model I decided to try and fix up is my F-102 Delta Dagger. I applied some Mr. Surfacer 500 on the top to smooth out the spine and fill a couple small gaps:

You can see above that I also used my AV putty to fill in the slight gaps at the wing root. Some time later, this got sanded smooth. Now I think I'm ready to mask the canopy and start slinging paint:

Finally, the little Jetstream was calling my name so I answered it by assembling the tiny cockpit and seating the pilots inside:

I also glued the windows inside the fuselage sides and then assembled the main wings and the two tail surfaces:

Later on I'll complete the interior assembly and move on with this one.
This was all I got done on my aircraft.
However, while I was shooting white on my C-118, I also took the opportunity to touch up the white on my VW bus:

That was all I did on that. I am still missing the other door.
After that, I wanted to finally get all the decals finished on my Russian aircraft carrier. I was so close to being done with that deck so out it came. I finished up the final six decals and then sealed this up:

Afterward, I completed applying the decals on the hull as well so now this bird farm is finally able to be completed:


Wow! Finally I can move on with that model!!
Okay, now it's time to move on to my armor and vehicles.
To start with, my friend Harmon and I continued our dual build of two Sherman Fireflies in 1/48 scale for the Bolt Action game. I got the tracks on mine finally:

Later on I applied the rather scanty decals to this model while Harmon finished his Firefly:


Since I was applying decals to 1/48 scale tanks, I also added the decals to the M4A3 early; turning her into Classy Peg:


Now these are ready for dullcoat and weathering.
After that I got to work on my own models. The first one I decided to move forward on was this short-run SchturmTiger that has been languishing on the desk. It was time make some progress on this. I added all the final plastic detail parts as well as the main barrel in preparation for the P/E parts that go on this:


That was enough of that. I moved on to something simpler, like my USAAF resupply set. I was so close to being at the paint stage on these so I pulled them out and finished everything up to where I needed them to be to paint. First off, I did a crude repair on the axle of the bomb trailer. It ain't pretty but it should hold the wheel in the proper place:

Next I added the seats to the side of the bomb tractor bed:

And finally I added the last detail parts to the tanker trailer:

Now these are all ready for me to start slinging some OD.
I even assembled the bombs so I could paint them too:

After that I pulled out another simple and easy model to do. This is the Zvezda 1/72 scale British Bofors AA gun. It went together so fast and easy I never took time to shoot pics:

That was almost like taking a break from building. Now back to the rest of the production line...
Another new kit called to me so I pulled out my Vauxhall British Staff Car. I assembled the basic chassis at first:

I had broken one piece even before getting it off the sprue; that's how delicate this tiny model is. I also had some difficulty getting anything to stick where it was supposed to so this was as far as I got. I set that aside to work on another new and simple model: my Merkava IV.
I started with the tracks and wheels. The way they molded these makes this part so easy:

Next I assembled all the little detail pieces to the lower hull. Here I also test-fit the tracks to the lower hull to see how they look:

I'll pull them off again for painting.
I then assembled all the turret parts except for the final machine guns and some antenna. That took all of five minutes. Next I added the turret to the upper hull; then dry fit the upper hull to the lower one to see how it looks and fits. There were no parts to add to the upper hull. Again, this will all be removed for painting:


Wow, this will feel fantastic having this tank in my collection!
That is all I got done so far in the last two or three days. I have a job starting Monday that will probably pull me away from the bench for awhile so I'm thrilled that I got this much done.
Thanks all for looking in. Comments are welcome.... when you wake up.... :woohoo:
Okay, here's a nice long update on all I've been working on the last two or three days.
I went to Hobby Day weekend this past Friday and Saturday and was able to get a considerable amount of progress done on some of my models while finding time to start a few more. I'll start with my aircraft that I've been working on.
First up is my pair of Tomcats that I'm doing the review on. It was time to finally build the burner cans for these models. If I hadn't said it before, I'll say it now: Always pay attention to the I and 2 symbols shown in the instruction sheet to be sure you are using the correct parts for the version you are building!
Here are the two burner cans for the F-14B. They were very easy to assemble as it was all plastic parts:
The inside of the F-14A burner cans had photo-etch parts. These were fairly easy to add and were a tremendous improvement on the appearance of these cans:
Once assembled, however, they were almost invisible:
If you look straight in, they are still visible.
Next it was time to assemble the wings. These are all the parts that are needed for the wing assembly. You can see I needed to do a lot of cleanup first:
Afterward I assembled almost all the wing. The little protrusions you see all need to be cut off if you intend to make these models with the wings swept:
I will be assembling both of these with swept wings due to my limited space for display when these are done. I did cut all those off and assembled the leading edge to each wing.
As the wing was drying, I installed the vertical stabilizers and dry-fit the horizontal stabilizers. It is a good thing I did this since when I first snapped the horizontal stabilizers in, I got this:
Rather than try and re-shape the holes or anything to make these more horizontal, I pulled them out; switched them to the opposite sides of the fuselage and then re-inserted them:
Perfect! So, when you build these models; pay close attention to where you are inserting the tail surfaces to make sure you are putting them on the correct sides before you try to level them out. This will save you a ton of frustrating work.
Moving on, I had to install the forward canards on the front of the main fuselage. For the -A Tomcat I installed them extended:
I installed them retracted on the -B model Tomcat:
This certainly helps to make it easy to tell the two apart.
Here are the two of them side by side:
I apologize that I did not get any pics of some of the speed brake door installation or the installation of the engine burner cans. Everything went together fairly smoothly so I continued to move on. I also installed all the speed brake doors closed since I know I will break them multiple times during the paint stage if I left them open. One thing to note: make sure you line up the burner cans so that the tab on the end inserts into the slot provided. Press in the burner cans close to eliminate any gaps. I did have a couple small gaps on the -A model Tomcat which I filled with the AV putty that I have. Interestingly enough, the -B model Tomcat burner cans went in far easier than the -A model Tomcat.
Finally I got around to installing the wings. These are actually only pressed in and lightly glued:
Later on, I made some effort at carving out some of the inside opening on the main fuselage where the cockpit module goes. This thinning of the front of the main fuselage seemed to fix the issue with the step between the cockpit and main fuselage. It's not too easy to see here as these are just dry-fit together, but they do look far better now:
Okay that is as far as I got on this for now. A few more steps to do and I'll be able to shoot some paint on these.
After all that, I decided to start a simple kit and pulled out my Boeing 737 kit:
So simple, so basic; it doesn't even have a cockpit! So, I added a couple nose weights to this to be sure it sits properly on all wheels:
Later I shot the interior with flat black:
Once that was dry, I started to glue the two fuselage halves together. I ran into some problems on the front of this:
...so I started gluing the tail and moved forward until I had two-thirds of this glued. When it dries sufficiently, I'll adjust this front section until it glues together properly. Meanwhile, I set this aside to dry:
While that was drying, I cemented together the two halves of the tail surfaces:
And then I cemented together the two halves of the wings:
Before I closed them up though, I had to shoot a pic of this:
Finally, I assembled the two engines for this:
Wow, that was fast and easy work! Later on I'll go back and close up the nose and then clean everything up.
Meanwhile, I wanted to get further on another large aircraft so I re-masked and re-shot the white on the top of the C-118 for the sixth time ever. Five coats of white later, I shot four more coats of gloss over that. After all that re-shooting of the white and gloss; I think I might be finally ready to apply the decals:
The next model I decided to try and fix up is my F-102 Delta Dagger. I applied some Mr. Surfacer 500 on the top to smooth out the spine and fill a couple small gaps:
You can see above that I also used my AV putty to fill in the slight gaps at the wing root. Some time later, this got sanded smooth. Now I think I'm ready to mask the canopy and start slinging paint:
Finally, the little Jetstream was calling my name so I answered it by assembling the tiny cockpit and seating the pilots inside:
I also glued the windows inside the fuselage sides and then assembled the main wings and the two tail surfaces:
Later on I'll complete the interior assembly and move on with this one.
This was all I got done on my aircraft.
However, while I was shooting white on my C-118, I also took the opportunity to touch up the white on my VW bus:
That was all I did on that. I am still missing the other door.
After that, I wanted to finally get all the decals finished on my Russian aircraft carrier. I was so close to being done with that deck so out it came. I finished up the final six decals and then sealed this up:
Afterward, I completed applying the decals on the hull as well so now this bird farm is finally able to be completed:
Wow! Finally I can move on with that model!!
Okay, now it's time to move on to my armor and vehicles.
To start with, my friend Harmon and I continued our dual build of two Sherman Fireflies in 1/48 scale for the Bolt Action game. I got the tracks on mine finally:
Later on I applied the rather scanty decals to this model while Harmon finished his Firefly:
Since I was applying decals to 1/48 scale tanks, I also added the decals to the M4A3 early; turning her into Classy Peg:
Now these are ready for dullcoat and weathering.
After that I got to work on my own models. The first one I decided to move forward on was this short-run SchturmTiger that has been languishing on the desk. It was time make some progress on this. I added all the final plastic detail parts as well as the main barrel in preparation for the P/E parts that go on this:
That was enough of that. I moved on to something simpler, like my USAAF resupply set. I was so close to being at the paint stage on these so I pulled them out and finished everything up to where I needed them to be to paint. First off, I did a crude repair on the axle of the bomb trailer. It ain't pretty but it should hold the wheel in the proper place:
Next I added the seats to the side of the bomb tractor bed:
And finally I added the last detail parts to the tanker trailer:
Now these are all ready for me to start slinging some OD.
I even assembled the bombs so I could paint them too:
After that I pulled out another simple and easy model to do. This is the Zvezda 1/72 scale British Bofors AA gun. It went together so fast and easy I never took time to shoot pics:
That was almost like taking a break from building. Now back to the rest of the production line...
Another new kit called to me so I pulled out my Vauxhall British Staff Car. I assembled the basic chassis at first:
I had broken one piece even before getting it off the sprue; that's how delicate this tiny model is. I also had some difficulty getting anything to stick where it was supposed to so this was as far as I got. I set that aside to work on another new and simple model: my Merkava IV.
I started with the tracks and wheels. The way they molded these makes this part so easy:
Next I assembled all the little detail pieces to the lower hull. Here I also test-fit the tracks to the lower hull to see how they look:
I'll pull them off again for painting.
I then assembled all the turret parts except for the final machine guns and some antenna. That took all of five minutes. Next I added the turret to the upper hull; then dry fit the upper hull to the lower one to see how it looks and fits. There were no parts to add to the upper hull. Again, this will all be removed for painting:
Wow, this will feel fantastic having this tank in my collection!
That is all I got done so far in the last two or three days. I have a job starting Monday that will probably pull me away from the bench for awhile so I'm thrilled that I got this much done.
Thanks all for looking in. Comments are welcome.... when you wake up....
:woohoo: MM2CVS9
Active member
After that, I wanted to finally get all the decals finished on my Russian aircraft carrier. I was so close to being done with that deck so out it came. I finished up the final six decals and then sealed this up:
Afterward, I completed applying the decals on the hull as well so now this bird farm is finally able to be completed:
Wow! Finally I can move on with that model!!
Really nice floaty there. How did the flight deck decals go down?
ij001
Well-known member
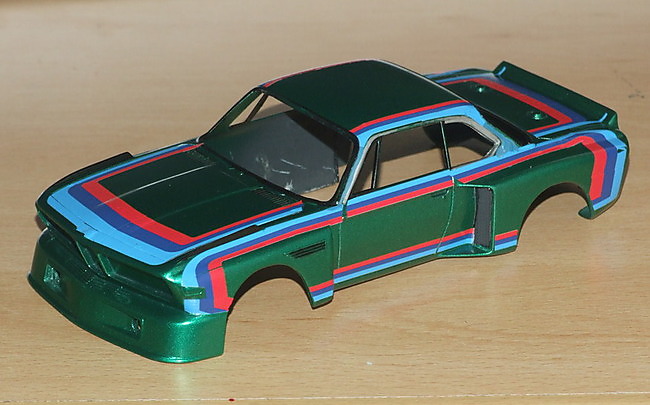
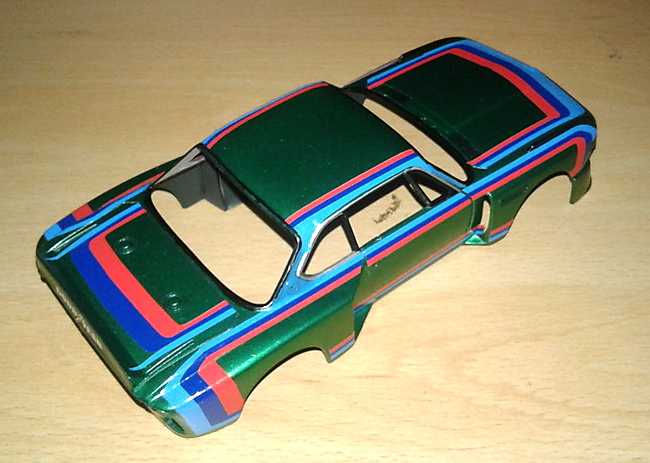
Stripes have happened !! - horrible job to get them to conform around the curves of the rear flared arches, but I think I've won !! - need to mix a light blue now to spray in to the gaps behind the front 'guide veins' and ahead of the aerofoil mounts. This is a fun hobby, right ??
Ian.
Duke Maddog
Well-known member
Thanks Dave. Yeah, I had a very productive three days.
Thanks! The decals actually went on very well. Only the parking decals on the lighter grey gave me any kind of issue. Everything else pressed down and stayed very well.
Ian, that car looks magnificent! Way to go!
After that, I wanted to finally get all the decals finished on my Russian aircraft carrier. I was so close to being done with that deck so out it came. I finished up the final six decals and then sealed this up:
Afterward, I completed applying the decals on the hull as well so now this bird farm is finally able to be completed:
Wow! Finally I can move on with that model!!
Really nice floaty there. How did the flight deck decals go down?
Thanks! The decals actually went on very well. Only the parking decals on the lighter grey gave me any kind of issue. Everything else pressed down and stayed very well.
Ian, that car looks magnificent! Way to go!
Duke Maddog
Well-known member
For the first time in about a week or so I was able to get into the hobby room to play. I managed to put in a couple hours getting caught up on a few things.
To start with, I added the engines to the wings of the Boeing 737 and did some sanding on the filler I added to the fuselage seams. I also glued on the tail surfaces. Here it is with the wings dry-fit to the fuselage:

The wings will remain off so I can paint the fuselage and wings separately.
Moving on, I dullcoated the Russian carrier Baku. The island is just sitting there dry-fit to the hull:


Finally, here is the progress I made on the armor I've been working on.
Since I had the airbrush out to dullcoat the carrier, I also dullcoated the three 1/48 scale gaming Shermans. Since they don't look any different (except flatter) I didn't shoot any pics of them. I did however shoot paint on my Merkava IV tank:


This is just a basecoat of green drab. I had a friend of mine who told me these tanks were more green than the Israeli armor sand-grey that previous tanks were painted. So, I figured I'd basecoat this with the green drab then lightly mist on the Israeli armor sand-grey over to so that the green shows through. If I do this right; I hope it really shows well.
Since I was still airbrushing, out came the USAAF support set of vehicles. All of these got a base coat of Olive Drab:

Next will be detail painting and then gloss coat for decals.
While I was at it, I also shot a base coat of Olive Drab on the little Bofors cannon:

I'm gonna paint the barrel a metallic black/gunmetal color.
Finally, after putting away the airbrush, I still wanted to build something so I pulled out the little Vauxhall car and finished off the suspension that I didn't get to finish at Hobby Day:

Man this is a fiddly little kit that is a challenge to get lined up. I moved on and built the interior and main body of this car:

Later on I added the fenders to the chassis:

Once again, it was tough getting those fender to sit right.
Finally, here is a shot of the whole car dry-fit together:

This is going to be one sharp looking little car when I get done.
That's all I got done so far. I may be able to work on some more models tomorrow so stay tuned.
Meanwhile, thanks for looking in, comments are welcome.
To start with, I added the engines to the wings of the Boeing 737 and did some sanding on the filler I added to the fuselage seams. I also glued on the tail surfaces. Here it is with the wings dry-fit to the fuselage:
The wings will remain off so I can paint the fuselage and wings separately.
Moving on, I dullcoated the Russian carrier Baku. The island is just sitting there dry-fit to the hull:
Finally, here is the progress I made on the armor I've been working on.
Since I had the airbrush out to dullcoat the carrier, I also dullcoated the three 1/48 scale gaming Shermans. Since they don't look any different (except flatter) I didn't shoot any pics of them. I did however shoot paint on my Merkava IV tank:
This is just a basecoat of green drab. I had a friend of mine who told me these tanks were more green than the Israeli armor sand-grey that previous tanks were painted. So, I figured I'd basecoat this with the green drab then lightly mist on the Israeli armor sand-grey over to so that the green shows through. If I do this right; I hope it really shows well.
Since I was still airbrushing, out came the USAAF support set of vehicles. All of these got a base coat of Olive Drab:
Next will be detail painting and then gloss coat for decals.
While I was at it, I also shot a base coat of Olive Drab on the little Bofors cannon:
I'm gonna paint the barrel a metallic black/gunmetal color.
Finally, after putting away the airbrush, I still wanted to build something so I pulled out the little Vauxhall car and finished off the suspension that I didn't get to finish at Hobby Day:
Man this is a fiddly little kit that is a challenge to get lined up. I moved on and built the interior and main body of this car:
Later on I added the fenders to the chassis:
Once again, it was tough getting those fender to sit right.
Finally, here is a shot of the whole car dry-fit together:
This is going to be one sharp looking little car when I get done.
That's all I got done so far. I may be able to work on some more models tomorrow so stay tuned.
Meanwhile, thanks for looking in, comments are welcome.
Duke Maddog
Well-known member
Thanks EJ! I'm so glad to get all those decals done.
Damn Duke!
Are you singlehandedly trying to keep the model industry in business? :yipee
People have called me prolific over the years. Compared to you, I'm an amateur!
Keep going! I love to see people so engaged and enjoying their hobby!
Bob
Are you singlehandedly trying to keep the model industry in business? :yipee
People have called me prolific over the years. Compared to you, I'm an amateur!
Keep going! I love to see people so engaged and enjoying their hobby!
Bob
Duke Maddog
Well-known member
Damn Duke!
Are you singlehandedly trying to keep the model industry in business? :yipee
People have called me prolific over the years. Compared to you, I'm an amateur!
Keep going! I love to see people so engaged and enjoying their hobby!
Bob
Bob, you honor me more than I deserve.
 Thank you ever so much
I am certainly trying to just keep up myself! My productivity is down from many past years; I used to finish between 65-75 kits a year; now it's down to 35-45 a year so I'm not all that prolific anymore. But yes, I do so enjoy this hobby, especially when I can get together with my friends and build together. That and the comments of compliments and encouragement like yours keep me fired up to go on.
I do have more to show, stay tuned....
Similar threads
- Replies
- 39
- Views
- 13K
- Replies
- 60
- Views
- 24K