
-
Modelers Alliance has updated the forum software on our website. We have migrated all post, content and user accounts but we could not migrate the passwords.
This requires that you manually reset your password.
Please click here, http://modelersalliance.org/forums/login to go to logon page and use the "Forgot your Password" option.
You are using an out of date browser. It may not display this or other websites correctly.
You should upgrade or use an alternative browser.
You should upgrade or use an alternative browser.
American Southwest, Circa 1876, Sioux Warriors vs US 7th Cavalry
- Thread starter Steve Ski
- Start date
Steve Ski
Well-known member
Story’s Paint
Ok, let’s try this again. I’ve been on a stretch of this, that, and the other thing, and bench time has been limited, again. We all get those distraction runs from time to time, some lasting longer than others, but no need to expound upon our miseries, lol. So, here we go.
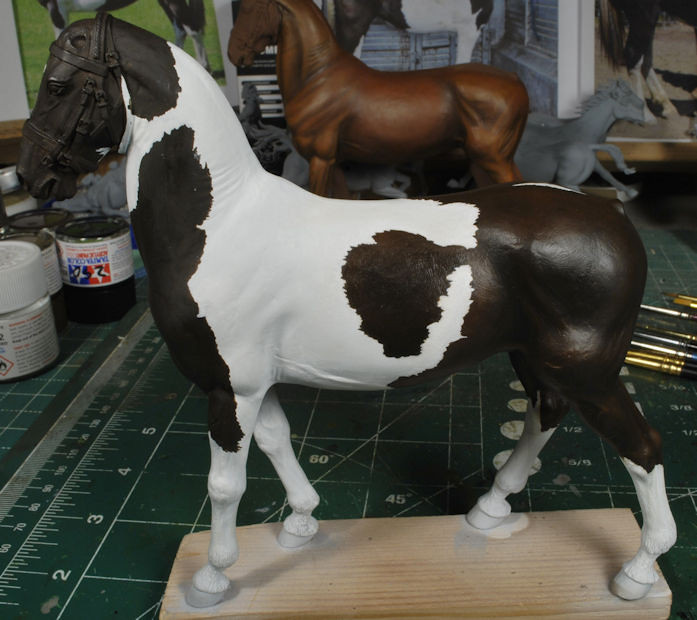
As per usual, I neglected to take sequential pics, but most everything I’m doing here is pretty basic. But I will give a short run down of the process to get things up to snuff. Having just started learning Big Dogs I kinda need to remember what I’m doing for later projects. Story has proven to be unique in her paint as each one is, but she doesn’t have the more complex patterns that we see out there. So, this is actually a great test pattern to learn on. Like the Dennison Smock, in regard to each color being highlighted and shaded individually, this will be treated in the same manner, but much simpler, with each tone getting the highlights and shadows to transition from dark to light as seamlessly as possible. That is the goal.
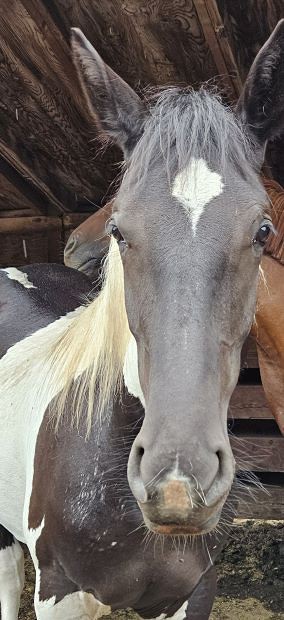
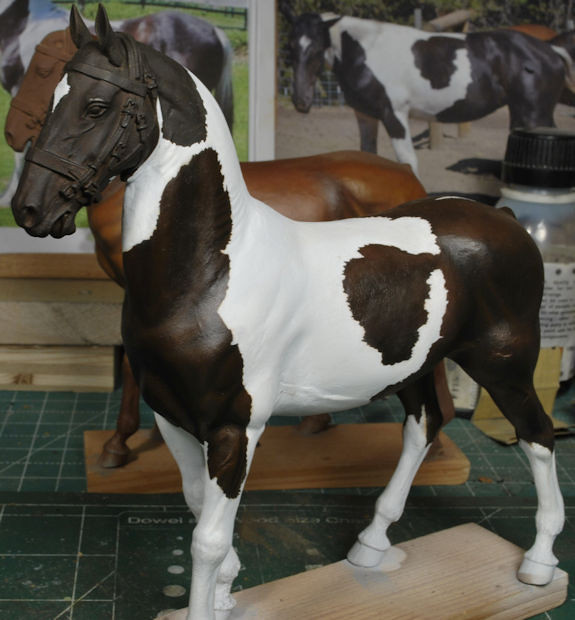
I added a few more reference photos to verify the pattern. I need to address the neck area a bit more before oiling that area completely, and I now see I may need to enlarge that patch on her left belly toward the shoulder just a bit more. It’s looking a little small to me. I will work the nose when I get to that area as well. But, so far, I think I’m close enough to call this pattern a decent rendition once I correct those few areas.
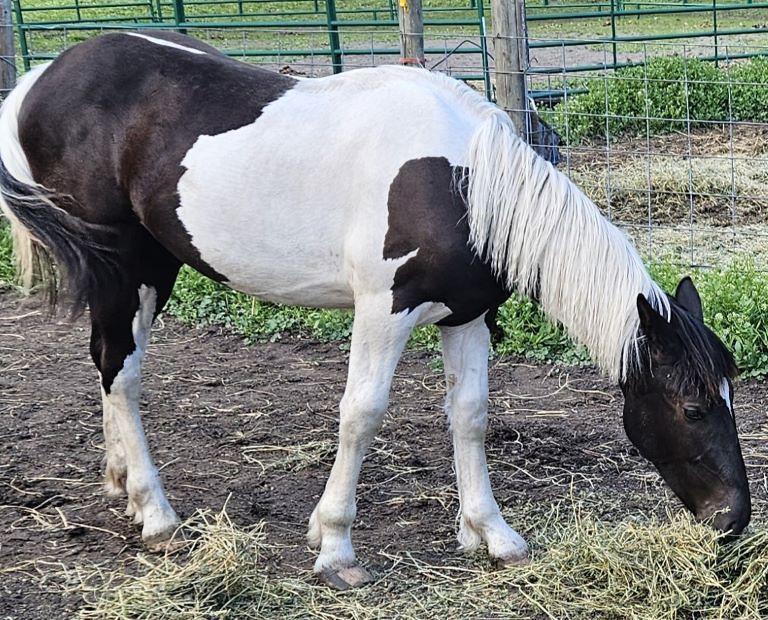
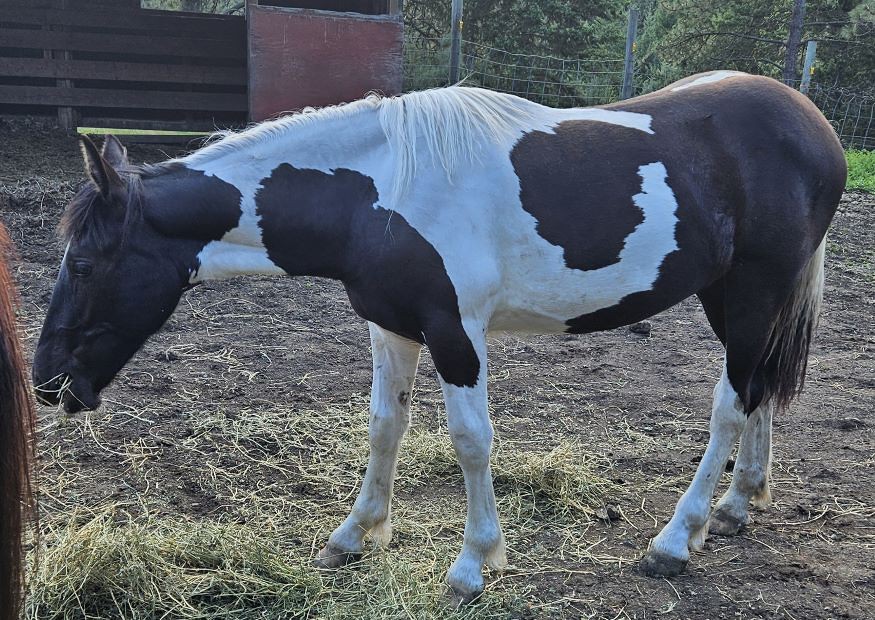
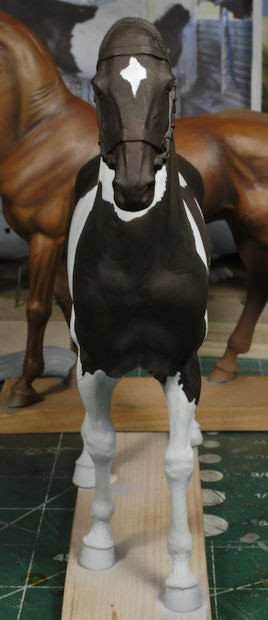
I started with a solid coat of Tamiya XF-2 Flat White airbrushed on for even coverage. I then mixed up XF-1 Flat Black, and XF-10 Flat Brown for the initial dark tone. Please don’t ask me what they call that dark color on Story. I forgot, and it’s not a deal breaker, so we carry on. HA! I know my wife could rattle off all that stuff, but not me. Regardless, the dark mixture is really close to the photos, so I airbrushed that on.
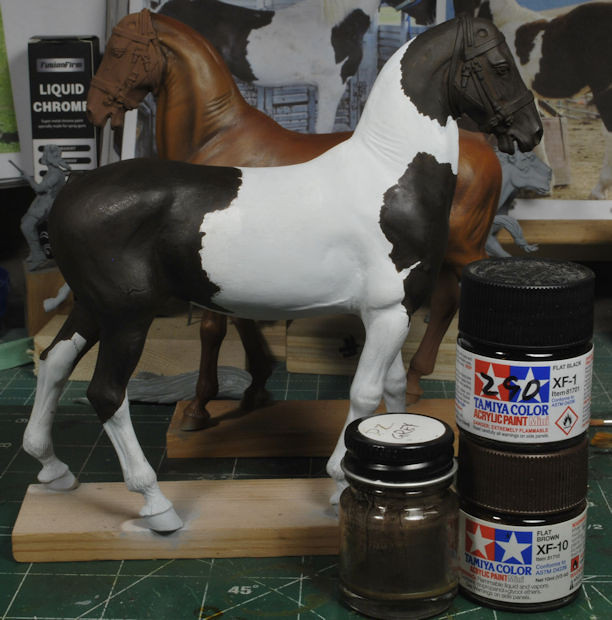
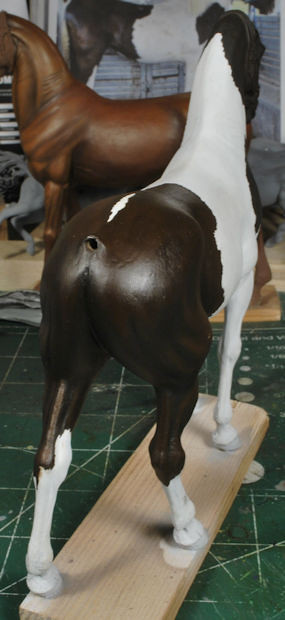
To get the pattern as close as possible during the initial color application I used AK’s Camouflage Elastic Putty. Man, that stuff is a life saver in this case and it worked great. After that coat dried completely I went back over the entire edge of each dark pattern to add in the irregularities that are visible in the pics. There are quite a few jagged edges on this paint pony and I wanted it as close as possible. Granted, it’s not such a radical pattern as many I’ve seen, but it’s there and clearly visible in the photos. I’ve added a pic of the “star” on her snout. There was also a white strip running up her back from the tail that I’ve never noticed, nor have I clearly seen them in any of the photos. This pup is getting big fast, so I may need a step ladder soon if I need more pics, lol.
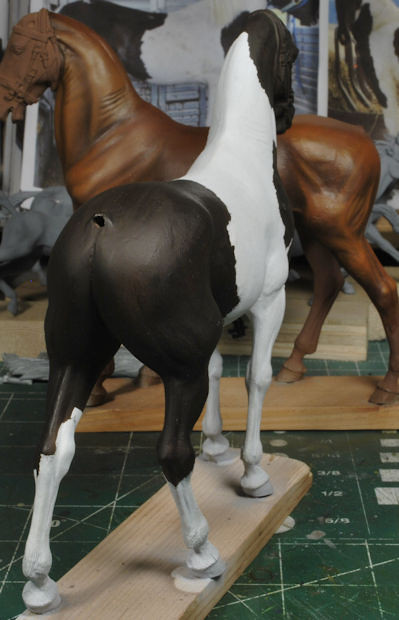
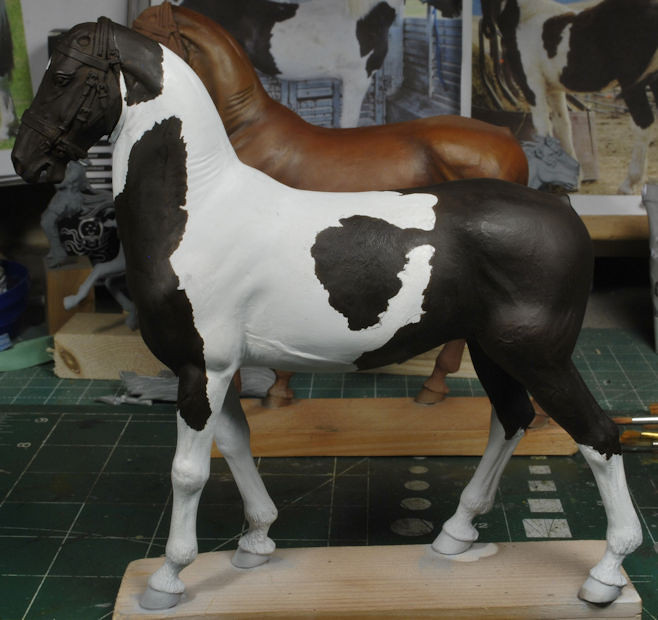
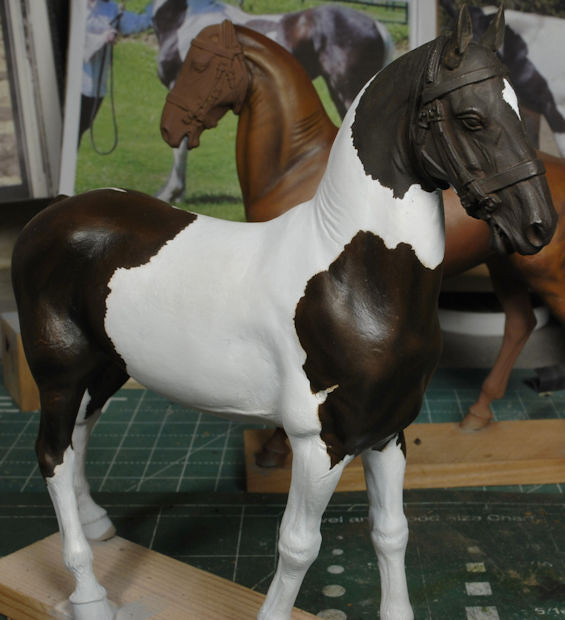
The oils have been applied to the back end of this pony, but it’s a bit difficult to see in these pics. Using a mix of Windsor & Newton Burnt Umber, Burnt Sienna, and Raw Umber to create the shadows and highlights, I worked my way from the left side to the right. Once these oils dry completely the sheen will dull and I will apply more highlights in specific areas.
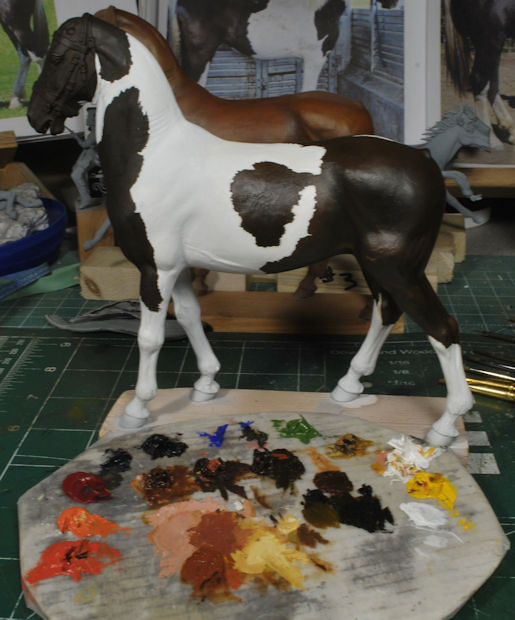
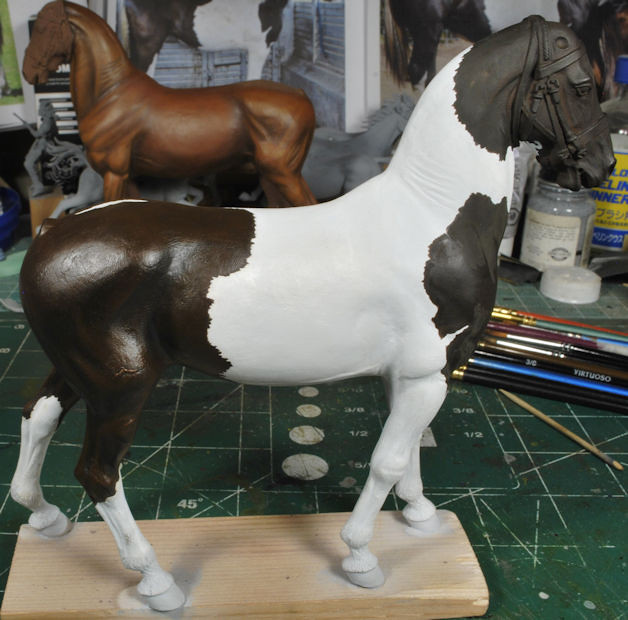
The difficulty I’m finding is keeping the tones dark enough without getting carried away with the highlights. I will address the front shoulder areas and neck next. Once I’m satisfied with the initial brush work, I’ll tackle the whites.
I will eventually get the tail and mane installed, but I’m pondering using some kind of hair thread, or something way more realistic than this molded mane and tail. I’ve seen others use some type of material, but I’m not sure what it is, but I’ll research that and see if I can realistically apply that instead. I’ve stopped on the other Big Dog, Nash, but I think I’ll take this one full run to completion, then get rolling on the 1/35 scale ponies. Wow, won’t that be a change, eh?
More to follow soon and thanks for watchin! Cheers, Ski.
Ok, let’s try this again. I’ve been on a stretch of this, that, and the other thing, and bench time has been limited, again. We all get those distraction runs from time to time, some lasting longer than others, but no need to expound upon our miseries, lol. So, here we go.
As per usual, I neglected to take sequential pics, but most everything I’m doing here is pretty basic. But I will give a short run down of the process to get things up to snuff. Having just started learning Big Dogs I kinda need to remember what I’m doing for later projects. Story has proven to be unique in her paint as each one is, but she doesn’t have the more complex patterns that we see out there. So, this is actually a great test pattern to learn on. Like the Dennison Smock, in regard to each color being highlighted and shaded individually, this will be treated in the same manner, but much simpler, with each tone getting the highlights and shadows to transition from dark to light as seamlessly as possible. That is the goal.
I added a few more reference photos to verify the pattern. I need to address the neck area a bit more before oiling that area completely, and I now see I may need to enlarge that patch on her left belly toward the shoulder just a bit more. It’s looking a little small to me. I will work the nose when I get to that area as well. But, so far, I think I’m close enough to call this pattern a decent rendition once I correct those few areas.
I started with a solid coat of Tamiya XF-2 Flat White airbrushed on for even coverage. I then mixed up XF-1 Flat Black, and XF-10 Flat Brown for the initial dark tone. Please don’t ask me what they call that dark color on Story. I forgot, and it’s not a deal breaker, so we carry on. HA! I know my wife could rattle off all that stuff, but not me. Regardless, the dark mixture is really close to the photos, so I airbrushed that on.
To get the pattern as close as possible during the initial color application I used AK’s Camouflage Elastic Putty. Man, that stuff is a life saver in this case and it worked great. After that coat dried completely I went back over the entire edge of each dark pattern to add in the irregularities that are visible in the pics. There are quite a few jagged edges on this paint pony and I wanted it as close as possible. Granted, it’s not such a radical pattern as many I’ve seen, but it’s there and clearly visible in the photos. I’ve added a pic of the “star” on her snout. There was also a white strip running up her back from the tail that I’ve never noticed, nor have I clearly seen them in any of the photos. This pup is getting big fast, so I may need a step ladder soon if I need more pics, lol.
The oils have been applied to the back end of this pony, but it’s a bit difficult to see in these pics. Using a mix of Windsor & Newton Burnt Umber, Burnt Sienna, and Raw Umber to create the shadows and highlights, I worked my way from the left side to the right. Once these oils dry completely the sheen will dull and I will apply more highlights in specific areas.
The difficulty I’m finding is keeping the tones dark enough without getting carried away with the highlights. I will address the front shoulder areas and neck next. Once I’m satisfied with the initial brush work, I’ll tackle the whites.
I will eventually get the tail and mane installed, but I’m pondering using some kind of hair thread, or something way more realistic than this molded mane and tail. I’ve seen others use some type of material, but I’m not sure what it is, but I’ll research that and see if I can realistically apply that instead. I’ve stopped on the other Big Dog, Nash, but I think I’ll take this one full run to completion, then get rolling on the 1/35 scale ponies. Wow, won’t that be a change, eh?
More to follow soon and thanks for watchin! Cheers, Ski.
Excellent Steve, I can see the shading over here. Story looks great!
AndyFettes
Master at Arms
oh yes indeed !!!!!!!!!!
Heavens Eagle
Well-known member
Hard to believe those are the dogs I sent!
Steve Ski
Well-known member
Good deal, Bob. That sheen can not only mess with the eyes, but the camera, too.Excellent Steve, I can see the shading over here. Story looks great!
Thanks, andy!oh yes indeed !!!!!!!!!!
Yes, Borther Saul, these are your babies and they are fun to work, tanks, Bro! I was going to forgo the final finish on Story, but the whites need a revisit, because they can be a head trip, if you get carried away and dismiss the subtleties of the shading. I've seen a lot of potentially great work go to pot from overdone shading, therefore, massive moderation, and a lot of walking away from the bench to reassess is what I've learned to do.Hard to believe those are the dogs I sent!
Now, if I can practice what I just preached, we're good, ya?
 Worst comes to worst, my trusty oven cleaner is always on stand-by, HA!
Steve Ski
Well-known member
Thanks, Chris. I've just found a good base with character, so I just might jump right to the herd and put these two aside. But, then again, loose ends, they drive me bonkers, lol.Bravo! It looks like your warm up is sucessful!
Steve Ski
Well-known member
Shifting Gears, Skipping Ahead
I was getting impatient with all the interruptions I’ve been dealing with and decided to put the bigger Big Dogs aside and start working on the base layout. My motivation was already faltering, so the only “real” way to reengage the drive to Ruck On was to shift gears, turn the wheel in a different direction. I love doing layout and base planning and I just so happened to have a left-over chunk of wood from the piece I used on the 42nd Highlanders vignette.
Before I get too far into the layout, I need to mention that the chest area on Story has begun, but I stopped short of working the neck and head area. I’ll get back to it later, but right now I need a redirect to keep the momentum going.
Honestly, this was the only way to compress this many ponies into one direction of battle while still telling the story with limited space. This chunk of wood has a lot of character and it just so happened to be big enough for the job, without a large footprint. I will be using air-clay and the appropriate amount of ground cover without destroying the grain. I plan to proceed as I did on the Highlander base and keep as much natural wood exposed as possible, yet give the ground cover it’s due. I think this will work, but what do yall think?
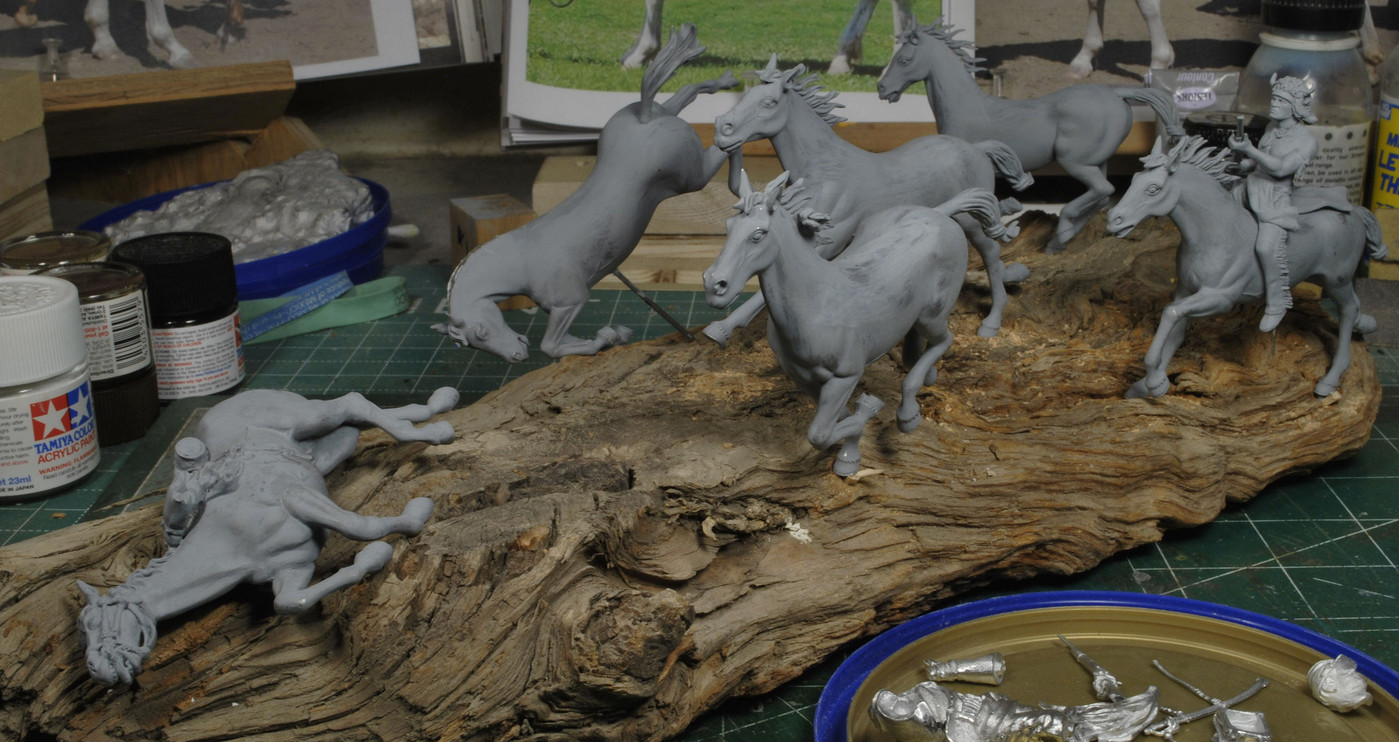
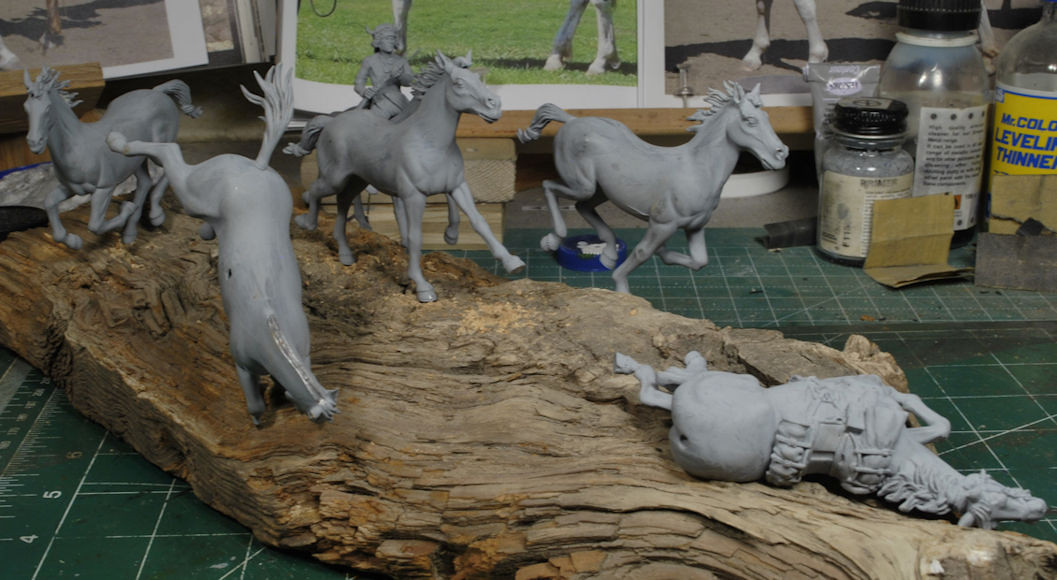
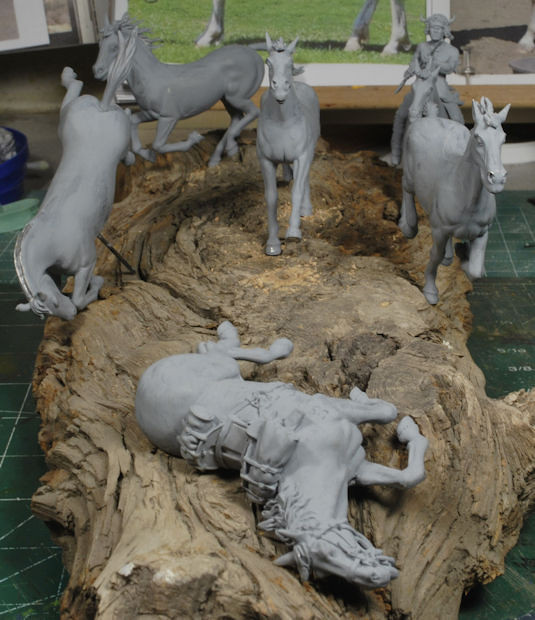
It may be difficult to imagine all the riders and their interactions with the Trooper, but each has been positioned in the most logical location for this scenario. Any final adjustments will be made once all of the figures have been assembled and put on, or falling off, their respective ponies. This layout is pretty basic, but I really don’t see any other way to make adjustments beyond minor movements in any given direction for each pony. So, if you see something I’m missing, please holler, I’m all ears.
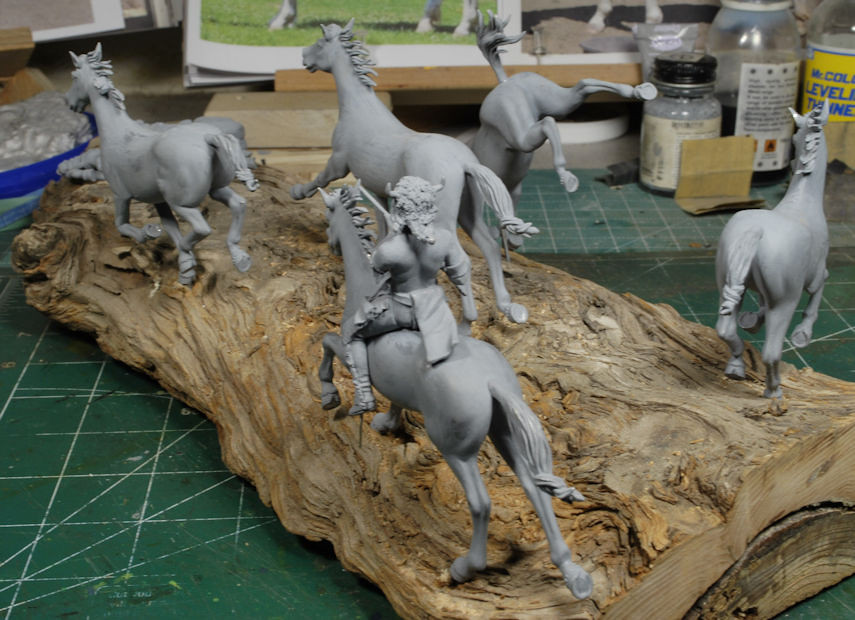
Note; the Chief is charging straight at the Trooper, in the middle, just so you know which rider is making that suicide run. In any case, the Trooper is toast with that single shot carbine. I never understood why they didn’t issue Winchesters to all calvary troops until I read of the government selection process was a major factor, among many other reasons; training, ammo supply, etc. Regardless, it is well understood that Custer’s men were outnumbered and out-gunned in that particular battle. Remember, I am not replicating the Battle of Little Big Horn, per se, not at all. This is just some background information I found that plays into this scenario that could have taken place anywhere in the region before, or after, the Battle of Little Big Horn.
Might I add that I am not at all a fan of metal figures, not at all, and these Andreas kits are lacking basic assembly pics for some of the more intricate features. Still, for as old as these kits are, they are decent enough to make them work, even if I gotta fight em to make em work, lol.
More to follow soon and thanks for watchin. Cheers, Ski.
I was getting impatient with all the interruptions I’ve been dealing with and decided to put the bigger Big Dogs aside and start working on the base layout. My motivation was already faltering, so the only “real” way to reengage the drive to Ruck On was to shift gears, turn the wheel in a different direction. I love doing layout and base planning and I just so happened to have a left-over chunk of wood from the piece I used on the 42nd Highlanders vignette.
Before I get too far into the layout, I need to mention that the chest area on Story has begun, but I stopped short of working the neck and head area. I’ll get back to it later, but right now I need a redirect to keep the momentum going.
Honestly, this was the only way to compress this many ponies into one direction of battle while still telling the story with limited space. This chunk of wood has a lot of character and it just so happened to be big enough for the job, without a large footprint. I will be using air-clay and the appropriate amount of ground cover without destroying the grain. I plan to proceed as I did on the Highlander base and keep as much natural wood exposed as possible, yet give the ground cover it’s due. I think this will work, but what do yall think?
It may be difficult to imagine all the riders and their interactions with the Trooper, but each has been positioned in the most logical location for this scenario. Any final adjustments will be made once all of the figures have been assembled and put on, or falling off, their respective ponies. This layout is pretty basic, but I really don’t see any other way to make adjustments beyond minor movements in any given direction for each pony. So, if you see something I’m missing, please holler, I’m all ears.
Note; the Chief is charging straight at the Trooper, in the middle, just so you know which rider is making that suicide run. In any case, the Trooper is toast with that single shot carbine. I never understood why they didn’t issue Winchesters to all calvary troops until I read of the government selection process was a major factor, among many other reasons; training, ammo supply, etc. Regardless, it is well understood that Custer’s men were outnumbered and out-gunned in that particular battle. Remember, I am not replicating the Battle of Little Big Horn, per se, not at all. This is just some background information I found that plays into this scenario that could have taken place anywhere in the region before, or after, the Battle of Little Big Horn.
Might I add that I am not at all a fan of metal figures, not at all, and these Andreas kits are lacking basic assembly pics for some of the more intricate features. Still, for as old as these kits are, they are decent enough to make them work, even if I gotta fight em to make em work, lol.
More to follow soon and thanks for watchin. Cheers, Ski.
Heavens Eagle
Well-known member
Hmmm, only place ground cover where the horses and other stuff are and leave the natural wood in between?
Wow! That'll be action packed! Git'er done Steve.
centaur567
Well-known member
This is going to look very exciting when done. Gary S.
Steve Ski
Well-known member
That's a big 10-4, roger that, Good Buddy! Yes, keep as much of the wood character as possible and air-clay the critical points for ground cover. If you look at how the 42nd Highlander vignette was done I will be attempting to work this in the same manner. The Trooper's pony will require some build up and same for the falling pony, but the rest will be straight forward.Hmmm, only place ground cover where the horses and other stuff are and leave the natural wood in between?
Yes, Sir, bob, will do. Thanks!Wow! That'll be action packed! Git'er done Steve.
Thank you, Gary. I like the action being portrayed with this set.This is going to look very exciting when done. Gary S.
Heavens Eagle
Well-known member
Looking good!

Steve Ski
Well-known member
Trooper Big Dog
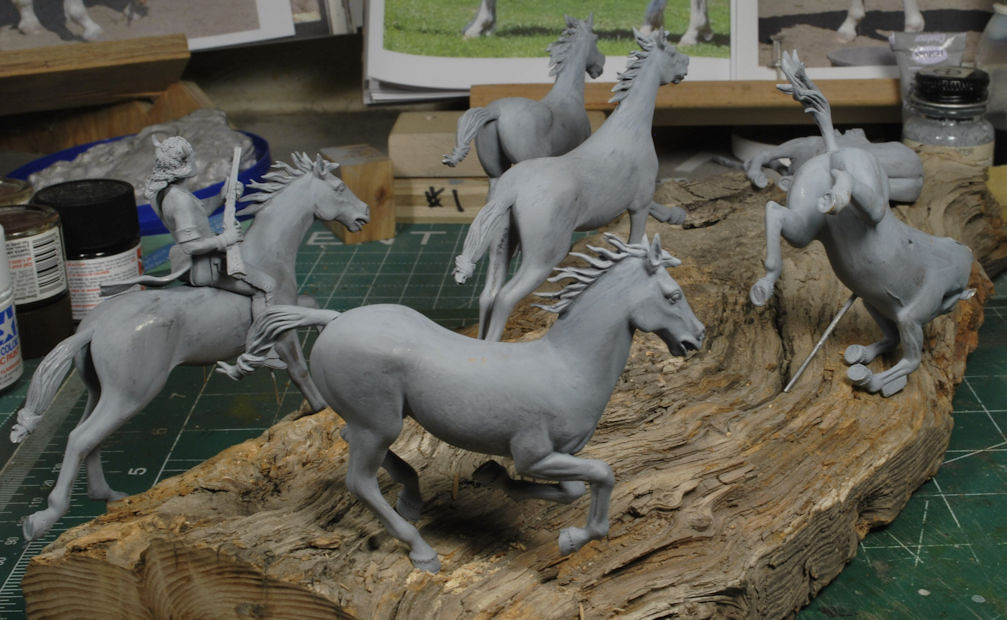
It’s been an incredibly slow roll this season, but I’m getting to the bench as much as possible. I started back on some of the figures and the Trooper’s Big Dog. After finagling with the metal pieces for this pony I was able to get all of the accessories applied. They appear to be in the correct locations, so I’ll run with it.
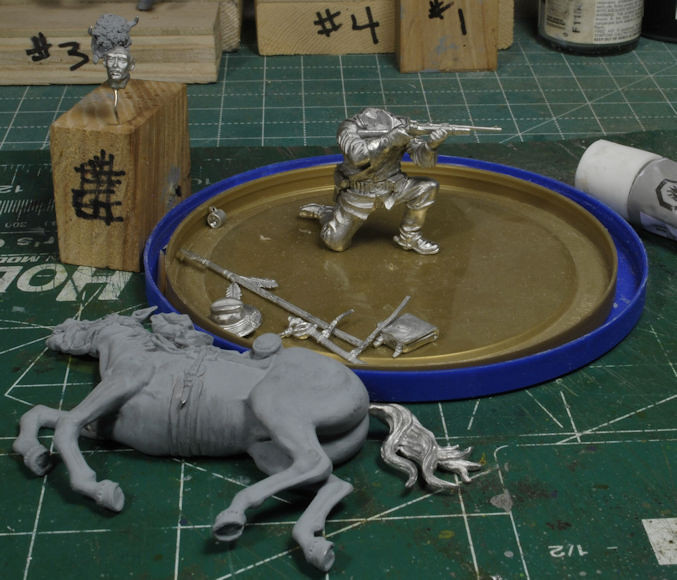
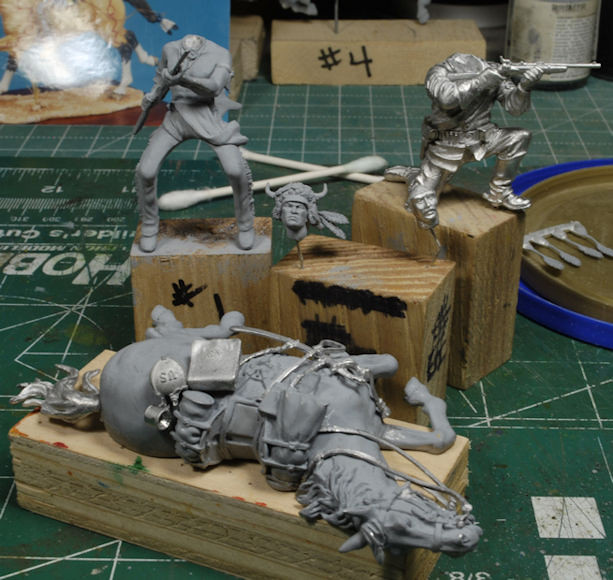
As time allowed, I was able to finish the pony and move on to the Trooper, and now the Sioux warrior. I will keep at it until they are all assembled and ready for a primer coat. As usual I have posted the heads on pins for painting separately.
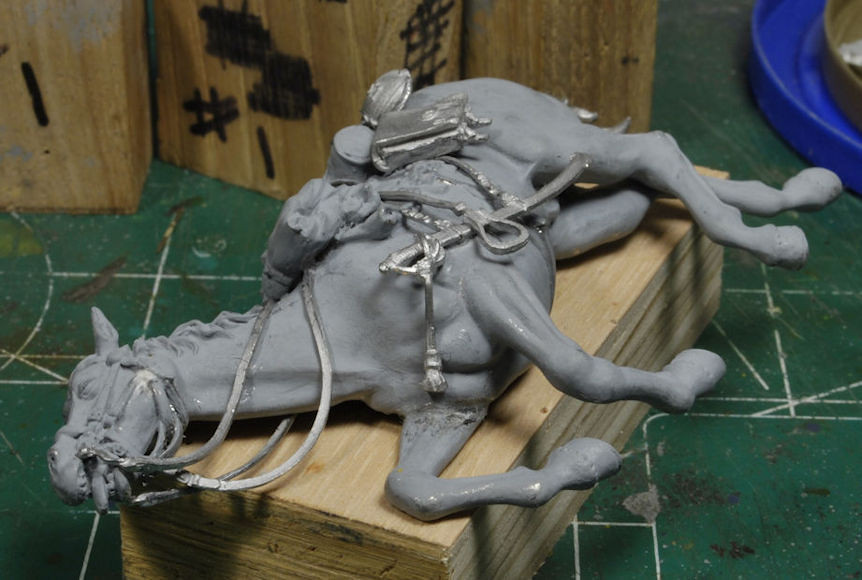
Unfortunately, some of these figures will require an almost complete assembly before I can take a brush to them. I still need to learn the head dress for the Chief, and the chest bone armor for the others, but I’ll deal with it however it works best.
Thanks for watchin and more updates as time allows. Cheers, Ski.
It’s been an incredibly slow roll this season, but I’m getting to the bench as much as possible. I started back on some of the figures and the Trooper’s Big Dog. After finagling with the metal pieces for this pony I was able to get all of the accessories applied. They appear to be in the correct locations, so I’ll run with it.
As time allowed, I was able to finish the pony and move on to the Trooper, and now the Sioux warrior. I will keep at it until they are all assembled and ready for a primer coat. As usual I have posted the heads on pins for painting separately.
Unfortunately, some of these figures will require an almost complete assembly before I can take a brush to them. I still need to learn the head dress for the Chief, and the chest bone armor for the others, but I’ll deal with it however it works best.
Thanks for watchin and more updates as time allows. Cheers, Ski.
Looks great Steve. Looking forward to some color on them.
Similar threads
- Replies
- 104
- Views
- 22K
- Replies
- 54
- Views
- 11K
- Replies
- 41
- Views
- 8K