• Modelers Alliance has updated the forum software on our website. We have migrated all post, content and user accounts but we could not migrate the passwords.
    This requires that you manually reset your password.
    Please click here, http://modelersalliance.org/forums/login to go to logon page and use the "Forgot your Password" option.

Tamiya North American P-51D Mustang 8th AF

Greg Kimsey

Well-known member
20221214_213622.jpg
I started this a couple of days ago and will show you my progress thus far.
20221213_171450.jpg
So after looking extensively and closely at as many photos as I could find I got to use my little rivet tool and mark some new lines. I really hope I did that right!
20221214_092341.jpg
I feel like I cheated using some photoetched seatbelts, but they look pretty good. In one of the photos I noticed a wire going along the cockpit wall so I added that. I also added some wiring to that stuff behind the seat. Again, I hope I did it right or at least close.
20221214_201420.jpg

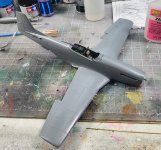
I looked through my collection of decals and found some for the instrument panel for a P-51D. Yay! I wouldn't have to paint those tiny dials by hand! Wrong. They were so old that after 4 attempts I gave in and hand painted the dials and what not. I used my fly fishing resin and made glass for the dials. It really does look better than those dumb decals anyway.
20221214_204617.jpg
20221214_213350.jpg
I got the fuselage glued and drying now.

However! I am going to set this aside and do my best to finish an A10A Thunderbolt for my friend, Ray, before Christmas. Wish me luck because I think I am going to need it!
 
dang I forgot myself.
 
Well, I got her back out tonight to see what I can do while I wait for my new nozzles. I do have a "working" airbrush, but it is basic stuff only; no finesse at all. In fact, I used it to spray the wheel wells.
20230105_213154.jpg
So, as you can see, I have the nose cone glued and drying.
Oh, BTW, I found a great site called Prime Portal with great photos, which I am sure you all already know about. It is here: http://www.primeportal.net/hangar/domeric_barbot/p-51d/index.php?Page=1

I noticed in the photos that the walls of the intake on the underside are fairly thin. The walls of the model would be 3" thick in real life. So I got to use my micro drill bits to thin down the walls.
20230105_220236.jpg
David, of Plasmo YouTube channel fame, uses these things extensively, so they found their way onto my Santa list. I fit one into my Dremel and started eating plastic. Man, it worked great!
20230105_220213.jpg
I think you be able to tell, but I sanded as well as I could, then final smoothed the edges and inside the opening with Tamiya extra thin cement.
20230105_221635.jpg


That's it for now. I want to add wiring and details to the wheel wells that will never be seen again (but I will know they are there) tomorrow.
 
32 scale
22 Cal (5.56mm) - #95
30 Cal (7.62mm) - #88
50 Cal (12.7mm) - 1/64 #78
14.5mm - #77
20mm - #72
23mm - #70
30mm - #63

35 scale
22 Cal (5.56mm) - #96
30 cal (7.62mm) - #89
50 cal (12.7mm) - #79
14.5mm - #78
20mm - #74

48 scale
50 Cal (12.7mm) - #86
30 Cal (7.62mm) - #96
20mm - #78
30mm - #73

72 scale
50 Cal (12.7mm) - #94
30 Cal - 0.10mm drill
20mm - #85
30mm - #78

@Iron Mike posted this a long time ago:
1673020834853.png
 
I got to work on her a little today After watching a couple of videos of a Mustang build I decided to hold the wiring until later.I glued the wing halves together and let them dry. Boring so no pictures. (Forgot to take them anyway). After they dried I glued the wings to the fuselage. I had actually purchased a kit with gun barrels and sights.
20230106_160835.jpg
I drilled the holes to 1.6mm as instructed. How you keep a drill bit centered for 6 holes is still a mystery to me. Not only that, I ended up pushing two of them iirretrievably inside the wing. So, I had to make two gun barrels with copper tubing. Fortunately I had the right ones on hand. I cut the tubes: longer for the larger tube and a little shorter for the inner tubes.
20230106_142128.jpg
The crimps on the larger tube are from holding it with pliers while I drilled it out large enough for the next tube. I glued the two larger together with thin superglue then beveled the ends a little. I put the smallest tube in and did the same.
20230106_142405.jpg
I will be the first to admit that it doesn't look very good. I did straighten that barrel after seeing it engaged by the camera. I put them in their holes and they look fine.
20230106_150838.jpg
It certainly won't be a show winner LOL. I need to figure a better way of handling the more delicate copper tubing. I am new to scratch building stuff. Anyway, that is where I am now!
 

Attachments

  • 20230106_160319.jpg
    20230106_160319.jpg
    1.1 MB · Views: 10
  • 20230106_160342.jpg
    20230106_160342.jpg
    1.4 MB · Views: 14
So, the Elmer's glue failed completely with the hardware for the canopy. I took it all apart and am using clear acrylic varnish as the glue. Do y'all see any problems with that?
20230108_121717.jpg
Next question. I bought aftermarket tires and they are beautiful, but the holes are too small for the axel.(I think that's what it is called still). My plan: cut off the axel, drill a hole and put the brass rod to be the new axel. Anyone see a problem with that?
20230108_121126.jpg
 
Back
Top