• Modelers Alliance has updated the forum software on our website. We have migrated all post, content and user accounts but we could not migrate the passwords.
    This requires that you manually reset your password.
    Please click here, http://modelersalliance.org/forums/login to go to logon page and use the "Forgot your Password" option.

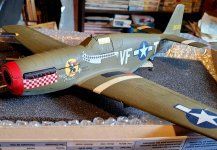
Revell 1/32 P-51B Mustang for my Dad

20230216_092753.jpg
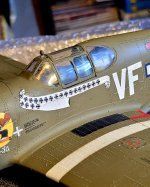
The Bumble-Snowmonster came today. So I decided to get started on decals. I LOVE to decal! Now, that being said, if you buy Zotz decals, these babies are so fine and thin, I advise coating all the ones you want to use with decal film. I airbrushed mine using isopropyl alcohol as a thinner.
I learned this by dropping the propeller scripts in water and piecing them back together (sort of).
After that, I have no complaints.
Thanks again for looking in!
 
View attachment 157385
The Bumble-Snowmonster came today. So I decided to get started on decals. I LOVE to decal! Now, that being said, if you buy Zotz decals, these babies are so fine and thin, I advise coating all the ones you want to use with decal film. I airbrushed mine using isopropyl alcohol as a thinner.
I learned this by dropping the propeller scripts in water and piecing them back together (sort of).
After that, I have no complaints.
Thanks again for looking in!
Very interested in this, because I want,....no, I NEED to love putting on decals. "I" don't hate them, "they" seem to hate me! Teach your humble padawan, oh master decalist.
 
Very interested in this, because I want,....no, I NEED to love putting on decals. "I" don't hate them, "they" seem to hate me! Teach your humble padawan, oh master decalist.
Master decalist am I not. Mistakes I still make, Hmm. Happy I am, tricks to share! oh yes. Tricks, Hmmm! (Yoda emoji)

Using Testors Metalizer Sealer for your clear coat gives you more chances to use your Solvaset. Spray enough Metalizer sealer to make it shiny.
If your clear coat is acrylic, repeated coats of decal solvent may dissolve the acrylic clear too. That makes a MESS! Your flat coat won't hide it.
Bear in mind, I worked on these markings for FOUR days.

First, SLOW DOWN! Have something else to do while you apply decals. I worked on my Yukon River steamer between decal/solvaset applications.
On smaller decals, put the decal on the model on it's backing in a drop of water. Wait until the adhesive lets go (the decal slides off the backing using a paint brush) put it where it goes then use a cotton bud to pull the extra water off the model. Do something else for a little while and then swipe the decal with Solvaset, then LEAVE IT ALONE!! I rarely put more than one decal on a model at a time.

For bigger decals, soak off the backing paper, then make puddle of Solvaset (Future works here too!) on the model and lay the decal down on top Hurry up a little getting the decal in position before it dissolves! Don't dab at it or dick around very much once you're happy with where it's at. LEAVE IT ALONE! You can't rush the chemicals! You can brush on small amounts of Solvaset later on until you get all the bubbles out.

I used Paul's hole-poke-trick on the bigger decals on this Mustang. The prominent rivet detail creates a "bubble" under the big (for me) markings.
Some touch-up may be required using the hole-poke trick. Use a new #11 blade or sharp needle to poke holes. More modern models without such huge rivets may not need their holes poked a'tall.

Patience is the MOST important tool or chemical you may use applying decals. If you drink a lot of coffee while you model, Hang it up, Son.
Make a pot of stew, shave your cat, shovel a shit-ton of snow or dust/vacuum the house and come back later on.

,
 
About Zotz decals, they need to be dipped in (not dropped into) very warm water then placed on a paper towel to relax. This softens the film and prevents shattering. Otherwise, the water soaks the paper which expands and curls it inwards. This curling causes fractures on the super thin film which then is released as pieces once the water-soaked paper releases the adhesive holding the decal to the backing.

Eli Raphael, the owner, and I discussed some of the issues as several sheets have sharkmouth schemes (including one I hope @jeaton01 will use).
 
20230223_103931.jpg
First Dullcoat applied. I had a little bit of decal silvering.
Brushing on small amounts of basecoat on to the silvered decal, but carefully!
Dullcoat can be brushed on small areas and cures as if it had been sprayed without much fuss.
I cheated!:bigrin:
20230223_113833.jpg
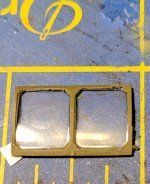
Removing 2019's Tamiya tape took a little effort. Using a bit of sprue to prize the tape up keeps from scratching the clear parts.
I had a little paint bleed under the masking on the portside quarter window. 3M Microfine sanding pad and Future fixed it. :yipee:
20230224_151305.jpg20230224_163141.jpg
The Revell kit is notorious for it's delicate canopy hinge pins. Here's my solution.
I plan to display Dad's Mustang with the canopy open and the upper cowling removed. I still want the canopy hinges to operate.
Thanks again for looking in!
:oldguy:
:salute:
:pilot
 
The Bumble Snow Monster of the North is again terrorizing our humble rural home. Big, fat snowflake you can hear fall with a rainy mix descends from the gray, taciturn Midwest sky. In the midst of Microscopic Model Mania, while I wait for Solvaset to cure on Otto and the 109, my Dad's Mustang got some more attention.
20230311_171637.jpg20230311_171625.jpg
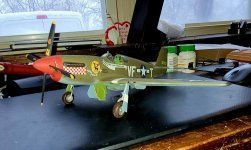
To quote Chris Sherburn, I "stood her up" today. I needed a big flat space to get the wheel bulges lined up. The pitot tube is installed, the underside trailing edges got touched up. Underside flat coat will come after the chrome silver on the pitot dries.
Coming to the finish of this build is bittersweet.
I imagine my Dad in his P-51B on the grass field in Polk City. The Merlin is cheerfully burbling away just off idle. He's holding the brakes, warming up. Kermit in his spotless red-tailed C model Mustang ready to taxi.
"Tower to Wizard flight."
"Wizard flight".
"You are cleared to taxi runway 14. Take off at Wizard's discretion. Over."
"Roger tower, Wizard Flight is rolling." "Didja get that Victor Foxtrot?, over"
"Roger Wizard. Victor Foxtrot copies, over."
"Ah, Victor Foxtrot, Why don't you lead this time, Over."
"WILCO Wizard! Over".

Close and lock the canopy panels. 30 degrees of flaps, throttle up. 2300 r's. Hold right rudder. The cheerful burble becomes a throbbing purposeful snarl. Check the T's and P's again. Kermit is glued to VF's starboard wing. just astern. 85 kts. getting light. 100 kts. Fly her from grass in the 3-point (Showing off a little) gear coming.......zoom between the ponds low and fast.

"Wizard, Victor Foxtrot".
"Go ahead Carl, over."
"Wizard, Follow Left turn to airshow center. Let's give the folks a good show. Over.
"Wilco Victor Foxtrot. Make it fast and pretty, Over."

Such things run through my mind as I progress with a challenging kit.
Thanks again for looking in.
:pilot
:salute:
 
20230421_160749.jpg20230421_160759.jpg20230421_160831.jpg
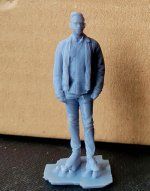
The figures arrived from Jolly old England today.
Option A: The Father and son, in suitable '70's clothing in front of Dad's Mustang. The Father figure actually looks a little like my Dad.
Option B: The Father/Son with one of the other younger adults, In a Cowboy hat. I could print a VF-1 Wolfpack Patch and a US Flag for his jacket, making it my Dad, my brother as a small boy and myself 2/3rds of a Lifetime ago.
Option C: My Dad with My baby brother, Me as a teenager in a hooded sweatshirt (with hair. No shit!) and Charles Lindbergh in front of Dad's Mustang.

I think I know what I what to do, but I am interested in the opinions of my Fellows.
 
Back
Top