• Modelers Alliance has updated the forum software on our website. We have migrated all post, content and user accounts but we could not migrate the passwords.
    This requires that you manually reset your password.
    Please click here, http://modelersalliance.org/forums/login to go to logon page and use the "Forgot your Password" option.

MODERN RUSSIAN ARMOUR - T-72B3M in UKRAINE [22nd May 2025 update]

Ok, so the teaser pics work just fine for me, incredible, Ian. I chuckled at your comments about what your wife said. My lovely bride has never said that, but she also knows I'm anal retentive, so that would be wasted breath, HA! You comeback is what I would have said myself, lol.

Thanks for the explanation on the aluminum fuel and stowage bins, makes perfect sense, and the way you did that is a handy method to remember for my tool box, Excellent!
 
Ok, so the teaser pics work just fine for me, incredible, Ian.
Thanks Steve.
I chuckled at your comments about what your wife said. My lovely bride has never said that, but she also knows I'm anal retentive, so that would be wasted breath, HA! You comeback is what I would have said myself, lol.
🤣
Thanks for the explanation on the aluminum fuel and stowage bins, makes perfect sense, and the way you did that is a handy method to remember for my tool box, Excellent!
:good:
 
Last edited:
Beautiful work Ian , very cool build , I love the scratch/damage/wear on the alum tanks and stowage boxes .
 
A small update on the last details with finishing the tank. I am finalising the figures currently, so as soon as they are done I will post the overall shots of the little scene.
I removed the turret to do the final mud spatter in various dirt and mud colors from AK. They are actually very good products and each has adifferent consistency and color according to their type, which gives you some great effects. I masked off the areas I didn't want the spatter on with cotton wool and tape as below.

20250428_202307.jpg

20250428_202315.jpg


Next was the task of addressing some missing details that I discovered once I completed the model :ph: ....the joy of research on a new subject.:hmm::doh: this is my second modern tank and my first dive into the myriad of T-72 variations.
I neededto add 2 small handles to the comanders cupola outer side. I spotted these at the last minute on a reference shot of a displayed T-72B3M. Once I saw them I started seeing them everywhere in heaps of photos.
*Made with my 'Grabhandler' tool from Mission Models.
20250428_153347.jpg

I also added boltheads to the armor grates where they fold up and a full scale hardware one with a washer and nut to simulate what is left after the armour section was torn off. Photos are not great - phone cameras are not that good at Macro shots.
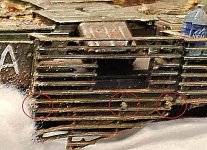
armour grate nuts.jpg20250428_153451.jpg
I then extended the damaged cammo netting around the barrel but needed to attache and hang clamping tweezers for weights while the white glue mix dried.
20250428_201828.jpg

Finally a few other details were added like a Corona can and a Pepsi can, as well as some water bottles. I will take more photos shortly when the figures are done and on the dio.
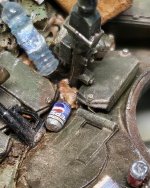
20250428_153517.jpg20250428_153530.jpg
 
Last edited:
Back
Top