
-
Modelers Alliance has updated the forum software on our website. We have migrated all post, content and user accounts but we could not migrate the passwords.
This requires that you manually reset your password.
Please click here, http://modelersalliance.org/forums/login to go to logon page and use the "Forgot your Password" option.
You are using an out of date browser. It may not display this or other websites correctly.
You should upgrade or use an alternative browser.
You should upgrade or use an alternative browser.
**FINISHED** Airfix 1/24 Mosquito build log
- Thread starter Scrodes
- Start date
Airfix 1/24 Mosquito build log
:nopics
:nopics
Airfix 1/24 Mosquito build log
Tease... :pp
Tease... :pp
Heavens Eagle
Well-known member
Airfix 1/24 Mosquito build log
Chuck we know you like smooth and shiney at heart. When you going to do a car model? You plenty of bodaceous babes to show it off!
Maybe a German staff car. :hmmm
oooo- swank!
Chuck we know you like smooth and shiney at heart. When you going to do a car model? You plenty of bodaceous babes to show it off!
Maybe a German staff car. :hmmm
Airfix 1/24 Mosquito build log
Well folks;
Here you have it - the last update of this build. We've crossed the finish line and the only thing left to do is box her up and ship her out.
Here's the last day of assembly.
You will likely remember that I scrapped the plan to use the Master Barrels for the 20mm cannon as they wouldn't be visible.
Well, here's the installation of the 303 barrels.
5 part barrels for all 4 guns

I learned from previous experience that it's criticial that you paint the barrel before inserting it into the sleeve - otherwise you can't ensure paint coverage and you may have brass spots showing through the cooling slots on the sleeve.
I shoved them in blue tack for ease of painting.

I cannot tell you how beautiful these parts are - and for the price! What a bargain


plastic barrels cut off with my trusty JLC razor saw


The ammo chutes for the 303s are the worst damn idea I have ever seen. You have to insert them into the guns, glue the guns to the floor of the gunbay (the fit isn't firm enough to hold them, so you HAVE to glue them - it's impossible to get them to line up properly and sit level all at once) and then you have to attach the breeches they bolt to, which only fit to the bottom of the weapons and not to the floor of the gunbay. It is more tedious than I can explain, so here's the photos.
OH - and if you've tried to paint metal or rubber parts before, you'll know it just peels off when bent. So you have to fit all of these parts in together before painting them - than include the viewing holes on the ammo belts.
Note the ammo chute on the rubber fret still. You have to install the ejector chutes at the same time and mount them with the guns to the gunbay floor.

These parts press fit up against the guns - which are balanced tediously on a single peg.

Did I mention the ends of both of those parts are crucial for the alignment of the gunbay floor into the nose which we already discovered didn't fit well?

I think I did a fair job of getting the guns aligned in the end. Imagine trying to glue a marble onto a lead pellet resting on top of a baseball.
(you can see the notches in the ends of the mounts that fit onto pegs in the nose to align the floor)


With the painting all done - it's time to open the nose to install the guns. You may remember I hold panels on with sticky tack to mask these areas off. Works well and it's fast.


Globs of sticky tack masking off the gunports. Tape masking off the divots for the hinges because there's no overlapping plastic

Bend those suckers! (They don't want to, and the belts are too long to sit quietly. They fight the strongest of superglues and you have to hold all four ends down while you attach the top to the ammo bins which hold them in place - and THEN you get to paint them!)

And then hold your breath while you glue the nose on while wiggling the barrels through their ports. No one breathe!

The propellers I paint black and then lighten with Nato black - a nice scale black from Tamiya. Yellow tips already painted - why try any paint yellow over black?

Post-its are my next favourite masking material. Time to paint the hubs - dull aluminum for me

Contrasted with polished aluminum. (in case Glenn wants to leave the spinner off on the 'open' side.

The bomb bay walls needed a tighter fit than sticky tack would allow - so I used krystal kleer to glue them for painting, then they come right off and get glued back on after the cannons get mounted.

The instructions are more than a little ambiguous as to where the corrugated piping goes on the gun end. It took me ages of scouring to find a good photo. It's shown on page 50 of Squadron's Mosquito Walkaround.


Well folks;
Here you have it - the last update of this build. We've crossed the finish line and the only thing left to do is box her up and ship her out.
Here's the last day of assembly.
You will likely remember that I scrapped the plan to use the Master Barrels for the 20mm cannon as they wouldn't be visible.
Well, here's the installation of the 303 barrels.
5 part barrels for all 4 guns
I learned from previous experience that it's criticial that you paint the barrel before inserting it into the sleeve - otherwise you can't ensure paint coverage and you may have brass spots showing through the cooling slots on the sleeve.
I shoved them in blue tack for ease of painting.
I cannot tell you how beautiful these parts are - and for the price! What a bargain
plastic barrels cut off with my trusty JLC razor saw
The ammo chutes for the 303s are the worst damn idea I have ever seen. You have to insert them into the guns, glue the guns to the floor of the gunbay (the fit isn't firm enough to hold them, so you HAVE to glue them - it's impossible to get them to line up properly and sit level all at once) and then you have to attach the breeches they bolt to, which only fit to the bottom of the weapons and not to the floor of the gunbay. It is more tedious than I can explain, so here's the photos.
OH - and if you've tried to paint metal or rubber parts before, you'll know it just peels off when bent. So you have to fit all of these parts in together before painting them - than include the viewing holes on the ammo belts.
Note the ammo chute on the rubber fret still. You have to install the ejector chutes at the same time and mount them with the guns to the gunbay floor.
These parts press fit up against the guns - which are balanced tediously on a single peg.
Did I mention the ends of both of those parts are crucial for the alignment of the gunbay floor into the nose which we already discovered didn't fit well?
I think I did a fair job of getting the guns aligned in the end. Imagine trying to glue a marble onto a lead pellet resting on top of a baseball.
(you can see the notches in the ends of the mounts that fit onto pegs in the nose to align the floor)
With the painting all done - it's time to open the nose to install the guns. You may remember I hold panels on with sticky tack to mask these areas off. Works well and it's fast.
Globs of sticky tack masking off the gunports. Tape masking off the divots for the hinges because there's no overlapping plastic
Bend those suckers! (They don't want to, and the belts are too long to sit quietly. They fight the strongest of superglues and you have to hold all four ends down while you attach the top to the ammo bins which hold them in place - and THEN you get to paint them!)
And then hold your breath while you glue the nose on while wiggling the barrels through their ports. No one breathe!
The propellers I paint black and then lighten with Nato black - a nice scale black from Tamiya. Yellow tips already painted - why try any paint yellow over black?
Post-its are my next favourite masking material. Time to paint the hubs - dull aluminum for me
Contrasted with polished aluminum. (in case Glenn wants to leave the spinner off on the 'open' side.
The bomb bay walls needed a tighter fit than sticky tack would allow - so I used krystal kleer to glue them for painting, then they come right off and get glued back on after the cannons get mounted.
The instructions are more than a little ambiguous as to where the corrugated piping goes on the gun end. It took me ages of scouring to find a good photo. It's shown on page 50 of Squadron's Mosquito Walkaround.
Airfix 1/24 Mosquito build log
Here it is folks - the Encore, the true gand finale.
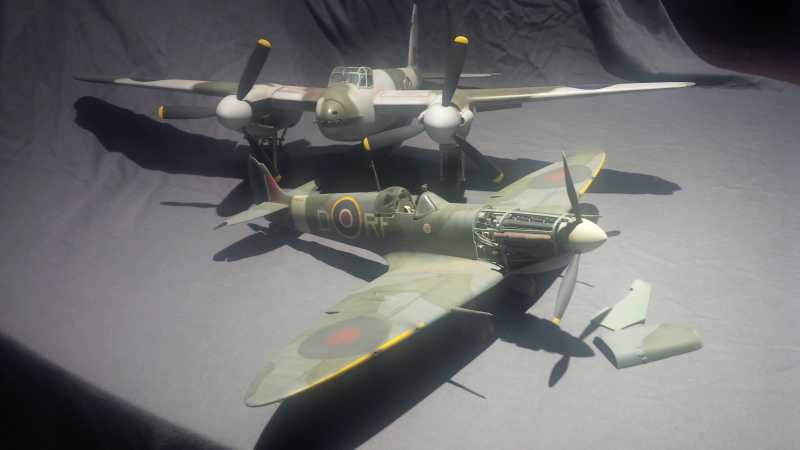
To start it, in a bid to instill confidence in all of those new to our hobby, I present this - the evolution of my own personal model making.
From left to right is the 1/32nd scale Revell Mosquito - I built this when I was 8. Next is the 1/48th scale Tamiya Mosquito - I built this when it was released, so probably when I was about....18? ish? and last but not least, my most recent completion at the age of 30 - The jewel of someone else's collection, the Airfix 1/24th scale kit.
So don't look at the builds of others thinking 'I wish I could build like that'. Look at them for techniques you haven't tried and DO build like that!

You may notice that I decided the colour scheme shown in the instructions looked 'stupid' so I switched the grey and the green around. Or the box art had it backwards, or the model pictured on the side of the box etc, and I decided I liked this better.


Filler? Lol tube cement.


Tamiya, surprisingly, didn't provide parts for the ammo chutes. I'd still rather this than those stupid rubber parts provided in the airfix kit.

It’s a real death-or-glory show, boys’ – that was how Group Captain Percy Pickard ended the briefing for one of the RAF’s most daring and dangerous raids of WWII; ‘Operation Jericho’, the Amiens Gaol Raid of February 1944. Requested by the French Resistance to free, or to sacrifice, up to 700 prisoners held by the Gestapo at Amiens, 18 Mosquito FBVIs of 140 Wing were prepared at short notice to attack the prison at low-level and high speed, the objective being to break the walls.
Led by Pickard in Mosquito HX922, 140 Wing attacked with completesurprise causing utter chaos inside the prison. 258 prisoners escaped through the breached walls, with 102 killed. Warned of collateral damage, the Resistance said death from RAF bombs was preferable to Gestapo torture and execution. Only two Mosquitoes were lost, one of which was HX922. Pickard and his navigator, ‘Bill’ Broadley, failed to return and are buried at Amiens.

OOB Instruments! Wow these turn out well.

These shots to show the canopy before removing the masking - that magical step where and angel gets her wings


C'est Fini!


The separate intenal frame for the canopy is a gorgeous part.


Thanks to each and every one of you for following along.
A very special thanks to ChukW for his infinite wisdom and always being there for me to vent to, whenever I wasn't using him as a sounding board.
Here it is folks - the Encore, the true gand finale.
To start it, in a bid to instill confidence in all of those new to our hobby, I present this - the evolution of my own personal model making.
From left to right is the 1/32nd scale Revell Mosquito - I built this when I was 8. Next is the 1/48th scale Tamiya Mosquito - I built this when it was released, so probably when I was about....18? ish? and last but not least, my most recent completion at the age of 30 - The jewel of someone else's collection, the Airfix 1/24th scale kit.
So don't look at the builds of others thinking 'I wish I could build like that'. Look at them for techniques you haven't tried and DO build like that!
You may notice that I decided the colour scheme shown in the instructions looked 'stupid' so I switched the grey and the green around. Or the box art had it backwards, or the model pictured on the side of the box etc, and I decided I liked this better.
Filler? Lol tube cement.
Tamiya, surprisingly, didn't provide parts for the ammo chutes. I'd still rather this than those stupid rubber parts provided in the airfix kit.
It’s a real death-or-glory show, boys’ – that was how Group Captain Percy Pickard ended the briefing for one of the RAF’s most daring and dangerous raids of WWII; ‘Operation Jericho’, the Amiens Gaol Raid of February 1944. Requested by the French Resistance to free, or to sacrifice, up to 700 prisoners held by the Gestapo at Amiens, 18 Mosquito FBVIs of 140 Wing were prepared at short notice to attack the prison at low-level and high speed, the objective being to break the walls.
Led by Pickard in Mosquito HX922, 140 Wing attacked with completesurprise causing utter chaos inside the prison. 258 prisoners escaped through the breached walls, with 102 killed. Warned of collateral damage, the Resistance said death from RAF bombs was preferable to Gestapo torture and execution. Only two Mosquitoes were lost, one of which was HX922. Pickard and his navigator, ‘Bill’ Broadley, failed to return and are buried at Amiens.
OOB Instruments! Wow these turn out well.
These shots to show the canopy before removing the masking - that magical step where and angel gets her wings
C'est Fini!
The separate intenal frame for the canopy is a gorgeous part.
Thanks to each and every one of you for following along.
A very special thanks to ChukW for his infinite wisdom and always being there for me to vent to, whenever I wasn't using him as a sounding board.
phantom II
Master at Arms
Airfix 1/24 Mosquito build log
Very nicely done :drinks What the heck are those ornery feed chutes made of ? :idonno
Cheers, Christian B)
Very nicely done :drinks What the heck are those ornery feed chutes made of ? :idonno
Cheers, Christian B)
Airfix 1/24 Mosquito build log
Can I breathe now? Getting kind of dizzy- or maybe it's just how nice this great honkin' thing looks! Those guns came out beautifully- the canopy frame, too, is just fabulous. You would never know what a struggle you had getting all those nose panels to fit. I'd give it a 12 out of 10 overall, my friend- cheers! :drinks
Can I breathe now? Getting kind of dizzy- or maybe it's just how nice this great honkin' thing looks!
Those guns came out beautifully- the canopy frame, too, is just fabulous. You would never know what a struggle you had getting all those nose panels to fit. I'd give it a 12 out of 10 overall, my friend- cheers! :drinksAirfix 1/24 Mosquito build log
Thanks guys - I'm really pleased with how she came out.
Phantom - the chutes are made from the same rubber as the tires. It's awfully stiff stuff - only made more difficult by the fact they're not the right size (too tall) so you have to twist them, hold them down, grab the top to the ammo bins, cement and pray all at the same time lol.
Airfix 1/24 Mosquito build log
Great build, great big build! Well done!
Great build, great big build! Well done!
phantom II
Master at Arms
Airfix 1/24 Mosquito build log
Not sure what the tires are made of but too short would definitely be a problem.
Hot water didn't help ?
Anyhow, great outcome
Cheers, Christian B)
Not sure what the tires are made of but too short would definitely be a problem.
Hot water didn't help ?
Anyhow, great outcome
Cheers, Christian B)
Sherman 18
Master at Arms
Airfix 1/24 Mosquito build log
Great job!
Thanks for sharing
Great job!
Thanks for sharing