
-
Modelers Alliance has updated the forum software on our website. We have migrated all post, content and user accounts but we could not migrate the passwords.
This requires that you manually reset your password.
Please click here, http://modelersalliance.org/forums/login to go to logon page and use the "Forgot your Password" option.
You are using an out of date browser. It may not display this or other websites correctly.
You should upgrade or use an alternative browser.
You should upgrade or use an alternative browser.
MiG 23MF (Moved from Red Banner Campaign)
- Thread starter Sherman 18
- Start date
Very cool indeed! 
Dave The Chef
Member
Nice choice Ian and great minds do think alike too. Guess what kit I've got lined up for this campaign? I'm going to do the Hell Fighter scheme though :cheer:
ij001
Well-known member
Didn't even consider that scheme, even tho' it's on the RV sheet (let me know if you want/need some of the spares I'll have left over). Would never have considered the 'Flogger' as a subject until I saw what Artur (Arkady72) did with his on Britmodeller (and other sites). Have to repeat this is one I'm really looking forward to.
Later.
Ian.
Later.
Ian.
Skinny_Mike
Well-known member
Cool Ian - can't wait to see what you do with this kit!
Mike
Mike
ij001
Well-known member
(adopts Hollywood(esque) Russian accent),Comrades
I have commenced my build and immediately encountered a problem. Through the clear plastic bag that the kit comes wrapped in, I could see there was some problem with a small part of the molding of the main fuselage.
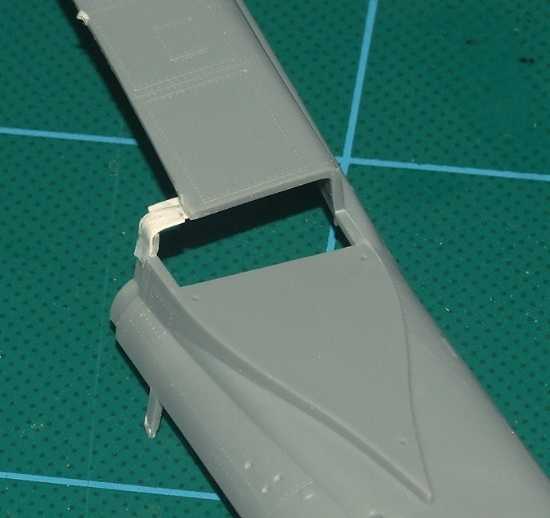
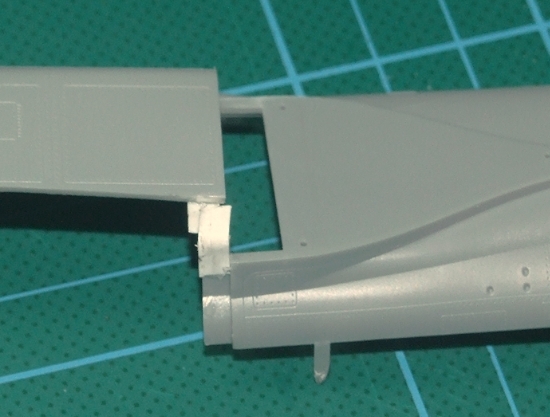
Just to the inside of the intakes there's a wee 'joint' around 3mm wide. On the right side it was warped and wrinkled - I was able to repair this with a pair of sharp tweezers and a hot needle (old skool modelling):
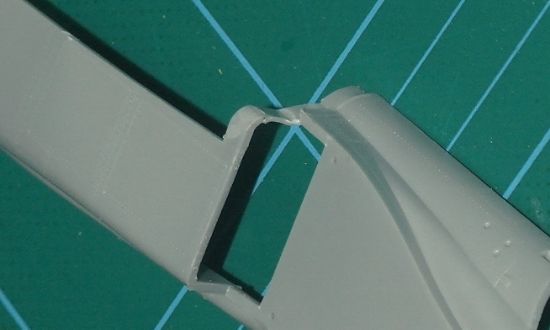
On the Port side it had snapped right off and the remnants were pointing upward. I fashioned a repair from some plastic card, and now it looks OK. Problem is, it will never be as strong as the original molded piece, and I'll not know whether it's satisfactory until I start building.
Not a great start, but at least the camouflage will be 'a challenge' later on:
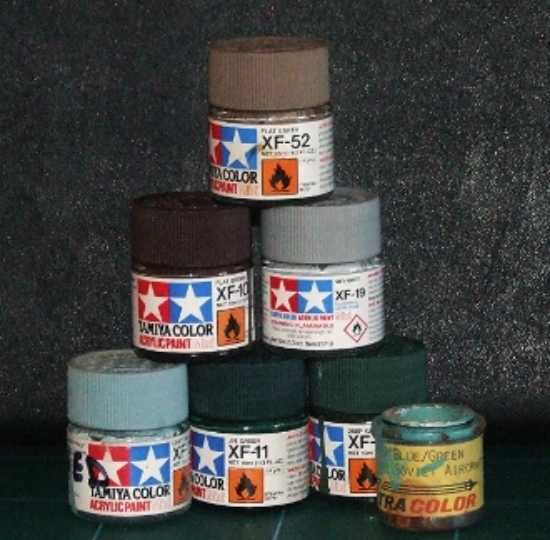
Four colour topsides and two-colours below !! - Thanks for taking the time to look and/or comment. More soon, hopefully without any further 'issues'.
Ian.
I have commenced my build and immediately encountered a problem. Through the clear plastic bag that the kit comes wrapped in, I could see there was some problem with a small part of the molding of the main fuselage.
Just to the inside of the intakes there's a wee 'joint' around 3mm wide. On the right side it was warped and wrinkled - I was able to repair this with a pair of sharp tweezers and a hot needle (old skool modelling):
On the Port side it had snapped right off and the remnants were pointing upward. I fashioned a repair from some plastic card, and now it looks OK. Problem is, it will never be as strong as the original molded piece, and I'll not know whether it's satisfactory until I start building.
Not a great start, but at least the camouflage will be 'a challenge' later on:
Four colour topsides and two-colours below !! - Thanks for taking the time to look and/or comment. More soon, hopefully without any further 'issues'.
Ian.
Good fix Ian

ij001
Well-known member
So today for reasons beyond my control - I have a lousy cold-like thing going-on that's left me without a voice and stuffed-up, think it's like what Bob had, maybe it's one o'dem computer viruses I heard 'bout  ldguy - So not really fit for work, kids at school and I was at my bench at 0845.
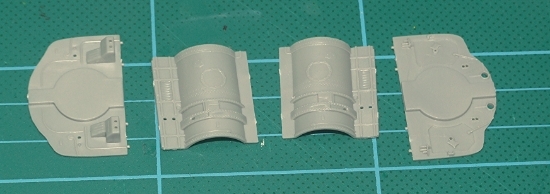
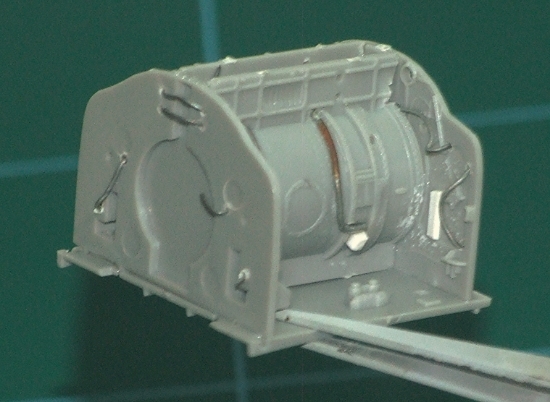
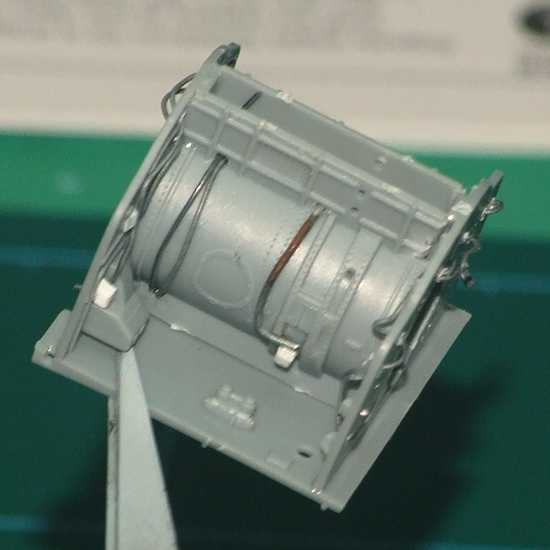
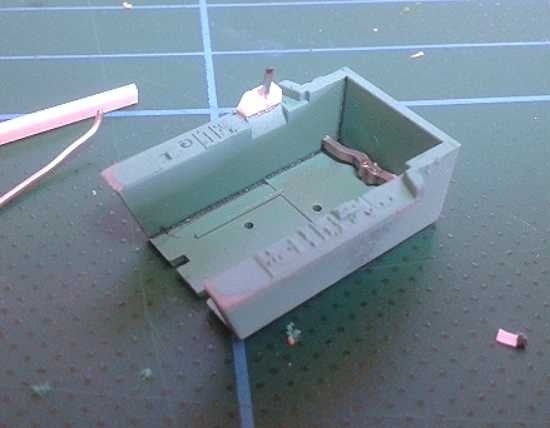
Starting the sub-assemblies seemed to be the logical idea. Here's the main wheel bay as it comes in the kit:
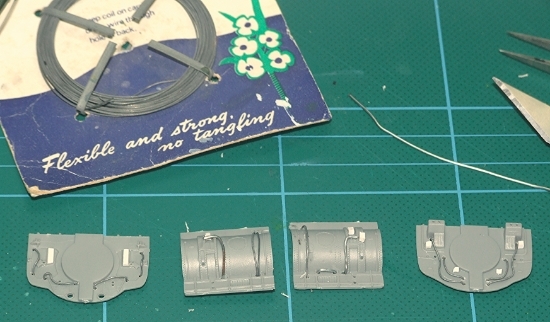
...and after about 45mins with some square section plastic rod, fuse wire and florists wire it looked like this:
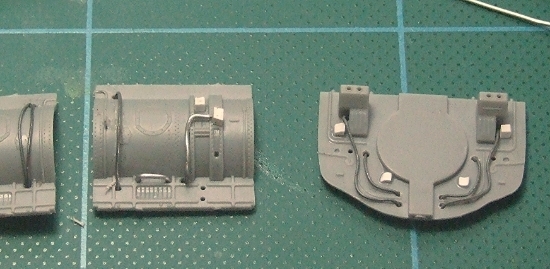
Next I glued it alltogether...
...and went for a coffee-break :java
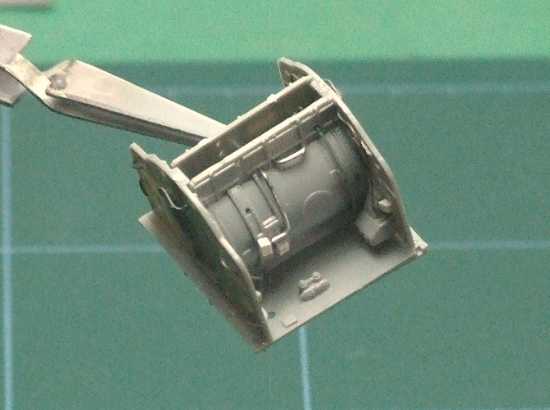
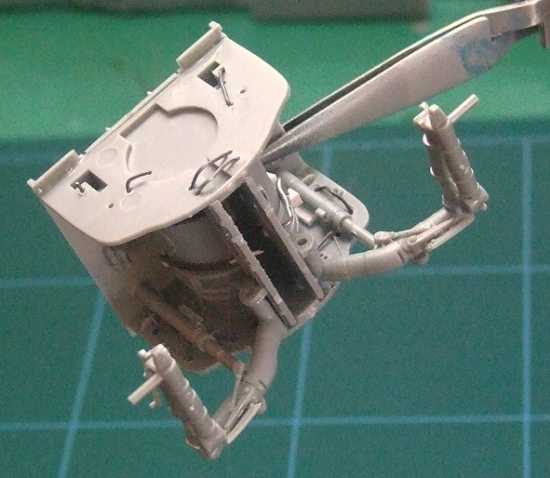
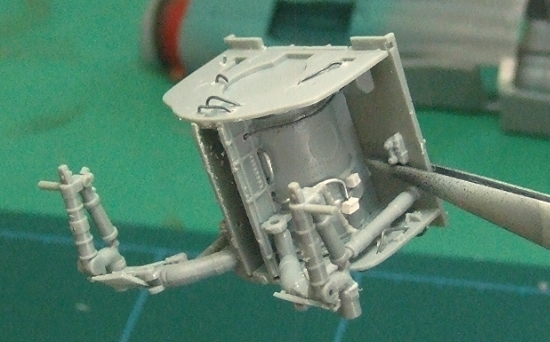
Following the worlds best pick-me-up, I bit-the-bullet and began with the main undercarriage. Let nobody tell you that Trumpeters' engineering is 'lacking' in some way, it most certainly IS NOT. A MiG 23's undercart is phenomenally complicated, but in just eight parts, Trumpeter has 'nailed' this complex structure AND made it incredibly strong.
Once attached to the bay (yes the instructions are a little vague, but even with my limited intelligence I figured-it-out in less than five minutes), the whole thing does look, ungainly but it's absolutely rigid, trust me on this.
More in a min...
Ian.
ldguy - So not really fit for work, kids at school and I was at my bench at 0845.Starting the sub-assemblies seemed to be the logical idea. Here's the main wheel bay as it comes in the kit:
...and after about 45mins with some square section plastic rod, fuse wire and florists wire it looked like this:
Next I glued it alltogether...
...and went for a coffee-break :java
Following the worlds best pick-me-up, I bit-the-bullet and began with the main undercarriage. Let nobody tell you that Trumpeters' engineering is 'lacking' in some way, it most certainly IS NOT. A MiG 23's undercart is phenomenally complicated, but in just eight parts, Trumpeter has 'nailed' this complex structure AND made it incredibly strong.
Once attached to the bay (yes the instructions are a little vague, but even with my limited intelligence I figured-it-out in less than five minutes), the whole thing does look, ungainly but it's absolutely rigid, trust me on this.
More in a min...
Ian.
ij001
Well-known member
Feeling pretty pleased with m'self I built the wings - not worth a photo, just upper and lower halves with very thin trailing edges, enough to give one a paper-cut if you aren't careful ( :pinch: Owwww).
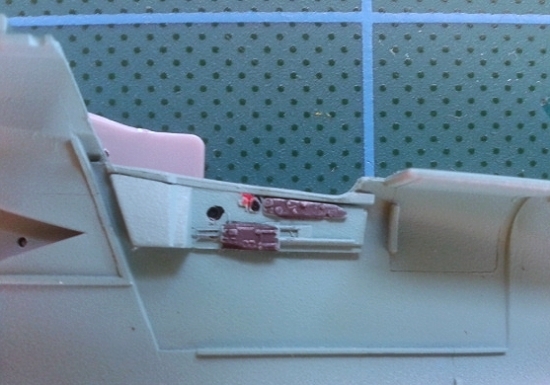
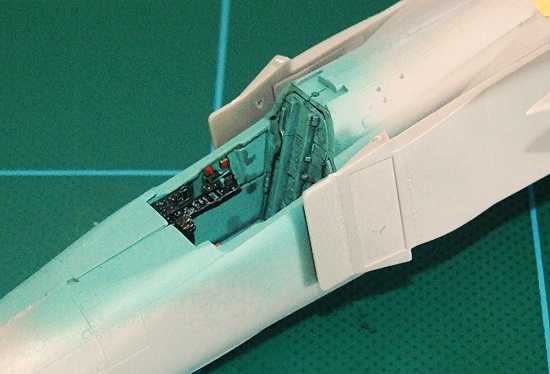
After I cleared the blood off the cutting-mat, I started on the cockpit. The turquoise is straight from the Xtracolour tin, this particular pot-of-paint has been with me over twenty years and still sprays as easily as the day I first opened it. Strangely lacking in the 'pit is any depth to the detail, it's all very 'soft', not bold and rough like the real thing. Even more surprising is the complete absence of a throttle quadrant. So I built one out of more square section plastic rod and fuse wire !!
A little delicate painting with various blacks, greys and reds, and it looks like this now:
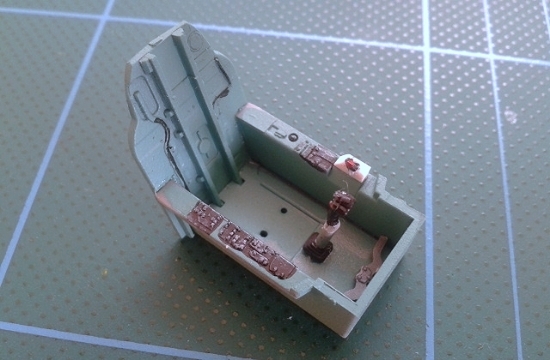
Nice touch, and obviously looking over their collected shoulders at the AM resin manufacturers, Trumpeter have molded the sidewalls separately, but again very, very soft detail. Bit of a shame that.
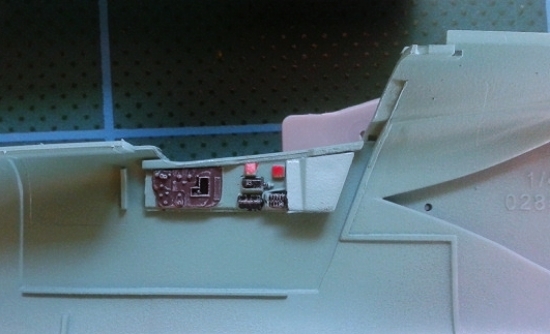
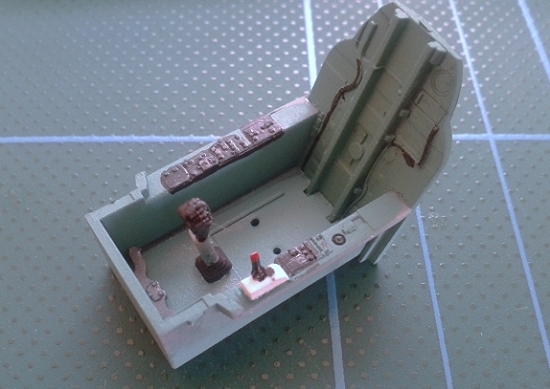
So that's the story so far. I've made a start on the IP, but need to go back and check the available photos, there just don't appear to be enough dials/read-outs on the panel, just hope I don't have to make my own !!
Ahhh well, more (very) soon. Thanks for taking the time to look and/or comment.
Ian.
After I cleared the blood off the cutting-mat, I started on the cockpit. The turquoise is straight from the Xtracolour tin, this particular pot-of-paint has been with me over twenty years and still sprays as easily as the day I first opened it. Strangely lacking in the 'pit is any depth to the detail, it's all very 'soft', not bold and rough like the real thing. Even more surprising is the complete absence of a throttle quadrant. So I built one out of more square section plastic rod and fuse wire !!
A little delicate painting with various blacks, greys and reds, and it looks like this now:
Nice touch, and obviously looking over their collected shoulders at the AM resin manufacturers, Trumpeter have molded the sidewalls separately, but again very, very soft detail. Bit of a shame that.
So that's the story so far. I've made a start on the IP, but need to go back and check the available photos, there just don't appear to be enough dials/read-outs on the panel, just hope I don't have to make my own !!
Ahhh well, more (very) soon. Thanks for taking the time to look and/or comment.
Ian.
Sorry you got the bug, should have wiped everything down after reading my post.
Great work Ian!
Great work Ian!
ij001
Well-known member
Surprisingly the two gear bays, 'pit and a*se-end didn't put up too much of a fight, but the fuselage halves are VERY thin and prone to warping. Chef, if you're reading this, mate, be aware.
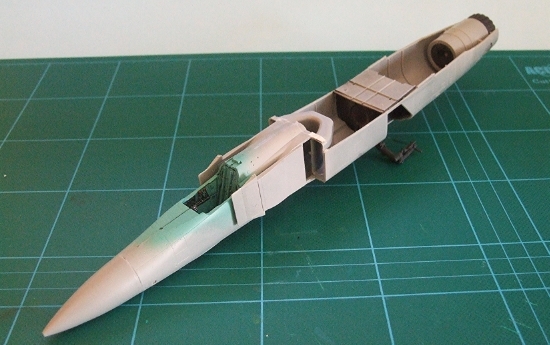
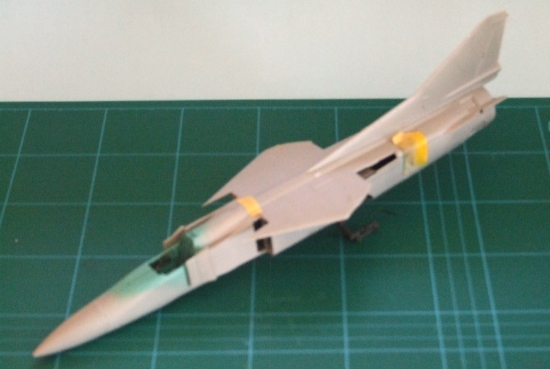
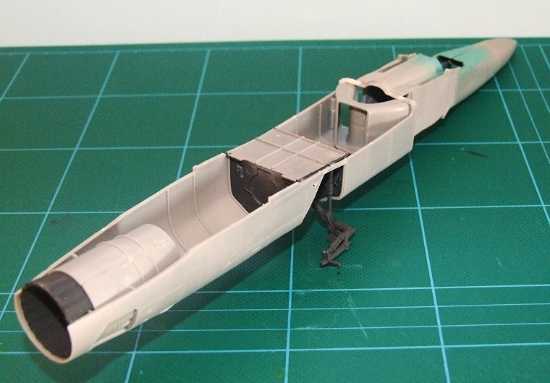
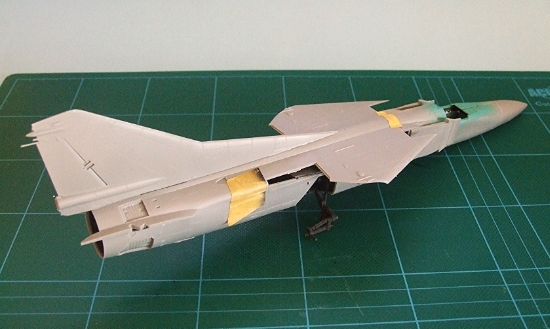
It took a lot of 'doing' but I'm happy to report I've managed to bring the fuselage halves together, of course I also have to somehow shoehorn-in the wing sweep mechanism and the wings, wing gloves and the tailplane.... Deep joy :java
Ian.
It took a lot of 'doing' but I'm happy to report I've managed to bring the fuselage halves together, of course I also have to somehow shoehorn-in the wing sweep mechanism and the wings, wing gloves and the tailplane.... Deep joy :java
Ian.
Dave The Chef
Member
Thanks for the heads up Ian, I will approach with caution. So far it appears at least my parts don't have that warping around the intakes. Keeping my eye on this one
Similar threads
- Replies
- 3
- Views
- 1K