• Modelers Alliance has updated the forum software on our website. We have migrated all post, content and user accounts but we could not migrate the passwords.
    This requires that you manually reset your password.
    Please click here, http://modelersalliance.org/forums/login to go to logon page and use the "Forgot your Password" option.

Maddog Manufacturing 2020 Production

Thanks Paul! It's been a challenge, but I'm thrilled to have gotten so much progress done.

Thanks Warren! Your compliments are most appreciated.

By the way, I finished the three Abrams and the Howitzer. Feel free to check them out.
 
Well, it's been a slow week so there's only a small update this time.

I did manage to get the photo etch on the Redstone capsule; these panels make it into the Friendship 7:

full


Later I shot that black, even though it doesn't show well in this pic:

full


Sorry about the blurriness in that pic; the camera had a difficult time focusing on that capsule. Now for a gloss coat and then decals.


Moving on, I stopped working on the rocket to get going on the tank transporters I've had languishing while I worked on the Abrams and Paladin.

First off, I added more details to the HEMMTT tank transporter chassis. This was starting to take shape:

full


After that, I built the engine and added it to the chassis, along with the exhaust and other platform framework:

full


Once I got done with that, I assembled the cab for this truck. In the process of holding it together, I got some glue under my finger and smeared it all over the windscreen:

full


Yeah, that looked really bad. So I disassembled the cab, removed the windscreen and went to work trying to fix it. After some persistent and constant sanding and polishing with ever higher grit levels (from 600 to 12000) I dipped it in Future to try and clear it even more. The final result isn't as great as I had hoped, but there's at least no sign of glue smear:

full


Time to move on with that. Before I put it aside for the day, I dry-fit everything together that I had done:

full


Moving on from there, I finally assembled the cab for the M-1070 tractor:

full


After that, I wanted to build up the chassis and suspension to mount that cab on, so I built the first two axle sub-assemblies 'A' and 'B':

full


Then I got called away so I put them both aside before I left. A couple days later, I return to start on this again and sub-assembly 'B' is gone! I tore the room apart for hours looking for it and finally gave up. I assembled the last two axle sub-assemblies 'C' and 'D' and cemented all three to the chassis frame. So now this will be the "light" version of this truck until I either find that sub-assembly or buy a whole new kit to replace it:

full


Later I cut off the fenders to add to the chassis. One of them flat out broke when I tried cutting it off:

full


It's like that hole on the left half was inside waiting for the any pressure to be applied so it could break! I glued it back together and added it to the chassis:

full


Later I added Mr. Surfacer 500 to that crack, but not before this pic was taken. Here is the whole chassis with most of the extra parts added to it:

full


Later I dry fit the cab to this to see how it would fit:

full


It's gonna take some finagling, but it'll fit well. After that I can build the winch platform. Until then, I moved on and started the new Japanese Type 73 tank transporter. First was the chassis and engine which went together very fast and easy:

full


There's still more detail parts to add to that,, but not before I get the cab mounted on it. So, I started the cab; building the interior first:

full


Naturally I get everything done on this except the steering wheel. When I tried cutting that from the sprue, it tumbled down to the floor and disappeared. After another hour of frustrating search; I finally decided that it would not be noticeable enough once the cab was closed so to hell with it; I'm moving on! Life is too short and I have too many models to build to screw around with extra tiny pieces that refuse to stay on the table.

I then added the windows to the cab and popped the interior in to see if my premise was correct. It certainly does not show unless someone really looks hard:

full


Onward we go from here to start assembly on the trailer:

full


After that I was ready to get back to tanks. Since the Missing Lynx was running the Churchill Group Build, I pulled out two Churchills from Dragon to get started on. Since I've pretty well reached my 20-pic limit, I'll continue this in the next post.
 
Continued from above; here's the two tanks I started...

First was the Churchill III AVRE, starting with the turret:

full


That petard mortar was a real pain to build, but I got it done. Then I added the five parts to the upper hull that are supposed to go on it and then added the turret for the pic:

full


After that, I built the lower hull and roadwheels:

full


Here's a test fit after all that was done:

full


There's still a bit more to do on that, not least of which is to add the tracks. Until then, I started the Churchill IV AVRE; building the turret:

full


By that time it was late so I stopped until I have more time to build later. Until then, thanks for looking in, comments are welcome.
 
Life is to short to worry about a steering wheel, good call.
Keep the line moving along.
Great work so far.
Liken the rockets and Abrams
Frank
 
Ahh Yes, seems sometimes half my building time is actually looking for - parts, pieces that seem to vaporize into thin air, missing tools, glue, paint, misplaced sprues, etc.

You are right - Life's too short

Nice fix on the windshield. Kinda reminded me of the windshield on my jeep.

EJ
 
Thanks Frank! Yeah, I'm keeping the line moving. By the way, all the the Abrams did get finished. Feel free to check them out.

Thanks EJ! Yeah, I'm so sick and tired of constantly looking for parts. Generally they end up showing up later anyway; many times when I'm looking for something else. So, I might as well just keep going.

Thanks Kenny! That is so cool that you know someone who drove that beast! I can imagine what it was like.
 
One major issue was found when I taped the lower tub under the forward part of the fuselage assembly. Not sure how I'm going to fix this yet so this bird went back on the shelf for now:


Mark, my apologies but I forgot about this. Was just going through some of my stash this week and I pulled out my Shinmeiwa and remembered I was going to look at it and get back to you.

I did a test fit and I don't seem to be coming up with the same fit issue on my kit.

shin1.JPG


shin2.JPG


AS you can see, it fits pretty well. Mine is an older boxing, could your body perhaps be a little warped or maybe if it is a newer boxing perhaps the moulds are starting to wear?? Could there be a piece getting in the way that might need some adjustment?

I was thinking that if you cut a piece of flat sheet perhaps you could glue it flush to the front hull and then mate the front hull up to the rest of the fuselage. . That should at least eliminate the gap you are seeing.

shin3.JPG


Hope that helps,
 
Sharkman, thank you. I was thinking the same thing; maybe a sheet of styrene there would help. I also think a couple spreader bars in select places would also help. We'll see but I do appreciate the assist here; hopefully I can get this plane back on track. Thanks again man!
 
Sharkman, thank you. I was thinking the same thing; maybe a sheet of styrene there would help. I also think a couple spreader bars in select places would also help. We'll see but I do appreciate the assist here; hopefully I can get this plane back on track. Thanks again man!


Yeah, some spreader bars might help as well!

:popcorn
 
Thanks. I'm going to be moving forward on some other models first. After that; when I have more room, we'll get this Shinmeiwa going again.
 
Greetings all, here's another small update due to life happening; or else I might have gotten more done. This time I'll start with my armor since I barely got anything done on armor.

Basically all I did was to mask the windows for the three tank transporters. First the Japanese Type 87:

full


Then the HEMMTT cab:

full


...and finally the M-1070 cab:

full


Later on I gloss coated the German Cabriolet car and painted the chrome on it, along with painting the roof:

full


After all that, I went to work on my two rockets since they were so close to being done. Here they are all mocked up:

full


The first thing I did was to apply the decals to the Atlas rocket; as you saw above. Here it is showing three sides when I had finished the decals:

full


full


full


After that it was only a matter of adding a few more external plumbing parts to this and it was done. Meanwhile the Redstone had a bit more to be done.

First off, there were some highly noticeable blemishes in the white coat of the main rocket body that were really annoying me. I tried to ignore them because I knew any fix was going to ruin the smooth finish I'd already achieved. I just couldn't let it go. So, I pulled out a post-it notepad and my Tamiya Tape and masked off the offending area. I then shot some more white; adding several coats to try and cover the blemishes. It was amazing how they kept popping out from under the white. Finally, I got it covered enough for my satisfaction:

full


I was right, there was a noticeable square that I could not eliminate; especially that close to the decal. So I have to live with it:

full


Oh well. At least I found the decals for the capsule and promptly added them to it:

full


A few more detailed parts to add and that one was done.

Finally, it was time to work on my large aircraft again. The first one I worked on was the Russian An-124. I finally got the fourth engine finished:

full


After that, it was time to work on the landing gear. I started with the forward landing gear wheels. I needed to make four of them and they had to have the hubs added to the middle of the wheel halves, just like the main landing gear wheels. That made them impossible to close properly without some serious sanding and shaping and squeezing:

full


I had four of those to do. Then I assembled the first forward landing strut, adding the wheels to it:

full


I'm supposed to make two of those but of course, the second strut is missing......

So, I moved on and finished off one side of the main landing gear bay; completing all the main landing gear struts:

full


After that I halfway finished the twenty wheels that go on those struts; adding all the hubs to the wheel halves. Next I need to put each wheel half together. Later....

Each main landing gear strut has eleven parts in it. I still have to do the other side. Once that is done and I paint these (along with finding and finishing the second forward landing gear); I'll be done with all the incidentals and can finally work on building the whole plane; adding the wings and tail to the fuselage. Man that is gonna be one difficult beastie to paint!

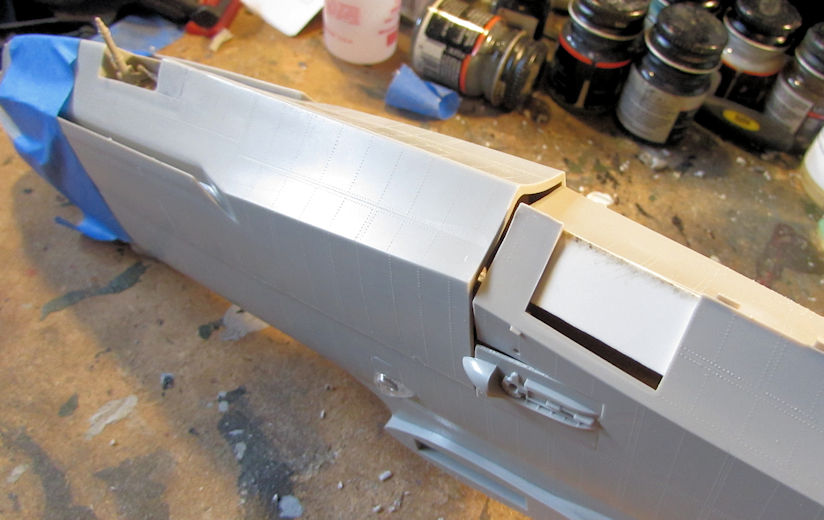
So, I put that aside and went to do something easier. Only it wasn't so easy. After two hours or so of fighting the fuselage halves to the A-400 Grizzly; I finally managed to get the whole fuselage to fit right:

full


The clear part is only dry fit to see how well it fits. Wow, it fits like a glove! Beautiful!

Next, since this was all glued together, I tried test fitting the wings and tail to see what fit issues I was going to have to deal with:

full


Yeah, that big beast barely fits on my workbench!

The third big aircraft I pulled out was my C-54. All I did with that was to add two extra windows to one fuselage half that I apparently forgot; then cemented the cockpit to the interior fuselage assembly and then added nose weights to the forward part of this whole assembly:

full


The next step will be to close this up inside the fuselage and move on.

Okay, that's it for this update. Thanks to all who stop in and comment, I appreciate everyone and everything. Stay tuned for more progress updates in the next couple weeks.
 
Every little bit is progress! Just remember Mark, You're like one of the most productive members on here!

That's quite the landing gear set up!!
 
Thanks Sharkman! Yeah, that landing gear set is quite the major job! This is so far about two days worth of work.

Thank you for the compliment on my productivity. I'm just having fun!
 
Despite it being a very difficult two weeks, I did manage to get some progress done., Miraculously, I even found a few missing parts! More on that later....

Right now, let's tour the Aircraft Hanger and see what's been happening there.

First off, I finally managed to finish all the main landing gear struts for the An-124. Man was that an ordeal:

full


And here is the first of the missing parts I found. It's been lost so long, I forgot it was missing! This is the last engine nacelle for the Japanese Shinmeiwa that had been missing for so long. Once I found it, I installed it right away; no need to give it a chance to escape again:

full


It's the one on the right. I did have a tough time getting that to line up properly and fit right. Man, the parts on this Shinmeiwa are all just refusing to fit!

Moving on, I wanted to get caught up on the C-54 since it's been neglected for so long. The first thing I did was to get the interior installed on one side of the outer fuselage. Take a last look at that interior detail; you ain't ever gonna see that again:

full


Next I closed it up. It took a lot of tape and some clamps to get it to line up. Even after that I did have a few tiny steps to sand smooth:

full


Later I removed everything and was pretty happy with the way this closed up:

full


After that I deepened a few of the panel lines and added some Mr. Surfacer 500 to the most egregious areas and let it dry. While that was drying, I decided to mask the canopy before installing it on the fuselage:

full


I used my trusty Tamiya tape for that. Then after everything else was dry on the fuselage; I installed the canopy. It was tough as that thing did not want to stay in place for some reason:

full


Time to let that dry and moved on to the wings. Wow, what an amazing amount of work is going into these! First, I installed all the engine firewalls in all four nacelles and side walls for the main landing gear bays. There's five or six parts in both of these:

full


Here's a shot from the other side:

full


Now, because I plan on posing this with the landing gear down, I had to cut these sections out so I can depict these particular flaps as lowered:

full


Later I added the top wing to the whole assembly. I had to start by gluing it around the nacelles and the end closest to the fuselage since the top wing was so warped. More clamps in use:

full


Later, when that is all dry I will close up the ends of the wings. They'll be easier to clean up on that end. As it is, I'll be doing a lot of sanding and cleaning up on the inner ends of these wings anyway. Here's a shot of both top wings in place:

full


Darn thing almost looks like an X-wing!


Okay, since this only lets me post a max of 20 pics, the remainder of the update will be in the next post....

Part II coming up....
 
Part II commences with all the work done on my armor.

Here is my latest progress on my armor and vehicles, starting with the finding of the missing piece that I needed for the Japanese tank transporter. While cleaning up and looking for something else, I found the tiny steering wheel for the truck and promptly installed it:

full


Moving on, I also found a shelf queen that I'd almost forgotten about. This is the Ukrainian BTR-3K that I started some time ago (last year?)

full


It was time to move forward. After perusing the instruction sheet for some length of time, I finally figured out how to start the suspension and running gear. This got me halfway:

full


Later I was able to finish up the rest of it:

full


After lining those up, I set that aside to dry and started on the interesting turret. This whole thing is remote controlled:

full


That was more difficult than I imagined it would be getting that together, then again; the instructions didn't help much. I decided to stop there on that and went back to the hull. I finished that off by adding all but the most delicate, breakable parts to it. Here you can see it with the base turret added:

full


Again, while searching for something else, I found the turret to the Churchill Mk IV AVRE that had gone missing. Time to pull that out to get it caught up to the Mk III. I started with the lower hull and the running gear:

full


Later I dry-fit the upper hull and turret to see how they look and fit:

full


Add the tracks and some more detail parts and this will be ready for paint. Both of these are now caught up to each other:

full


I've also been working on two German touring cars. One was almost done so I needed to get the other one moving along, as you can see here:

full


First I shot a basic black over it. This is the Wal-Mart 96-cent spraycan of flat black:

full


Next I masked the outside to paint the interior:

full


This then got a gloss coat:

full


After that dried, I installed the windows:

full


...Followed by the roof:

full


Now all that is needed is some detail parts and detail painting before I can add the decals. So, now I needed to get the other car caught up! I pulled it out and added the windows as well:

full


I decided to make this a partial convertible. Here it is with the rear portion of the roof attached:

full


Again, a few more detail parts (and the wheels!) and this will be done. Here you can see both cars almost finished. Shouldn't be too long:

full


That's all I have for now. Thanks all for looking in, comments are always welcome.
 
Back
Top