"Take me drunk I'm home"?I barely made it back to the motor home.

-
Modelers Alliance has updated the forum software on our website. We have migrated all post, content and user accounts but we could not migrate the passwords.
This requires that you manually reset your password.
Please click here, http://modelersalliance.org/forums/login to go to logon page and use the "Forgot your Password" option.
You are using an out of date browser. It may not display this or other websites correctly.
You should upgrade or use an alternative browser.
You should upgrade or use an alternative browser.
Maddog Manufacturing 2020 Production
- Thread starter Duke Maddog
- Start date
Duke Maddog
Well-known member
Thank you Frank! I'm trying, but I've already lost a whole week due to being so busy. Still, I hope to make up some of that time this coming week. I love your stories about the time you saw that An-124. I'll remember that advice about not drinking with Russians or Australians!
Thank you Sharkman! It's such a simple build; it shouldn't be long now.
Thank you Sharkman! It's such a simple build; it shouldn't be long now.
Duke Maddog
Well-known member
Well, despite the obstacles and other issues during this week I managed to get a surprising amount of work done on the workbench. This is my semi-weekly update showing my latest progress. So, sit right down and buckle in; this tour of Maddog Manufacturing is about to begin.
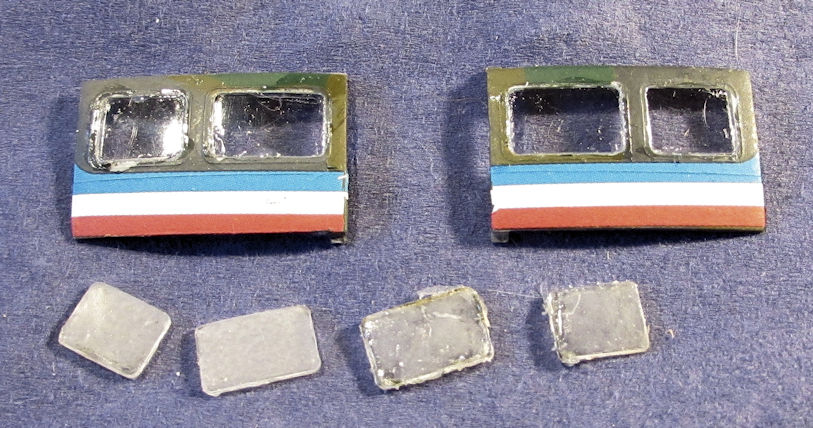
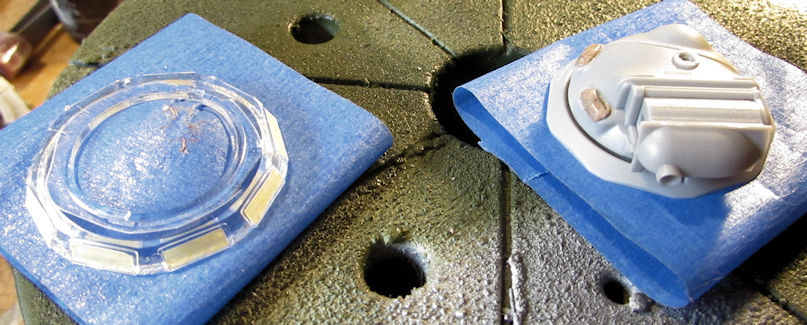
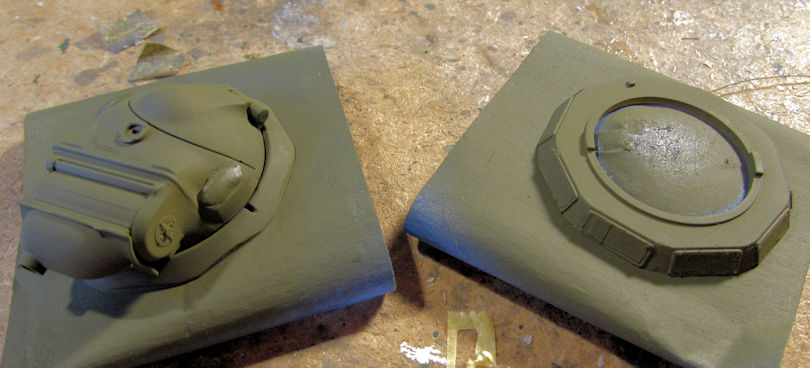
I'll start in my aircraft hanger. I've been working on a couple rockets here as well as this one helicopter that has been giving me fits. To start with, I changed out the windows on the Huey's sliding doors. You can see the old fogged windows below the doors holding their new windows:
Next I added the missing pieces to the tail. Now I can add the tail rotor when I get it painted:

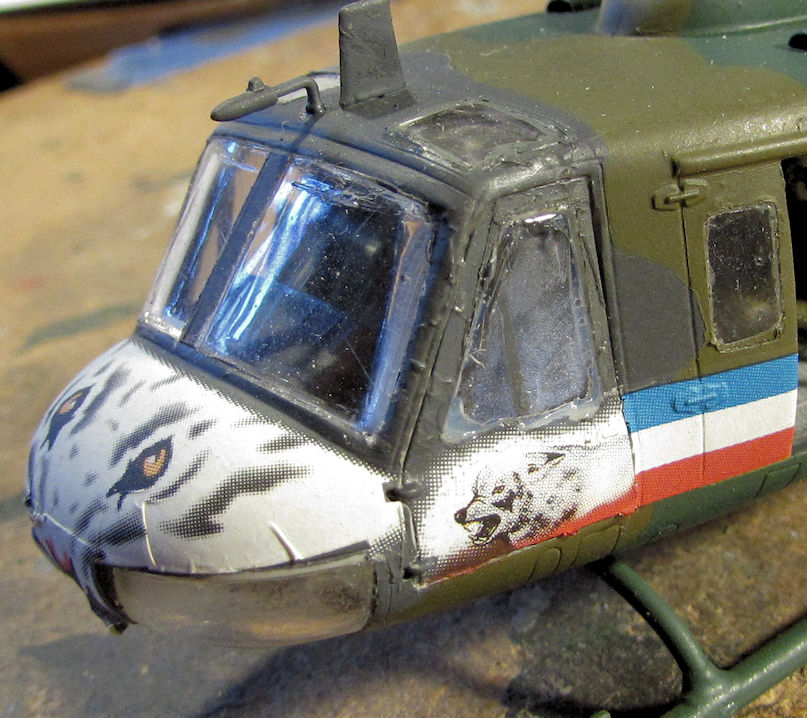
I went to replace the pilot's door window since it was also fogged, but I found that I didn't have the spares in the second kit. So I tried to clear that one up using very fine sanding pads (from 2800 to 20000) and then dipping in Future. No go. This was as good as I could get it so this will still be a poor rendition of this model, until I find a third kit I can cannibalize! Here it is installed again after all that week of sanding and buffing:
Finally, I moved ahead on this for once; building the main rotor. Afterward I'll be painting it:
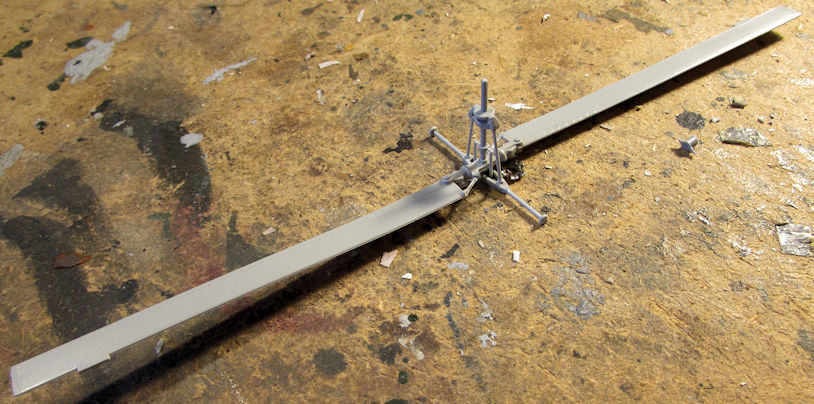
Yes, I added the droop.
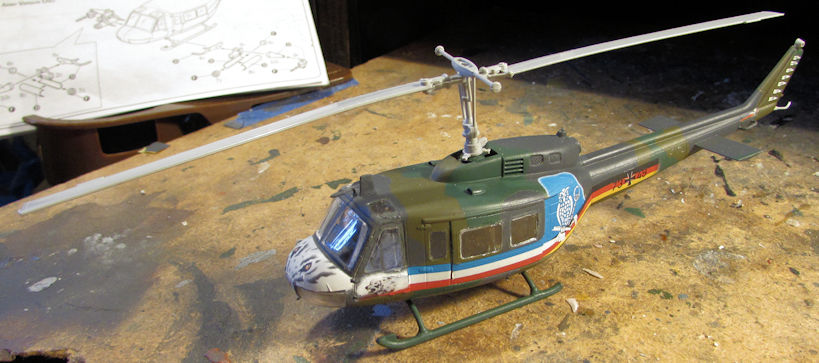
Here is the whole thing up to this point. All that's left is detailing the replaced parts; painting and weathering the rotors and adding them in and then I can call this PITA done:
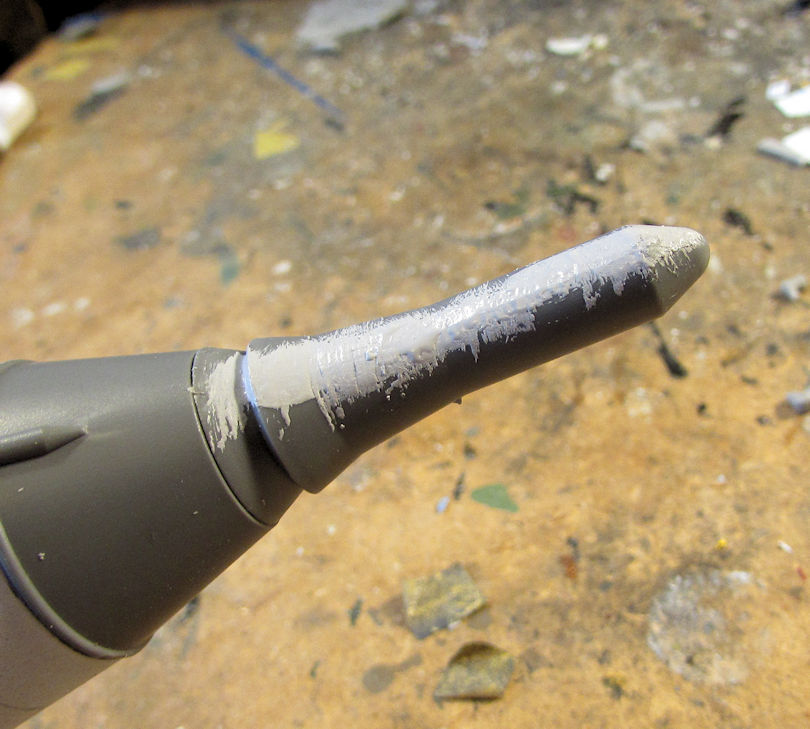
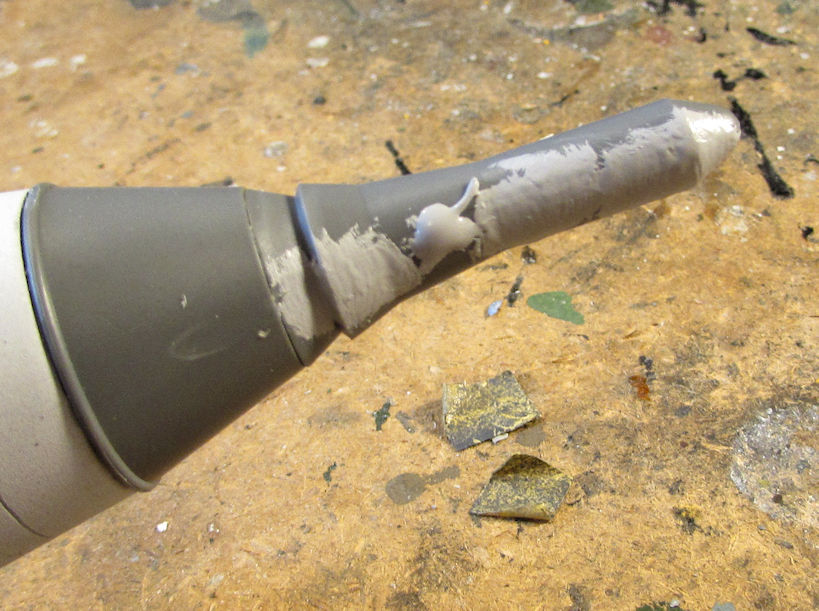
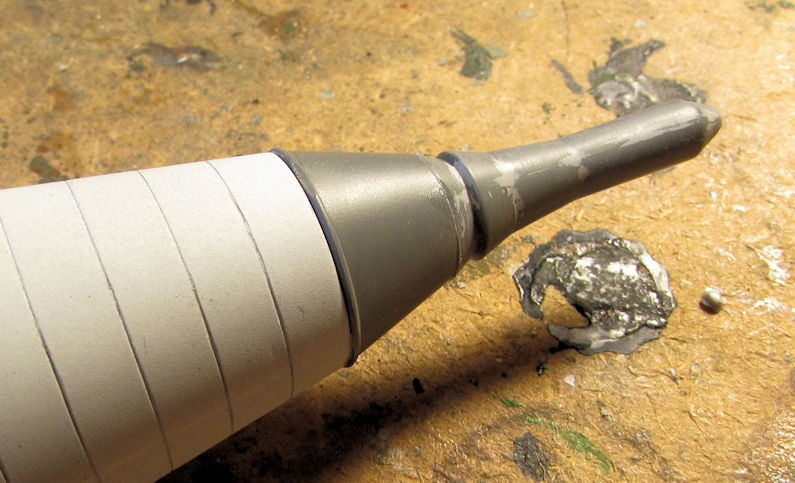
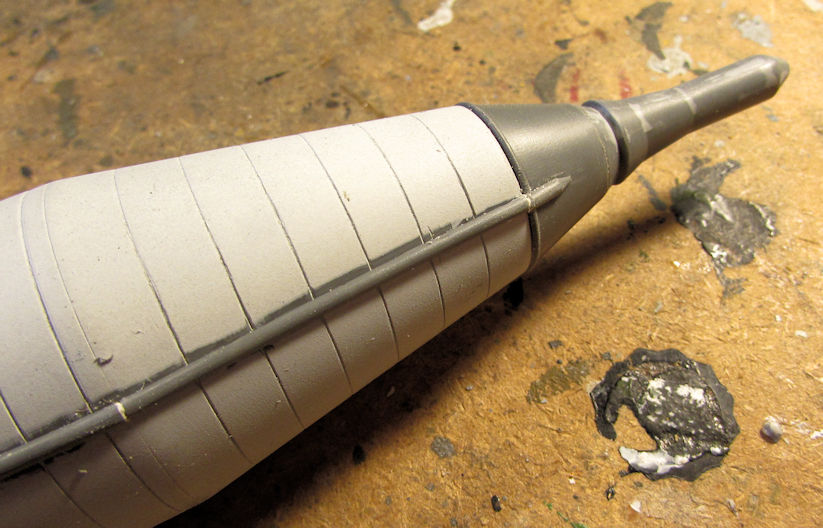
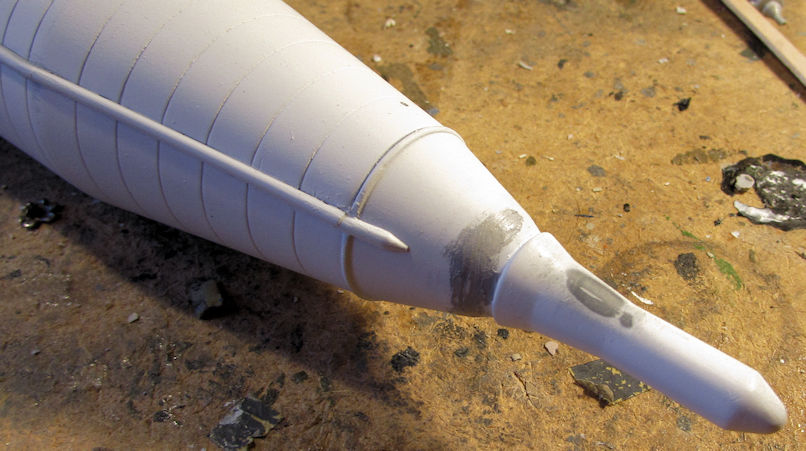
Moving on, I had to repair the top cone on the Redstone capsule since it broke when I tried cleaning the attachment point off. Here it is after I'd covered it with Mr. Surfacer 500, let it dry and then tried sanding it smooth:
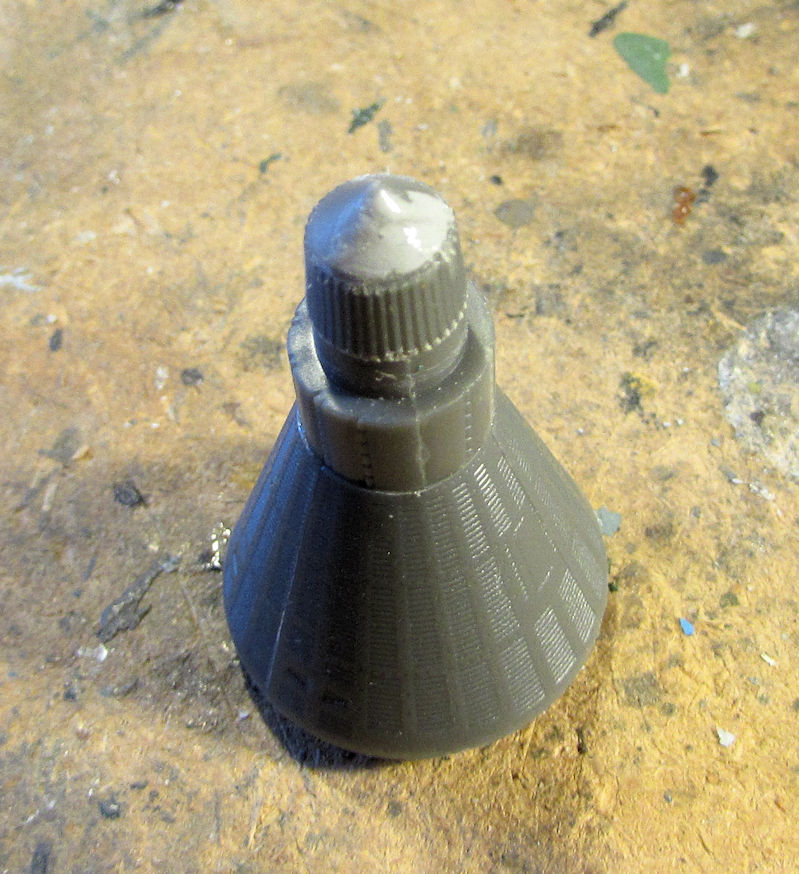
Later I'll primer that and see how well I did....
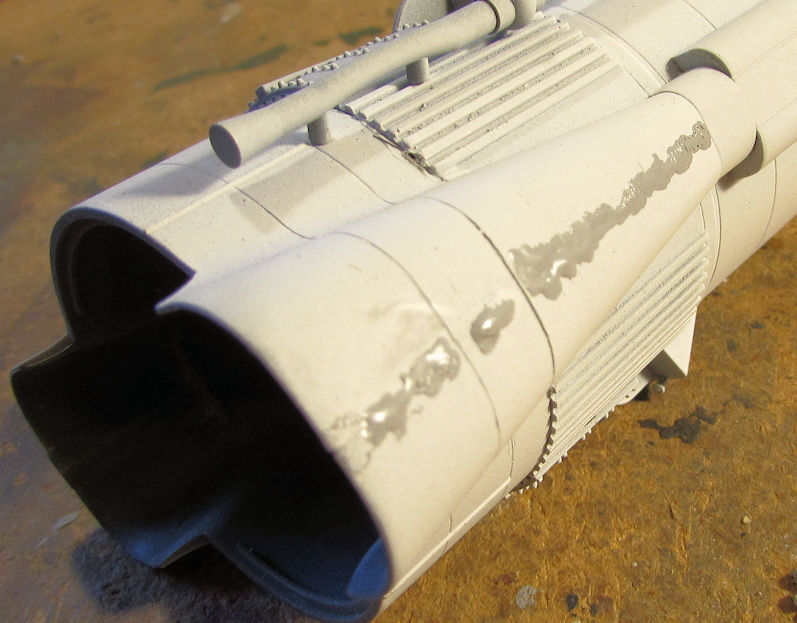
Meanwhile the Convair Atlas was also calling my name. This beastie was another two-steps-forward; one-step-back kind of deal again. Here's the breakdown...
I started by filling the seams and slight gaps in the nose cone with Mr. Surfacer 500:
That's both sides filled. Later I sanded this down after that dried:
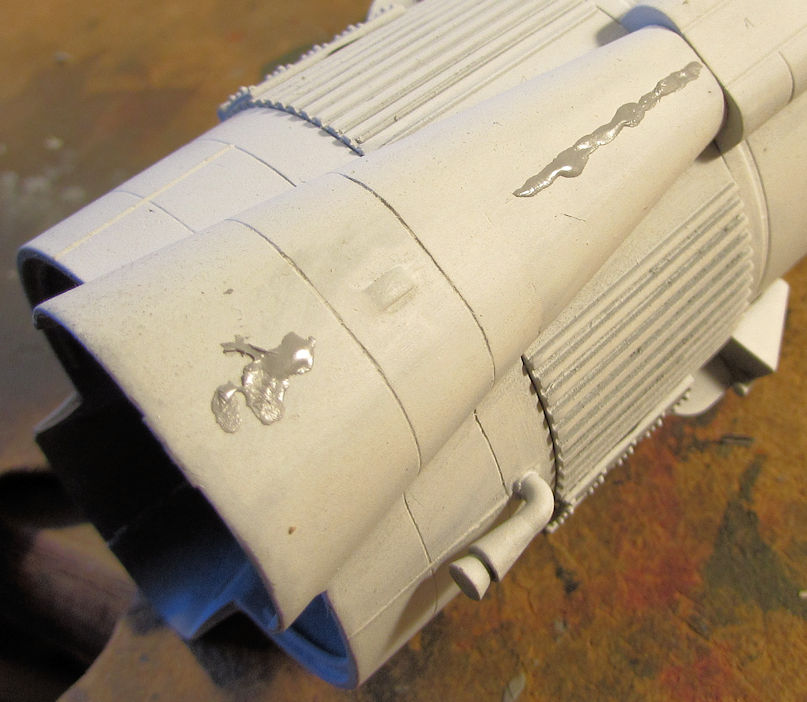
Afterward, I also noticed the tube going up the side had a few gaps in it that I filled with Vallejo acrylic putty:
When that was dry enough, I shot some more white primer on this and let it dry. When it was dry, I looked it over and found a few more dimples and seams that needed correcting. So, I sanded some of them down and the rest I filled with Mr. Surfacer 500 again:
That's where I left off on that one. I was too tired of sanding anymore to get on it so I put that aside for next week.
That completes this tour of the hanger, now on to my armory in the next post...
I'll start in my aircraft hanger. I've been working on a couple rockets here as well as this one helicopter that has been giving me fits. To start with, I changed out the windows on the Huey's sliding doors. You can see the old fogged windows below the doors holding their new windows:
Next I added the missing pieces to the tail. Now I can add the tail rotor when I get it painted:
I went to replace the pilot's door window since it was also fogged, but I found that I didn't have the spares in the second kit. So I tried to clear that one up using very fine sanding pads (from 2800 to 20000) and then dipping in Future. No go. This was as good as I could get it so this will still be a poor rendition of this model, until I find a third kit I can cannibalize! Here it is installed again after all that week of sanding and buffing:
Finally, I moved ahead on this for once; building the main rotor. Afterward I'll be painting it:
Yes, I added the droop.
Here is the whole thing up to this point. All that's left is detailing the replaced parts; painting and weathering the rotors and adding them in and then I can call this PITA done:
Moving on, I had to repair the top cone on the Redstone capsule since it broke when I tried cleaning the attachment point off. Here it is after I'd covered it with Mr. Surfacer 500, let it dry and then tried sanding it smooth:
Later I'll primer that and see how well I did....
Meanwhile the Convair Atlas was also calling my name. This beastie was another two-steps-forward; one-step-back kind of deal again. Here's the breakdown...
I started by filling the seams and slight gaps in the nose cone with Mr. Surfacer 500:
That's both sides filled. Later I sanded this down after that dried:
Afterward, I also noticed the tube going up the side had a few gaps in it that I filled with Vallejo acrylic putty:
When that was dry enough, I shot some more white primer on this and let it dry. When it was dry, I looked it over and found a few more dimples and seams that needed correcting. So, I sanded some of them down and the rest I filled with Mr. Surfacer 500 again:
That's where I left off on that one. I was too tired of sanding anymore to get on it so I put that aside for next week.
That completes this tour of the hanger, now on to my armory in the next post...
Duke Maddog
Well-known member
Here in the armory, I first went to work on my 1/35th scale Patton for the Tribute Build/AMPS Group Build. First I masked off all the vision ports in the cupola with Tamiya tape and Silly Putty so I could paint it:
Later when the airbrush came out, I shot this with the OD color:
Next I shot the hull. Lower first:

The the upper hull:
They are attached, by the way....
Then I shot the turret:
Here's a shot of everything together:

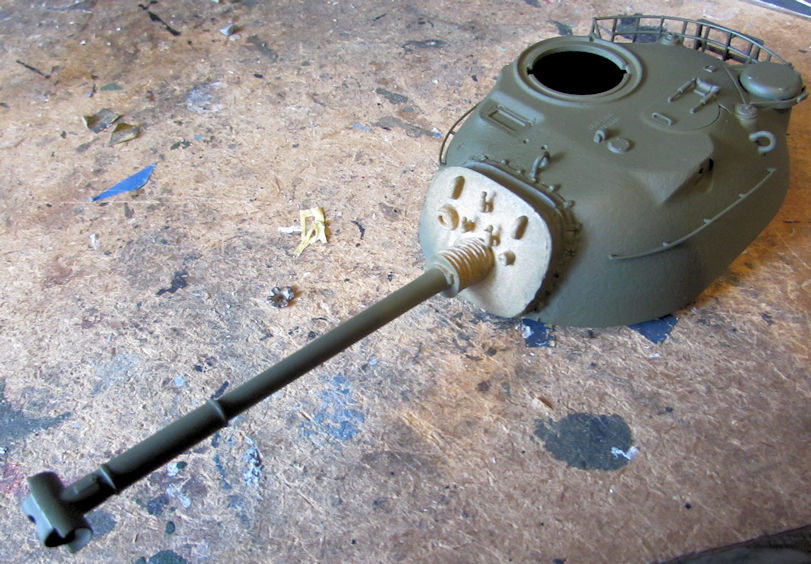
After that I brush painted the mantlet cover with Field Drab. The DS plastic made it look gloss even after it dried:
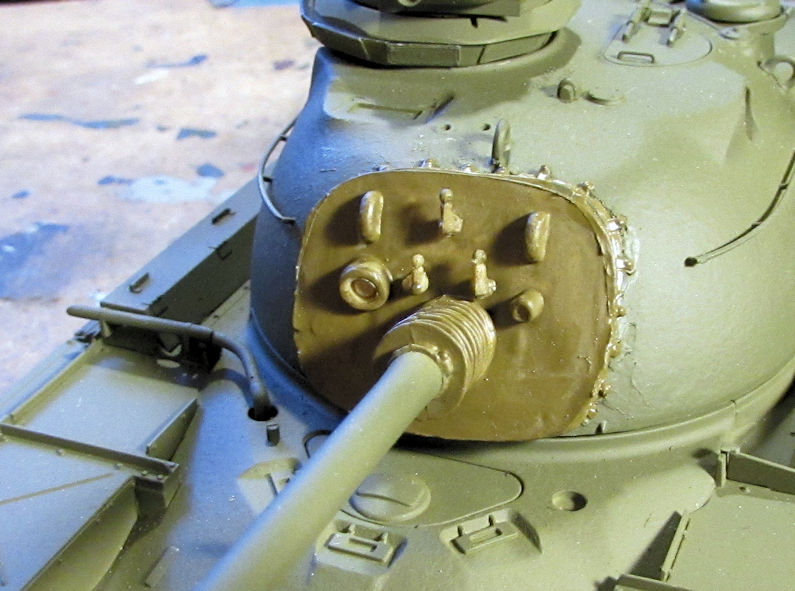
That is where I left off on that. I'll do something about that mantlet cover later. I have a few ideas for trying to make it look more 'fabric' and dull.
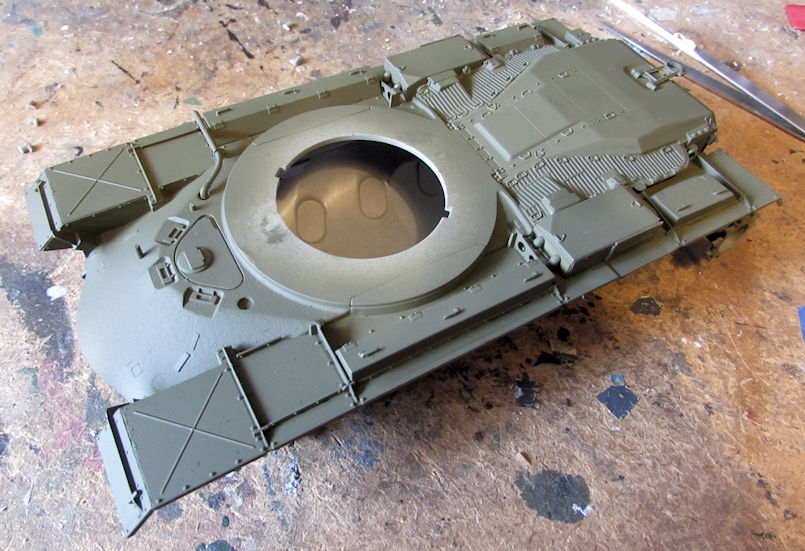
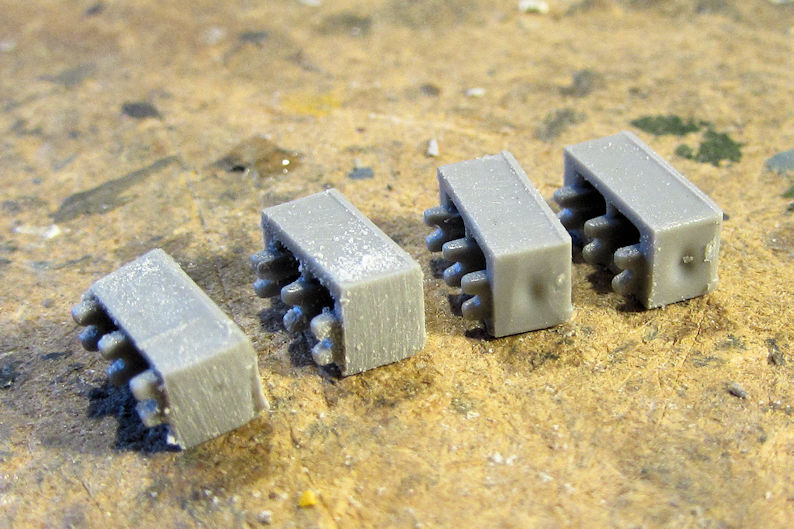
Moving on to my next project, I started adding the (almost) final detail parts on the M-109. On the back of the turret, there are these four boxes that attach to the rear stowage baskets. They had these dimples on the ends that I had to sand down. Here are two of them already sanded beside the other two so you can see what I had to deal with:
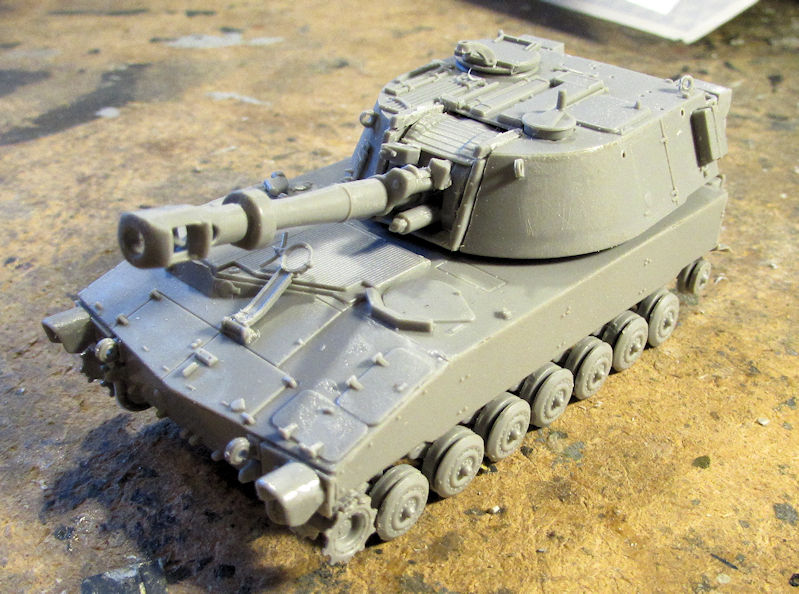
After they were done, I added most of the rest of the parts to this so I could get started on painting it. Aside from a few parts that I know will break off during handling, painting and weathering; this beastie has everything it needs on it for paint:
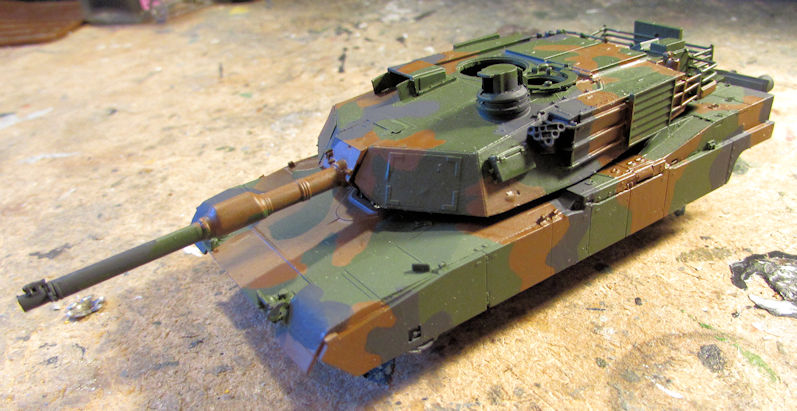
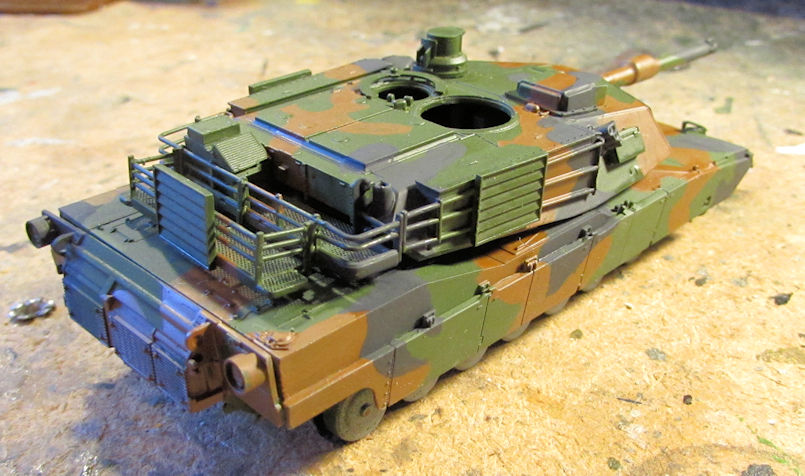
Finally, I decided to go ahead and hand paint the camouflage patterns on the two M-1 SEP Abrams since there were only three views on the paint pattern chart in the instructions: front, back and one side. Nothing for the other side or the top. By doing hand painting, I could at least freehand the hidden side and top. These two patterns are slightly different, but they are all based on the existing pattern from the instruction sheets.
First is the M-1A2 Abrams SEP:
And here is the M-1 A2 Abrams SEP with the mine roller. The mine roller is only sitting in front of this at this time. I'll be adding it later when all the final work is done:
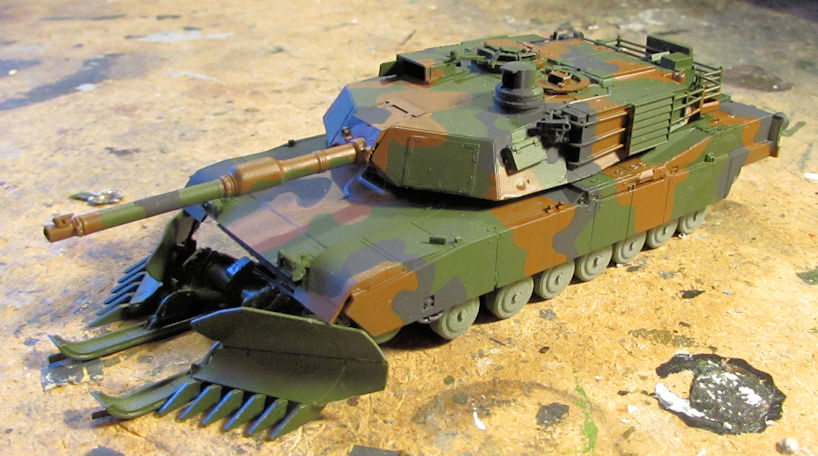
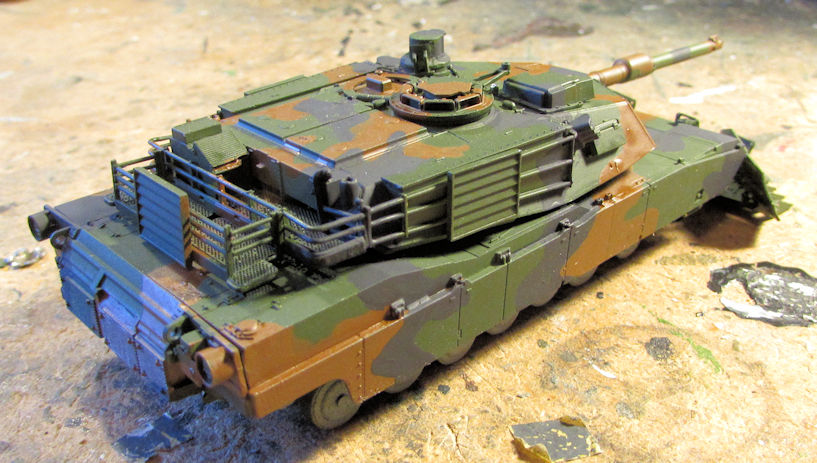
The M-1A2 Abrams SEP TUSK I with be airbrushed as I already have the Silly Putty on it. Hopefully next week.
After that I looked around for something else to work on but nothing screamed at me so I put everything away.
That concludes this latest tour of Maddog Manufacturing, I hope you enjoyed it. Thanks for stopping in and comments are always welcome.
Later when the airbrush came out, I shot this with the OD color:
Next I shot the hull. Lower first:
The the upper hull:
They are attached, by the way....
Then I shot the turret:
Here's a shot of everything together:
After that I brush painted the mantlet cover with Field Drab. The DS plastic made it look gloss even after it dried:
That is where I left off on that. I'll do something about that mantlet cover later. I have a few ideas for trying to make it look more 'fabric' and dull.
Moving on to my next project, I started adding the (almost) final detail parts on the M-109. On the back of the turret, there are these four boxes that attach to the rear stowage baskets. They had these dimples on the ends that I had to sand down. Here are two of them already sanded beside the other two so you can see what I had to deal with:
After they were done, I added most of the rest of the parts to this so I could get started on painting it. Aside from a few parts that I know will break off during handling, painting and weathering; this beastie has everything it needs on it for paint:
Finally, I decided to go ahead and hand paint the camouflage patterns on the two M-1 SEP Abrams since there were only three views on the paint pattern chart in the instructions: front, back and one side. Nothing for the other side or the top. By doing hand painting, I could at least freehand the hidden side and top. These two patterns are slightly different, but they are all based on the existing pattern from the instruction sheets.
First is the M-1A2 Abrams SEP:
And here is the M-1 A2 Abrams SEP with the mine roller. The mine roller is only sitting in front of this at this time. I'll be adding it later when all the final work is done:
The M-1A2 Abrams SEP TUSK I with be airbrushed as I already have the Silly Putty on it. Hopefully next week.
After that I looked around for something else to work on but nothing screamed at me so I put everything away.
That concludes this latest tour of Maddog Manufacturing, I hope you enjoyed it. Thanks for stopping in and comments are always welcome.

")
Frank
Well-known member
Mark,
The HUEY is coming along nicely.
For the fogged windows, I have had some luck doing this:
With Tamiya thin liquid glue.
Spread some on the fogged side of the clear part.
This will soften and then re-harden the clear part.
Let it set for two days, this way it is cured.
Then sand it with 400 grit.
You should be able to get below the fog with the 400..
Then polish through the normal procedures.
Just a suggestion, it may help so you do not have to sacrifice a third kit.
Frank
Duke Maddog
Well-known member
James, thanks!
Chris, thanks! I must be a bit mad to keep going on some of these crazy projects.
Frank, thank you. Good suggestion. I might try that although the fogging seems to be inside the part as both sides buffed to a glossy shine without reducing the fog one bit. I can't even tell what side the fog is on anymore since both sides are so shiny smooth from all the buffing I did.
Heavens Eagle
Well-known member
Something I ran into a few years ago with an acrylic watch crystal. Turns out alcohol can cause them to turn milky. I don't know where or how but I had a brand new crystal that got a milky haze inside the plastic. It had to be replaced. There was no way to polish it off as it was "IN" the plastic.
Duke Maddog
Well-known member
Paul I believe that something like that happened here too. This fog is inside the plastic, but I don't know how it happened. I will most liekly have to replace it, so maybe someday when I find a new side window I'll have it done. Meanwhile, I'm just going to complete it as is.
Duke Maddog
Well-known member
Thank you Frank. I did get the helicopter finished yesterday. Gotta find time to take the pic and get it posted.
Duke Maddog
Well-known member
Thanks Big 10! Yeah, there's a lot going on. I need to bring some of these across the finish line.
Thanks Bruce! I did manage to finish the F-16 recently. I'm thrilled that I finally have that in my collection.
Thanks again for the compliments!
Thanks Bruce! I did manage to finish the F-16 recently. I'm thrilled that I finally have that in my collection.
Thanks again for the compliments!
Duke Maddog
Well-known member
Well this week I have quite a large update so I'll most likely have to split it into two or possibly three posts. I gotta say though; it sure felt good to get all this progress done!
I'll start with my two rockets.
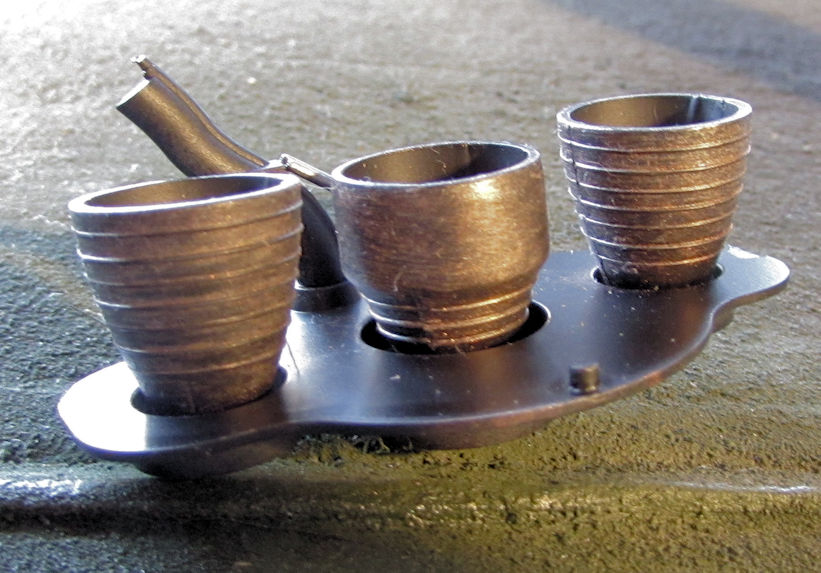
First off, I manage to get the exhaust nozzles painted on the Convair Atlas. I started with a flat black:
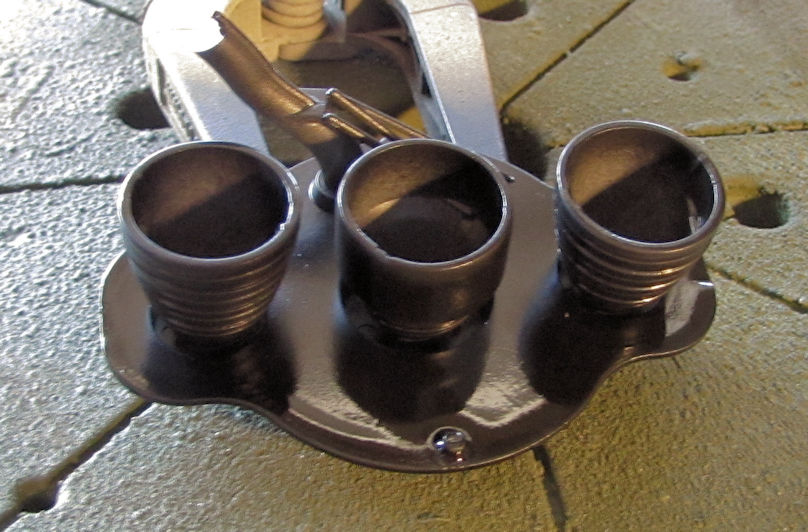
Afterward I drybrushed both a dark metallic grey and a copper color to give it a burned look:
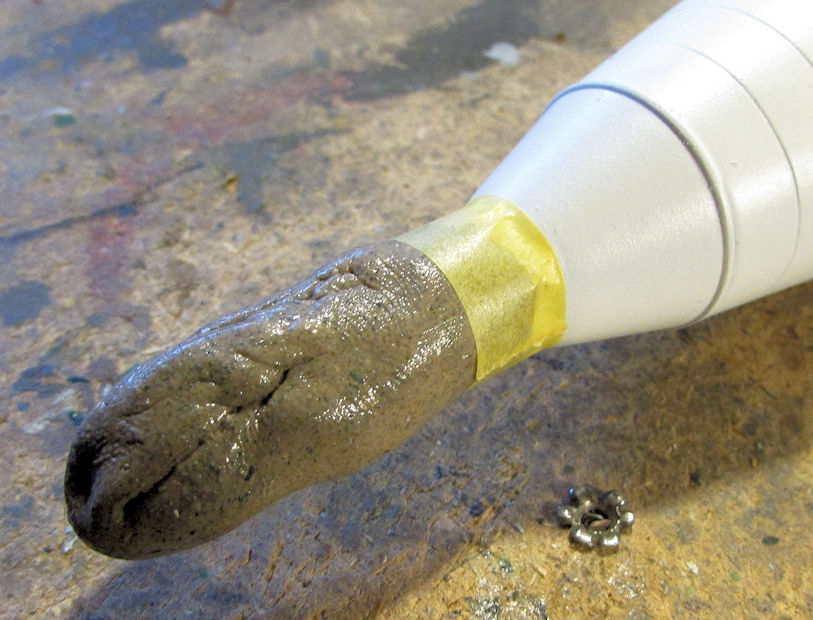
It does look better in person. Later, after the white on the nose cone had dried sufficiently enough, I masked off the area I wanted to stay white:
Once that was done, I shot a coat of Tamiya Gloss Aluminum over the rest:
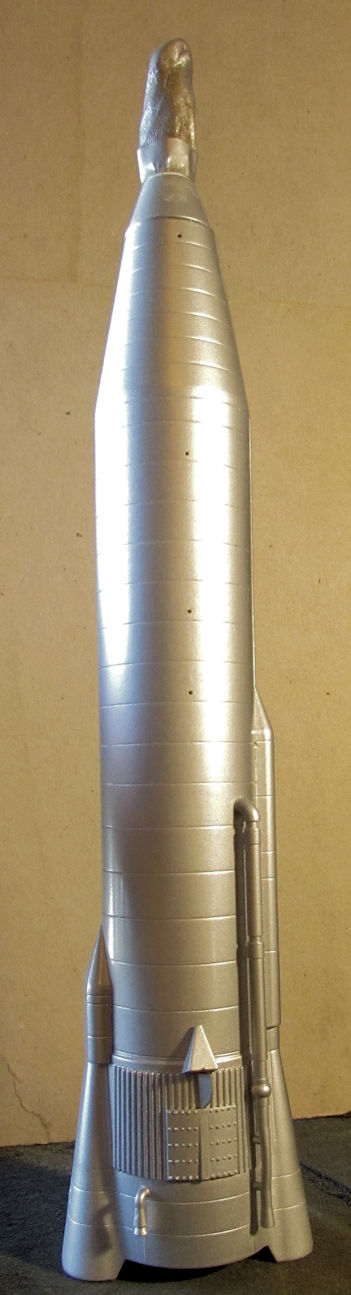
This bird is now ready for decals. Hopefully in the next couple days.
While that was drying somewhat and while I was already doing decals on my armor; I also pulled down the Mercury Redstone rocket. First I had removed all the masking covering the areas I'd painted black, and then added another coat of gloss:
Next came the decals:

Now all I have to do is add the photo-etch to the capsule and then paint and detail that. This bird is close to being done, hopefully withing the next few days.
Moving on, I starting feeling a hankering to do an ACE kit. So, since my SoCal AMPS group was doing an online Halftrack Group Build; I decided to pull out a WWII French halftrack artillery tractor. I first started on the tracked running gear and got this far before realizing that the one main drive sprocket was missing:
After searching for awhile that got put aside, but in both confidence and hope that I find it again; I continued to work on this model, building up the chassis and body:
You can see by the rough assembly this is one of ACE's earlier kits before he started the digital design. Lots of cleanup to get that to fit like you see it. I still had some issues, as the steering wheel broke apart and part of it disappeared while trying to clean it up! So, I installed the half steering wheel in the drivers side; thinking that some intrepid mechanic had replaced it with an aircraft yoke when some idiot had messed up the original steering wheel:
Makes for a good story.
Anyway, I still haven't found the drive sprocket so this is as far as I'll be going in this until it turns up:
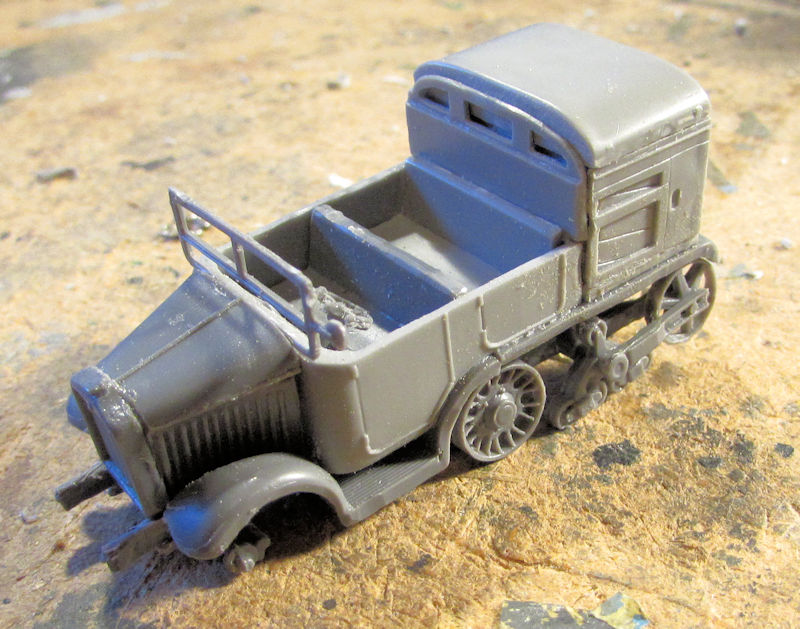
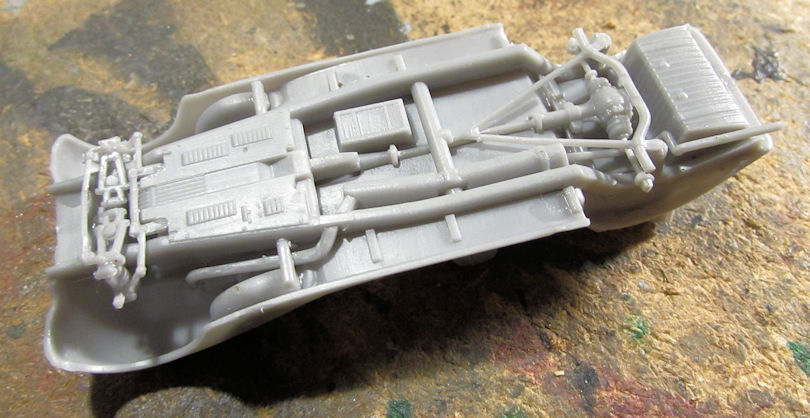
Moving on, I still wanted to do an ACE kit. So, during a SoCal AMPS ZOOM meeting/build night, I pulled out this little German Type 770 Cabriolet staff car that I'd started some time ago. I has already started the chassis, so I assembled the remaining undercarriage parts, axles and exhaust:
Next I completed all of the seats:
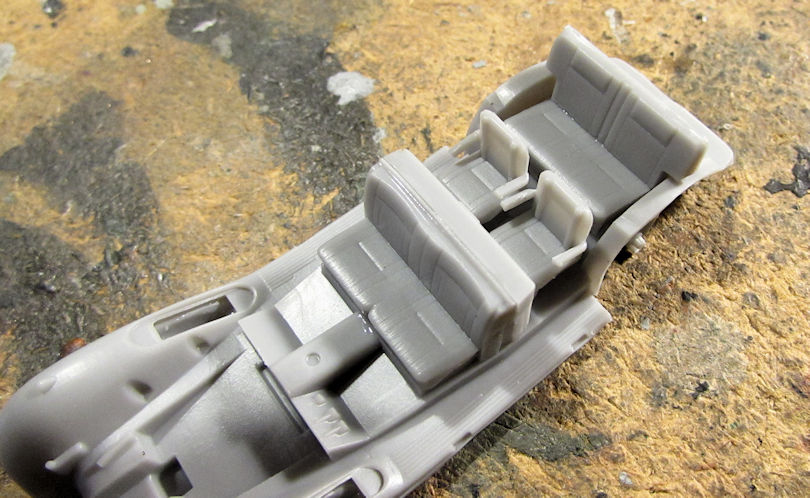
I then closed up the interior; adding any additional parts that were needed:
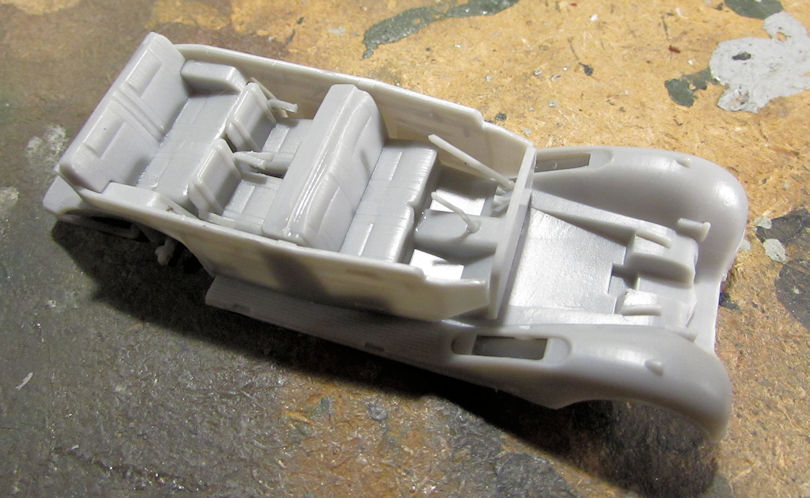
That's when I realized I should have painted the interior walls since the instructions call for a "wood-grain" type of interior. Well, in for a penny, in for a pound; I completed the rest of the exterior body and engine cover as well as the rear roof section:

After that, while looking through the instructions, it mentions one of the versions is for a restored vehicle in a museum that had been painted a dark green when it was restored. I thought, that would rock; especially since I had already started a different model Cabriolet similar to this one that will be all black. So in the interests of changing things up and having some variety, I shot this one with a lovely green shade:
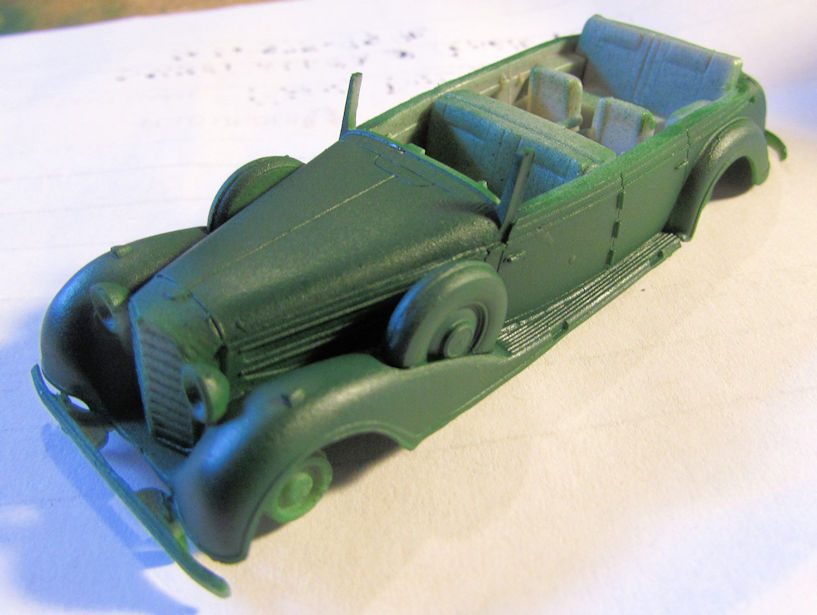
Don't worry about the roughness; I'll be buffing this and then shooting a nice gloss coat over it.
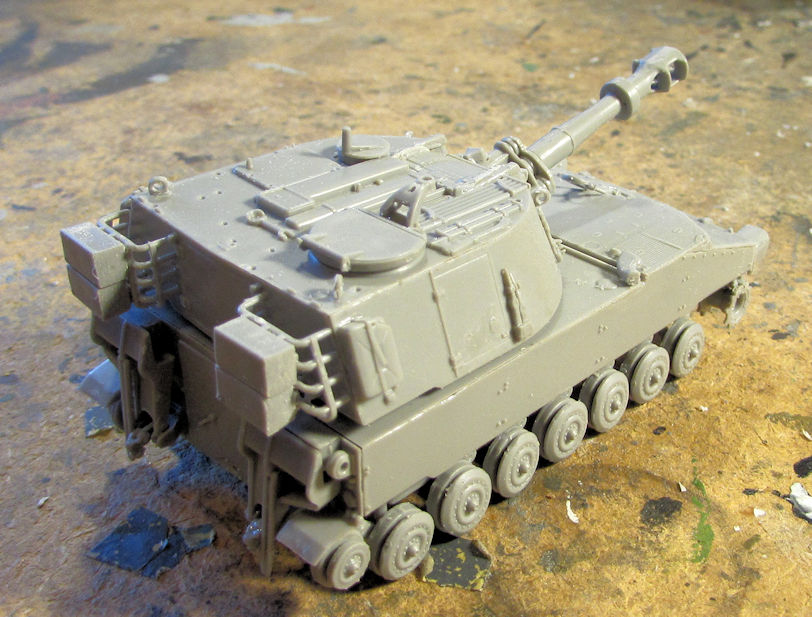
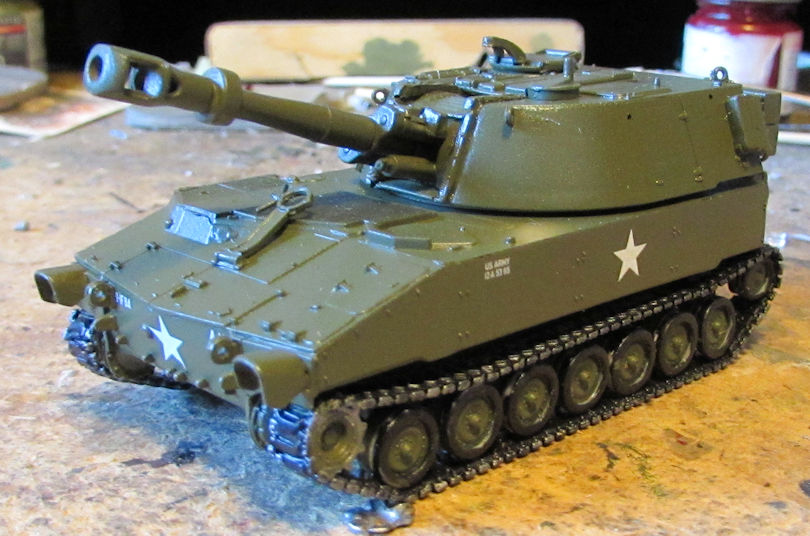
Moving along from there; it was time to get a few more models across the finish line. I started with my M-109 Paladin which needed a little filler on the sides of the turret mantlet frame:
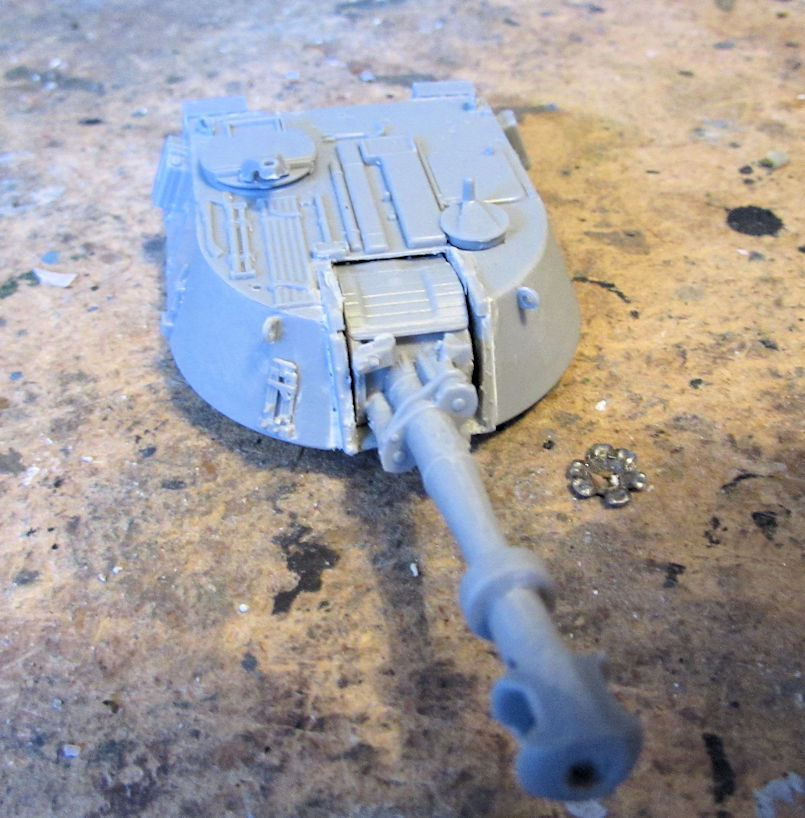
After that I shot a coat of paint over this:
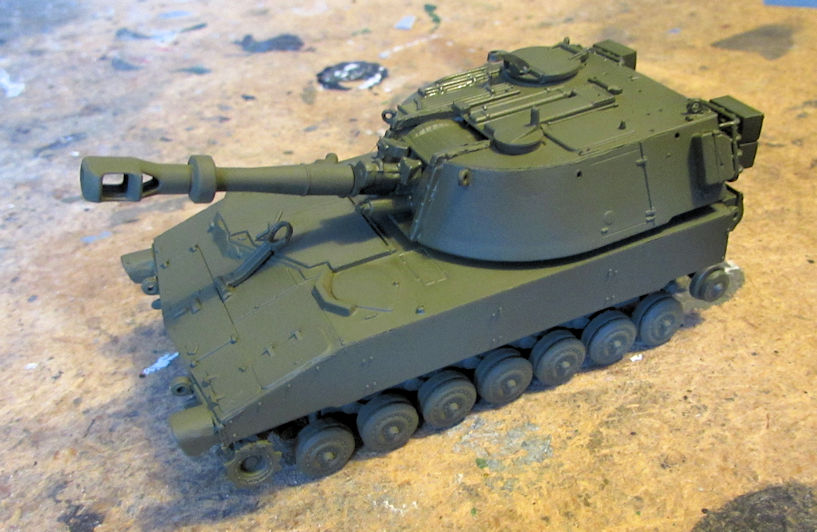
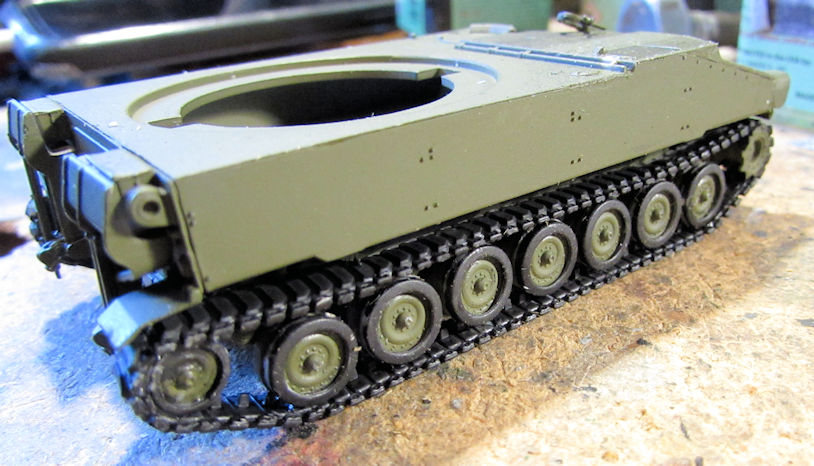
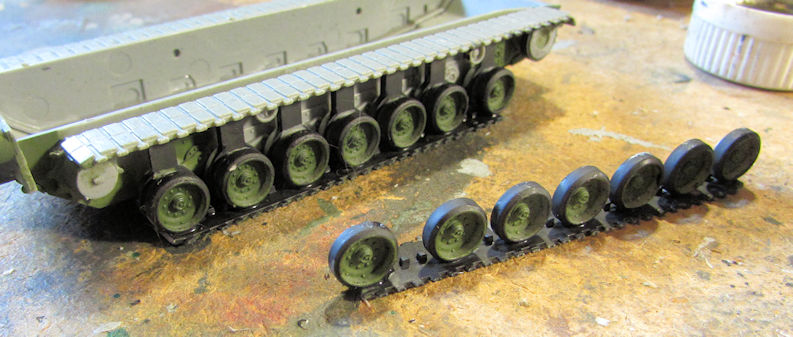
Later I installed the tracks on this beastie:
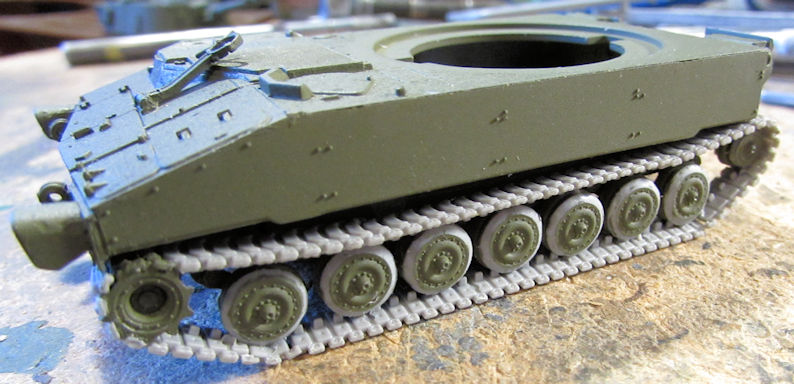
The outer road wheels have separate "tire" sections that I decided to put on afterward when the tracks had been installed and painted:
After a shot of glosscoat, I added the decals; which went on exceptionally well:
Okay, that is my 20 images for this post; I'll be continuing this on the next post....
I'll start with my two rockets.
First off, I manage to get the exhaust nozzles painted on the Convair Atlas. I started with a flat black:
Afterward I drybrushed both a dark metallic grey and a copper color to give it a burned look:
It does look better in person. Later, after the white on the nose cone had dried sufficiently enough, I masked off the area I wanted to stay white:
Once that was done, I shot a coat of Tamiya Gloss Aluminum over the rest:
This bird is now ready for decals. Hopefully in the next couple days.
While that was drying somewhat and while I was already doing decals on my armor; I also pulled down the Mercury Redstone rocket. First I had removed all the masking covering the areas I'd painted black, and then added another coat of gloss:
Next came the decals:
Now all I have to do is add the photo-etch to the capsule and then paint and detail that. This bird is close to being done, hopefully withing the next few days.
Moving on, I starting feeling a hankering to do an ACE kit. So, since my SoCal AMPS group was doing an online Halftrack Group Build; I decided to pull out a WWII French halftrack artillery tractor. I first started on the tracked running gear and got this far before realizing that the one main drive sprocket was missing:
After searching for awhile that got put aside, but in both confidence and hope that I find it again; I continued to work on this model, building up the chassis and body:
You can see by the rough assembly this is one of ACE's earlier kits before he started the digital design. Lots of cleanup to get that to fit like you see it. I still had some issues, as the steering wheel broke apart and part of it disappeared while trying to clean it up! So, I installed the half steering wheel in the drivers side; thinking that some intrepid mechanic had replaced it with an aircraft yoke when some idiot had messed up the original steering wheel:
Makes for a good story.
Anyway, I still haven't found the drive sprocket so this is as far as I'll be going in this until it turns up:
Moving on, I still wanted to do an ACE kit. So, during a SoCal AMPS ZOOM meeting/build night, I pulled out this little German Type 770 Cabriolet staff car that I'd started some time ago. I has already started the chassis, so I assembled the remaining undercarriage parts, axles and exhaust:
Next I completed all of the seats:
I then closed up the interior; adding any additional parts that were needed:
That's when I realized I should have painted the interior walls since the instructions call for a "wood-grain" type of interior. Well, in for a penny, in for a pound; I completed the rest of the exterior body and engine cover as well as the rear roof section:
After that, while looking through the instructions, it mentions one of the versions is for a restored vehicle in a museum that had been painted a dark green when it was restored. I thought, that would rock; especially since I had already started a different model Cabriolet similar to this one that will be all black. So in the interests of changing things up and having some variety, I shot this one with a lovely green shade:
Don't worry about the roughness; I'll be buffing this and then shooting a nice gloss coat over it.
Moving along from there; it was time to get a few more models across the finish line. I started with my M-109 Paladin which needed a little filler on the sides of the turret mantlet frame:
After that I shot a coat of paint over this:
Later I installed the tracks on this beastie:
The outer road wheels have separate "tire" sections that I decided to put on afterward when the tracks had been installed and painted:
After a shot of glosscoat, I added the decals; which went on exceptionally well:
Okay, that is my 20 images for this post; I'll be continuing this on the next post....
Duke Maddog
Well-known member
This weeks update part II...
Continuing from where I was before; I had finished with the M-109 Paladin and so moved on to something else. I had been told that the windows for the cab on the M-1070 were green tinted so I tried shooting a Tamiya Clear Green on the windows for the cab and the Dozer. This was the result of the first attempt:
Yep! Way too dark! So, I took some 70% alchohol and a Q-tip and cleaned them off to try again. This is the second attempt:

Still a bit dark for my tastes, but it'll do. I'm moving on.
So this brings me to my three Abrams tanks. To start with, I decided to add all the tracks and roadwheels to these tanks. Both Tiger Models and Flyhawk have some unique and interesting ways of getting tracks on their tanks. On the Flyhawk models which are the two SEP tanks; here is the process. First you add the rear roadwheels to the lower hull. They already have the top run of tracks attached. Then you put the outer road wheels on which have the bottom run already attached. You can see one side here installed and the other one that goes on the other side:
Once that is done, you add the drive sprocket and idler wheel with the indy links and small runs; filling out the rest and completing the track. And here it is with the tracks already completed:

The next thing I did was to detail out the mine roller on the other SEP tank. Flyhawk gives you this tiny chain that you have to thread through four parts before you fasten it on each side to the anchor points underneath. Here is a shot of the chain installed with the extra that I had to cut off so you can see how tiny this chain is. Also, in this shot, the mine plow is down for use:

And in this shot, the mine plow is locked up in the travel position:
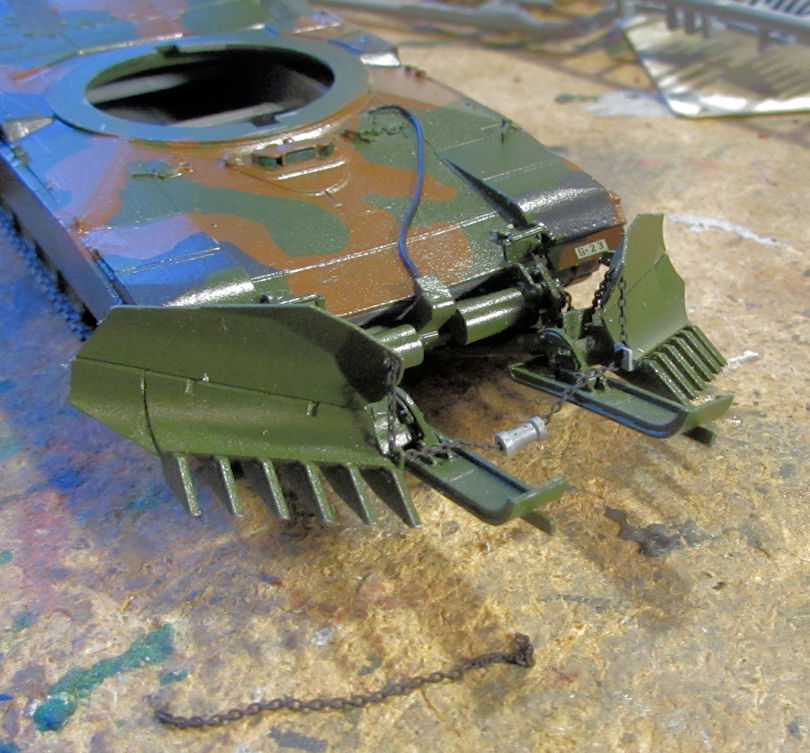
You can also see the control cable that Flyhawk gives in the kit as well.
Now, since I'd been putting the tracks on the Flyhawk Abrams; I also did the same with this Tiger Models kit. In this kit; they have the tracks already molded together in shape; but cut in half lengthwise. One length has the teeth, the other does not. Here's how they are installed. First, you add the rear roadwheels:

Then you add the rear track section; the one with the teeth over those road wheels. I painted my roadwheels after I added the track run:

After that, you add the outer road wheels:
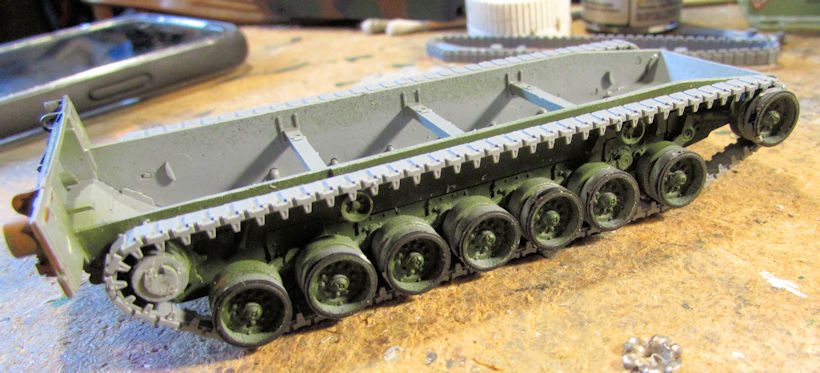
Followed by the outer track run:

Pop in the drive sprocket and you are done! Cool!
After that it was time to camouflage this tank. I started by covering the green with the Silly Putty:
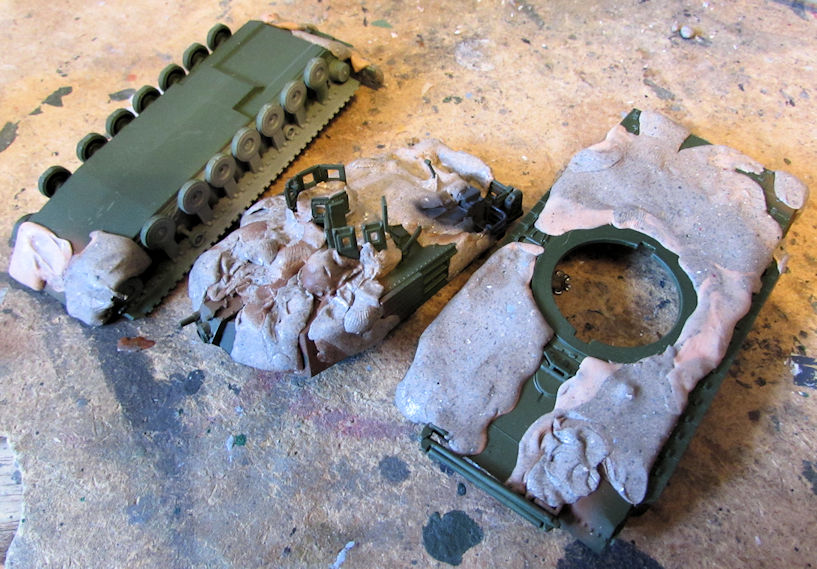
Then I shot the brown color over this:
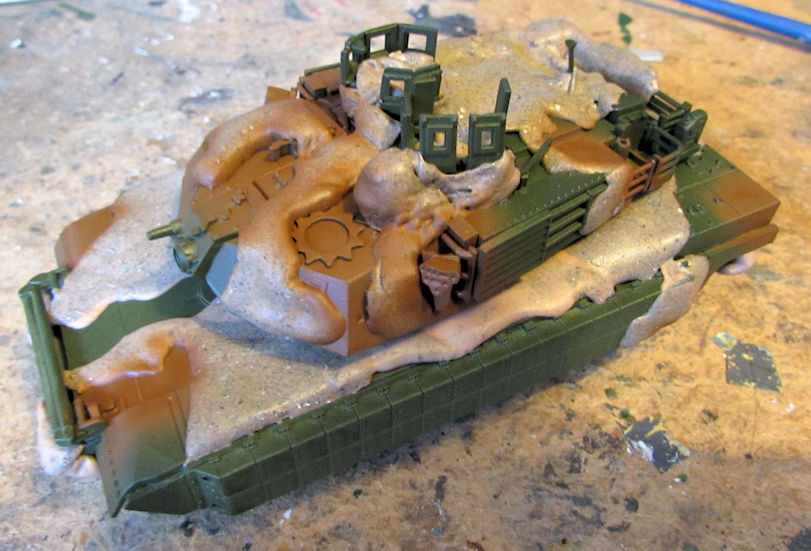
Then I added more Silly Putty to cover the brown and then shot the 'lightened' black:
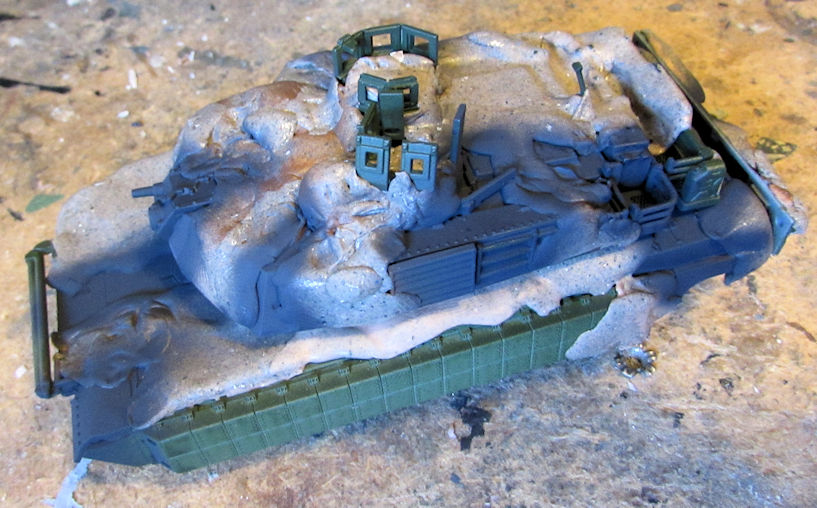
After that I removed all the Silly Putty to check out the pattern:

After that; the instructions call for painting all the TUSK I additions in a tan color so that is what I did:
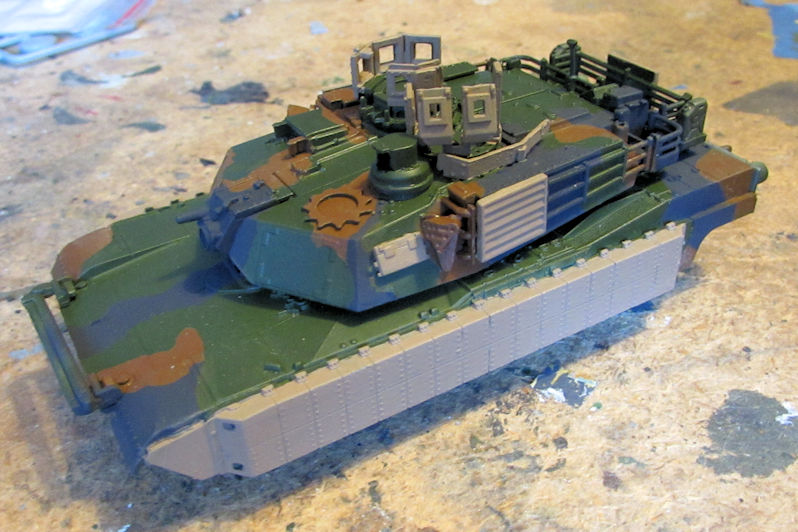
I really love the look of this tank in this paint scheme! It looks so cool!
Later, after I glossed this and added the decals; I added all the final detail parts to all the Abrams, especially this SEP TUSK tank. Check out the green windows:
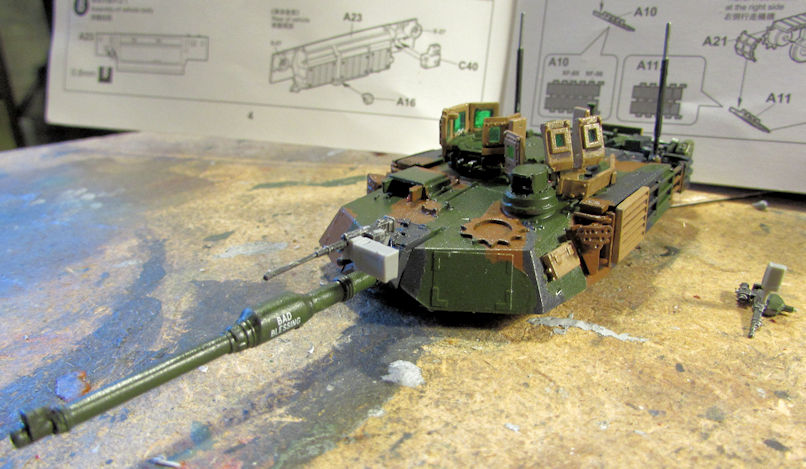
Finally, I added all the machine guns and other additional delicate parts. Here are all three of these Abrams before I touched up the paint, shot a dullcoat and then weathered these:
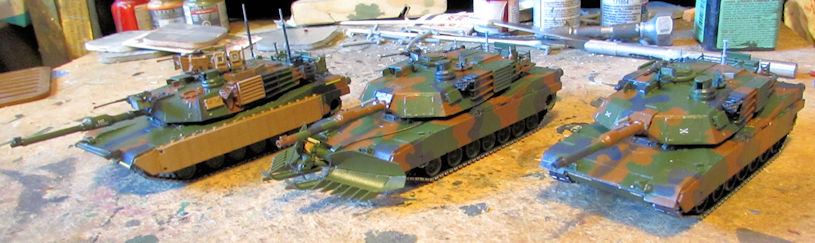
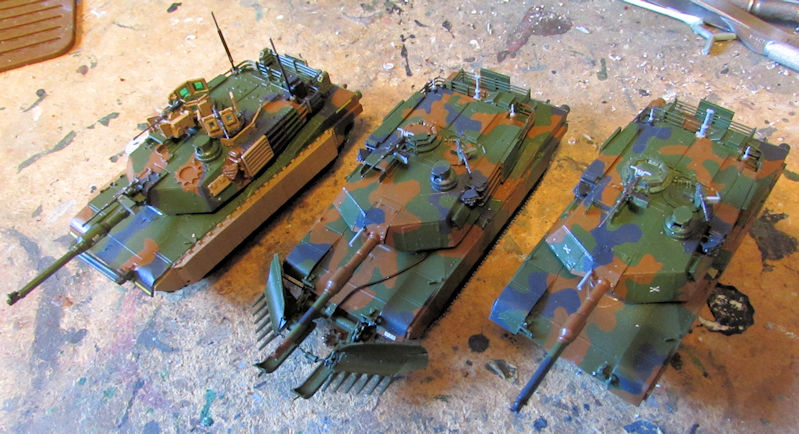
These three Abrams and the Paladin will be posted in the competed Armor Forums so feel free to go check them out there after I get them posted. Until the next update, I want to express my appreciation for your support, motivation, comments and compliments.
Thank you all for looking in, comments are welcome.
Continuing from where I was before; I had finished with the M-109 Paladin and so moved on to something else. I had been told that the windows for the cab on the M-1070 were green tinted so I tried shooting a Tamiya Clear Green on the windows for the cab and the Dozer. This was the result of the first attempt:
Yep! Way too dark! So, I took some 70% alchohol and a Q-tip and cleaned them off to try again. This is the second attempt:
Still a bit dark for my tastes, but it'll do. I'm moving on.
So this brings me to my three Abrams tanks. To start with, I decided to add all the tracks and roadwheels to these tanks. Both Tiger Models and Flyhawk have some unique and interesting ways of getting tracks on their tanks. On the Flyhawk models which are the two SEP tanks; here is the process. First you add the rear roadwheels to the lower hull. They already have the top run of tracks attached. Then you put the outer road wheels on which have the bottom run already attached. You can see one side here installed and the other one that goes on the other side:
Once that is done, you add the drive sprocket and idler wheel with the indy links and small runs; filling out the rest and completing the track. And here it is with the tracks already completed:
The next thing I did was to detail out the mine roller on the other SEP tank. Flyhawk gives you this tiny chain that you have to thread through four parts before you fasten it on each side to the anchor points underneath. Here is a shot of the chain installed with the extra that I had to cut off so you can see how tiny this chain is. Also, in this shot, the mine plow is down for use:
And in this shot, the mine plow is locked up in the travel position:
You can also see the control cable that Flyhawk gives in the kit as well.
Now, since I'd been putting the tracks on the Flyhawk Abrams; I also did the same with this Tiger Models kit. In this kit; they have the tracks already molded together in shape; but cut in half lengthwise. One length has the teeth, the other does not. Here's how they are installed. First, you add the rear roadwheels:
Then you add the rear track section; the one with the teeth over those road wheels. I painted my roadwheels after I added the track run:
After that, you add the outer road wheels:
Followed by the outer track run:
Pop in the drive sprocket and you are done! Cool!
After that it was time to camouflage this tank. I started by covering the green with the Silly Putty:
Then I shot the brown color over this:
Then I added more Silly Putty to cover the brown and then shot the 'lightened' black:
After that I removed all the Silly Putty to check out the pattern:
After that; the instructions call for painting all the TUSK I additions in a tan color so that is what I did:
I really love the look of this tank in this paint scheme! It looks so cool!
Later, after I glossed this and added the decals; I added all the final detail parts to all the Abrams, especially this SEP TUSK tank. Check out the green windows:
Finally, I added all the machine guns and other additional delicate parts. Here are all three of these Abrams before I touched up the paint, shot a dullcoat and then weathered these:
These three Abrams and the Paladin will be posted in the competed Armor Forums so feel free to go check them out there after I get them posted. Until the next update, I want to express my appreciation for your support, motivation, comments and compliments.
Thank you all for looking in, comments are welcome.
Heavens Eagle
Well-known member
You have been quite busy Mark! Looking GOOD!

Similar threads
- Replies
- 20
- Views
- 2K
- Replies
- 1
- Views
- 496
- Replies
- 41
- Views
- 8K