• Modelers Alliance has updated the forum software on our website. We have migrated all post, content and user accounts but we could not migrate the passwords.
    This requires that you manually reset your password.
    Please click here, http://modelersalliance.org/forums/login to go to logon page and use the "Forgot your Password" option.

Israeli Tiran 5

Greg Kimsey

Well-known member
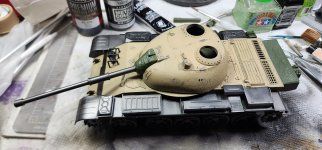
Thought I would switch gears for a bit and build a tank. I had two of this kit on my shelf so this is it:
20221129_203943.jpg

It seems this tank design was adopted by dozens of countries, includi
20221129_203908.jpg
ng Israel. I am building the Tiran 5 version;
I am not finding much reference material to base my weathering on so if anyone knows where to find some info on this tank I would be grateful! I have only found for or five fuzzy photos with my google search. Here is where I an in the build:
20221129_204015.jpg
Just getting started. My plan is to mostly use parts from the kit and only add what I can make myself, like handles and such. Let's see how it goes!
 
If you do Facebook, there is an excellent group called AMPS Israel and the folks there are incredibly helpful and there's tons of reference photos there...
 
I can see why this kit was on clearance. Almost all of the parts have had to be trimmed to fit, some of them significantly. Some could be attributed to me not knowing what I am doing but not all.
I got to this point...
20221130_092539.jpg

and thought I should paint since once the wheels go on I would not be able to.
20221130_093821.jpg

Priming reveals a LOT of areas that need sanding and maybe putty so that is my next step.
As for paint color, I have Tamiya light brown which looks sort of like the photos I am finding. If anyone has a better suggestion I would love to hear it!
 
So I resanded the body pretty extensively and puttied where I needed to and it looks good now.
20221130_213104.jpg
20221130_225626.jpg

I decided to work on the turret while things were drying. I wanted to give it a cast iron surface texture so I mixed some Vallejo plastic putty and glazing medium which is thin but retains adhesion properties unlike water. I started applying the slurry with a deerfoot brush
20221130_205621.jpg

But wasnt loving the speed or the texture so I got my elephant ear sponge and made quicker work with better texture
20221130_210016.jpg

You can see there in the background I have the wheels together. Once the glue had dried a bit I sanded the seam line down then wet sanded them smooth.
20221130_213055.jpg

Next came black primer
20221130_225618.jpg

That is about it for tonight. My plan is to paint everything "steel" color, then apply chipping medium, then main paint color, then chip paint where needef. Anybody see a flaw in that plan?
 
This is coming alone nicely Greg :good:
Chipping--Here is how I would tackle that. Instead of a 'Steel' color give the model a coat of a very dark reddish brown. The brown is actually closer to the color of bear metal. Once that had dried proceed as planned the Chipping medium and base color. Lastly for the actual chipping follow the old adage of "Less is More" keep the chips as small as you can and in logical places where the would happen at.

Good Luck and looking forward to seeing how it comes out.
:victory:
YES! This is what I was hoping for. I have never done actual chipping before, but use silver (or whatever color should be underneath) and put it where chipping would occur. Thank you. I think the metallic color Engine Exhaust is a reddish metallic color.
 
Ok, whether right or wrong, here is where I am. I sprayed everything with Vallejo Burnt Iron "metal color" over a black base so the overall tone came out a reddish grey. I started thinking, and that is usually where the trouble begins; I thought I should spray the main color on the axels and weather them first so I did. It probably didn't change or speed up anything,, I just thought I should.
20221201_195940.jpg
Next I will chip the wheels and weather the inside, then install the wheels and continue with the build. To paint the wheels I cut a pieceof sprue just smaller then the wheel axel opening then wrapped the end with tape to grip the wheel so I could spin it while I sprayed
20221201_195956.jpg
after spraying I put the clothes pin on the sprue stick and stood them up
20221201_195934.jpg
You can see I painted the turrett, just because it was there and there was paint in the airbrush.

The other thing I have done today is upgrade the barrel with aluminum tubing
20221201_203003.jpg
Since that center green part is oval shaped and the barrel is offset I think I will need to use that piece and drill holes for the barrels.

Thanks for following along. Please point out any mistakes!
 
Looks good thus far, your on the right track. :vgood:
I always start the weathering process on the bottom of the hull to get a feel for what I want to do. Practice the chipping on the bottom so you get a feel for how it will act. That way any weirdness that happens will not be visible.

Here a great video on Hairspray Chipping. The process is the for chipping fluid.


Great job on the barrel replacement. :good:

:victory:
 
I am changing my work flow midstream and hopefully making things easier on myself. I was priming each part, then metalize, then chip medium, letting it dry, painting, chipping, then glue in place. That became old REALLY FAST. Here is where I am. I have decided to glue the remaining parts on, then spray black over those parts AS WELL AS the already chipped tan areas and work as if they were new. Then metallic, then chip medium (no one in this house has hair spray! 3 females, no hair spray. Go figure), then let that dry while I work on the treads.
It was like "Man! What were you thinking?". I told you earlier in this thread that "thinking" was usually where the wheels fall off.
 

Attachments

  • 20221202_182606.jpg
    20221202_182606.jpg
    2.4 MB · Views: 16
Back
Top