
-
Modelers Alliance has updated the forum software on our website. We have migrated all post, content and user accounts but we could not migrate the passwords.
This requires that you manually reset your password.
Please click here, http://modelersalliance.org/forums/login to go to logon page and use the "Forgot your Password" option.
You are using an out of date browser. It may not display this or other websites correctly.
You should upgrade or use an alternative browser.
You should upgrade or use an alternative browser.
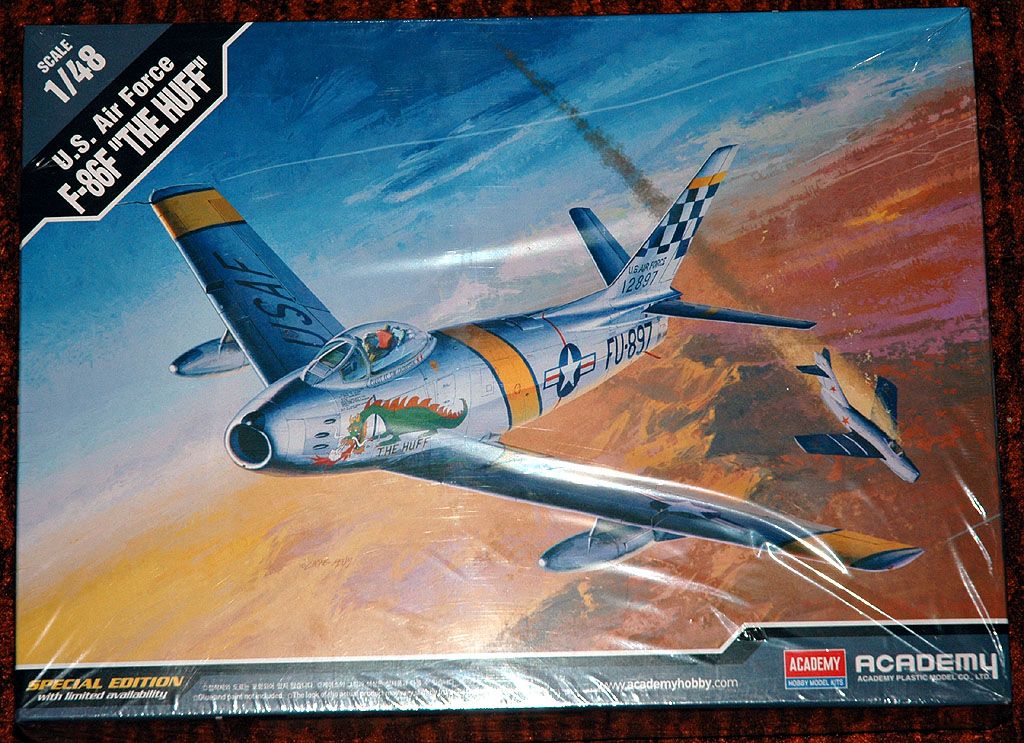
F86-F Sabre "The Huff" Completed.
- Thread starter Phil
- Start date

Sherman 18
Master at Arms
F86-F Sabre "The Huff"

Phil are you ding it straight out of the box?
Phil are you ding it straight out of the box?

F86-F Sabre "The Huff"
Another Academy F86! Go man! I got to pull mine out, strip it and try again.
Another Academy F86! Go man! I got to pull mine out, strip it and try again.
F86-F Sabre "The Huff"
Yes this one straight OOB, it has some very nice detail parts, looks ready good, will be my first Academy 48th kit.
Leaving the port side gun bay closed cause I don't want to cut that lovely dragon decal!
Starboard gun bay will be open to show the nice .50's in there.
this one later......!!
By the way, wouldn't those drop tanks shown on the box art been jettisoned during combat??!!
F86-F Sabre "The Huff"
Watch your "six" Terry!!
Finally started after a big snag with the Dambuster build - just a mini update

not much done just tried the IP, seat and stick to see how it looks,

putting the pilot fig in so no need for belts, engine disappears so just sprayed that silver and that will do

15grams of lead weight is fitted if you are wondering what that big lump is on the nose intake!
more later, progress might be slower than my usual slow speed! as I found out yesterday my 4th disc is pressing on my spine causing sciatic pain, on anti inflams, exercises, and time will heal by the Doc's account.
It is sure putting a dampener on my concentration
Hey that commie just shot down a F-84.
Watch your "six" Terry!!
Finally started after a big snag with the Dambuster build - just a mini update
not much done just tried the IP, seat and stick to see how it looks,
putting the pilot fig in so no need for belts, engine disappears so just sprayed that silver and that will do
15grams of lead weight is fitted if you are wondering what that big lump is on the nose intake!
more later, progress might be slower than my usual slow speed! as I found out yesterday my 4th disc is pressing on my spine causing sciatic pain, on anti inflams, exercises, and time will heal by the Doc's account.
It is sure putting a dampener on my concentration
F86-F Sabre "The Huff"
Good luck with the back Phil, sending :zen
Cockpit looks great, very clean
how do you shape the weight?
Good luck with the back Phil, sending :zen
Cockpit looks great, very clean
how do you shape the weight?
F86-F Sabre "The Huff"
Thanks for the kind :zen words!
with a small hammer and a concrete floor MP!
it's wrapped in Aluminum foil, with cuts in the bottom of the foil then Ca glued to the plastic
Well I'm not really impressed by my efforts, not sure if it was me or the kit, seems the members who are building Sabres atm are all doing an academy kit? which I would of thought were all the same but with dif markings - seems they all have their own quirks for fit.
I found the wing root fit on mine was near perfect, nose intake ring was a shocker, seemed like a 1/47th instead of a 48th.
Bad inward curve on the bottom join line going towards the tail and the main wing join to the fuselage bottom.
The two upper fuse parts you have to glue in were just too big to fit, once again seemed like 1/47 sized parts - out of scale, even though their is no such thing but gives you an idea what the parts were like to fit
I've come to the conclusion that if you want to do a NMF bird - start with a Tamiya kit!!
Anyway here is my nightmare, as it is now.
Sprayed with Tamiya A/S 12 then some small panels masked over, then Tamiya T/S 17.
masked panels are still covered.
I may mask some more panels then spray it with Mr Metal Aluminum the same paint I used on the B-35J, not sure yet.


now for the horrid underside

As you can see detail has been obliterated due to the stupid oversized nosecone

So this may turn out to be an exercise in NMF shades of silver, or I'll just chuck it into a bucket of black wash and let it drip dry.........
Thanks for the kind :zen words!
Cockpit looks great, very clean
how do you shape the weight?
with a small hammer and a concrete floor MP!
it's wrapped in Aluminum foil, with cuts in the bottom of the foil then Ca glued to the plastic
Well I'm not really impressed by my efforts, not sure if it was me or the kit, seems the members who are building Sabres atm are all doing an academy kit? which I would of thought were all the same but with dif markings - seems they all have their own quirks for fit.
I found the wing root fit on mine was near perfect, nose intake ring was a shocker, seemed like a 1/47th instead of a 48th.
Bad inward curve on the bottom join line going towards the tail and the main wing join to the fuselage bottom.
The two upper fuse parts you have to glue in were just too big to fit, once again seemed like 1/47 sized parts - out of scale, even though their is no such thing but gives you an idea what the parts were like to fit
I've come to the conclusion that if you want to do a NMF bird - start with a Tamiya kit!!
Anyway here is my nightmare, as it is now.
Sprayed with Tamiya A/S 12 then some small panels masked over, then Tamiya T/S 17.
masked panels are still covered.
I may mask some more panels then spray it with Mr Metal Aluminum the same paint I used on the B-35J, not sure yet.
now for the horrid underside
As you can see detail has been obliterated due to the stupid oversized nosecone
So this may turn out to be an exercise in NMF shades of silver, or I'll just chuck it into a bucket of black wash and let it drip dry.........
F86-F Sabre "The Huff"
can't see the pictures yet but I agree about the fit around the intake ring.
can't see the pictures yet but I agree about the fit around the intake ring.
Dave The Chef
Member
F86-F Sabre "The Huff"
Very nice so far Phil! B)
Very nice so far Phil! B)
ij001
Well-known member
F86-F Sabre "The Huff"
Strange, I didn't notice the intake ring being oversize. Can I offer a suggestion ??....
Very prominent on all Sabres - the large centre panel that stretches from the wing-root to the wingtip 'cap' was a dull greyish aluminium tone, quite different from the rest of the panels. It may be that those panels were puttied and painted the same way as P-51 wings to aid airflow.
If you have a look at my F-86 early on in the painting process you'll see what I mean.
Ian
Adam Baker
Active member
F86-F Sabre "The Huff"
I had similar but not quite the same issues. I did find that my nose did seem to be a bit on the small side, the same thing w/ the 2 panels that go on the top of the fuselage. Had fairly large gaps around both panels that I had to fill in w/ stretched sprue.
The wing root fit on mine was large, probably 1/16" or greater along the entire gap, those took up a fair amount of material to fill in.
Along the bottom between the exhaust opening and the wing, it kinda seemed like the plastic on one side had a bit too much curve in it so when the 2 halves were put together, there's a small step between the sides.
Thanks for the kind :zen words!
with a small hammer and a concrete floor MP!
it's wrapped in Aluminum foil, with cuts in the bottom of the foil then Ca glued to the plastic
Well I'm not really impressed by my efforts, not sure if it was me or the kit, seems the members who are building Sabres atm are all doing an academy kit? which I would of thought were all the same but with dif markings - seems they all have their own quirks for fit.
I found the wing root fit on mine was near perfect, nose intake ring was a shocker, seemed like a 1/47th instead of a 48th.
Bad inward curve on the bottom join line going towards the tail and the main wing join to the fuselage bottom.
The two upper fuse parts you have to glue in were just too big to fit, once again seemed like 1/47 sized parts - out of scale, even though their is no such thing but gives you an idea what the parts were like to fit
F86-F Sabre "The Huff"
Thanks Ian and Adam, one thing I forgot to mention that the fuse halves were a touch different, one being thicker than the other, weird.
Will resume this on the weekend, the last spray was Tamiya T/S17 gloss Aluminum which needs to be left alone for at least 3 days, just my method of being sure I don't get any finger prints in soft uncured paint.
:drinks
F86-F Sabre "The Huff"
After a mammoth masking effort from the previous night, had a perfect sunny day so out with the Mr Metal Aluminum.
This was sprayed straight from the bottle, over the second round of silver Tamiya rattle T/S 17 gloss Aluminum.


Left it alone for 3 hours then the first cautious polish, with the masking tape still on selected panels


Full sunshine coming up


Final polish then all masking tape off


maybe I can run an oil stain down that cursed join......


Thanks to Ian for the idea for the centre of wing color tip, and I copied Ian's nosecone color which got rid of one prob quite nicely!
Testors metalizer sealer 1409 next
After a mammoth masking effort from the previous night, had a perfect sunny day so out with the Mr Metal Aluminum.
This was sprayed straight from the bottle, over the second round of silver Tamiya rattle T/S 17 gloss Aluminum.
Left it alone for 3 hours then the first cautious polish, with the masking tape still on selected panels
Full sunshine coming up
Final polish then all masking tape off
maybe I can run an oil stain down that cursed join......
Thanks to Ian for the idea for the centre of wing color tip, and I copied Ian's nosecone color which got rid of one prob quite nicely!
Testors metalizer sealer 1409 next
Similar threads
- Replies
- 73
- Views
- 5K
- Replies
- 0
- Views
- 191