
I will either rename this thread or delete it depending on the answer...

The dust encrusted display tomb, I mean case...

ZipLoc bags so as not to lose any more pieces...

The interior is scratch built, the casting numbers are new and differently located than the Tamiya M4A3 it was based on.

The engine deck was converted based on Hunnicutt's book. A tarp strategically covers a slip of the knife boo boo.

Twisted wire chains for the fuel, water, and oil filler caps.

You can't see it but a new rear engine wall with exhausts was scratch built (sadly on a fully detailed M4A3 belly pan).

Close up of the side showing the skip welded sand skirt brackets, home resin cast road wheels (Verlinden later came out with an update set that included this type), threaded rods and different casting marks on the bogies.

Dilled out MG, MV lenses for head lights, studs on the MG cover ring, 'comb', and glacis converted to the later M4A2 (lifting loops outboard, rear view mirrors on brackets, etcetera).

Extreme close up shoes some unidentified Top Brass PE piece laying in the filler cap area.

Ignore the dust, it is a shelf queen after all and they don't clean themselves. Note the hasps and converted figure. He seems happy at the attention.

More casting marks and a fully detailed M4A3 belly but this is an M4A2.

Close up of the RO's hatch which broke off (since I made them all working).

Other side, I see glue marks from my repair decades ago.

Flimsy but working hinges gave way to hinges from the kit, sliced off and glued on.

I don't remember what this is, an antenna perhaps?

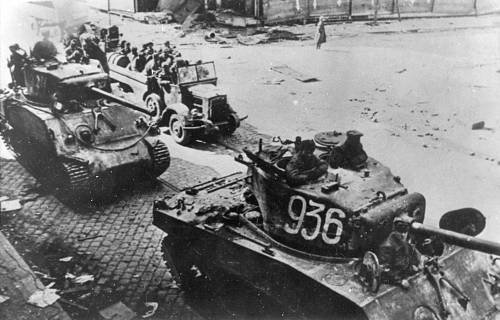
Hand painted markings and cast texture. Added the mantlet cover mounts but the subject didn't have them... I based my model on one image (the second shown below) which appeared in the Hunnicutt book and in Steven Zaloga's Osprey book on the Sherman in Allied use.

Scratch built loader's hatch with locking bayonet detail. Note the clip, on the right, holding it open as per the original.

Another close up highlighting the dust, I mean details.

Hard to focus on something tiny, loader's hatch locking hasp and casting marks. This is an Italeri M4A1 76mm turret converted to a later version with oval loader's hatch using Verlinden's Sherman book as inspiration.

Casting marks are correct for the part although this combination of foundries may not be found on an M4A2.

The gun sight has snapped, it needs replacement or I can call it battle damage.

Working Commander's hatch (which is a heavily reworked Tamiya item with the center rotated and lots of details added).

Other side...

Yep, still works.

Replicated the patch the original subject had.

Italeri PzKpfw IV muzzle brake becomes an American 76mm muzzle brake with details added. Again, idea taken form the Verlinden book.
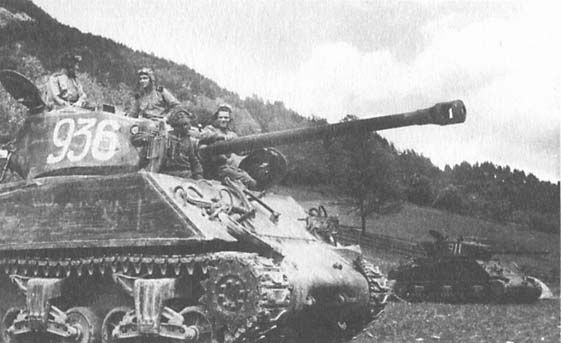
The original subject:
Looking at the images of the original she needs repairs, a new belly pan (M4A2 style), removal of the gun mantlet cover fasteners, new road wheels, and new tracks.
Regards,
The dust encrusted display tomb, I mean case...
ZipLoc bags so as not to lose any more pieces...
The interior is scratch built, the casting numbers are new and differently located than the Tamiya M4A3 it was based on.
The engine deck was converted based on Hunnicutt's book. A tarp strategically covers a slip of the knife boo boo.
Twisted wire chains for the fuel, water, and oil filler caps.
You can't see it but a new rear engine wall with exhausts was scratch built (sadly on a fully detailed M4A3 belly pan).
Close up of the side showing the skip welded sand skirt brackets, home resin cast road wheels (Verlinden later came out with an update set that included this type), threaded rods and different casting marks on the bogies.
Dilled out MG, MV lenses for head lights, studs on the MG cover ring, 'comb', and glacis converted to the later M4A2 (lifting loops outboard, rear view mirrors on brackets, etcetera).
Extreme close up shoes some unidentified Top Brass PE piece laying in the filler cap area.
Ignore the dust, it is a shelf queen after all and they don't clean themselves. Note the hasps and converted figure. He seems happy at the attention.
More casting marks and a fully detailed M4A3 belly but this is an M4A2.
Close up of the RO's hatch which broke off (since I made them all working).
Other side, I see glue marks from my repair decades ago.
Flimsy but working hinges gave way to hinges from the kit, sliced off and glued on.
I don't remember what this is, an antenna perhaps?
Hand painted markings and cast texture. Added the mantlet cover mounts but the subject didn't have them... I based my model on one image (the second shown below) which appeared in the Hunnicutt book and in Steven Zaloga's Osprey book on the Sherman in Allied use.
Scratch built loader's hatch with locking bayonet detail. Note the clip, on the right, holding it open as per the original.
Another close up highlighting the dust, I mean details.
Hard to focus on something tiny, loader's hatch locking hasp and casting marks. This is an Italeri M4A1 76mm turret converted to a later version with oval loader's hatch using Verlinden's Sherman book as inspiration.
Casting marks are correct for the part although this combination of foundries may not be found on an M4A2.
The gun sight has snapped, it needs replacement or I can call it battle damage.
Working Commander's hatch (which is a heavily reworked Tamiya item with the center rotated and lots of details added).
Other side...
Yep, still works.
Replicated the patch the original subject had.
Italeri PzKpfw IV muzzle brake becomes an American 76mm muzzle brake with details added. Again, idea taken form the Verlinden book.
The original subject:
Looking at the images of the original she needs repairs, a new belly pan (M4A2 style), removal of the gun mantlet cover fasteners, new road wheels, and new tracks.
Regards,
")


 I was never able to do that. I have fallen in love with the Archer stuff.


