• Modelers Alliance has updated the forum software on our website. We have migrated all post, content and user accounts but we could not migrate the passwords.
    This requires that you manually reset your password.
    Please click here, http://modelersalliance.org/forums/login to go to logon page and use the "Forgot your Password" option.

'Close Contact' Diorama (WIP)

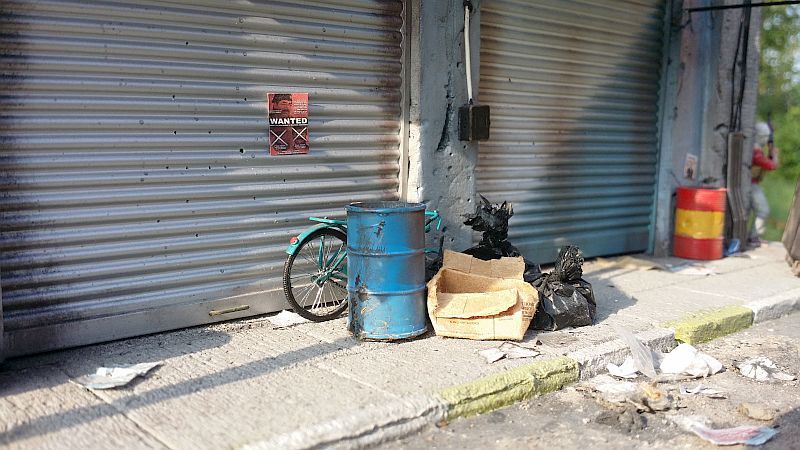
Very , very cool , I have been following this but I can't remember if you covered how you made the black garbage bags , ........... soooooo , how'd ya do them ?

Thanks. I made the trash bags using this method:

1. I cut a small piece of GLAD food rap plastic and cut it into the size I wanted; more like a square shape napkin.

2. Then I took some sugar( sand works fine too) and placed some in the center of the plastic.

3. I gently folded all four corners together then used a piece of thread to tie the plastic together.

4. Then I took a spray primer and sprayed the entire plastic. You might want to use a plastic type spray that is compatible with such materials. I did not have any on hand. So I just used a car primer spray can.

4. After it dried for an half hour to an hour, I took a black spray can( Tamiya Matt Black, but any will do, I guess) and spray the bags until I covered all areas except the bottom. This area will not be seen anyway. That's it. Instant trash bags.

I am a cheapo modeler. So O try and look for all cheap methods to building. That is why I decided to do this project. A special note. I have not been able to find a compatable spray that will stick to plastic wrap. There probably isn't but remember, it will flake so handle the bags with care or the paint with flake and fall off. Make sure you glue them in place after the paint has dried. It would be even better if you can find a plastic wrap already colored in black, if there are any please let me know.
 
Things have been going slow as I have been busy with work and my family. Also, I had not been so impress with the US paint job on the uniforms. So, I have renamed the dio and will discard the US figures altogether until I am satisfied with the results of my camo painting.I just do not want to bring the dio down just because the camo looks like a 3-year old had painted them. I am a somewhat of a perfectionist, in a way. Not to say that the insurgent figures are any better but they do not crave the complex camo design as that of the US figures do. I will add them eventually when I am totally satisfied with the results.
I have added a couple more details to the building and added a third insurgent figure and a kid. The new name of the dio will be called, '...around the corner'. Unfortunately it will be the insurgents that get the spot- lights on this dio. I have also decided to remove the pickup vehicle and replaced it with Diopark's new mercedes civilian car. I will be adding garbage bins, street lights and few other details. Will post pics shortly. Thanks for all the great support fellows. I do appreciate it
 
Ok, here are pics of the diorama, which name has been changed to "...around the corner". The dio is pretty much done for the exception of one more figure to be added. The last figure will be a boy pointing to the corner of the building, alerting the insurgents that they( us troops) are coming around the corner. I am in the process of painting the figure, so will add that when it is completed and will post the pics. 
 
As you can see there have been some changes and addition to the diorama. As mentioned in my previous post, the insurgents get the spotlight for this diorama. As I was not completly happy with the outcome of the US camo, I decided to put it aside until such time I can improve on it. So, I hope you can still find it in your heart to like the dio, regardless of the sudden change.
 
As you can see, the pick-up truck has been replaced with the new mecedes from Diopark. Not a bad kit. A big plus with this kit, is that the doors can be closed or open in real-time. That's right. You can have the option to keep it shut or if you so desire you can open them on demand. Two thumbs up for this little addition. The downside is, it is not so easy to put together ans glue the part that makes this to work. Not a kit for the beginner, I can tell you that. Lots of mistakes and mishaps trying to get the doors to work perfectly. Unfortunately I only succeeded having one door work( the passenge side) The rest were glue into their respective position. Als ogot to mention that you need lots of patience, something I am striving to maintain.
 
The next addition is the concrete canopy on the right. I simply used a piece of pink styroform and glued it in place and painted it a concrete color. No biggy there. I also added another canopy made of corrugated material. Made the bracing of some pieces of white styrene and glued that in place after painting it blue. I think the variation of these two objects adds a little spice to the dio.
 
I added a small sign which I took off the internet. That is in fact a pic of a real sign that one of the US soldiers were posting up. I just downloaded it and re-sized it in photoshop. I thought it was a cool sign.
 
As you can see I added another satilite dish and a mast for a antannae array on the top of the building. I was given a pic which showed many of these on one building alone but decided to limit the amount as I did not want to risk cluttering the diorama. 
 
I added another insurgent figure from Blast models. I hand bought it and saved it for a rainy day. I guess that rainy day came.
 
I included MIG street lights, which are pretty good. I also went ahead and bought a dumspter to place the garbage in it at the side of the building. All resin and are pretty good products. I thought it added life and variation. Variation is the key. But you all know that already.
 
Anyways, enjoy the pics and thanks for being patience and giving me tips to finally ( almost) bringing this project to a close.
 
Lots of pics!!!!
 
around_the_corner26_zpsde03f8be.jpg


around_the_corner25_zps86935c19.jpg


wide_angle_view_of_diorama_zps1308ba67.jpg
 
 
A masterpiece tiking :notworthy
I was afraid the Mercedes would not be as goodlooking as the truck, but it is (y)
Building, garbage, street, car, everything is fine !

Maybe give the backstraps on the guy with the green shirt a little more depth, they seem somehow shallow.
Maybe its the the light or photography, else a small pinwash should do the trick.

Compliments, willem

Thank you Willem for the tip. I will do that.
 
Finally added the US figures. Again. I am no figure builder. I still need lots of practice but I had to add them to give the dio a more atmospheric ambience. I had to remove the Merc due to a mishap but will add another vehicle when I get hold of one. Anyone knows where I can get a Datsun or similar model?

ccredux9_zps3cf1d500.jpg


ccredux6_zps850bad6e.jpg


ccredux5_zps548806e8.jpg


ccredux3_zps6d705671.jpg


ccredux2_zps9ca64bee.jpg


ccredux4_zpsf8b1b94b.jpg
 
Very convincing. The ground work, stone work all looks top notch! You got just enough clutter and trash laying about and it doesn't look overdone. Really diggin' this! (y)
 
Back
Top