
-
Modelers Alliance has updated the forum software on our website. We have migrated all post, content and user accounts but we could not migrate the passwords.
This requires that you manually reset your password.
Please click here, http://modelersalliance.org/forums/login to go to logon page and use the "Forgot your Password" option.
You are using an out of date browser. It may not display this or other websites correctly.
You should upgrade or use an alternative browser.
You should upgrade or use an alternative browser.
An unlikely escort
- Thread starter chrispisme
- Start date
a better modeller could do better I know.
I don't know how....
")
don't forget to dangle a few wires out.
chrispisme
Well-known member
Thanks for the kind words and encouragement!
Using what I learned (I do learn now and then) from the horizontal stab. work and from the great images supplied by Paul (Heavens Eagle) I have taken on framing the rudder to show the internal structure and eventually add ripped/ shredded fabric flapping in the wind behind it...eventually.


the... "progress" so far
Thanks for looking
Using what I learned (I do learn now and then) from the horizontal stab. work and from the great images supplied by Paul (Heavens Eagle) I have taken on framing the rudder to show the internal structure and eventually add ripped/ shredded fabric flapping in the wind behind it...eventually.
the... "progress" so far
Thanks for looking
Heavens Eagle
Well-known member
Thanks for the kind words and encouragement!
Using what I learned (I do learn now and then) from the horizontal stab. work and from the great images supplied by Paul (Heavens Eagle) I have taken on framing the rudder to show the internal structure and eventually add ripped/ shredded fabric flapping in the wind behind it...eventually.
the... "progress" so far
Thanks for looking
Always glad to share things I have found Chris. Even if it isn't exactly what you need it can give a good idea on what to do.
So far, so good! Keep up the good work!


chrispisme
Well-known member
Thanks guys! Very appreciated!!
The upper turtle deck I had been planning on putting a large battle damage hole in, is over 1/10 of an inch thick add to that the internal stringers and ribs and it's even thicker.
Dremel grinding damage will be easy to see, not like between ribs and stringers in the nose.
I tried forming a piece of .003" tin over it but the tin will not conform to the compound curves, even using split pieces. I thought about plunge or vacuum forming a copy but I'd lose all the rivet and panel line continuity.
Another idea was to mold and cast the section I want to damage with the top windows but cast it thinner than the kit part but, thinner means a visible difference in material that will be seen through the open area.
I thought I could drill bullet holes into the deck but that's not the effect I'm looking for.
I'll leave it a while and see if any inspiration hits.
meantime, kitchen type tinfoil as a stand-in for shredded canvas skin, flagging in the wind.

I made the framing removable so I could more easily detail/ paint the area.
Thank you for looking
The upper turtle deck I had been planning on putting a large battle damage hole in, is over 1/10 of an inch thick add to that the internal stringers and ribs and it's even thicker.
Dremel grinding damage will be easy to see, not like between ribs and stringers in the nose.
I tried forming a piece of .003" tin over it but the tin will not conform to the compound curves, even using split pieces. I thought about plunge or vacuum forming a copy but I'd lose all the rivet and panel line continuity.
Another idea was to mold and cast the section I want to damage with the top windows but cast it thinner than the kit part but, thinner means a visible difference in material that will be seen through the open area.
I thought I could drill bullet holes into the deck but that's not the effect I'm looking for.
I'll leave it a while and see if any inspiration hits.
meantime, kitchen type tinfoil as a stand-in for shredded canvas skin, flagging in the wind.
I made the framing removable so I could more easily detail/ paint the area.
Thank you for looking
That looks the part, really looks like fabric flying in the wind.
Heavens Eagle
Well-known member
Chris, I have a process for thinning down plastic parts from the inside. I used it on a couple of my builds, let me see if I have some photos that might help you.
To do it you need a "SHARP" 3/32 or 1/8 (max) drill bit and a decent drill press. If the press is sloppy you might have some problems as part of it depends on setting a precise depth of the plunge on the drill.
Now where are those photos.
Edit
OK, I found one, still not sure about any others at this point. This will probably scrunch down in posting so if you download the photo it "should" get you the larger pic.
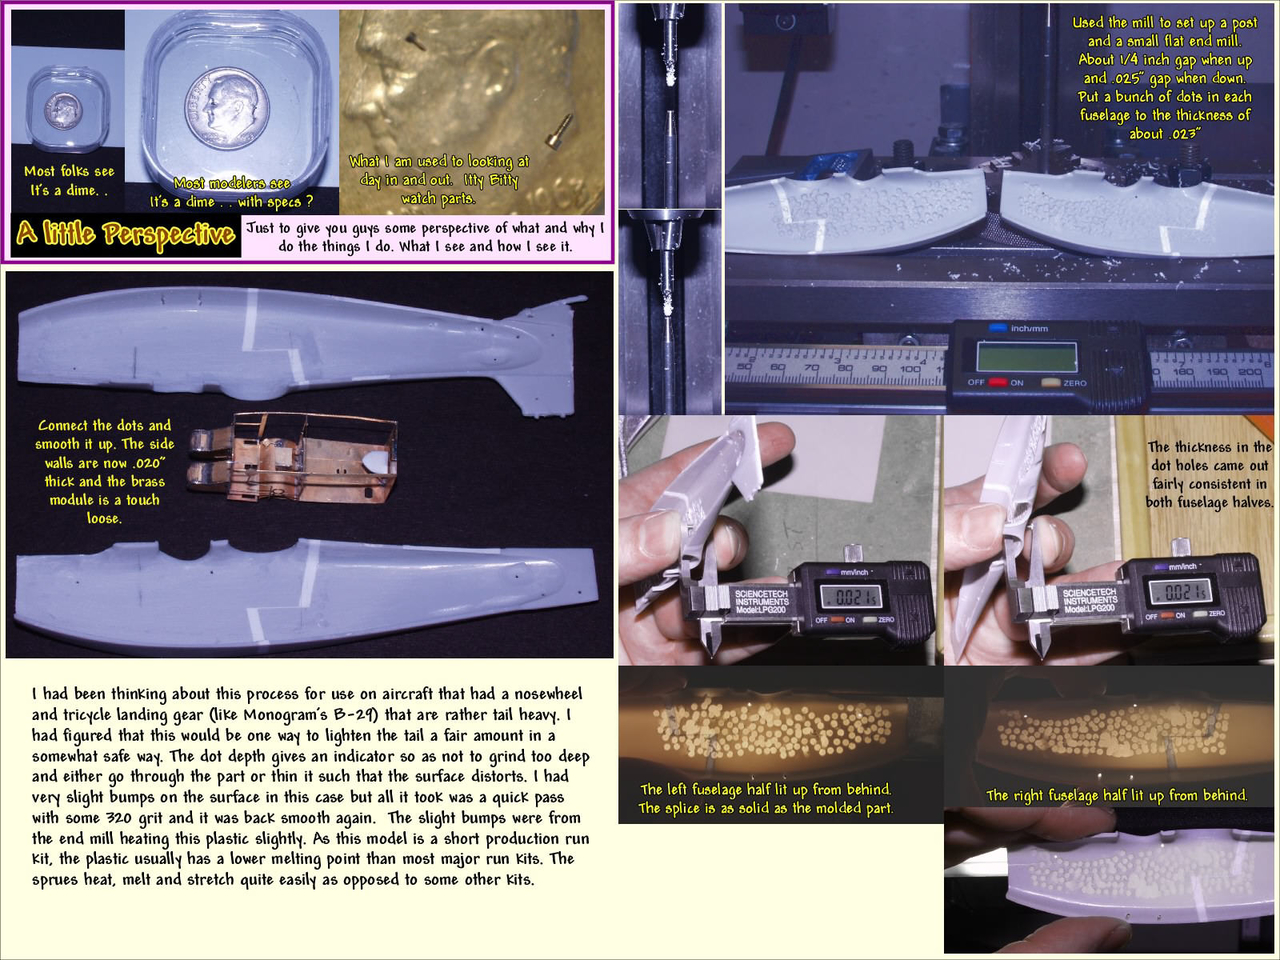
and after smoothing the inside and connecting the "dots" the sides were right at about .020 inches thick. That is 0.5mm for everyone else.
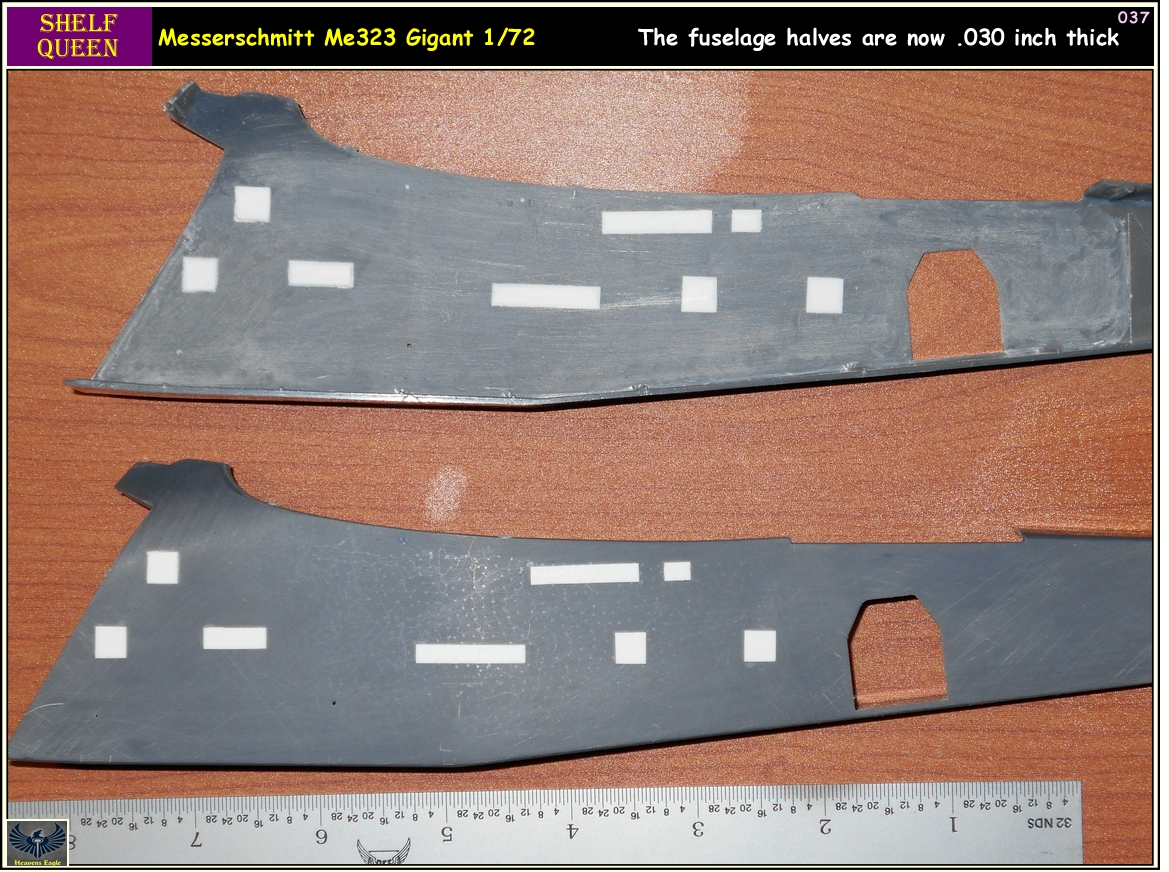
OK here are the other ones I did. This is a 1/72 Me323 (piece of garbage) The sides were wrong in so many ways. I also needed to thin them down. Here are before and after photos.
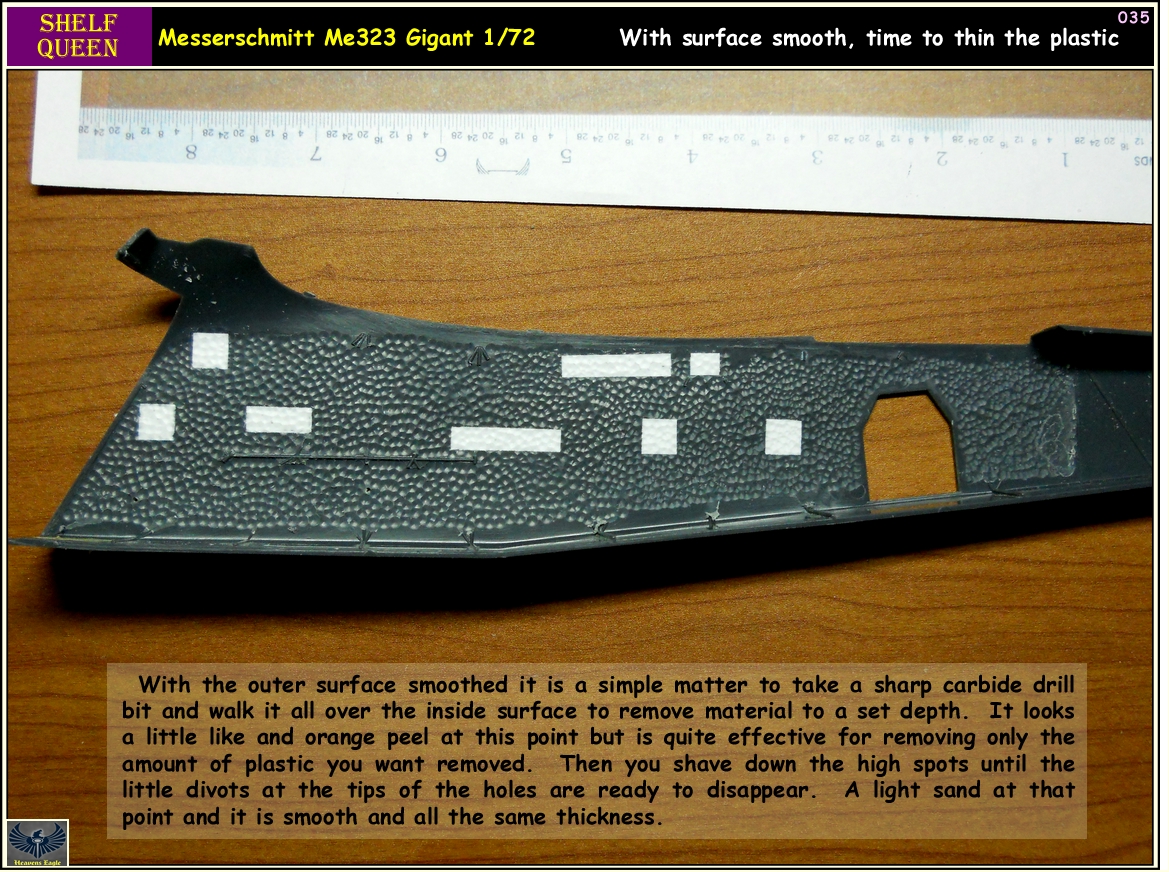
You can just see the little shiny spots where the underside support was located on the one piece. You have to take care with the set up and prep, but once it is fully locked in place this goes quick and easy.
To do it you need a "SHARP" 3/32 or 1/8 (max) drill bit and a decent drill press. If the press is sloppy you might have some problems as part of it depends on setting a precise depth of the plunge on the drill.
Now where are those photos.
Edit
OK, I found one, still not sure about any others at this point. This will probably scrunch down in posting so if you download the photo it "should" get you the larger pic.
and after smoothing the inside and connecting the "dots" the sides were right at about .020 inches thick. That is 0.5mm for everyone else.
OK here are the other ones I did. This is a 1/72 Me323 (piece of garbage) The sides were wrong in so many ways. I also needed to thin them down. Here are before and after photos.
You can just see the little shiny spots where the underside support was located on the one piece. You have to take care with the set up and prep, but once it is fully locked in place this goes quick and easy.
chrispisme
Well-known member
I get it...a little like a CNC machine but with a drill press....possibly
Thanks once again!
Thanks once again!
Duke Maddog
Well-known member
Oh this is really looking great! Can't wait to see more!
centaur567
Well-known member
Really nice!! Damp tissue paper might work for torn fabric. I use a dilute of water a white glue. After positioning let it dry and then paint it. Gary S. XXXXV XX XX
chrispisme
Well-known member
Thanks guys!
I'm still tinkering away at this monster. I lost 1/2 the ball turret somewhere (what happens when I jump around in the build sequence I guess) and had to make a new one, not a big deal, I borrowed one from a stash kit and made a copy. So, long story short, the ball turret is together and work is still moving along.


and fitting out the L/G as well now


Thanks for looking
I'm still tinkering away at this monster. I lost 1/2 the ball turret somewhere (what happens when I jump around in the build sequence I guess) and had to make a new one, not a big deal, I borrowed one from a stash kit and made a copy. So, long story short, the ball turret is together and work is still moving along.
and fitting out the L/G as well now
Thanks for looking
I could not imagine sitting in one of those things...for that manner, fitting in one.
Looks good Chris
Looks good Chris

Tankbuilder
Active member
Thus far it looks as if when this is finished it'd be worth placing in an aviation museum.
Cheers
Cheers
chrispisme
Well-known member
Thank you very much!
very kind!!
very kind!!