
-
Modelers Alliance has updated the forum software on our website. We have migrated all post, content and user accounts but we could not migrate the passwords.
This requires that you manually reset your password.
Please click here, http://modelersalliance.org/forums/login to go to logon page and use the "Forgot your Password" option.
You are using an out of date browser. It may not display this or other websites correctly.
You should upgrade or use an alternative browser.
You should upgrade or use an alternative browser.
American Southwest, Circa 1876, Sioux Warriors vs US 7th Cavalry
- Thread starter Steve Ski
- Start date
Huh?Some ears would be useful")

Steve Ski
Well-known member
Right O, mate! I removed all straps minus the halters last night, clean and smooth.The aforementioned breast collar which I don't see on your rendition.
View attachment 186520
Huh?Some ears would be useful
Ditto!Huh?
Yall are lucky over yonder across the pond. It must be a regional thing, or we gotz mutants, cause our ponies ears are only an inch or two. Must be the cold weather, the done got frozed off.Horses over here have ears.

Huh??
Guess if I have to explain it...
Git'er done Steve!
Guess if I have to explain it...
Git'er done Steve!

Steve Ski
Well-known member
Looks like ya got me beat

Steve Ski
Well-known member
Learning the Anatomy of a Big Dog
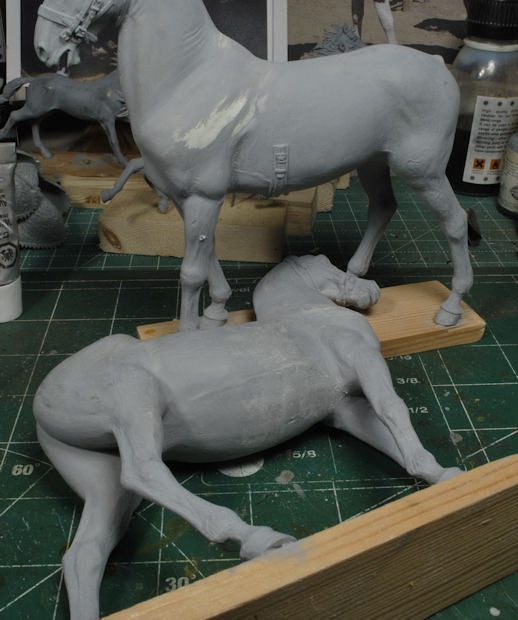
For me, this is where the fun begins, learning the anatomy of a Big Dog, or pony, if you prefer. Having never done one it was awesome that Saul sent these two. The bigger the better, as far as I’m concerned, especially when learning a new skill set. But before I got too carried away, I had to remove those molded saddle straps. I want a clean canvas to learn on with minimal disruption to my brush flow.
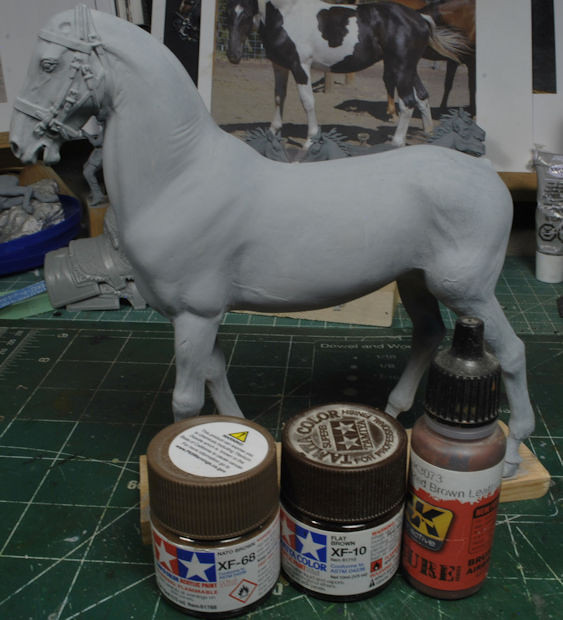
With the straps removed and the underside sanded smooth I laid out the basic colors for airbrushing. I was going to attempt to airbrush the shadows and highlights for the initial base but decided against it. My AB skills are pretty weak, so why push a bad situation, just go with what works. Besides, I’m trying to learn Big Dogs right now, not AB proficiency. However, when I do attempt to AB the second one, I have a few basic Tamiya colors ready. I was itching to get my oils warmed up and my brushes wet, it’s been way too long.
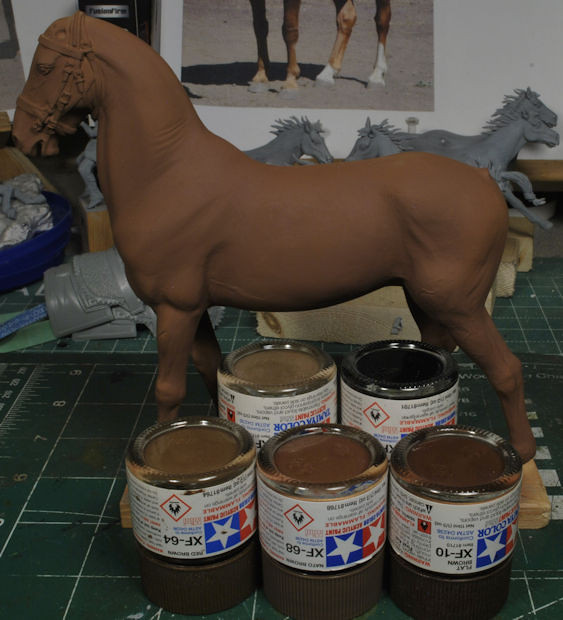
Since Mr. Nash, the Mustang, has a darker Chestnut color to him, I gave the pony a full coat of Tamiya XF-68 Nato Brown. It was the closest color tone to what I could see in the high-res photos. The shading and highlighting would be taken care of with the oils. After the base tone had been applied I prepped my pallet with the most common basic oil colors, then added Burnt Umber, Raw Umber, and Burnt Sienna, all Windsor & Newton.
I began by giving the figure a mild wash of Brunt Sienna in all the recesses and feathered out working the hind leg and belly area first. Then I added darker oils to the recesses and left the highlights for later. I kept the workspace small initially until I got the flow pattern figured out. Once I had my method of madness, I gradually expanded the workspace and fanned out towards the base of the neck. The only issue I found, after adding shadows and some basic highlights, was the slight oil build-up, which occurred the following day. Yes, I know, this is very common when working with oils in such a large area, but I’ll take that any day over constant layering of acrylics. The blending aspects of oils are just too dang crucial for me and working a little build-up ain’t nuthin but a thang. Just so ya know, it was a minor issue, not too difficult to remedy.
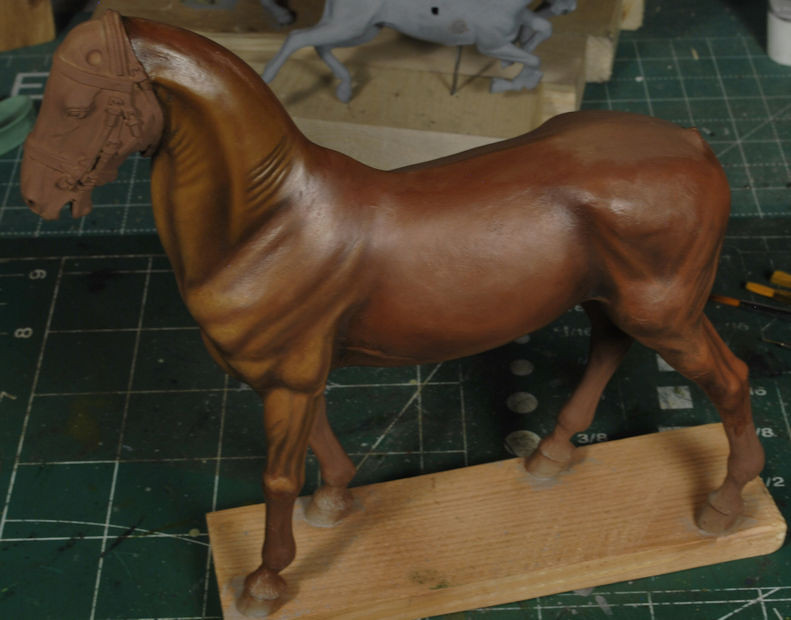
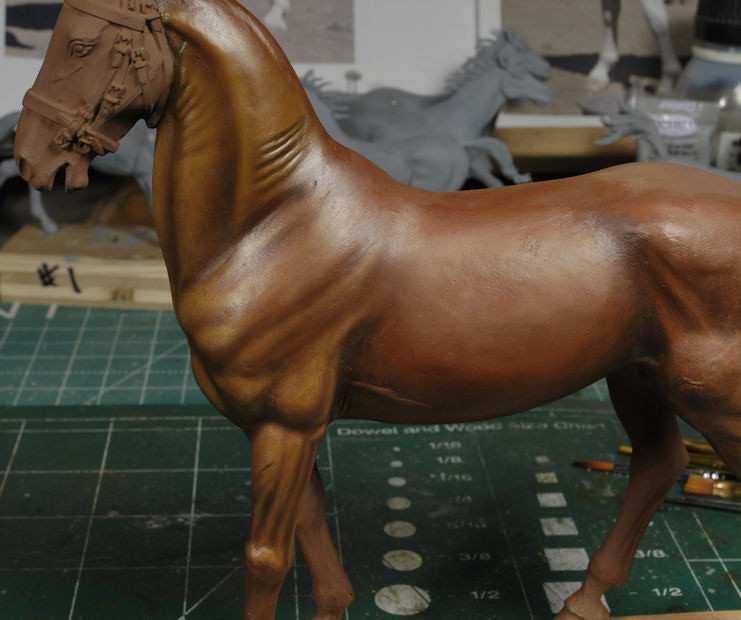
For those of you that do work oils you know that starting from where you left off and getting any blending properties can be a trick at times, so I just added a very thin wash of Burnt Sienna on top of the already set area and continued on. Getting the highlights to match what I see in the photos is still a bit of a challenge, but I’ll get that figured out. We’re still in the learning stages of this anatomy, and if it all goes south, I’ve got my trusty Oven Cleaner handy. It wouldn’t be the first time, lol.
Here’s some angled shots for a closer look at the muscle structure that appears to be well sculpted. You may also notice in these two photos the tonal difference between the front quarter and the hind quarter. I started to highlight the front qtr. with a tough of yellow in the mix to bring out the variations on Nash’s coat. This is by far not close to his natural color, but we’re working towards that. I’ve got nothing but time to get this figured out and if that means starting over, the learning curve will only get smaller, and my skill set will increase. It’s only a matter of practice, right?
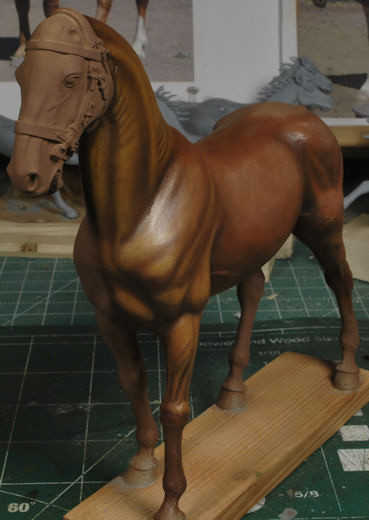
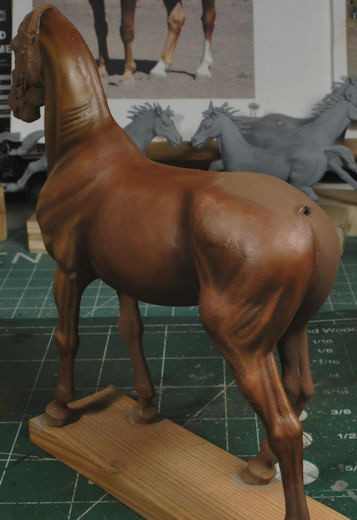
Below is a closer look at the muscle structure of this sculpt. This is giving me an opportunity to really bring out the sculpted features of the chest and front leg. Now that I’ve just gotten into this, I’m wondering why I was so hesitant in the first place. Painting Big Dogs is turning out to be fun!
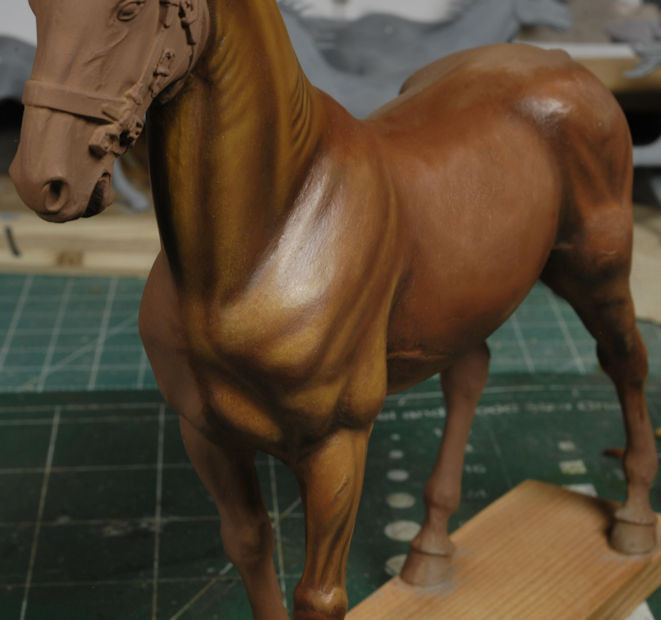
As you can see, by comparison, I still have a long way to go to get these tones correct and that yellowish tone is drifting, yet again, away from my intended result. Earlier I did run a lighter tone, more towards the reddish spectrum with Burnt Sienna and Titanium White, but it was drifting in the wrong direction as well. So, matching those high-res photos, getting the color tones just right, the lighter shinny area in particular, is proving evasive to my pallet right now. Remembering the muscle structure differences between Nash and this kit pony is very important. I won’t be able to get an exact copy, but I want it as close as possible. If any of you fellow Big Dog painters feel like chiming in on these tones, or anything you see needing attention, I’m all ears. Yall know this stuff way more than I do, and I always appreciate the assistance, this is how we learn.
More to follow soon and thanks for watchin, all comments welcome. Cheers, Ski.
P.S. That second Big Dog will be rendered as a “paint.” My daughter would kill me if I didn’t try to work in her pony, “Story.”
For me, this is where the fun begins, learning the anatomy of a Big Dog, or pony, if you prefer. Having never done one it was awesome that Saul sent these two. The bigger the better, as far as I’m concerned, especially when learning a new skill set. But before I got too carried away, I had to remove those molded saddle straps. I want a clean canvas to learn on with minimal disruption to my brush flow.
With the straps removed and the underside sanded smooth I laid out the basic colors for airbrushing. I was going to attempt to airbrush the shadows and highlights for the initial base but decided against it. My AB skills are pretty weak, so why push a bad situation, just go with what works. Besides, I’m trying to learn Big Dogs right now, not AB proficiency. However, when I do attempt to AB the second one, I have a few basic Tamiya colors ready. I was itching to get my oils warmed up and my brushes wet, it’s been way too long.
Since Mr. Nash, the Mustang, has a darker Chestnut color to him, I gave the pony a full coat of Tamiya XF-68 Nato Brown. It was the closest color tone to what I could see in the high-res photos. The shading and highlighting would be taken care of with the oils. After the base tone had been applied I prepped my pallet with the most common basic oil colors, then added Burnt Umber, Raw Umber, and Burnt Sienna, all Windsor & Newton.
I began by giving the figure a mild wash of Brunt Sienna in all the recesses and feathered out working the hind leg and belly area first. Then I added darker oils to the recesses and left the highlights for later. I kept the workspace small initially until I got the flow pattern figured out. Once I had my method of madness, I gradually expanded the workspace and fanned out towards the base of the neck. The only issue I found, after adding shadows and some basic highlights, was the slight oil build-up, which occurred the following day. Yes, I know, this is very common when working with oils in such a large area, but I’ll take that any day over constant layering of acrylics. The blending aspects of oils are just too dang crucial for me and working a little build-up ain’t nuthin but a thang. Just so ya know, it was a minor issue, not too difficult to remedy.
For those of you that do work oils you know that starting from where you left off and getting any blending properties can be a trick at times, so I just added a very thin wash of Burnt Sienna on top of the already set area and continued on. Getting the highlights to match what I see in the photos is still a bit of a challenge, but I’ll get that figured out. We’re still in the learning stages of this anatomy, and if it all goes south, I’ve got my trusty Oven Cleaner handy. It wouldn’t be the first time, lol.
Here’s some angled shots for a closer look at the muscle structure that appears to be well sculpted. You may also notice in these two photos the tonal difference between the front quarter and the hind quarter. I started to highlight the front qtr. with a tough of yellow in the mix to bring out the variations on Nash’s coat. This is by far not close to his natural color, but we’re working towards that. I’ve got nothing but time to get this figured out and if that means starting over, the learning curve will only get smaller, and my skill set will increase. It’s only a matter of practice, right?
Below is a closer look at the muscle structure of this sculpt. This is giving me an opportunity to really bring out the sculpted features of the chest and front leg. Now that I’ve just gotten into this, I’m wondering why I was so hesitant in the first place. Painting Big Dogs is turning out to be fun!
As you can see, by comparison, I still have a long way to go to get these tones correct and that yellowish tone is drifting, yet again, away from my intended result. Earlier I did run a lighter tone, more towards the reddish spectrum with Burnt Sienna and Titanium White, but it was drifting in the wrong direction as well. So, matching those high-res photos, getting the color tones just right, the lighter shinny area in particular, is proving evasive to my pallet right now. Remembering the muscle structure differences between Nash and this kit pony is very important. I won’t be able to get an exact copy, but I want it as close as possible. If any of you fellow Big Dog painters feel like chiming in on these tones, or anything you see needing attention, I’m all ears. Yall know this stuff way more than I do, and I always appreciate the assistance, this is how we learn.
More to follow soon and thanks for watchin, all comments welcome. Cheers, Ski.
P.S. That second Big Dog will be rendered as a “paint.” My daughter would kill me if I didn’t try to work in her pony, “Story.”

This is going to turn out great!
Steve Ski
Well-known member
No worries, Saul, your secret is safe with us, Brother. P.S. Is that check in the mail yet?@Steve Ski, I just realized that you and @Rhino have seen my seam work up close and personal!
View attachment 186763
Tanks, Chris, I was kinda hopin so, HA!Mmm. Him look like real Big Dog.
MP, you are too kind. Tanks, Amigo!
This is going to turn out great!
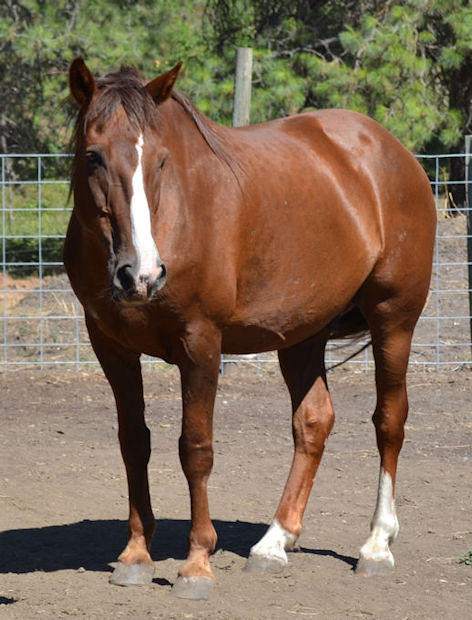
Jim Stewart's horse Pie.
I was able to find this via google.
I was able to find this via google.
jknaus
Administrator
If you curse the slow drying time with oils, I bought a small crock pot. Put card board in the bottom and then place your fig in. Put the heat on low and put a wooden spoon or if its an oval crock pot turn the lid so it does not get too hot inside. Will dry the oils over night.
I did find this gizmo on Amazon but have not yet tried it.

Loving the horse, really nailing the skin tone.
JAmes
I did find this gizmo on Amazon but have not yet tried it.
Loving the horse, really nailing the skin tone.
JAmes
Steve Ski
Well-known member
Will you do famous horses, for the fun of it? Hidalgo, John Wayne's Dollar. Annie Oakley's Target?
Yall are gettin too far ahead of the chicken, the egg ain't hatched yet, HA! I've seen some incredible Big Dog sets, with riders, very impressive sculpt and action work, over in the figure section at Planetfigure, those would be my next move if I plan on taking this further. But, ya never know, stranger things have happened.Jim Stewart's horse Pie.
I was able to find this via google.
Steve Ski
Well-known member
Thanks, James. I've heard and seen a few guys utilize some type of dryer, but I never have used one. After all these years I've learned to work around it to the point it no longer is an issue. I also use plain old paint thinner with my oils. To some that may seem ludacris, but it does shorten the drying time. I don't even use additives like I've seen some do. That does look like a very handy dryer though.If you curse the slow drying time with oils, I bought a small crock pot. Put card board in the bottom and then place your fig in. Put the heat on low and put a wooden spoon or if its an oval crock pot turn the lid so it does not get too hot inside. Will dry the oils over night.
I did find this gizmo on Amazon but have not yet tried it.
Loving the horse, really nailing the skin tone.
JAmes
jknaus
Administrator
Not ludicrous at all. I dont use additives either and just mineral spirits. Looking forward to more.Thanks, James. I've heard and seen a few guys utilize some type of dryer, but I never have used one. After all these years I've learned to work around it to the point it no longer is an issue. I also use plain old paint thinner with my oils. To some that may seem ludacris, but it does shorten the drying time. I don't even use additives like I've seen some do. That does look like a very handy dryer though.
James
Brokeneagle
Master at Arms
That finish is coming up excellent! Looking forward to the finished product as I think it will look spectacular.
Similar threads
- Replies
- 104
- Views
- 22K
- Replies
- 54
- Views
- 11K
- Replies
- 41
- Views
- 8K