• Modelers Alliance has updated the forum software on our website. We have migrated all post, content and user accounts but we could not migrate the passwords.
    This requires that you manually reset your password.
    Please click here, http://modelersalliance.org/forums/login to go to logon page and use the "Forgot your Password" option.

All Righty ... What's on the bench today?

In the past couple of weeks doing 5 minutes here or there I have achieved very little. Still working on the cockpit.

DSC06729.JPG


DSC06730.JPG


DSC06735.JPG


A buddy showed me a neat little tool for making eyelets and so I built one. Using a spring from a pen and a dowel.

DSC06737.JPG


Kind of hard to see I know.

I used 36 gauge nichrome wire to make the eyelets rather than copper. Its very easy to use and very strong. I got it here http://jacobs-online.biz/nichrome_wire.htm p/n NW36500. I got 1000 feet and my buddy figures that should be good for 5000 eyelets or so. You might be able to see them on the rudder bar.
I was hoping to do more as I got home from work early yesterday, but I got a call from my son needing to be picked up in Edmonton International airport. So 1400 we left and 0015ish we got back and today I am paying for a day of work and then a long trip. Lots of black ice but at around -26 C thats to be expected.
Maybe tomorrow I'll feel a bit better to build.

Kind of hard to see but I used Bronco half wing nuts to make the switched.

switch.png


James
 
The counter to Dave's challenge.
DSCF2119.JPG


Also found some little Sterilite drawer storage units and set them up at the bench. Started clearing, stashing, and reclaiming work space. :bat
 
Looking good Terry! Nice details!

Bob, here's something else to be jealous of....

Here's my work from the last couple weeks.


I'll start with the Leopold Rail Gun. I assembled the lifting apparatus inside the hull of the thing as shown here:

WIP_CTA_III_Leopold_Railgun_V.jpg


Later, I also assembled the main ammo box/crane system with the little ammo cart:

WIP_CTA_III_Leopold_Railgun_VI.jpg


I know, I'm kinda working backwards on this, but I want to get the simpler things done first before I have to build and line up all the wheels for this.

Moving on, I assembled the engine for the Pershing II tractor. It was a lot smaller than I thought, as indicated by the Exacto blade:

WIP_Pershing_II_MIssile_System_X.jpg


Here it is installed on the main chassis, along with the bits and bobs for this side of the chassis:

WIP_Pershing_II_MIssile_System_XI.jpg


Afterward, I added all the bits and bobs to the other side of the chassis:

WIP_Pershing_II_MIssile_System_XII.jpg


Still a lot more to add to this, but it's going to go much easier now.... I hope.

Oh, in all the above pics the cab is only dry-fit on the chassis to make sure I have everything lined up properly.


After that, I decided to make another leap of faith. I had ordered a replacement part for my SMERCH so I could move on with this. Trusting that Modelcollect would come through; and inspired by another gentleman named Graham who is also building this, I went ahead and continued to work on this model.

First, as per Graham's advice, I assembled all the parts that go inside the two chassis rails, starting with the engine and radiator:

WIP_SMERCH_III.jpg


After that I also built all the other parts (transmission covers/differentials, etc). Here you can see them all lined up according to where they are supposed to go:

WIP_SMERCH_IV.jpg


After fighting this model for another half hour, I manged to get the entire chassis assembled, sans wheels on one side:

WIP_SMERCH_V.jpg


Since the replacement part hadn't arrived yet, I figured that I'd tackle the rocket tubes. I had already taken all the half pieces and assembled them together, so now it was time to mount them on their respective frames. Here you see the first two sets of tubes installed on the frames:

WIP_SMERCH_VI.jpg


You can see one was fired off already; I had lost the nose cone that was supposed to go inside there.


Here is the entire rocket set fully assembled:

WIP_SMERCH_VII.jpg


Now I have to assemble and install the lifting apparatus for these tubes.

Finally Modelcollect came through and in a BIG way! I had asked for one part as indicated by the arrow. They sent me all THIS:

WIP_SMERCH_VIII.jpg


Now I was able to complete the chassis on this model! I promptly went to work building all the remaining axles and installing them on the chassis. First one side (which had already been done):

WIP_SMERCH_IX.jpg


Then the other one with the all new parts:

WIP_SMERCH_X.jpg


You can see I also added the fuel tanks(?) and other bits and bobs too.

That's all I got done for now before life closed in again. At least I have all my Christmas cards mailed, bills paid, and now I can concentrate on finishing up my job I'm doing. I may not even get back to the bench before the end of the year, but stay tuned; one never knows.....
 
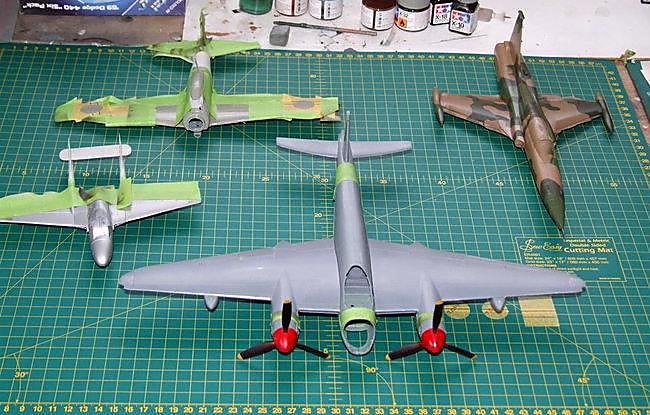
Don't usually post in this thread, but the kids are in the pool, the sun is out so...

h52e19a7.jpg


You've seen the Vampire, F-5 & A6M, the Mozzie came back to the bench just last night after a three year 'hiatus'. WiP thread for that probably after we get back from Europe in February. Vampire & Zero threads will be updated later today.

Ian.
 
Really nice Sherman Terry!

My local club is doing a quick build in honour of a member that passed away a few years ago.

This is what I'm building!


I got in a bit of time this week here and there. Yesterday was pretty good as
i got the seat done. Any thoughts on it?

DSC06742.JPG


DSC06743.JPG


DSC06744.JPG


DSC06745.JPG


DSC06746.JPG


DSC06747.JPG


DSC06748.JPG


DSC06749.JPG


James
 
Back
Top