
-
Modelers Alliance has updated the forum software on our website. We have migrated all post, content and user accounts but we could not migrate the passwords.
This requires that you manually reset your password.
Please click here, http://modelersalliance.org/forums/login to go to logon page and use the "Forgot your Password" option.
You are using an out of date browser. It may not display this or other websites correctly.
You should upgrade or use an alternative browser.
You should upgrade or use an alternative browser.
A Baltimore Clipper Build, this will take awhile..
- Thread starter Tim A.
- Start date
randy_ditton
Master at Arms
Hi Tim, The coloring looks AWESOME 
Randy
Randy
Sherman 18
Master at Arms
Great job painting!
Tim A.
Well-known member
Thanks Sherman :v
Heres a couple of update pics. As I mentioned there was not enough belaying pins for all the lines of the ship. I've made new ones ( 70 plus) by turning toothpics in the Dremel using a half round needle file. they measure about 8mm long. of course they are not perfect but will work.
I've also made the two mast's pin rails. They were a bit tricky as the front support posts for each has to be set same amount of degree angle as the masts but the rails holding the belaying pins must be level with the deck line. This type of Clipper ship had a lot of rake to thier masts. I decided to turn the rear posts on them for the heck of it")
Btw... the phrase - " I'll follow it to the bitter end" comes from the old sailing days. One loop of an anchor cable around the riding bitt was called a bitter, the rest of the cable coiled on deck was called the bitter end!
Tim


Heres a couple of update pics. As I mentioned there was not enough belaying pins for all the lines of the ship. I've made new ones ( 70 plus) by turning toothpics in the Dremel using a half round needle file. they measure about 8mm long. of course they are not perfect but will work.
I've also made the two mast's pin rails. They were a bit tricky as the front support posts for each has to be set same amount of degree angle as the masts but the rails holding the belaying pins must be level with the deck line. This type of Clipper ship had a lot of rake to thier masts. I decided to turn the rear posts on them for the heck of it
Btw... the phrase - " I'll follow it to the bitter end" comes from the old sailing days. One loop of an anchor cable around the riding bitt was called a bitter, the rest of the cable coiled on deck was called the bitter end!
Tim
Just beautiful Tim,
Very impressive.
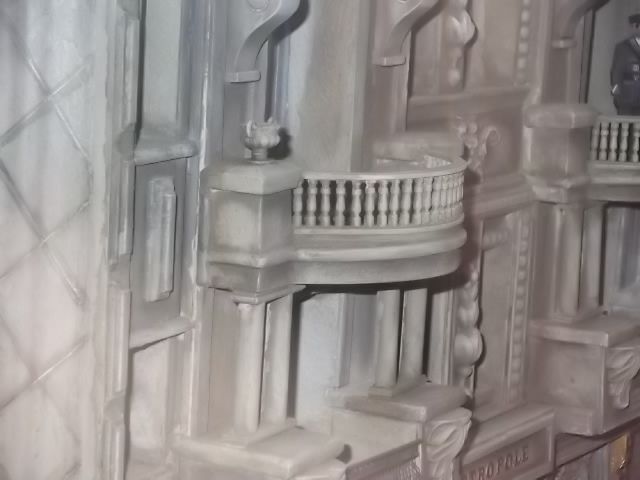
AS an aside, you are the first modeler to turn toothpicks like that I have known. I started doing that back in the late seventies, using them for concrete or marble railing on exterior balcony rails on buildings. See below.
You know what they say about great minds. :gogo Just thought you would be interested.
Bob
Very impressive.
AS an aside, you are the first modeler to turn toothpicks like that I have known. I started doing that back in the late seventies, using them for concrete or marble railing on exterior balcony rails on buildings. See below.
You know what they say about great minds. :gogo Just thought you would be interested.
Bob

Tim, fantastic work. I'm just getting introduced to your project and way back on page 1 you mention using station templates, how do you use these to shape a hull which has already been cut? Plz forgive the beginner question but have very little experience with wooden ships. Thanks Pat
Tim A.
Well-known member
Tim, fantastic work. I'm just getting introduced to your project and way back on page 1 you mention using station templates, how do you use these to shape a hull which has already been cut? Plz forgive the beginner question but have very little experience with wooden ships. Thanks Pat
Hi Pat and welcome aboard :v
On a plank on bulkhead type model the bulkheads that the planks are attached to forming the hull are already cut to the final shape of
the hull. The solid hull method has to have "guides" to help get the hull to it's final shape because the block of wood is just roughed into shape so there is still work to do. It's called fairing the hull and it's done by using station templates. There are two drawings on ship plans that tell you what their shape is and where they go on the hull, the Body plan & Sheer Plan (see the pics). The body plan is a drawing of the ship's hull lines. Each one of the vertical lines (numbered 1 thru 9 on this ship) is called a station. each station line is traced and transfered onto something stiff like posterboard. Then using an exacto the different shapes are cut. You'll end up with 9 seperate templates for this ship. To determine where each goes on the hull you use whats called the Sheer Plan. You can pencil mark each station's location on the hull's top and near the keel to line each template up on. The idea is to carve and sand till the hull's shape matches the station templates when they are held against it.
I hope I didn't guide you into muddy waters :huh:

Tim

Tim

Tim A.
Well-known member
Thanks Mike :v
Yep Pat, each plan is drawn to scale. Most all set of ship's plans have actually three main drawings, The Body plan, Sheer plan and Half breadth. What I did with this hull to mark the locations of the stations lay the hull against the Sheer plan.
An interesting side note, most ships of this time were built without plans at all. :hmmm
Tim
phantom II
Master at Arms
Hey Tim , good to see you post some more. Marvelous update as always .
Curious about turning pieces with a Dremmel . That looks like a flex shaft to me. Mine has some up and down play in it . Does your ?
I have nothing to compare mine with.
Cheers, Christian B)
Curious about turning pieces with a Dremmel . That looks like a flex shaft to me. Mine has some up and down play in it . Does your ?
I have nothing to compare mine with.
Cheers, Christian B)
An interesting side note, most ships of this time were built without plans at all. :hmmm
Tim
This would make for a real challenge. Was the hull way off before you started sanding? I'm also wondering, are using hand sanding, dremel attachments or detail sander? Or maybe a combo of all the above.
I guess historical societies do some real nice work drawing plans of older ships. Do you have any links to a set of plans for a lumber schooner perhaps? Thanks for all your help. Pat
Tim A.
Well-known member
The hull I'm working on was very rough and had to remove quite a bit in certain areas. Especially the bulwarks, they are thick to protect from shipping damage. I used a combination of technique's to get the hull right. A dremel is a must.
Don't know of any plan links but looking up Steve Priske may be a good starting point. He is an expert and historian on clippers & west coast Schooners as well as a model shipwrite. He has several how to video's on youtube.
Tim
Don't know of any plan links but looking up Steve Priske may be a good starting point. He is an expert and historian on clippers & west coast Schooners as well as a model shipwrite. He has several how to video's on youtube.
Tim
 ....
....