
-
Modelers Alliance has updated the forum software on our website. We have migrated all post, content and user accounts but we could not migrate the passwords.
This requires that you manually reset your password.
Please click here, http://modelersalliance.org/forums/login to go to logon page and use the "Forgot your Password" option.
You are using an out of date browser. It may not display this or other websites correctly.
You should upgrade or use an alternative browser.
You should upgrade or use an alternative browser.
1/700 Confederate Raiders CSS Alabama, CSS Florida
- Thread starter Rhino
- Start date


Looks swell Chris, reminds me of the profile plates you see in the books and whatnot.
Rhino
Super Moderator


"All Hands! Make Sail!" I make the headsails in a plastic lid. It flexes to slide the sail under the line and c/a glue peels up easily!
I considered making a scan of all the sails for each ship to make them simpler to size and fit to the model. It is too late for Roger B. Taney.
I put her together.

While I was mucking about with sails, booms and yardarms, Teresa womped me up a new parking spot for my spectacles. Cute, No?
Thanks again for looking in!


Rhino
Super Moderator


CSS Alabama shown here with every rag on she'll carry! Some additional rigging was done to make her look more the part. Installing the bridge ladders was a bit cumbersome at this stage. Of all the things that get bumped and need repair while setting sails and rigging, the bridge and smokestack are not among them. I couldn't get a good angle to glue on the tiny ratlines on the foremast platform yet. Yet!
This was fun! Boats, anchors, flag will finish this build. There is still touch-up to do.
Alabama is the warm-up for the crown jewel of the sailing ship trifecta, CSS Florida.

CSS Florida got the rest of her guns today. She will be ready to "dress" pretty soon! She's carrying 12 pound rifled guns forward and 9-pounders aft. Very large teeth indeed!
Thanks again for looking in!


Last edited:
Wow! Lovely lines and shapes. Go Chris go!! 
Rhino
Super Moderator
This is an addendum to my TLAR Mast and Sail tutorial.

After you cut out the size sail you wish for, hold the rod you want in a pair of self-closing tweezers. Slip the sail into the tweezers so it just touches the boom (in this case) and using a needle or a broken #78 drill bit, like mine, but a bit of c/a glue on to the boom and touch the sail to it.

Continue applying tiny droplets of c/a glue until it spans the length of the boom, taking care not to glue your tweezers to the copper rod.
TIP: Don't worry about getting glue on the sail and making it shiny. There is an old model ship trick to fix that!
Reverse your sail and put the sail on the gaff yardarm on the top using the same technique.

Trim your gaff and boom to fit the sail, being extra careful to make these flat where they will meet the mast. This is where I attach the diagonal line from the gaff to to the long end of the boom. A tiny dab of c/a on the boom and lay the INFINI lyrca line on it. Pull it straight, add another tiny drop of c/a on the mast end of the gaff boom and slide the INFINI into the c/a.
Once you tack the line in place, you can add more c/a to secure it and trim the tails of the left-over line.
Take care not to pull the lycra line too tight. It has enough strength to curl the sail and make your assembly difficult to install on the mast.
Voila'! You have made a sail to be proud of!! It isn't necromancy. No need to sell your soul to accomplish this! You will need thin c/a glue, a broken micro-drill bit or needle stuck in a pencil eraser to apply glue, a bottle cap, and I recommend Cap Holder-O-Matic.
An Opti visor or a set of 150 readers, good lighting and music are essential to be able to do this small scale work.
No other special magical skills are needed. If I can do it, anybody can. I DO get a lot more practice than most ship modelers do.
Use this same tweezer technique to put the topsails on the top and gallant yardarms.
What is the old model ship trick? Oh Hell, I almost forgot!
Using a small paint brush GENTLY paint/dab all the shiny C/A glue spots with clear flat. I use Testors Dullcote, that you can still buy at Hobby Lobby here in Iowa. Robert's your Uncle, Fanny's your Aunt, You're a sailing ship modeler!


A rare photo of a nekkid CSS Florida shows off the angle of her gaff booms. My first set of mainsails were inaccurate. These are much better!

This is where I am going with my 1/700 CSS Florida model. She'll be beautiful! Deadly and swift. Yankee sailors, beware!
Lessons learned from CSS Alabama:
Install the upper ratlines on the upper foremast platform before attaching any foretopsails.
It would be handy to leave the leeward side ratlines off to aid rigging and sail installation but they are needed for mast rigidity.
Laying sail assemblies on the curve of a big sharpie marker and brushing them with Future and Tamiya thinner makes for sails that better hold their shape. Be careful not to soak the INFINI elastic thread or it stops being stretchy.
That will do for now!
Thanks again for looking in!
After you cut out the size sail you wish for, hold the rod you want in a pair of self-closing tweezers. Slip the sail into the tweezers so it just touches the boom (in this case) and using a needle or a broken #78 drill bit, like mine, but a bit of c/a glue on to the boom and touch the sail to it.
Continue applying tiny droplets of c/a glue until it spans the length of the boom, taking care not to glue your tweezers to the copper rod.
TIP: Don't worry about getting glue on the sail and making it shiny. There is an old model ship trick to fix that!
Reverse your sail and put the sail on the gaff yardarm on the top using the same technique.
Trim your gaff and boom to fit the sail, being extra careful to make these flat where they will meet the mast. This is where I attach the diagonal line from the gaff to to the long end of the boom. A tiny dab of c/a on the boom and lay the INFINI lyrca line on it. Pull it straight, add another tiny drop of c/a on the mast end of the gaff boom and slide the INFINI into the c/a.
Once you tack the line in place, you can add more c/a to secure it and trim the tails of the left-over line.
Take care not to pull the lycra line too tight. It has enough strength to curl the sail and make your assembly difficult to install on the mast.
Voila'! You have made a sail to be proud of!! It isn't necromancy. No need to sell your soul to accomplish this! You will need thin c/a glue, a broken micro-drill bit or needle stuck in a pencil eraser to apply glue, a bottle cap, and I recommend Cap Holder-O-Matic.
An Opti visor or a set of 150 readers, good lighting and music are essential to be able to do this small scale work.
No other special magical skills are needed. If I can do it, anybody can. I DO get a lot more practice than most ship modelers do.
Use this same tweezer technique to put the topsails on the top and gallant yardarms.
What is the old model ship trick? Oh Hell, I almost forgot!
Using a small paint brush GENTLY paint/dab all the shiny C/A glue spots with clear flat. I use Testors Dullcote, that you can still buy at Hobby Lobby here in Iowa. Robert's your Uncle, Fanny's your Aunt, You're a sailing ship modeler!
A rare photo of a nekkid CSS Florida shows off the angle of her gaff booms. My first set of mainsails were inaccurate. These are much better!
This is where I am going with my 1/700 CSS Florida model. She'll be beautiful! Deadly and swift. Yankee sailors, beware!
Lessons learned from CSS Alabama:
Install the upper ratlines on the upper foremast platform before attaching any foretopsails.
It would be handy to leave the leeward side ratlines off to aid rigging and sail installation but they are needed for mast rigidity.
Laying sail assemblies on the curve of a big sharpie marker and brushing them with Future and Tamiya thinner makes for sails that better hold their shape. Be careful not to soak the INFINI elastic thread or it stops being stretchy.
That will do for now!
Thanks again for looking in!
Excellent tutorial. I could see this method being used in other installations like tents or tilts with rigid mounting points.
I've always wondered about those photos of the steam/sail ships. In that photo she's got sails deployed and making steam, how exactly did that work? I would have thought it's one or the other.
I've always wondered about those photos of the steam/sail ships. In that photo she's got sails deployed and making steam, how exactly did that work? I would have thought it's one or the other.
Rhino
Super Moderator
Right?! A some point, wind power would exceed steam power? It is said Florida could make 9 1/2 kts under full steam, but 12 Knots under full sail, making her "very fast" by standards of the time. It does not seem likely one would add the two speeds and come up with 21 1/2 knots in total.I've always wondered about those photos of the steam/sail ships. In that photo she's got sails deployed and making steam, how exactly did that work? I would have thought it's one or the other.
"Nigh uncatchable, hey?"
Coal capacity being a finite quantity, must be replenished. Wind may be considered infinite with lots of variables. How much wind? In what sea state? How much marine growth covers the hull below her waterline? How much cargo is aboard? What sort of ship handler was her Captain?
Her propeller or screw was not the 3 to 5 bladed type in modern use, but a 2-bladed affair that was retractable, very much like CSS Alabama, to reduce hydrodynamic drag under sail.
So the likelyhood of being under sail and under steam at the same time is pretty low.
Rhino
Super Moderator
The likelihood of getting 20+ knots out of the old girl is slim.So the likelyhood of being under sail and under steam at the same time is pretty low.
I am a Confederate Raider. My job is to pursue cargo vessels, capture, weapons and ammunition, treasure and fuel, prize or burn and sink Federal shipping. My activities keep a large portion of the Yankee navy busy hunting for me far from home and protecting trade routes. I am very expensive to hunt, for I am not easy to find. My Captain is among the cleverest of men. If am surprised by a powerful Yankee ship, I can fold my stacks down to my deck to conceal my true identity.
You are the Yankee Clipper ship Jacob Bell. Under full sail in favorable wind, you are fast. Your long, slim hull and huge sail area make you very fast when properly handled. Your cargo of black tea and firecrackers will fetch a fine price, indeed, Ma'am.
I will use all my sails and my steam engine to run you down, if I must. And I will! When I am finished with our business, I will steam off, against the wind and further vex any pursuers.
My Prize Crew may sail you to a neutral port so as your ransom may be paid.
I do not murder the crews of my prizes. I put them in boats to be rescued or deliver them to passing neutral vessels.
Some of these men may join me.
The stories of my prowess and victories are told by these survivors to newspapers. My reputation grows.
Jacob Bell, I took no joy in having to burn such a beautiful Clipper ship as you. You were too large and complex for a small crew of dedicated Sons of the Confederacy to sail safely to a neutral port in good order. Apologies, Ma'am.
How did the Yankee firebug Sherman put it? "War is Hell."
Regards,
Confederate States Ship Florida.
Rhino
Super Moderator

Curving sails by laying them over a curved surface and painting on a mix of Tamiya thinner and Future.

CSS Florida has all her kit sails rigged. Adding furled sails to the lower fore and main yards is up to YOU! Her bowsprit still need finished and rigged. This configuration would be called "Battle sails." Improved visibility to fight the ship.

These are sail assemblies that didn't make the cut. Not every thing goes perfectly every time.
Trimming the sail material to fit the space on the mast, building the boom, sail and yardarm assemblies and installing them is NOT for the faint of heart! Rigging, believe it or not, is easier than it may appear. The TLAR Mast and Sail Tutorial covers the technique in some detail.
This method is tidier, easier and quicker than the "old days" of fitting the sail to the mast with the boom installed on a bit of plastic and then gluing the assembled mast to the model. That, and a mast with a platform doesn't lay down flat.
Thanks again for looking in!

Rhino
Super Moderator

It's time to start drilling boats! I had a slew of scale resin boats to paint, so they are all the same color.


In this scale I make my davits from .0125 copper wire and bend them to fit the model. CSS Alabama carried her boats above the rail and under the swing of her booms, outboard of her hull. Her davits mounted on the outside of the hull as well. The stern davits and cutter vexed me, so it was BREAK TIME! I will quickly run out of places to pick these model up.
Only 9 more to make up. 5 for Florida and 3 for Niagara. Unless I hang a dingy from the CT-56's stern too.
Boats, then anchors, then flags to the finish!
It's been a busy TLAR week!
Rhino
Super Moderator
Bowsprit rigged and ships boats installed. Getting very close to box art now. I don't like davits. I know, I know, in order to be accurate..............
And, boats are needed for boarding captured vessels.

I'm not really fond of anchors either. These items disrupt the lines of a swift and lovely ship.
One may not just steam and sail about, blowing the dog-snot out of every vessel you encounter, then run the Yankee blockade to return to a hero's welcome in a deep water port, can one?
It's been a long while since April of 2018 when the Raider project began. (Deep sign of satisfaction)
A 1/700 Ship Model Facehole group member thinks there should be a 1/700 1864 USS Kearsarge kit. Ah ain't raahtly shur 'bout thayat theyer.
A 1/700 1862 USS Hartford too?
mebbe.
Again listening about naval battles on northern lakes it talks about anchors on springs and using anchor lines to move a ship about when there's no wind. Never thought of this stuff but it makes sense. Gotta have the ugly thing, the wind don't always blow.
Brokeneagle
Master at Arms
Great work, such small details
Rhino
Super Moderator
Thanks Chris, Ian and Bob!Great work, such small details
It must be obvious how much I enjoy making these intricate sailing ship models. My Sweetie is amazed and comments "She's beautiful!"
These same techniques and materials will be used to finish my long suffering Hawk 1/48 Curtiss RC3-2 airplane model.

Tonight, there's a new blog post on tlarmodels.com
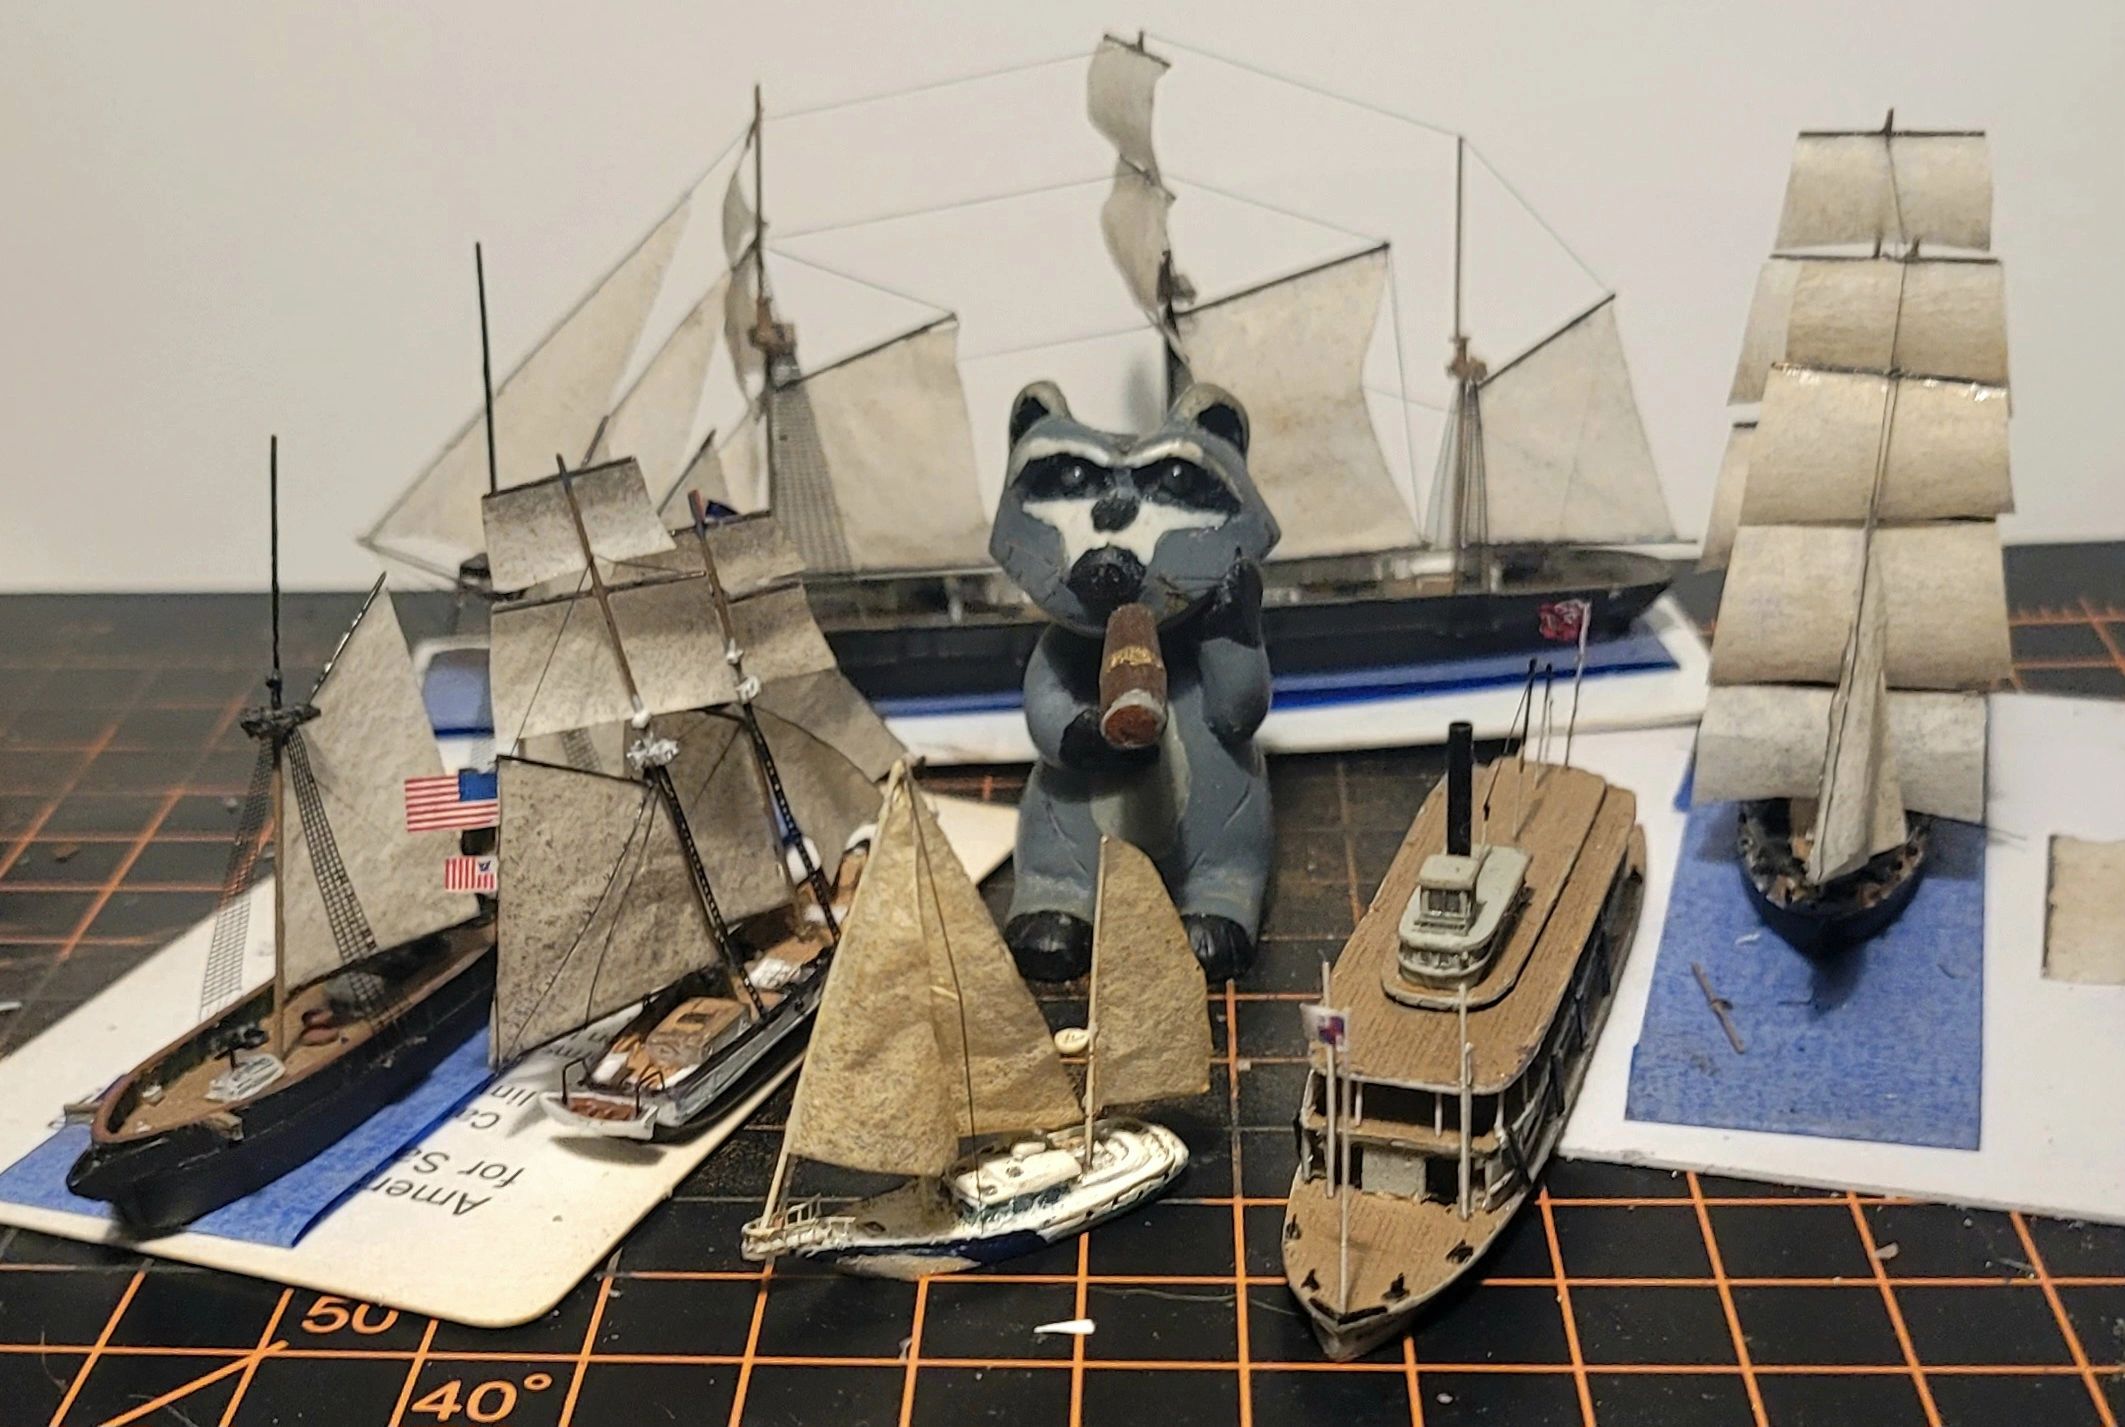
TLAR Models 1/700 Progress. Rick seems a little less skeptical!
Hello TLAR-ians and welcome guests! We last saw Rick Raccoon amongst finished LPP castings for a great many model ship projects. See him here looking over (clockwise) the CSS Alabama in progress build, The 1813 US Navy...
Last edited by a moderator:
Rhino
Super Moderator


CSS Alabama, in need of flatting the shinies and anchors for her to be complete. Kit contents for both Raiders.


The kit will include USRC Caleb Cushing, as she was captured by CSS Florida's Lt. Charles Read in a June 1863 raid on Portland, Maine.

.....and the 1/700 Horace L. Hunley, because I don't know where else to put him. This was a grand idea that began in April of 2018. It is gratifying to see it coming together.
Thanks for looking in!
Similar threads
- Replies
- 143
- Views
- 22K