Surely makes maintenance handy.

-
Modelers Alliance has updated the forum software on our website. We have migrated all post, content and user accounts but we could not migrate the passwords.
This requires that you manually reset your password.
Please click here, http://modelersalliance.org/forums/login to go to logon page and use the "Forgot your Password" option.
You are using an out of date browser. It may not display this or other websites correctly.
You should upgrade or use an alternative browser.
You should upgrade or use an alternative browser.
1/24 Airfix Hurricane FINISHED
- Thread starter paddy
- Start date
Heavens Eagle
Well-known member
Hey Paddy, in instances like this you might take the brass and soak it in white vinegar for a little while. It won't hurt the brass, but will eat off any contaminants. Then use a good primer on the brass where the decals are going to go. Use the Micro Set, with maybe a tiny bit of white glue mixed in, to place them and the white glue will help bond to the surface. Overall it looks great in spite of the problems you had.The supplied instrument panel is quite good, typically 1970's with a "glass" panel that pushes through the front fascia
View attachment 160274
I decided to go with the airscale after market part however the original clear part does have the instrument backs which i need so i sanded the instrument fronts off leaving a flat face with the backs retained...........and painted them black
View attachment 160275
View attachment 160276
Then green and added some wiring
View attachment 160273
View attachment 160272
This looks straight forward but as usual i managed to turn this into a drama
Basically the PE parts consist of a back plate, then decals, then front panel then centre panel decals, then the centre panel its self
The whole thing is a 4 part sandwich which is fine ............if the decals stick to the PE. mine didnt despite using micro set etc.
the whole thing fell apart and i ended up sandwiching the whole lot using Future Klear which seems to have worked. I can tell you decals that have dried and fallen off are very fragile so sticking them in place again with future is not easy
Anyway its worked.
I have a Ju87A Stuka that the instrument panel was buggered and I was going to use Airscale decals to MAKE a panel. It was going to be a nightmare and I don't think much of their instrument decals at this point. Another solution just popped up a few weeks back and I jumped on it. That is going to be the first kit I jump back on to when I finally get all my weeding and unpacking done.
paddy
Well-known member
Hi Paul
Yes the problem is the decals and to be fair to Airscale they dont make the decals, they are made by another UK company called "fantasy print shop" . Now i have the same decals bought direct from FPS and they are just the same, they dont adhere and they are often crazed and break up in the water. they are also quite low res so detail is poor on things like gauges. Its a shame because Airscale PE is really good.
After building the GWH SU27 recently that opened my eyes to how decals really should be . Ultra thin but ultra strong, no carrier film and hi resolution and an absolute joy to use. It can be done.

paddy
Well-known member
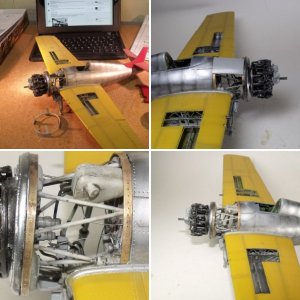
Things getting a little tricky now. The fuselage is like a banana as you can see the cowling mount is angled up and shouldn't be. It comes down when you bend the wing root a little
.

the problem is there are no mounting points for the engine or cockpit frame apart from the engine boss on the reduction unit and the top 1/4 of the seat back........and with engine and cockpit in position they dont pull it all straight . I think the wing would but that doesnt help at this stage.

I think the answer might be to try and get the cockpit in position, mark it then remove and add some home made mounting points...same for the engine.
.
the problem is there are no mounting points for the engine or cockpit frame apart from the engine boss on the reduction unit and the top 1/4 of the seat back........and with engine and cockpit in position they dont pull it all straight . I think the wing would but that doesnt help at this stage.
I think the answer might be to try and get the cockpit in position, mark it then remove and add some home made mounting points...same for the engine.
Really like how you've removed the panels. Tough problem, sounds like a reasonable fix.
What about the motor mount attachment points? Looks like you're missing some structure in here.
When I did the long forgotten open panel Wildcat I had to fabricate motor mount from brass rod and even had it adjustable to work the alignment.
I've recently salvaged the old website that had those images but I don't see any of that brass work in progress.
I guess I did finish the thing!
I've recently salvaged the old website that had those images but I don't see any of that brass work in progress.
I guess I did finish the thing!
Paddy, I posted the wrong wildcat. I started another but never finished this one.
 This is the one with the scratch built motor mounts.
Yellow Wing F4F
modelersalliance.org
paddy
Well-known member
The engine mount would have been the mount on the bulkhead and the wing spar i think, on the kit its the bulkhead and the two coolant pipes on the top of the engine. ") ,
,

Doesn't look like much has happened here but its actually hours of work and quite a way to go on this section.
,Doesn't look like much has happened here but its actually hours of work and quite a way to go on this section.
I could imagine some frame work coming off that bottom joiner in front of the supercharger.
That's what I though. 