• Modelers Alliance has updated the forum software on our website. We have migrated all post, content and user accounts but we could not migrate the passwords.
    This requires that you manually reset your password.
    Please click here, http://modelersalliance.org/forums/login to go to logon page and use the "Forgot your Password" option.

XX corps M2A1 Bastogne

Ken Abrams

Well-known member
Hi all.

You may or may not recall I originally started this build on the other site and am only now 'moving' it to here. I have made little progress due to spending some time battling H1N1, then the Holiday season hustle and bustle and more recently the closing of my place of employment which has left me feeling less than ambitious.

I have pulled my head from the funk a little bit and made a bit of progress, I have serious doubts as to whether or not I will be able to finish this build by the deadline, (which escapes me at the moment) but I want to post where I am with the build regardless.

:unsure:

first off was the required newspaper/unbuilt kit picture

august_20091226_1355657581.jpg


Next are some well known photos of the vehicle I am modeling with some notes as to some of the changes I will be making to the base kit.


snowcamohtwnotes_20091226_2015168598.jpg

snowcamohtwnotes2_20091226_1299048969.jpg


here are the first few construction pictures I had posted and where I had left off on the other forum.


m2a1-_20091226_1765322009.jpg

bumpers_20091226_1506355081.jpg

bumper-2_20091226_1803935204.jpg


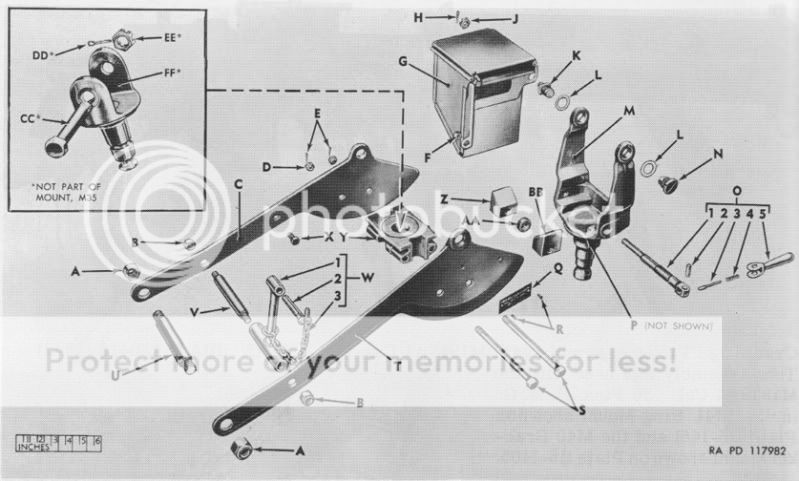
Next, in this cropping of a photo you can see the large bolted bracket on the MG pulpit that is missing in the Dragon kit and the following picture where I have made one out of some spare body panels and several individual screw heads shaved off of other spare parts.


pulpit_braket_20091226_1551526830.jpg

pulpit-braket2_20091226_1982958118.jpg


Lastly for now, the pulpit as it stands now, with the removed skate ring and the pintel mount attached to the frontal armor.


pulpit-pintel_20091226_1900323208.jpg


I only hope I can make some decent progress on this kit and if there is time, complete it by the deadline. :blush:

Thanks for looking.
 
It doesn't look like you slotted the screws...

(this is an inside joke between bolt counters ;) B) )

Regards,
 
Hey Ken Glad to hear you're on the mend!
As expected this thread is up to your usual high standard of photography, information and workmanship. A pleasure to read, and the meticulous research you have done until now on the US halftrack family is in my opinion second to nada. :)
Look forward to further updates
Brad
 
Hey Ken , sorry to hear you've had that flu thingie , nasty stuff , ....... the flu of some type went through my household like poop through a goose .
It wasn't your ordinary flu either , ............ that sucker was nasty !!!!!
I also went quite awhile without work , but did manage to pick up a custodial job in the next town overs school system .
Keep the faith baby , things will turn around for you , it's the tween times that suck big time !!!

Beautiful work man , she's looking good and the ref pics are sweet , [ what screws ? :laugh: ] .
I like what you're doing here .
Question , without backing out and re peeking at the build , is that a y mount or cradle for the 50 ?
 
Hiya Ken:

It is going to be another beautiful looking halftrack, and I am super interested as I can [strike]steal[/strike] borrow all the detailing stuff that I have no clue about to use on my halftrack.


Gary B)

Ken Abrams wrote:
I only hope I can make some decent progress on this kit and if there is time, complete it by the deadline. :blush:

Thanks for looking.

Eeewwww :unsure: . Except for specials (Braille Scale) Group Builds are nine months :pinch: . Which means that this one is over on Dec. 31st :duh .
 
sharkmouth wrote:
It doesn't look like you slotted the screws...

(this is an inside joke between bolt counters ;) B) )

Regards,

And didn't White and/or Autocar always align those heads on the horizontal plane? (just piling on the joke)

Great to see you back at it Ken!
 
sharkmouth wrote:
It doesn't look like you slotted the screws...

(this is an inside joke between bolt counters ;) B) )

Regards,

Joke away, you know me well enough to know I can take it!

I think you meant on the bracket, in which case you are right, I have yet to do that. The rest of the vehicle however has been done. My photos aren't 100% this time around. :blush:

Rudi Richardson wrote:
Ken,

Welcome back mate! Great to have you building again (read about the issues on your blog - glad you're feeling a bit better :) )

Rudi

Thanks Rudi,

physically I'm healthy as can be I suppose, it's the mind over matter thing I need to work on right now to get out of the funk. Thanks for looking in and for following the blog. I may have a bit of a surprise on there soon.

(psst it's German) B)

BradJ wrote:
Hey Ken Glad to hear you're on the mend!
As expected this thread is up to your usual high standard of photography, information and workmanship. A pleasure to read, and the meticulous research you have done until now on the US halftrack family is in my opinion second to nada. :)
Look forward to further updates
Brad

Hey Brad,

thanks for all the kind words man, I really appreciate it. You have been witness to many of my half track ramblings, considering you still find them informative has made my day just a wee bit better. :cheer: My son picked out a Calvin and Hobbes book for my wife to get my for Christmas and it made me think of you when I opened it...

yeah not like that dude. :woohoo:

Kreighshoer wrote:
glad to read that you are better now and great to see your allied halftrack magic again! :cheer:

Hi Laura,

thanks for the kind words they are encouraging. It's a shame I wont be able to finish this by the deadline though. I could always have you migrate this thread to the correct forum later in order to finish it I suppose, if that is a possibility that is. :ermm:

Cheyenne wrote:
Hey Ken , sorry to hear you've had that flu thingie , nasty stuff , ....... the flu of some type went through my household like poop through a goose .
It wasn't your ordinary flu either , ............ that sucker was nasty !!!!!
I also went quite awhile without work , but did manage to pick up a custodial job in the next town overs school system .
Keep the faith baby , things will turn around for you , it's the tween times that suck big time !!!

Beautiful work man , she's looking good and the ref pics are sweet , [ what screws ? :laugh: ] .
I like what you're doing here .
Question , without backing out and re peeking at the build , is that a y mount or cradle for the 50 ?

Glenn,

thanks for the encouragement man, the job sounds pretty sweet, whats better than a government job? I'm doing my best to keep the faith brother. My sister just hooked me up with a small job on her garage (LVL ridge beam and door headers new doors, build a loft etc.) that will hold me over for a bit but I have to keep looking.

The cradle looks to be one of the many styles found on a half track, this one a D36960 or whatever all that technical jargon is. ;)

D36960.jpg


G Cooper wrote:
Hiya Ken:

It is going to be another beautiful looking halftrack, and I am super interested as I can [strike]steal[/strike] borrow all the detailing stuff that I have no clue about to use on my halftrack.


Gary B)

Eeewwww :unsure: . Except for specials (Braille Scale) Group Builds are nine months :pinch: . Which means that this one is over on Dec. 31st :duh .

Hi Gary,

Steal/borrow/take/apply...

feel free, it's the whole reason I post this stuff and point it out as best I can. I do it in the spirit of sharing. If you, or anyone else finds this information useful in their builds than I am very much pleased with my work!

Dec. 31st eh? That's what I figured. Two bad things happen that day, I fail at completion of this group build and I turn forty... :angry:

moon puppy wrote:
And didn't White and/or Autocar always align those heads on the horizontal plane? (just piling on the joke)

Great to see you back at it Ken!

Hey MP,

pile it on man! :lol:

The general consensus among the restoration circles is as follows, (well to some extent, find one of their forums and ask the question and watch the sparks fly!)

White: Vertically aligned (early and late models)
Autocar: Clocked all over (early and late models)
Diamond T: Both vertical and clocked all over
International Harvester: Vertically aligned (cab screws as body had spot welds)

Most restorers seem to think this was done to shed the water and prevent rust but IMO that's silly. It may make sense in a modern environment, where the vehicle owner is looking to keep his vehicle pristine for as long as possible, but we're talking about an open top war vehicle here, they had bigger areas for water to settle in than the screw slots.

But hey, back to modeling! :silly:

Thanks to all of you for stopping in and commenting, it has boosted my spirits enough to head to the bench with a good deal of confidence this afternoon! :D
 
physically I'm healthy as can be I suppose, it's the mind over matter thing I need to work on right now to get out of the funk. Thanks for looking in and for following the blog. I may have a bit of a surprise on there soon.

(psst it's German) B)

You sure know how to sweet talk a guy :laugh: LOL! Lookin' forward to it buddy!
:woohoo:
 
No worries Rudi, hope I didn't let you down. B)

Moonpuppy, ( or any staff member I guess :blush: ) any chance you can move this thread as well? I'd like to continue the work here on site even though the group build deadline has passed.

Thanks in advance.
 
Dioramix wrote:
Ken, great that you are better again.

You make an amazing detail job in this vehicle. Will watch it.

Thanks for the well wishing and the encouragement, glad to have you along. B)


Well after Moonpups' little kick in the shorts a few posts back I hit the bench and got a few of the small fiddly details out of the way, like the casting numbers on the bogies and scratch built an exhaust bracket. I still have some more casting anomalies and bogie details to add as well but needed to lets these markings set up first.

bogie-detail_20100131_1646624143.jpg

exhaust-bracket_20100131_1518512640.jpg


Then I began altering the road wheel arms. I have never been very happy with the assembly of the two arms, the join surface is very small and delicate. Far too many times they come apart during the painting stage/weathering stage and re-gluing them can be a nightmare. I cut back the rod to the first ridge, drilled holes in both halves and inserted a styrene rod to make a much more rigid join. It's a bit of work but makes a lot of difference down the road.


road-wheels_20100131_1005482495.jpg


Lastly I made the rear stowage 'box' that is barely seen in the photos. These things all varied in size and shape as they were field mods, I did my best to replicate what is seen but had to use a bit of artistic license because of what is not seen. The PE mesh is just some random sheet from K&S IIRC that I had in the spares. One of my favorite aspects to building these half tracks is all of the various stowed items strewn about. It will be fun to scratch build items fill this box and I might even put some stuff on the fenders even though these pictures show none.


stowage-rack_20100131_1873683455.jpg

stowage-rack-2_20100131_1192854418.jpg


Looking back at the photos I realize that I made the rear box level with the top of the crew compartment and the pictures show quite it a bit below.

Ima' hafta' fix that...

:ermm: :pinch: :angry:

Thanks for looking.
 
Ken,
Welcome back... Looks great so far.
Keep posting the pictures so we can follow along.
Good to hear that you are feeling better too.
Shawn
 
ken great progress on the HT im not getting mine done but at least i can watch you :woohoo:
 
Thanks for commenting guys!

B)

I lowered the rear stowage rack to match the photos better and put some stowage in it too. Tamiya bits, resin bits and some tissue paper/white glue tarps and such. Threw a chain on the pintle hitch and made some mudflaps out of styrene, which is easier for me to make look like canvas versus the PE that comes in the kit.

100_1528_20100205_1371730423.jpg

100_1529_20100205_1779594519.jpg

100_1524_20100205_1987791308.jpg


Next thing I dealt with were the headlights. The brush guards are a bit simplified and lack some detail and the PE grills are rather flat so I did some scratch work, I also added the wire through the fender and to the back of the head light.

100_1525_20100205_1036451024.jpg

100_1526_20100205_1352836720.jpg


A few more details to do and then I can start slinging the paint!

Later peeps. :peace
 
That is just jamm packed full of detail everywhere. And it all looks so cool. By the way, how long did it take you to slot all those screws?

Gary B)
 
Back
Top