Hello All,
Just to let you know I have not dropped the project and shelved it as a shelf queen.
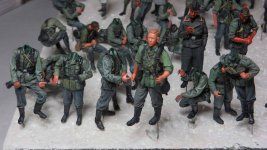
Here are some progress images of where the figure status is.
The figures have been given a base coat of Vallejo Acrylic and Humbrol enamel paints with a second layer of paints to enhance the details of the raised sections of the uniforms, arm and leg pose/movement.
In between paint coats there has been a small black pinwash applied with a fine paintbrush placed in the arm and leg creases. This is critical to enhance the figure pose. Use a 0 or 00 brush to control the use.
The black wash consisted of small amount of Mig Black wash and Mig odourless thinner.
The arms, faces and hands have all received an oil paint base layer with highlighting done with white, red, burnt sienna and white in very small amounts.
To try and keep the skin colour in uniformity I dip the brush into the base colour and try and blend in to get the skin tone.
Practice and be patient with this method because it has taken me many years to get to this standard from starting into the hobby in 1987.
Notes
Oil base colour
Burnt Umber, Burnt Sienna,Yellow Ochre
Apply onto all skin areas and then use a fine brush and lightly remove excess oil paint.
Highlight
Burnt Sienna for cheeks and lips , Spectrum Red, Yellow and Yellow ochre.
The yellows mixed with red seem to give you an orange looking appearance.
This stage please use a fine brush and remove excess oil and then let it settle for a couple hours or a day.
Go back again with the pin wash with a 00 Brush in super fine amount. The wash goes into the ears lips/mouth and eyes.
Use the wash in extremely small amounts because it will bleed the oil paint and there goes a good paint job. This application is the same for the hands and any skin areas.
Sort of building up the appearance of the skin in stages.
Final stage
Highlight with the white and Burnt sienna which will give you a pinky appearance. White and Burnt Sienna work better as there is more room to change and blend the skin tone.
Note if getting too pink through in a mix of yellow and red blended to give you an orange and blend with the white.
Its all down to Practice and tweaking
Your Own Paint Style.
Mine - Is a copy of the Mighty Francis Verlinden who gave me inspiration in the Hobby way back in the day.
Still working on the first German with the Mg and its a long Haul.


 . Have plans in at the moment and the collection is all packed up
 this will be a really detailed scene when its done. Can't wait to see this one completed.