
-
Modelers Alliance has updated the forum software on our website. We have migrated all post, content and user accounts but we could not migrate the passwords.
This requires that you manually reset your password.
Please click here, http://modelersalliance.org/forums/login to go to logon page and use the "Forgot your Password" option.
You are using an out of date browser. It may not display this or other websites correctly.
You should upgrade or use an alternative browser.
You should upgrade or use an alternative browser.
PV-1 Nightfighter-FINISHED !
- Thread starter Old Dog
- Start date
Old Dog
Well-known member
PV-1 Nightfighter-episode 2, AM and other things
OK, going to be covering a lot of ground in this episode so grab a cup of coffee or your favorite adult beverage. Taking up where we left off, once I filled the various gaps around the rear most cowl piece I glued the cowl flap section to it. This only makes contact in two places so make certain your mating surfaces are clean and flat. One thing I hate about resin stuff is gluing them with superglue. No matter how well things fit it always seems that once the super glue is applied things don't line and you have so little time to make things right. Well I got lucky on these and every thing went together well.

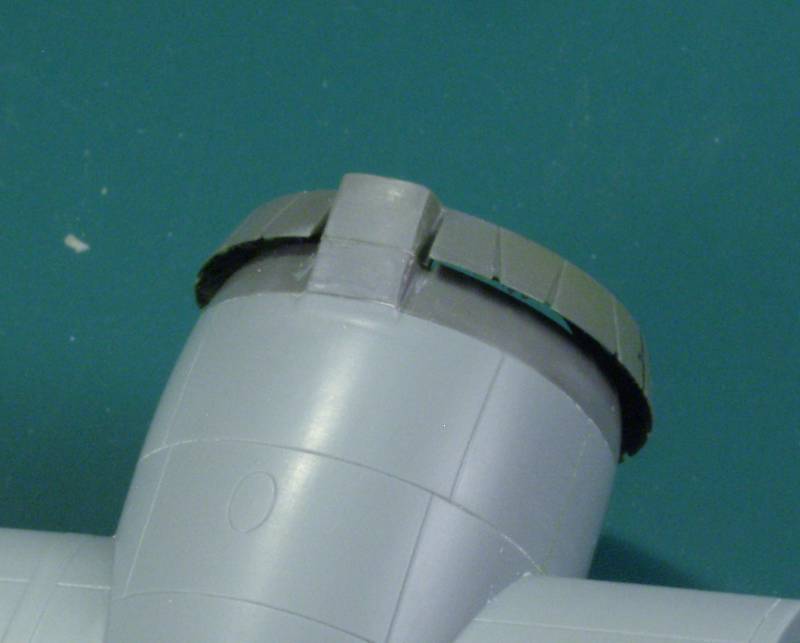
Just a bit of sanding top and bottom and things were good to go. Next up the kit engine keys into the from of the cowl flap section, no issues here.
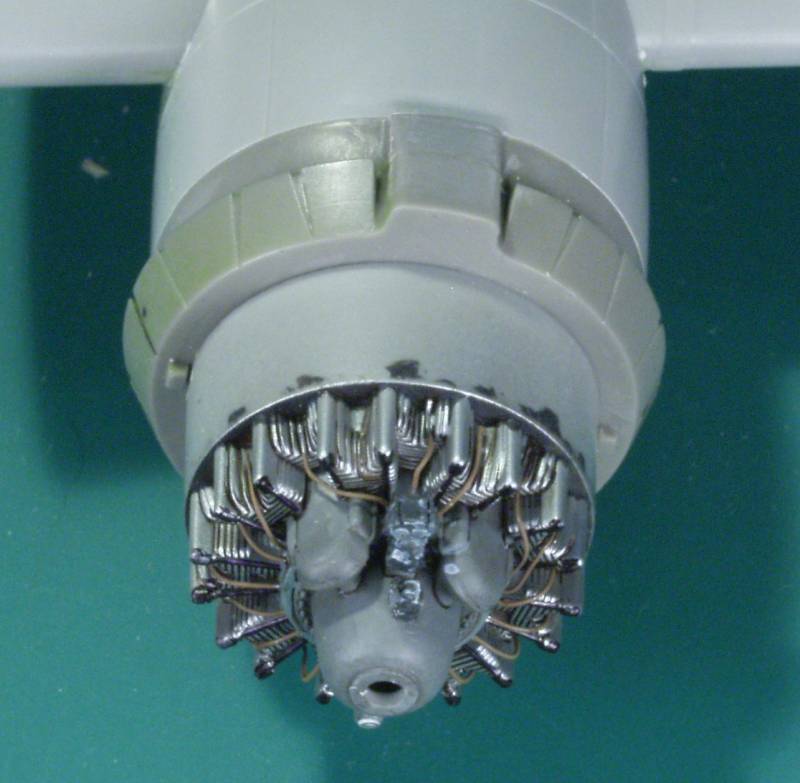
Next the cowlings are installed. These have two spacer nubs to center them but they still need to be rotated to the proper orientation and even using slow setting super glue I had my moments with these but in the end they ended up where needed.
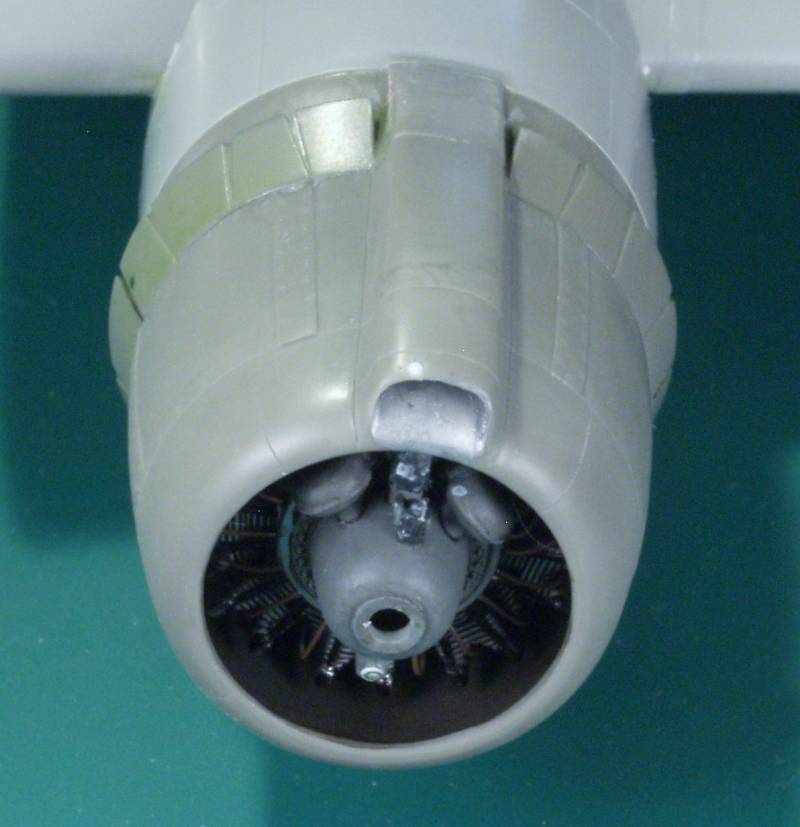
Fit was good and a sanding stick took care of a bit on excess glue. With the wings done as far as need be for now I moved to the fuselage. I did end up using the the bomb bay piece. I'm not sure it adds a lot of strength but felt it might be insurance against seam cracking when installing the wings. The fuselage went together well but I did need to reach in through the nose and pop the bomb bay piece into it correct position. The halves fit well with no other issues with interior parts. I did not like the idea of putting the astro dome in at this stage and sure enough as soon as I started working on the bottom seam I knocked it out. So this will need to be addressed some where down the road.
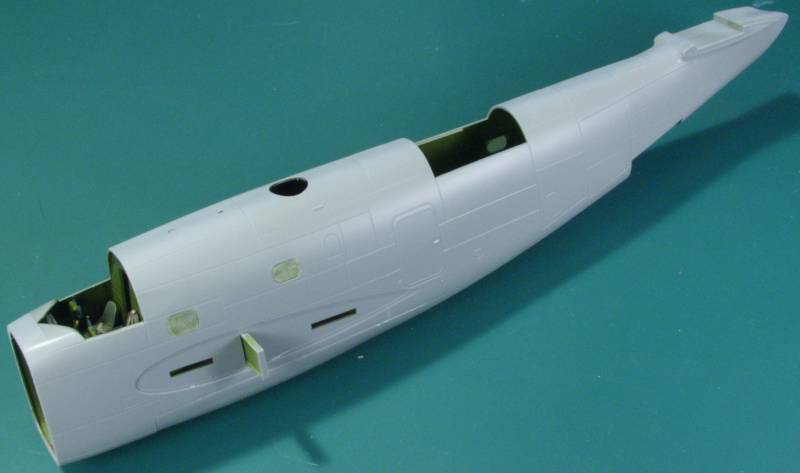
Once the fuselage had time to set up I cut the nose mounting flange off the front and smoothed it up a bit. Test fitting the resin nose showed it was just a tad larger than the fuselage so using sandpaper on a flat surface I sanded it down until it matched. As I mentioned earlier I really hate glue large pieces with super glue and in this case there were no alignment aids. I foresaw trouble in this an decided to use a different adhesive. In this case it's something I suspect most have never used in modeling. I have used it a few times primarily on parts that I was concerned that super glue would be to brittle.
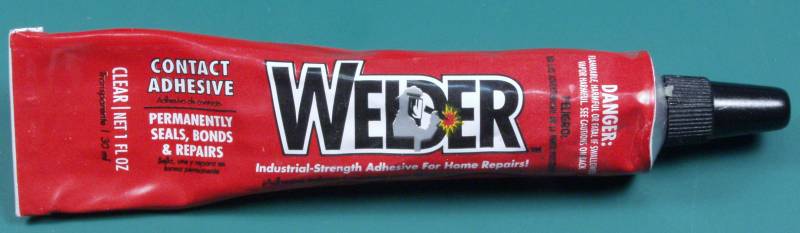
I put a bead around the outside of the fuselage being careful not to over do it as I did not want a mess to clean up, installed the nose and once positioned (which this stuff gives you plenty of wiggle time I let it set up over night. Everything fit tight and solid and I had only a couple squeeze outs to clean up. There were a couple places that did not meet perfectly but a little sanding on either the nose or fuselage too care of those.

Just as a reality check on the seat height if you compare this photo
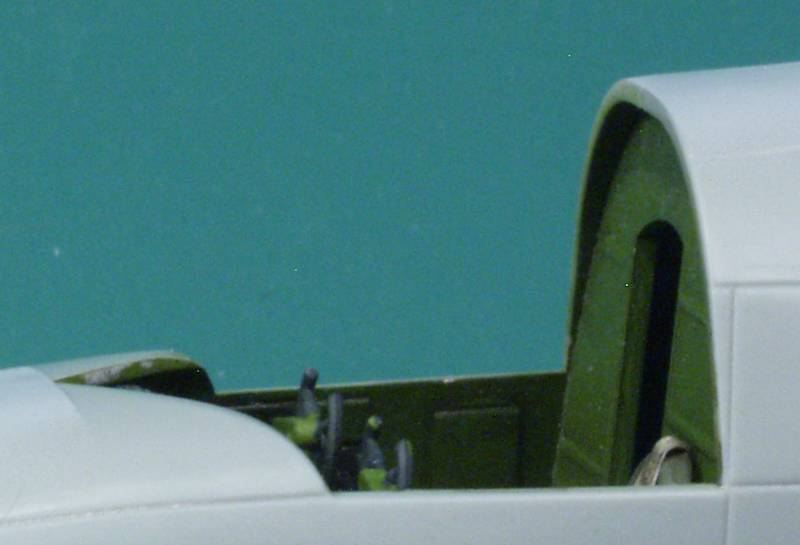
With this line drawing

It appears that Revell got it right on the seat height and my earlier supposition was wrong assuming the drawing is correct.
While on the subject of the cockpit I did receive the True details cockpit and as a diversion will show it here. The overall set is show below

The side walls are definitely an improvement over the kit and removing the kit detail to place them should be easy enough.

The instrument is better detailed than the kit part but you will need to remove and reuse the rudder pedals from the kit part. The instrument detail is a bit shallow and I would have an issue painting it so my choice would be the Eduard part, your mileage may vary.

The throttle quadrant also has more detail but is still short a couple levers.

It's pretty much a wash on the pilots side console.

The seats are a definite improvement.

The floor and the rear bulkhead offer a bit more detail

The control wheels don't offer anything that I could see worth the effort to clean them up and attaching them to the control columns.

If everything fits I think it is worth while but you'll need to make that call.
Anyway, on with the build. With the nose on it was time to start bringing things together. The wings were attached. The fit was great, I wish everyone would use recessed for mounting wings, it just makes every thing so much easier. The tail was also attached. This fit so tight I could have gotten by not gluing it but I decided to anyway. So now at least it looks a bit like an airplane.
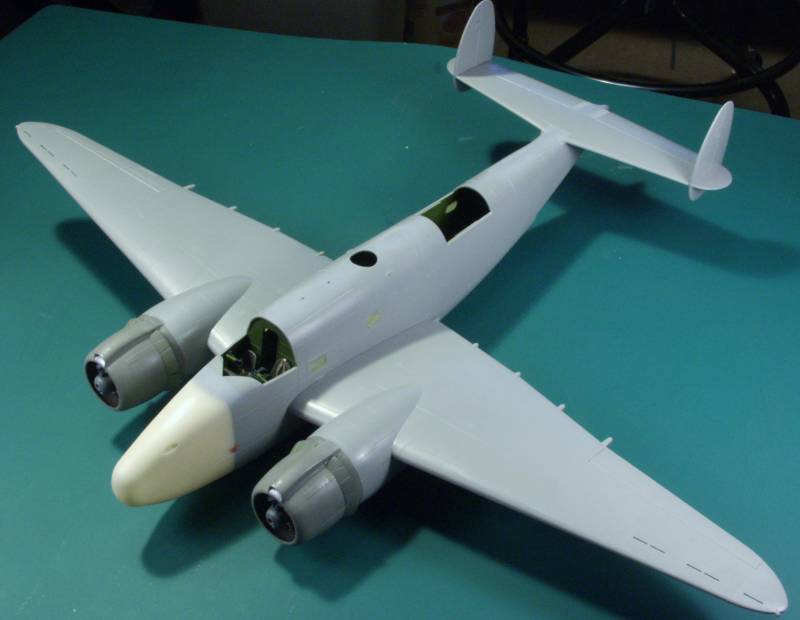
Things are going to slow down now as I found I don't have the colors I need (on order) and I want to get some Master Models gun barrels and Sprue Brothers is out of the ones I want. So stay tuned for the next exciting episode...
OK, going to be covering a lot of ground in this episode so grab a cup of coffee or your favorite adult beverage. Taking up where we left off, once I filled the various gaps around the rear most cowl piece I glued the cowl flap section to it. This only makes contact in two places so make certain your mating surfaces are clean and flat. One thing I hate about resin stuff is gluing them with superglue. No matter how well things fit it always seems that once the super glue is applied things don't line and you have so little time to make things right. Well I got lucky on these and every thing went together well.
Just a bit of sanding top and bottom and things were good to go. Next up the kit engine keys into the from of the cowl flap section, no issues here.
Next the cowlings are installed. These have two spacer nubs to center them but they still need to be rotated to the proper orientation and even using slow setting super glue I had my moments with these but in the end they ended up where needed.
Fit was good and a sanding stick took care of a bit on excess glue. With the wings done as far as need be for now I moved to the fuselage. I did end up using the the bomb bay piece. I'm not sure it adds a lot of strength but felt it might be insurance against seam cracking when installing the wings. The fuselage went together well but I did need to reach in through the nose and pop the bomb bay piece into it correct position. The halves fit well with no other issues with interior parts. I did not like the idea of putting the astro dome in at this stage and sure enough as soon as I started working on the bottom seam I knocked it out. So this will need to be addressed some where down the road.
Once the fuselage had time to set up I cut the nose mounting flange off the front and smoothed it up a bit. Test fitting the resin nose showed it was just a tad larger than the fuselage so using sandpaper on a flat surface I sanded it down until it matched. As I mentioned earlier I really hate glue large pieces with super glue and in this case there were no alignment aids. I foresaw trouble in this an decided to use a different adhesive. In this case it's something I suspect most have never used in modeling. I have used it a few times primarily on parts that I was concerned that super glue would be to brittle.
I put a bead around the outside of the fuselage being careful not to over do it as I did not want a mess to clean up, installed the nose and once positioned (which this stuff gives you plenty of wiggle time I let it set up over night. Everything fit tight and solid and I had only a couple squeeze outs to clean up. There were a couple places that did not meet perfectly but a little sanding on either the nose or fuselage too care of those.
Just as a reality check on the seat height if you compare this photo
With this line drawing
It appears that Revell got it right on the seat height and my earlier supposition was wrong assuming the drawing is correct.
While on the subject of the cockpit I did receive the True details cockpit and as a diversion will show it here. The overall set is show below
The side walls are definitely an improvement over the kit and removing the kit detail to place them should be easy enough.
The instrument is better detailed than the kit part but you will need to remove and reuse the rudder pedals from the kit part. The instrument detail is a bit shallow and I would have an issue painting it so my choice would be the Eduard part, your mileage may vary.
The throttle quadrant also has more detail but is still short a couple levers.
It's pretty much a wash on the pilots side console.
The seats are a definite improvement.
The floor and the rear bulkhead offer a bit more detail
The control wheels don't offer anything that I could see worth the effort to clean them up and attaching them to the control columns.
If everything fits I think it is worth while but you'll need to make that call.
Anyway, on with the build. With the nose on it was time to start bringing things together. The wings were attached. The fit was great, I wish everyone would use recessed for mounting wings, it just makes every thing so much easier. The tail was also attached. This fit so tight I could have gotten by not gluing it but I decided to anyway. So now at least it looks a bit like an airplane.
Things are going to slow down now as I found I don't have the colors I need (on order) and I want to get some Master Models gun barrels and Sprue Brothers is out of the ones I want. So stay tuned for the next exciting episode...
PV-1 Nightfighter-episode 2, AM and other things
Enjoyed the post and the cold beer.
I've often thought of using JB Weld or some simular product for tough situations but didn't know if there were any solvent worries to be aware of. Guessing not seeing how well it worked here.
Good stuff Gary")
OK, going to be covering a lot of ground in this episode so grab a cup of coffee or your favorite adult beverage. Taking up where we left off, once I filled the various gaps around the rear most cowl piece I glued the cowl flap section to it. This only makes contact in two places so make certain your mating surfaces are clean and flat. One thing I hate about resin stuff is gluing them with superglue. No matter how well things fit it always seems that once the super glue is applied things don't line and you have so little time to make things right. Well I got lucky on these and every thing went together well.
Just a bit of sanding top and bottom and things were good to go. Next up the kit engine keys into the from of the cowl flap section, no issues here.
Next the cowlings are installed. These have two spacer nubs to center them but they still need to be rotated to the proper orientation and even using slow setting super glue I had my moments with these but in the end they ended up where needed.
Fit was good and a sanding stick took care of a bit on excess glue. With the wings done as far as need be for now I moved to the fuselage. I did end up using the the bomb bay piece. I'm not sure it adds a lot of strength but felt it might be insurance against seam cracking when installing the wings. The fuselage went together well but I did need to reach in through the nose and pop the bomb bay piece into it correct position. The halves fit well with no other issues with interior parts. I did not like the idea of putting the astro dome in at this stage and sure enough as soon as I started working on the bottom seam I knocked it out. So this will need to be addressed some where down the road.
Once the fuselage had time to set up I cut the nose mounting flange off the front and smoothed it up a bit. Test fitting the resin nose showed it was just a tad larger than the fuselage so using sandpaper on a flat surface I sanded it down until it matched. As I mentioned earlier I really hate glue large pieces with super glue and in this case there were no alignment aids. I foresaw trouble in this an decided to use a different adhesive. In this case it's something I suspect most have never used in modeling. I have used it a few times primarily on parts that I was concerned that super glue would be to brittle.
I put a bead around the outside of the fuselage being careful not to over do it as I did not want a mess to clean up, installed the nose and once positioned (which this stuff gives you plenty of wiggle time I let it set up over night. Everything fit tight and solid and I had only a couple squeeze outs to clean up. There were a couple places that did not meet perfectly but a little sanding on either the nose or fuselage too care of those.
Just as a reality check on the seat height if you compare this photo
With this line drawing
It appears that Revell got it right on the seat height and my earlier supposition was wrong assuming the drawing is correct.
While on the subject of the cockpit I did receive the True details cockpit and as a diversion will show it here. The overall set is show below
The side walls are definitely an improvement over the kit and removing the kit detail to place them should be easy enough.
The instrument is better detailed than the kit part but you will need to remove and reuse the rudder pedals from the kit part. The instrument detail is a bit shallow and I would have an issue painting it so my choice would be the Eduard part, your mileage may vary.
The throttle quadrant also has more detail but is still short a couple levers.
It's pretty much a wash on the pilots side console.
The seats are a definite improvement.
The floor and the rear bulkhead offer a bit more detail
The control wheels don't offer anything that I could see worth the effort to clean them up and attaching them to the control columns.
If everything fits I think it is worth while but you'll need to make that call.
Anyway, on with the build. With the nose on it was time to start bringing things together. The wings were attached. The fit was great, I wish everyone would use recessed for mounting wings, it just makes every thing so much easier. The tail was also attached. This fit so tight I could have gotten by not gluing it but I decided to anyway. So now at least it looks a bit like an airplane.
Things are going to slow down now as I found I don't have the colors I need (on order) and I want to get some Master Models gun barrels and Sprue Brothers is out of the ones I want. So stay tuned for the next exciting episode...
Enjoyed the post and the cold beer.
I've often thought of using JB Weld or some simular product for tough situations but didn't know if there were any solvent worries to be aware of. Guessing not seeing how well it worked here.
Good stuff Gary
Old Dog
Well-known member
PV-1 Nightfighter-episode 3, going together
OK, at the end of the last exciting episode progress was halted due to lack of paint and the desire to acquire some Model Master gun barrels. Paint wasn't much of an issue as I found what I wanted in stock on line and just needed to wait on the required ground transportation. The gun barrels however were either out of stock or not available in the quantity needed from my usual sources. Finally went to Ultracast who had an ample stock. The only downside being they are in Canada and I would need to wait on two postal services for delivery.
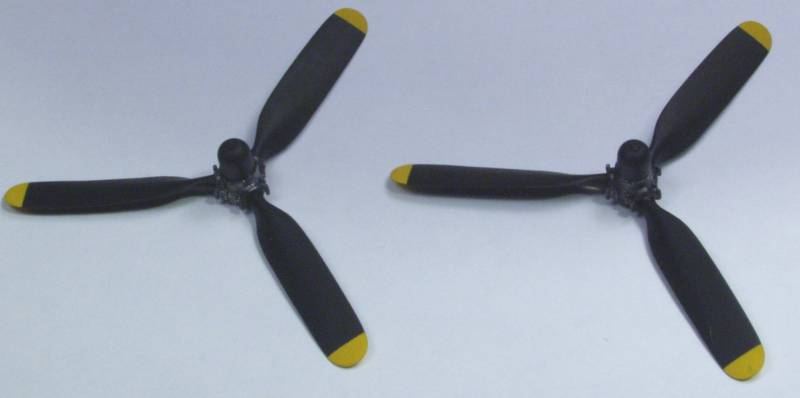
While waiting I decided to take care of some smaller details. The Resin props were painted and assembled. The kit provides Hamilton Standard decals for the props but they aren't visible in the photos I have of the ship I'm building and appeared only on about half the other aircraft I had photos of so I decided to leave them off, which also reduced the number of finishing steps required.
Next I decided to mask the canopies. I find this to be a mind numbing job even with a mask set and typically go into a coma during the process. I was nearly finished with the last item, the turret, when I decided to check some references. Well, it seems that Eduard has you masking for external frame lines where none exist.
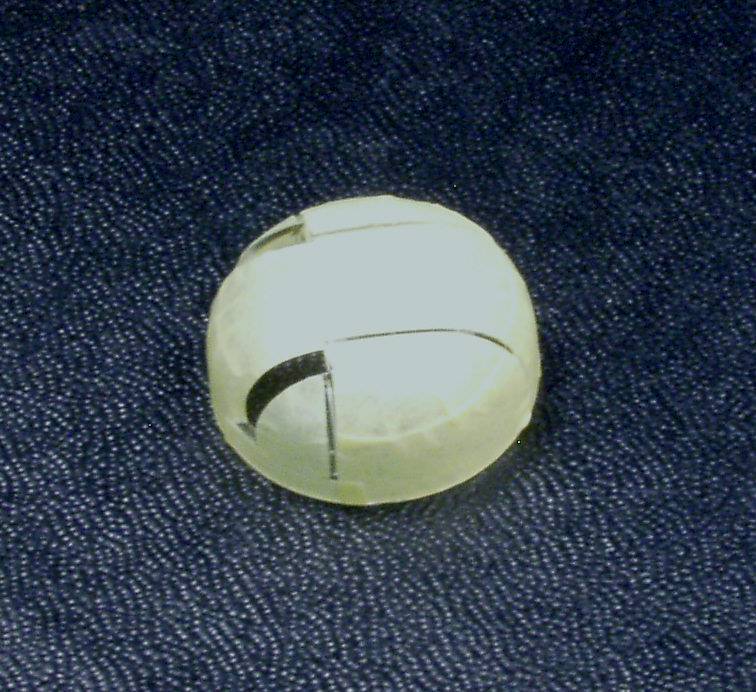
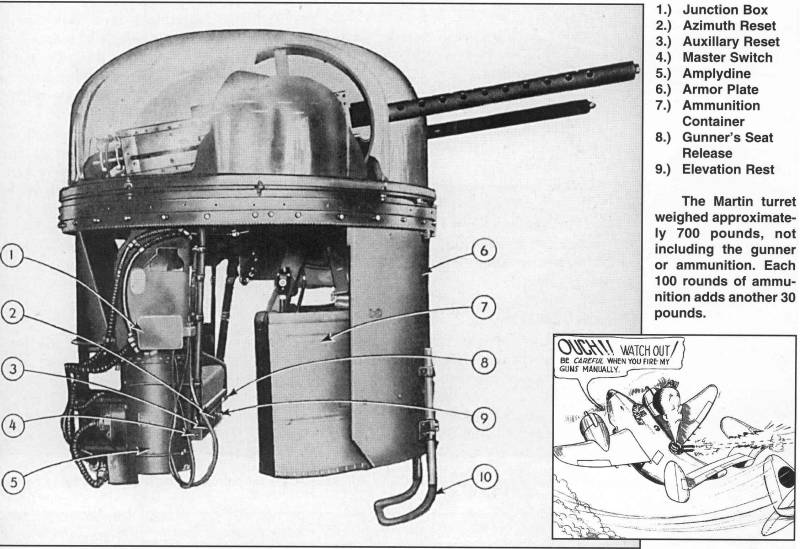
Photos from the manual show the glazing as a blown bubble with no exterior framing...
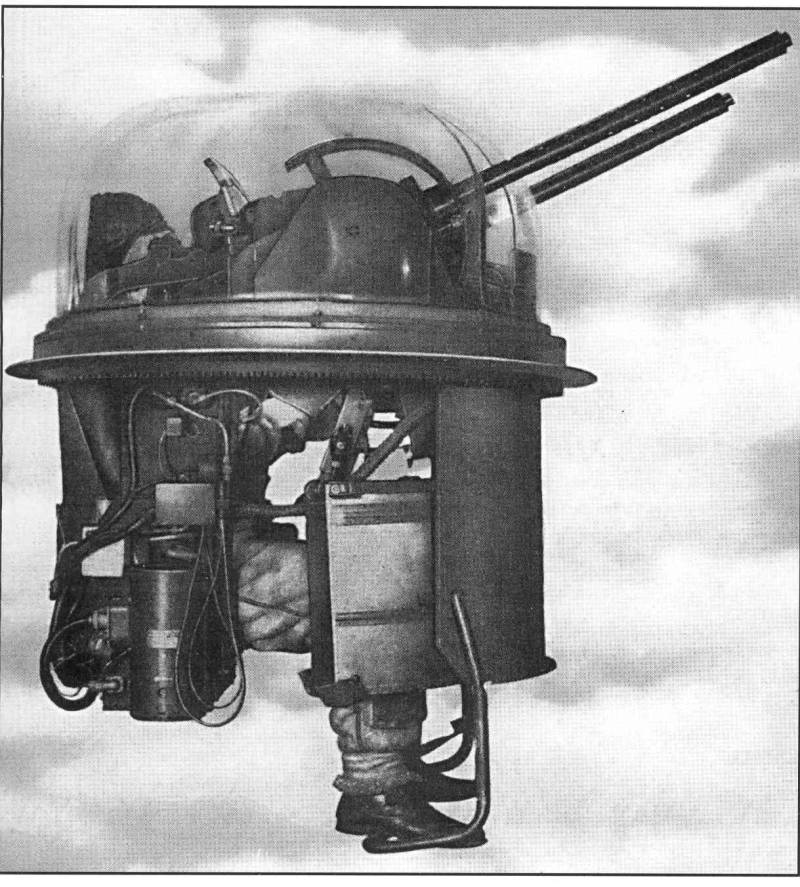
and many photos show the same...
I did find some photos that appear to have external framing but I think what you see is some internal stiffeners, probably also made of plex and Revell has these molded inside the turret. So I decide, since the turret isn't visible on the plane I'm doing, I'm not going to paint any external frame lines. Right wrong or otherwise. An additional note, once masked the turret won't fit in the opening so it would need to be painted separate from the airframe anyway.
I did manage to get the astrodome glued back in place through the hole that the turret mounts in.
Next up I decided to look ahead a bit to the radar antennas. The Owl kit provides two short PE parts to mount the receiving antennas to the engine nacelles back near the wing.
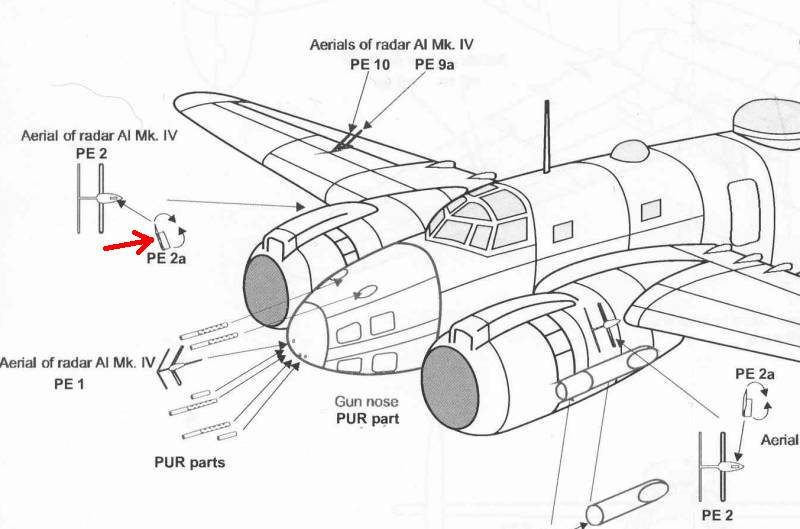
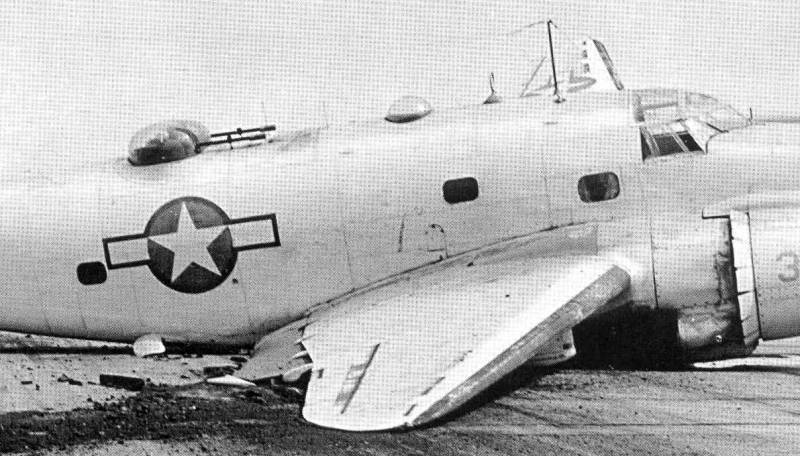
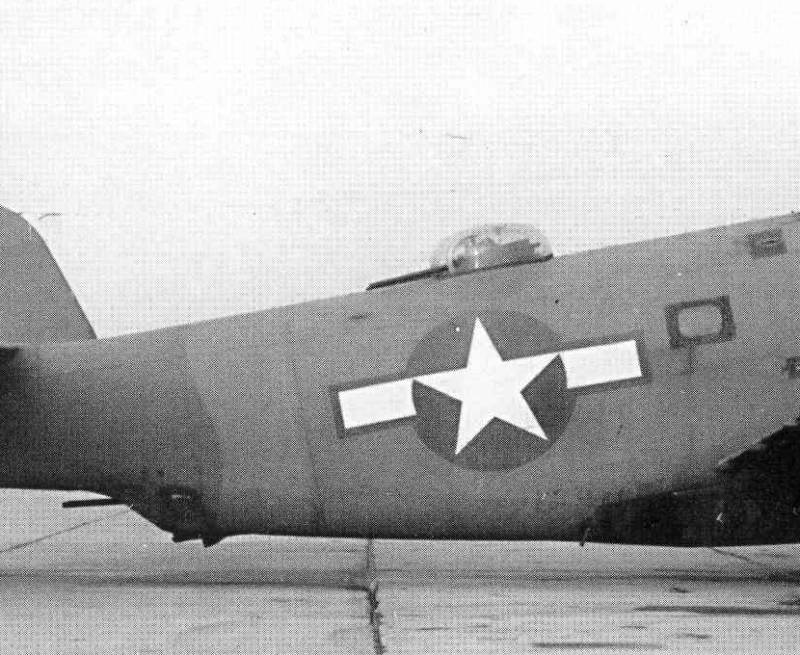
Somehow this didn't seem right to me as the antennas if mounted there would barely clear the cowl flaps and would be located behind the spinning propeller blades. I would not think this would be an optimum place for them, however they were very difficult to see in most of the reference photos I have, that is until I noticed this one...
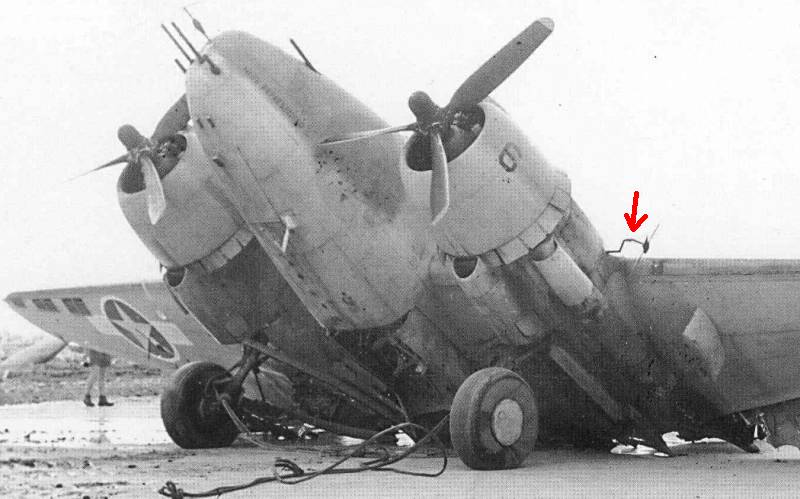
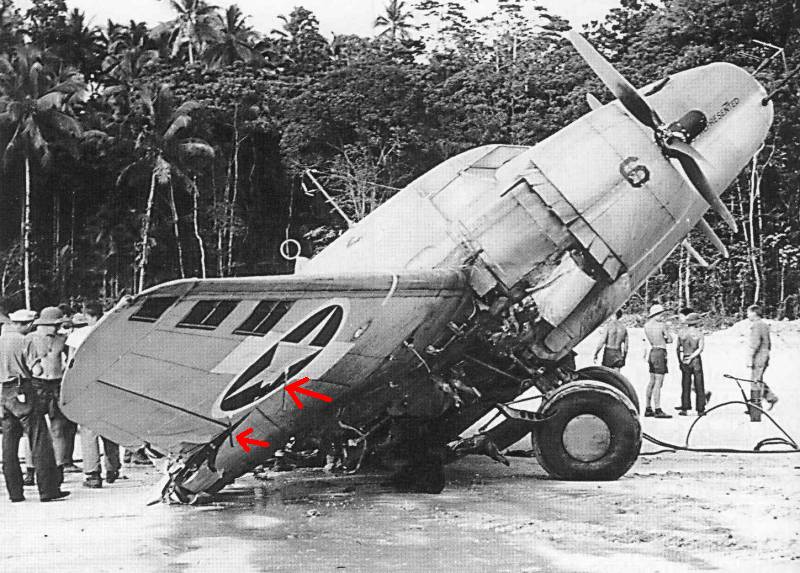
This PV-1 had the misfortune of being cut in half by a runaway Corsair but viola, it shows the correct mounting for the receiving antenna !
A photo of the same aircraft from the other side also shows two blade antennas on the lower wing. Owl gives you two for the top but none for the bottom and radars of this vintage usually had them top and bottom. So it looks like some creative scratching will be necessary.
Anyway as of this date the gun barrels and paint are now in hand and this is how things look.
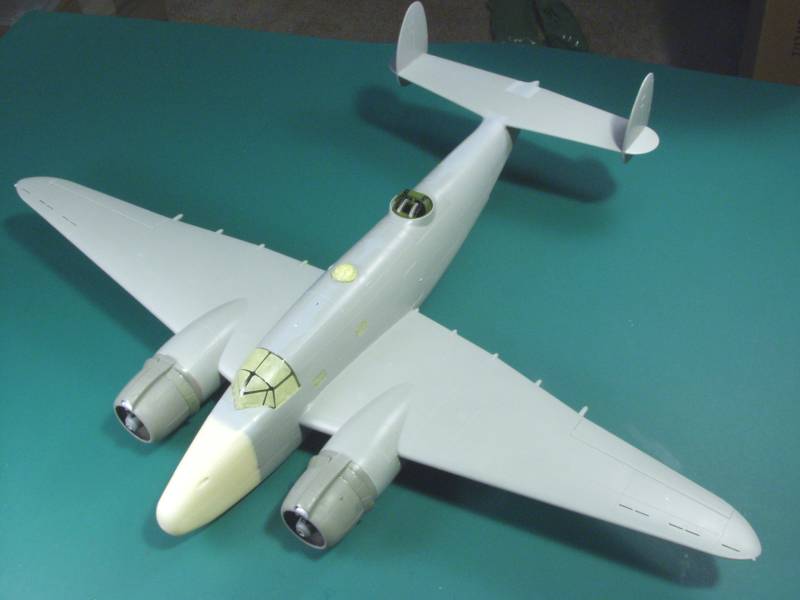
I still have a couple phantom seams that I need to take care of and a few panel lines to rescribe and rivets to replace but we should be seeing paint in the near future. Stay tuned !
OK, at the end of the last exciting episode progress was halted due to lack of paint and the desire to acquire some Model Master gun barrels. Paint wasn't much of an issue as I found what I wanted in stock on line and just needed to wait on the required ground transportation. The gun barrels however were either out of stock or not available in the quantity needed from my usual sources. Finally went to Ultracast who had an ample stock. The only downside being they are in Canada and I would need to wait on two postal services for delivery.
While waiting I decided to take care of some smaller details. The Resin props were painted and assembled. The kit provides Hamilton Standard decals for the props but they aren't visible in the photos I have of the ship I'm building and appeared only on about half the other aircraft I had photos of so I decided to leave them off, which also reduced the number of finishing steps required.
Next I decided to mask the canopies. I find this to be a mind numbing job even with a mask set and typically go into a coma during the process. I was nearly finished with the last item, the turret, when I decided to check some references. Well, it seems that Eduard has you masking for external frame lines where none exist.
Photos from the manual show the glazing as a blown bubble with no exterior framing...
and many photos show the same...
I did find some photos that appear to have external framing but I think what you see is some internal stiffeners, probably also made of plex and Revell has these molded inside the turret. So I decide, since the turret isn't visible on the plane I'm doing, I'm not going to paint any external frame lines. Right wrong or otherwise. An additional note, once masked the turret won't fit in the opening so it would need to be painted separate from the airframe anyway.
I did manage to get the astrodome glued back in place through the hole that the turret mounts in.
Next up I decided to look ahead a bit to the radar antennas. The Owl kit provides two short PE parts to mount the receiving antennas to the engine nacelles back near the wing.
Somehow this didn't seem right to me as the antennas if mounted there would barely clear the cowl flaps and would be located behind the spinning propeller blades. I would not think this would be an optimum place for them, however they were very difficult to see in most of the reference photos I have, that is until I noticed this one...
This PV-1 had the misfortune of being cut in half by a runaway Corsair but viola, it shows the correct mounting for the receiving antenna !
A photo of the same aircraft from the other side also shows two blade antennas on the lower wing. Owl gives you two for the top but none for the bottom and radars of this vintage usually had them top and bottom. So it looks like some creative scratching will be necessary.
Anyway as of this date the gun barrels and paint are now in hand and this is how things look.
I still have a couple phantom seams that I need to take care of and a few panel lines to rescribe and rivets to replace but we should be seeing paint in the near future. Stay tuned !
PV-1 Nightfighter-episode 4, odds & ends
Remember that the aerial radar array would have been in it's infancy back then so maybe they didn't notice any issues of the placement of those antenna, or the equipment was not as sensitive to any interference...just guessing. Looks good so far
Remember that the aerial radar array would have been in it's infancy back then so maybe they didn't notice any issues of the placement of those antenna, or the equipment was not as sensitive to any interference...just guessing. Looks good so far
phantom II
Master at Arms
PV-1 Nightfighter-episode 4, odds & ends
Hey Gary , I like the way this thing is shaping up Keep it coming
Cheers, Christian B)
Hey Gary , I like the way this thing is shaping up
Keep it coming Cheers, Christian B)
Old Dog
Well-known member
PV-1 Nightfighter-episode 4, odds & ends
OK, dang, it's been a month since the last update, time fly's when you have five kits going at once :gogo Not much to see this time either but the pace should pick up a bit now, I always get bogged down in masking, not one of my favorite things. Anyway the primary paint colors are on
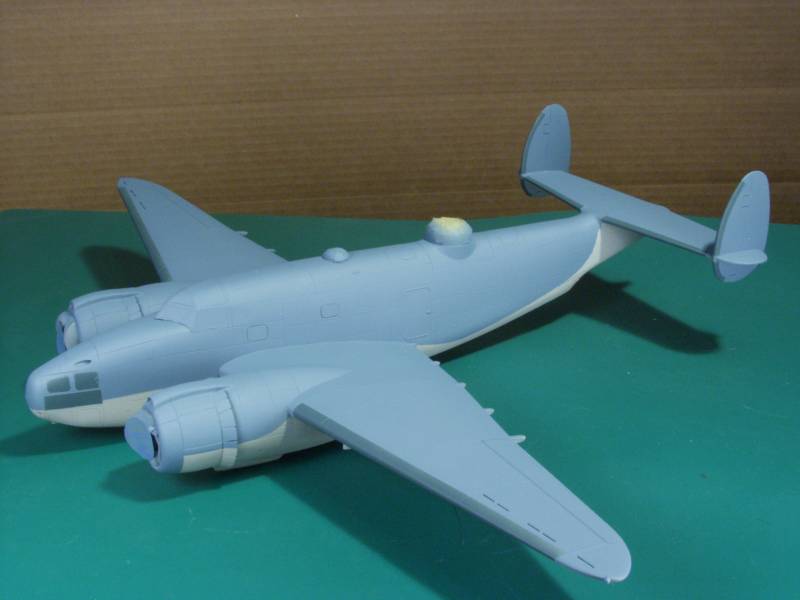
According to my references many PV-1s in this theater had the deicer boots painted over, I assume to protect the rubber but it could be the rubber was removed and the paint covered a primered area underneath. Not likely they needed deicers in the South Pacific at the altitudes they normally flew. Now what I need to do next is figure out how I'm going to do the markings. Thanks for looking in and stay tuned, I'll not to take so long next time !
OK, dang, it's been a month since the last update, time fly's when you have five kits going at once :gogo Not much to see this time either but the pace should pick up a bit now, I always get bogged down in masking, not one of my favorite things. Anyway the primary paint colors are on
According to my references many PV-1s in this theater had the deicer boots painted over, I assume to protect the rubber but it could be the rubber was removed and the paint covered a primered area underneath. Not likely they needed deicers in the South Pacific at the altitudes they normally flew. Now what I need to do next is figure out how I'm going to do the markings. Thanks for looking in and stay tuned, I'll not to take so long next time !
PV-1 Nightfighter-episode 4, odds & ends
Would there be another flaring to go over where the deicer boots were?

Would there be another flaring to go over where the deicer boots were?
phantom II
Master at Arms
PV-1 Nightfighter-episode 4, odds & ends
Painted over ? I would rather think probably removed altogether to save weigh .
Fairly common practice during this time frame.
Cheers, Christian B)
Painted over ? I would rather think probably removed altogether to save weigh .
Fairly common practice during this time frame.
Cheers, Christian B)
Sherman 18
Master at Arms
PV-1 Nightfighter-episode 5, paint
Similar threads
- Replies
- 7
- Views
- 773
- Replies
- 0
- Views
- 69