• Modelers Alliance has updated the forum software on our website. We have migrated all post, content and user accounts but we could not migrate the passwords.
    This requires that you manually reset your password.
    Please click here, http://modelersalliance.org/forums/login to go to logon page and use the "Forgot your Password" option.

James O'Leary's "Charlie Don'T Surf" projects

JamesOLeary

Master at Arms
My friend Shawn Gehling told me about this site and this group build. Since Vietnam subjects are pretty much all I model, this is right up my alley. Until I started working on my first two figures in August, I had been out of the hobby for about 5 or 6 years. I'm glad to be back in it.

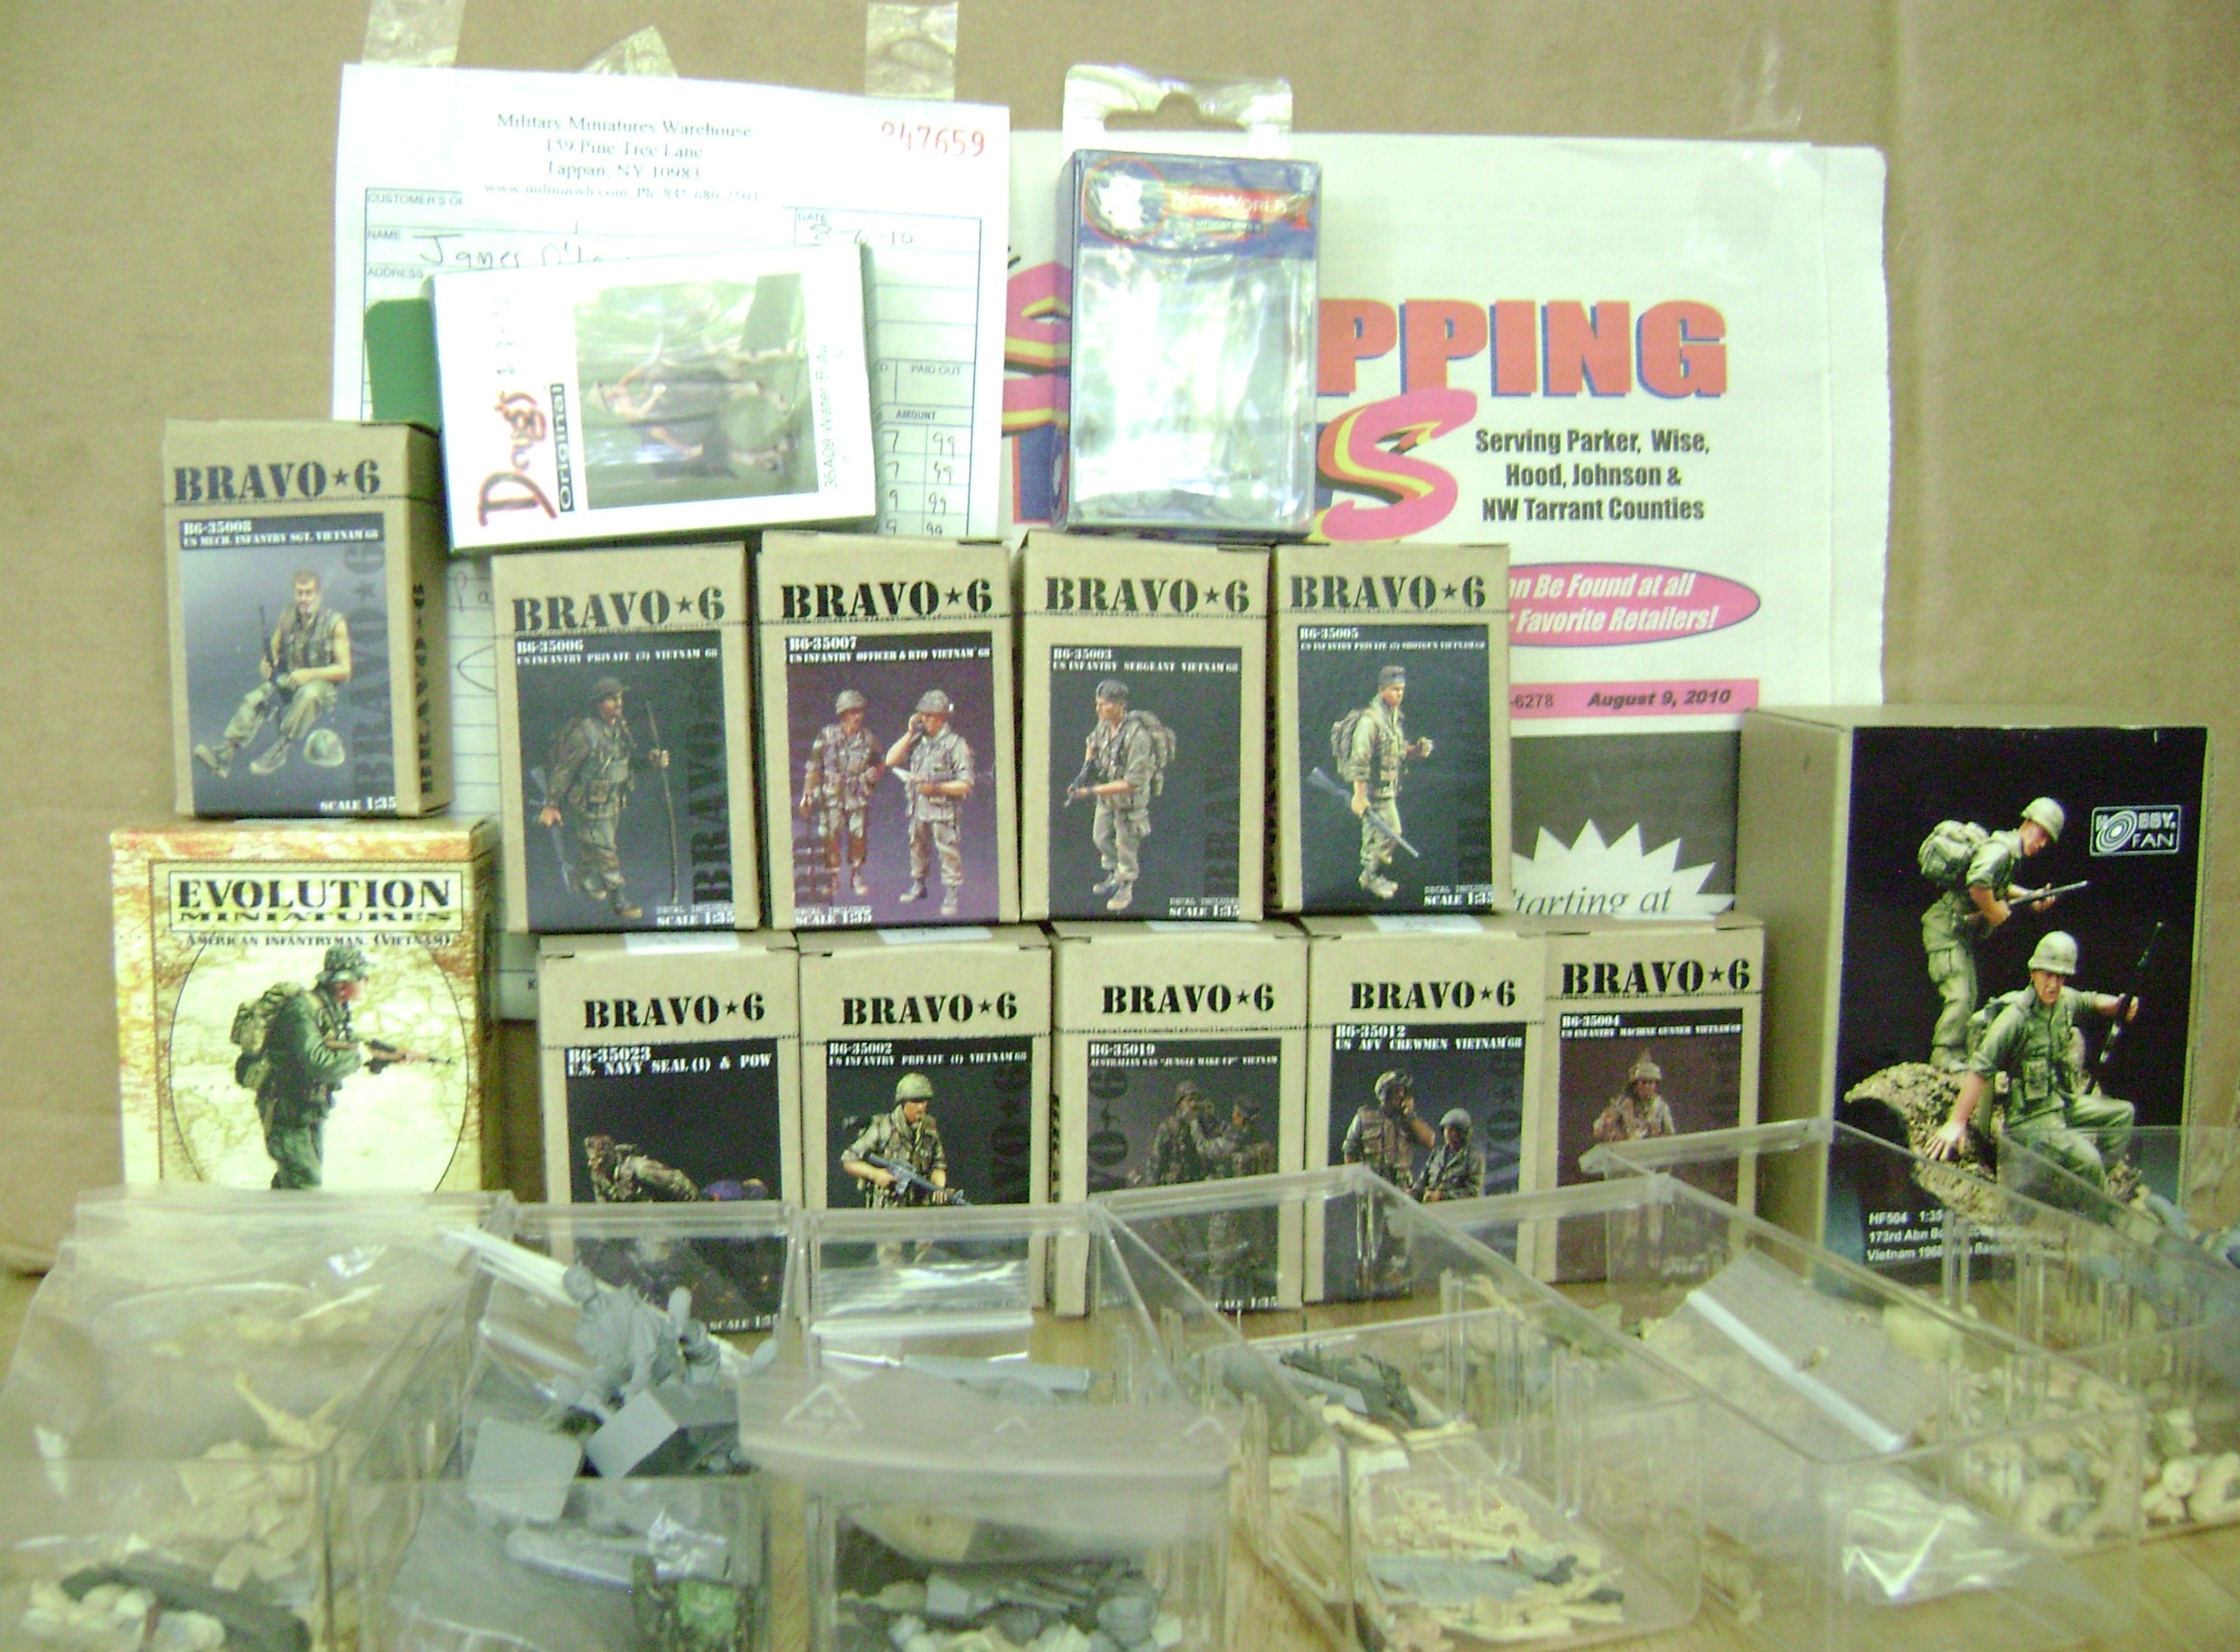
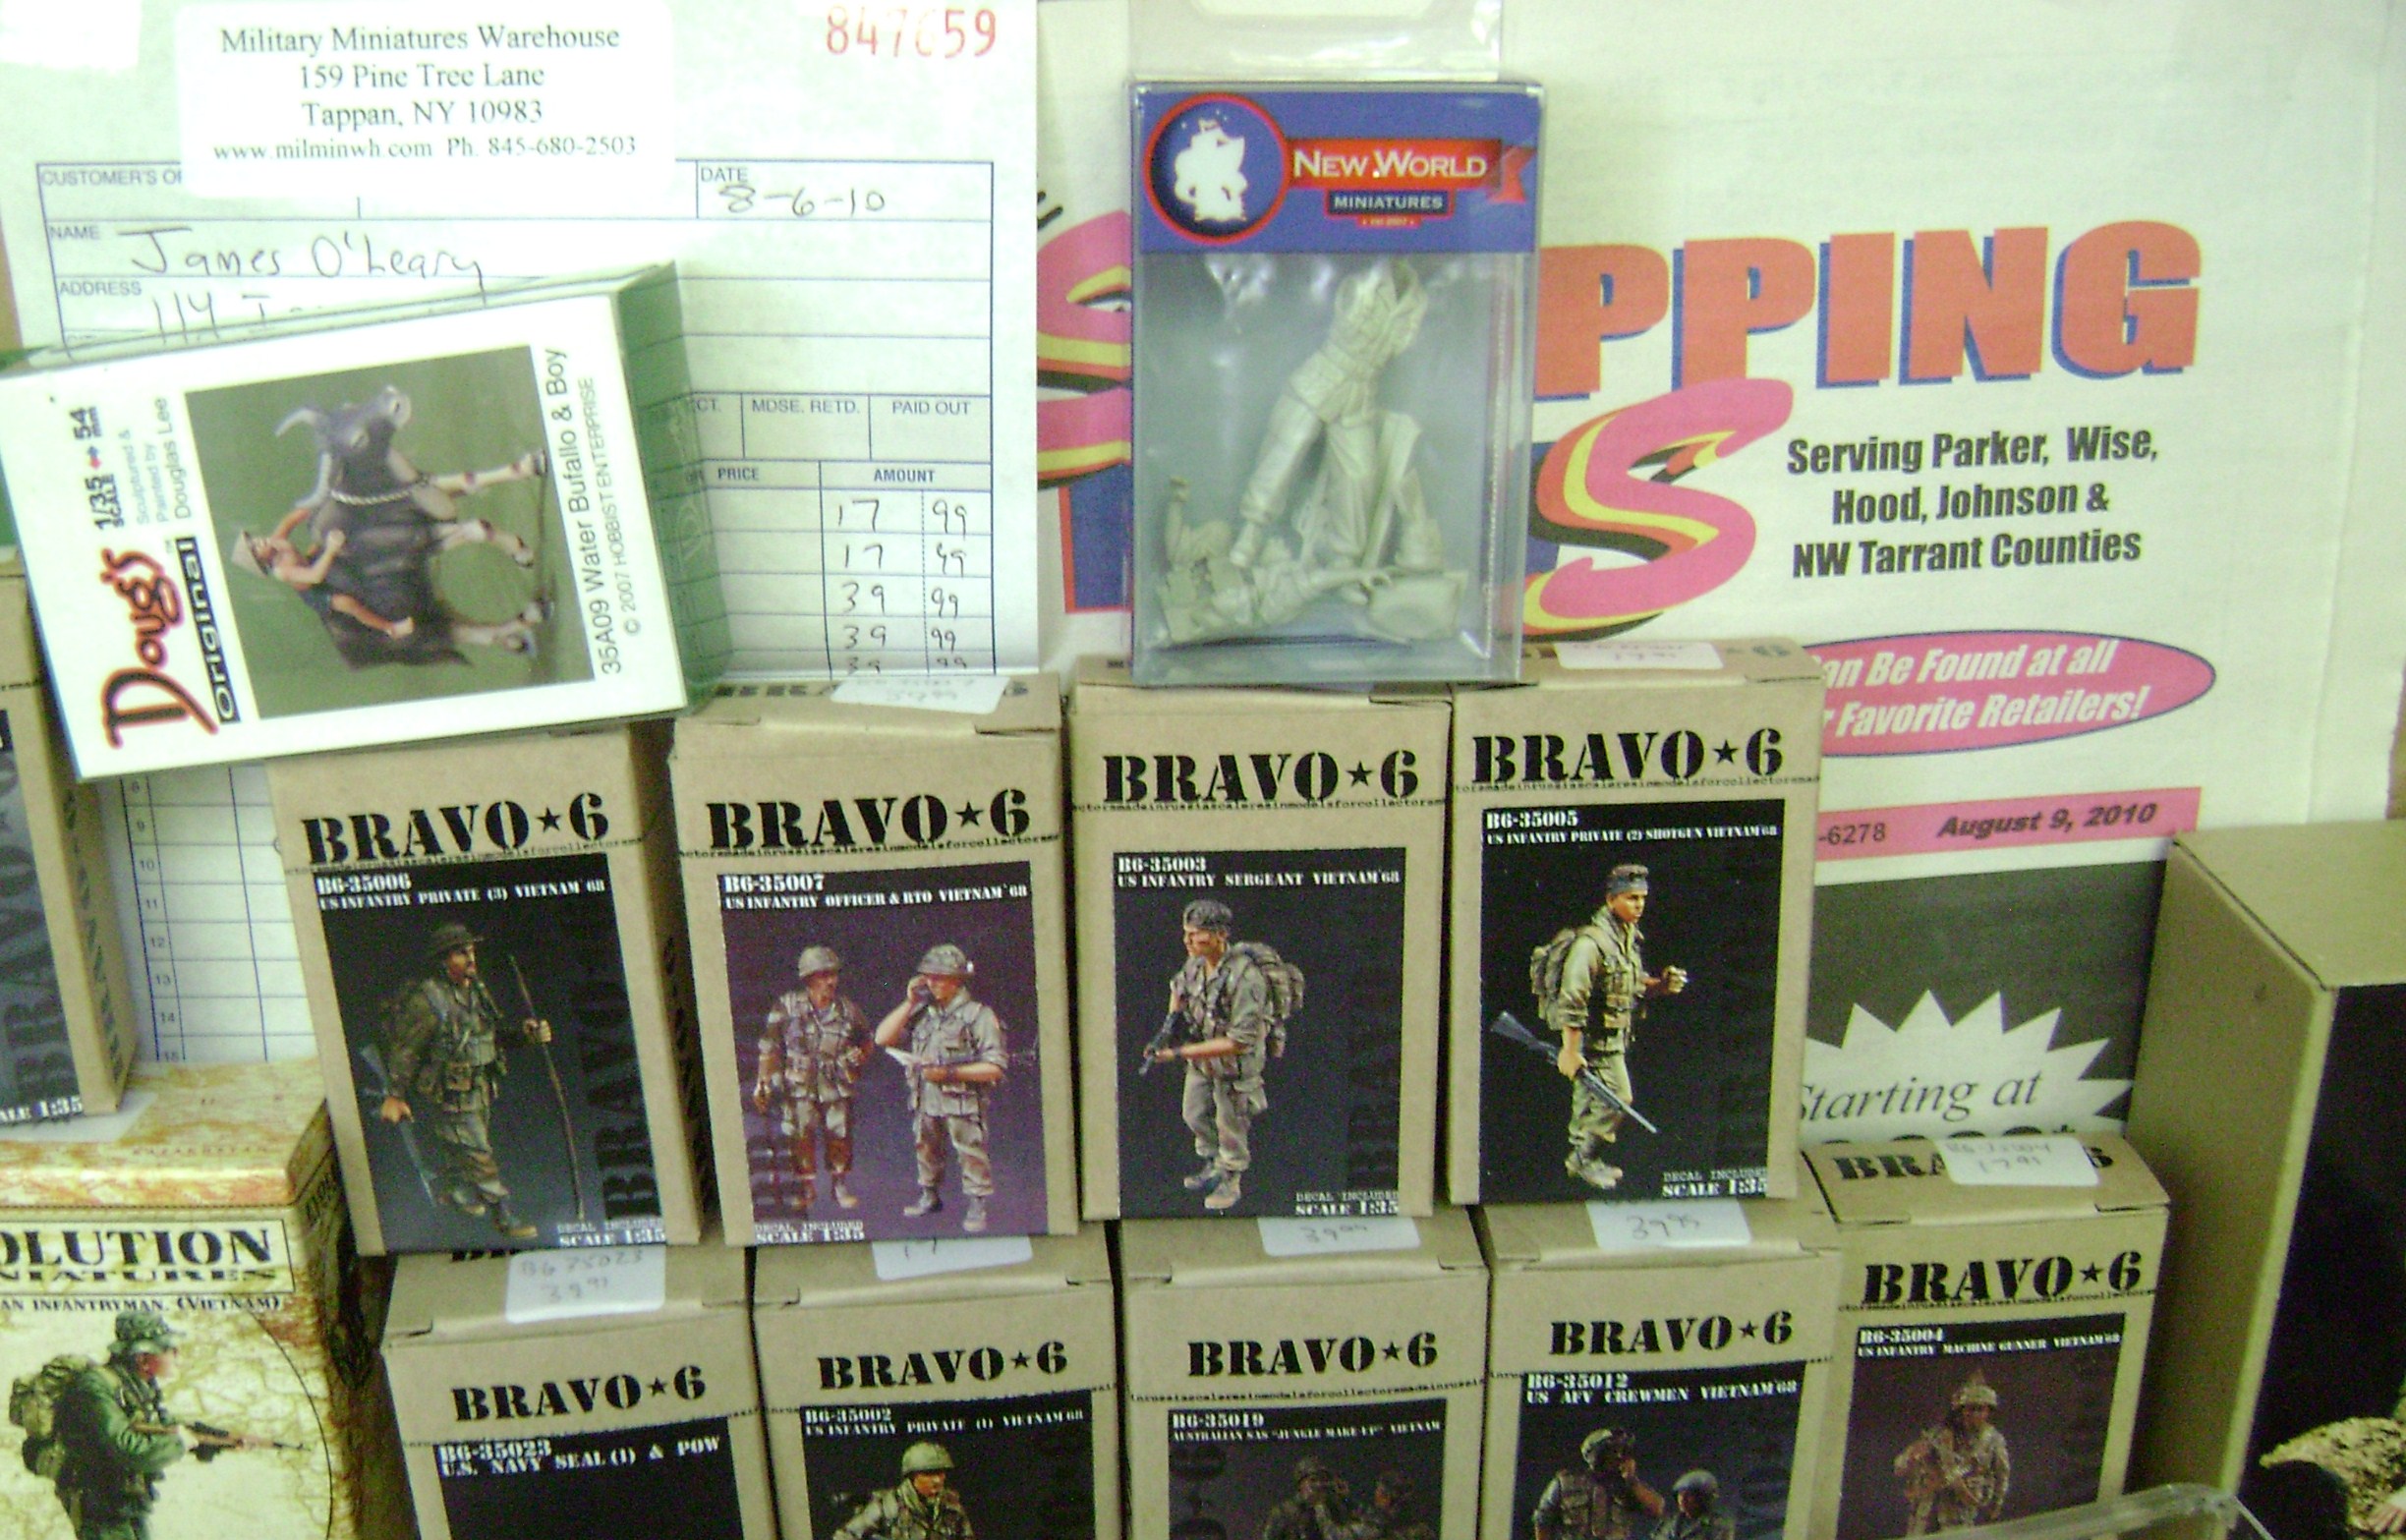
I'll post the photo with the newspaper in it once I get home to the computer where my pictures are stored.

I have several projects that I plan on working on over the course of this year. Since I primarily do figures and figure vignettes/dioramas, that is what most will consist of.

The first two projects that I have been working on since August are two single figure displays. Both are figure conversions that I was originally going to include in a diorama, but some military temporay duties came up and will be taking away some of the time I needed to try to complete the project prior to the model show in Austin, Texas on the 9th of October. Since I was going to be running short on time, and it didn't look like I was going to have anything done for the show if I continued on with my diorama plan, I decided to make my first two figures into single figure subjects. Due to the posing, I was able to make it work.

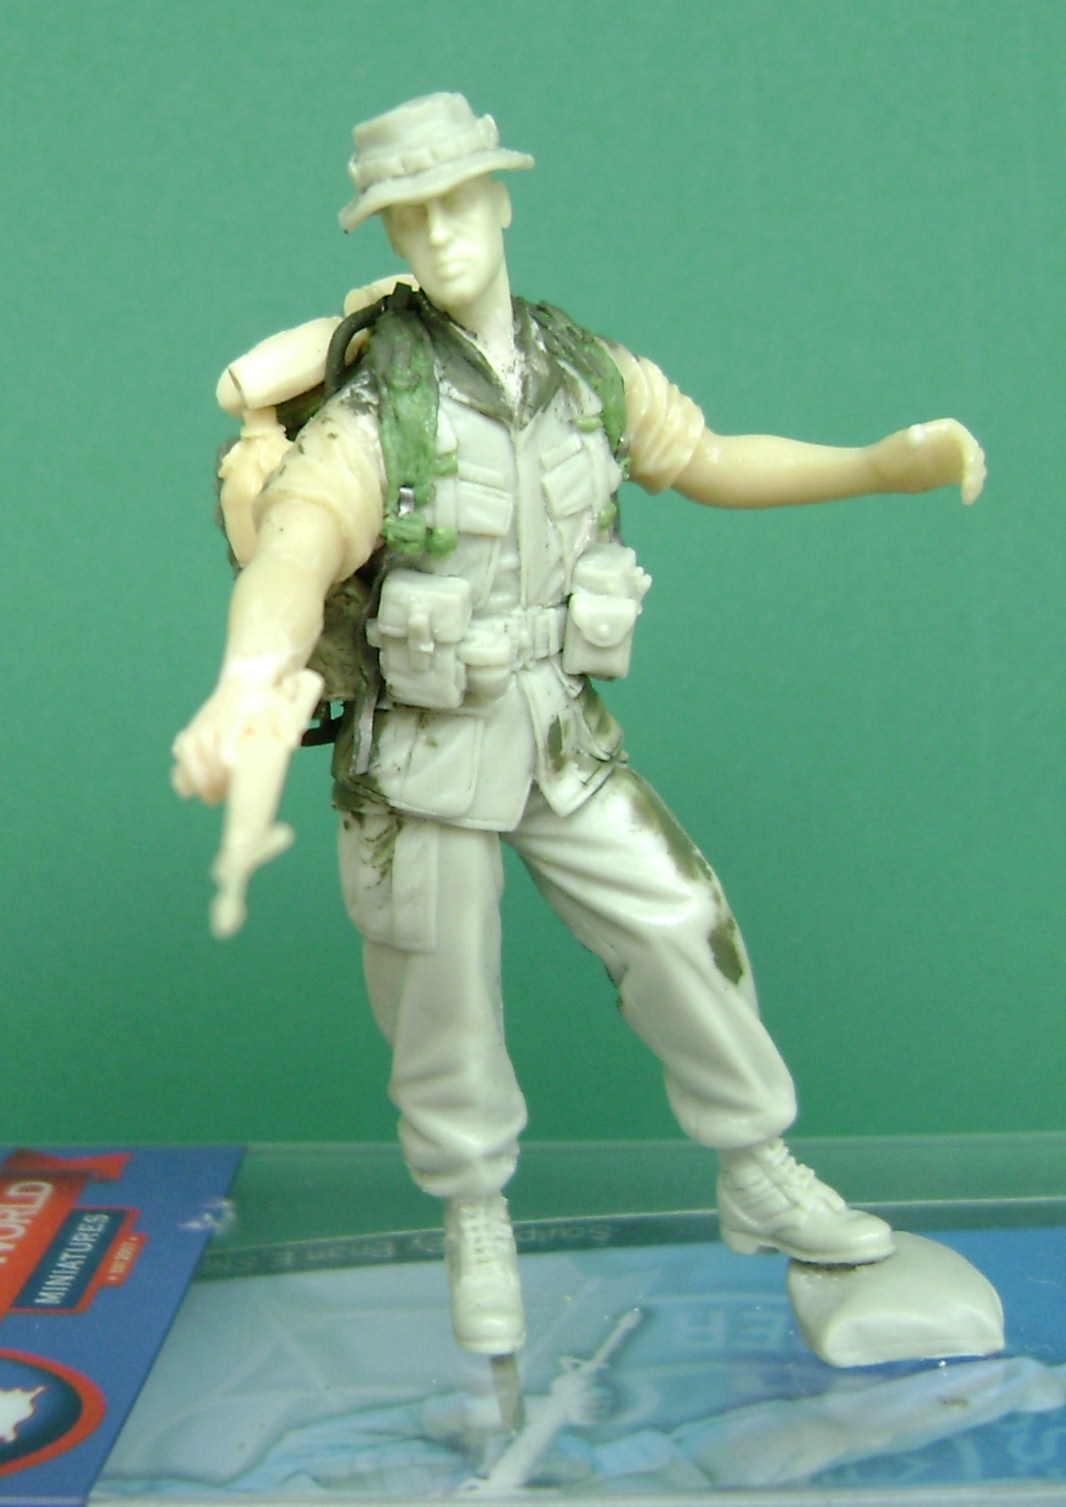
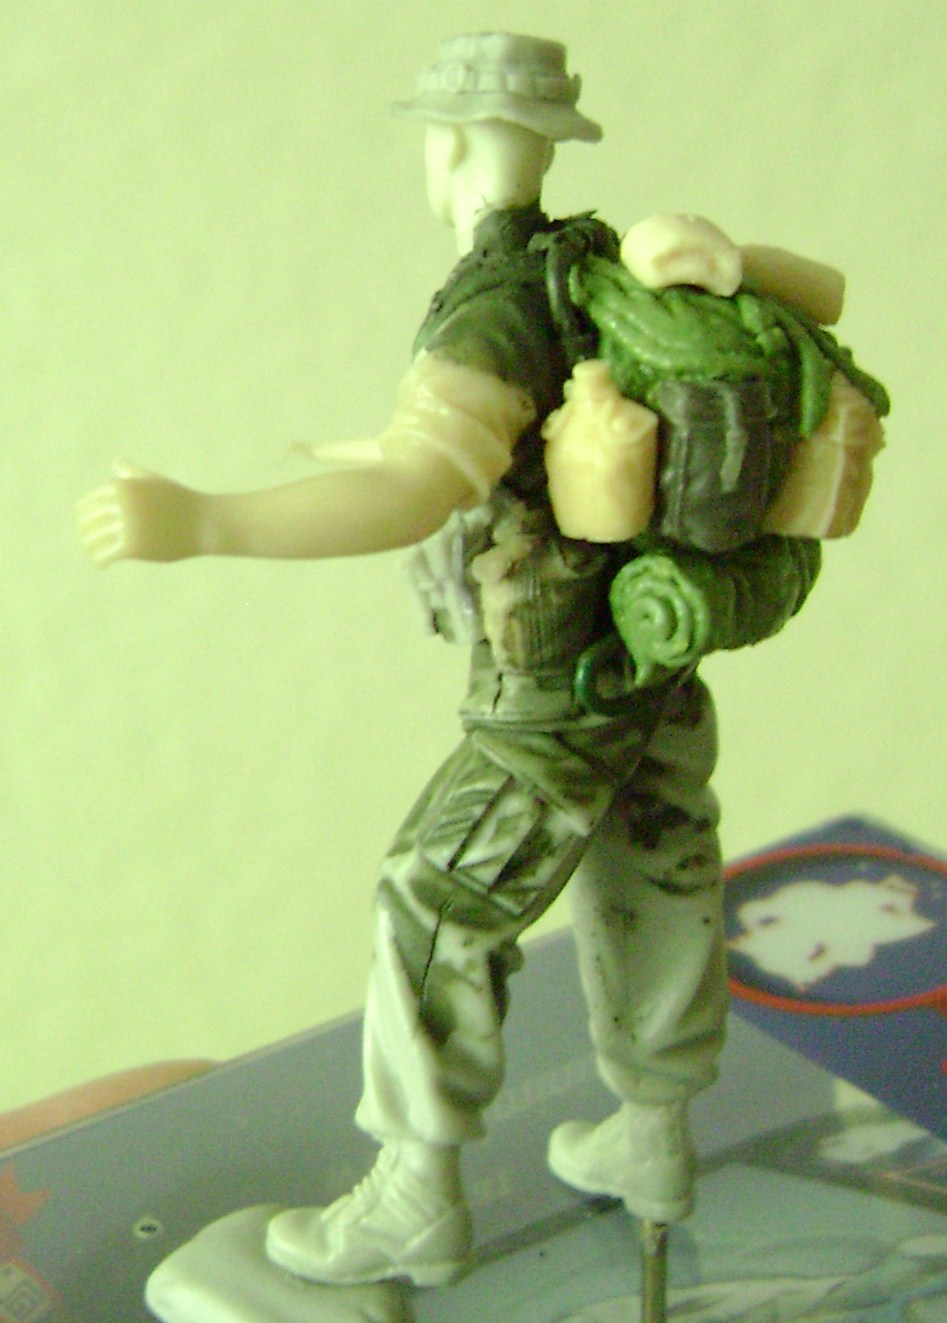
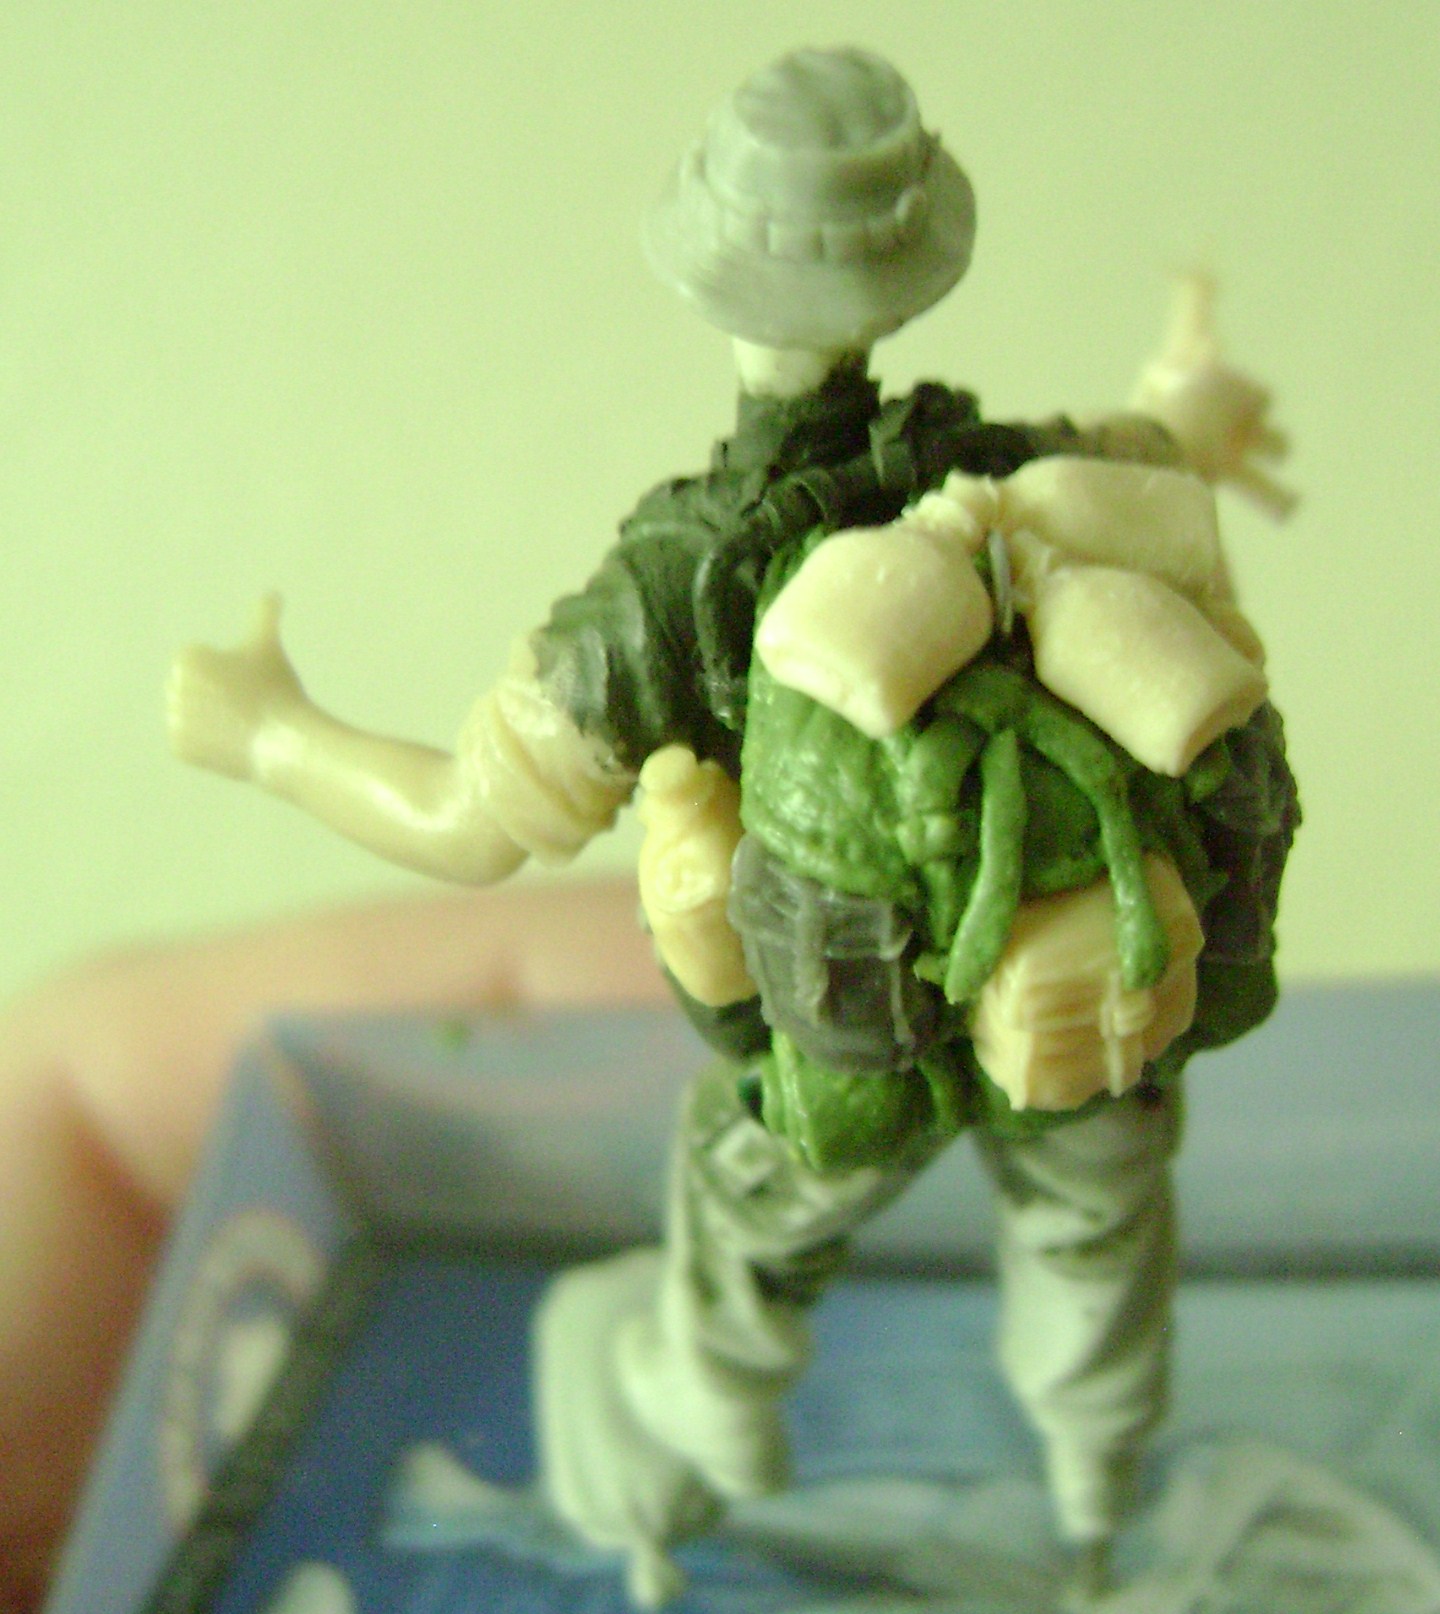
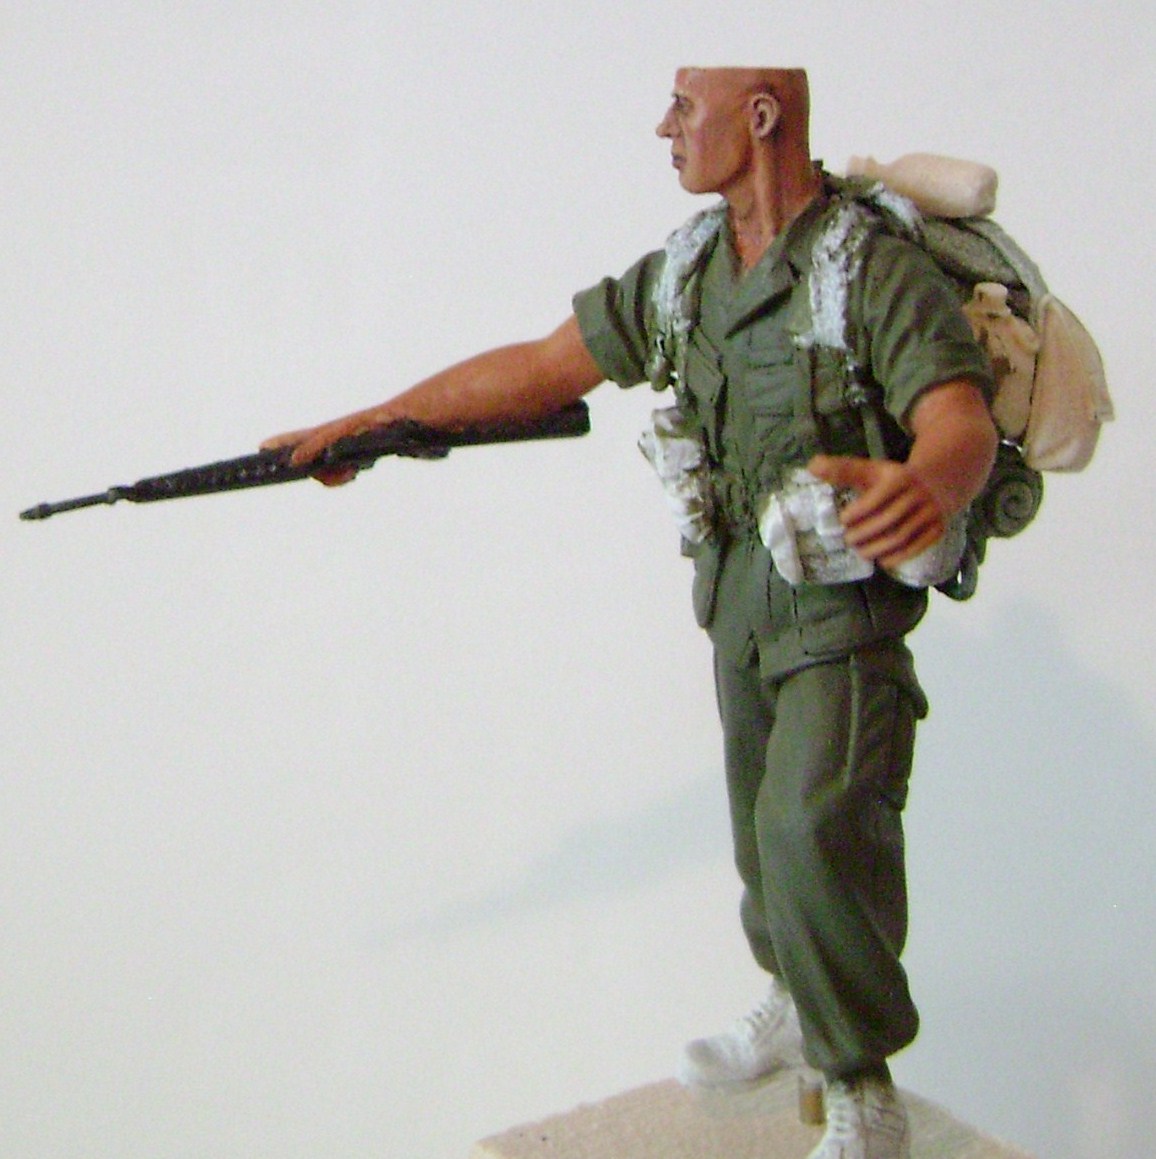
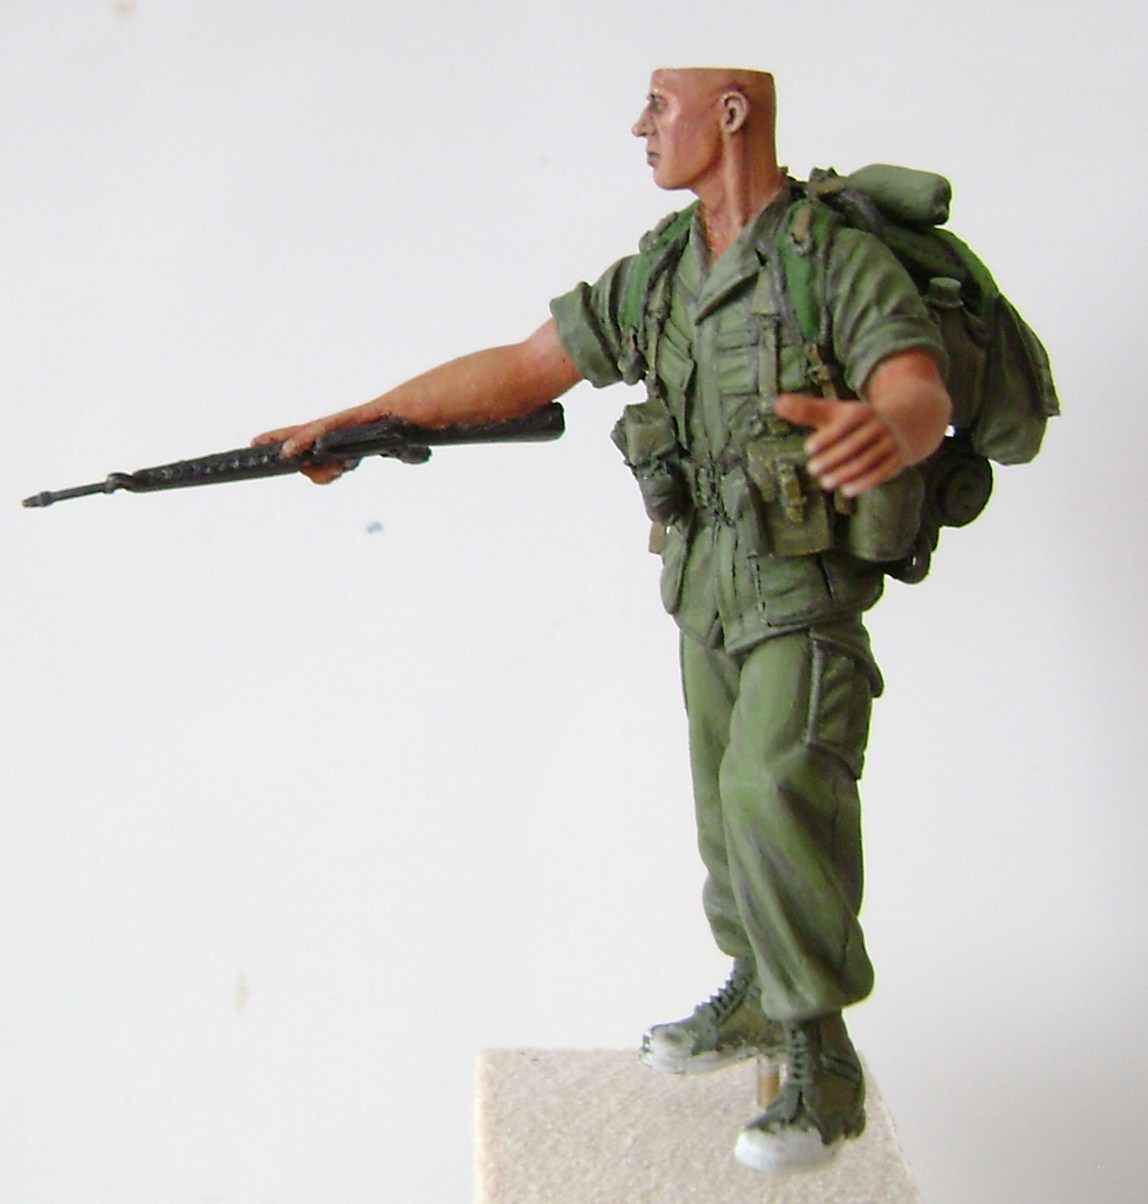
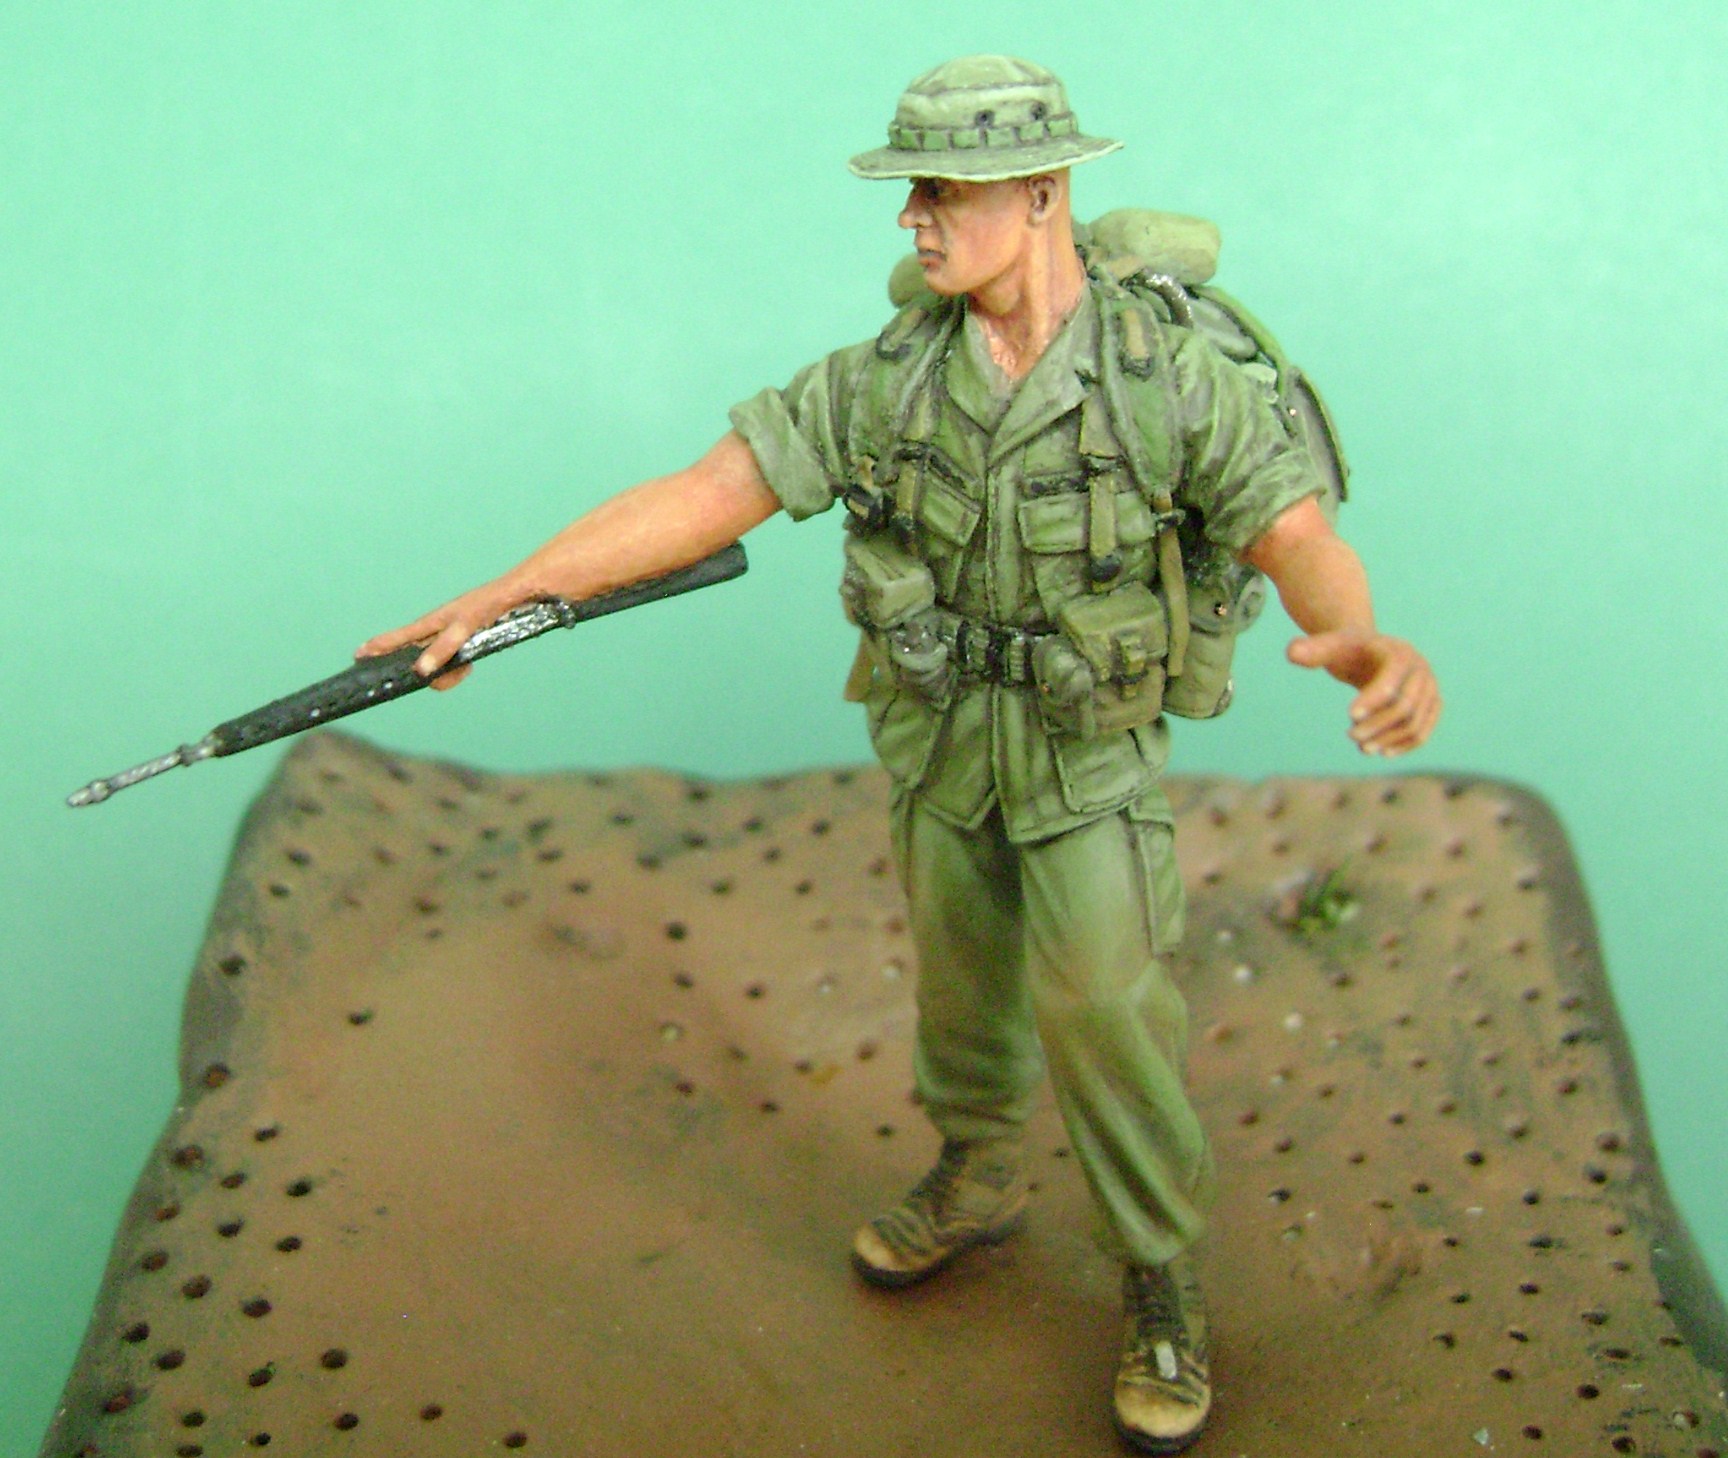
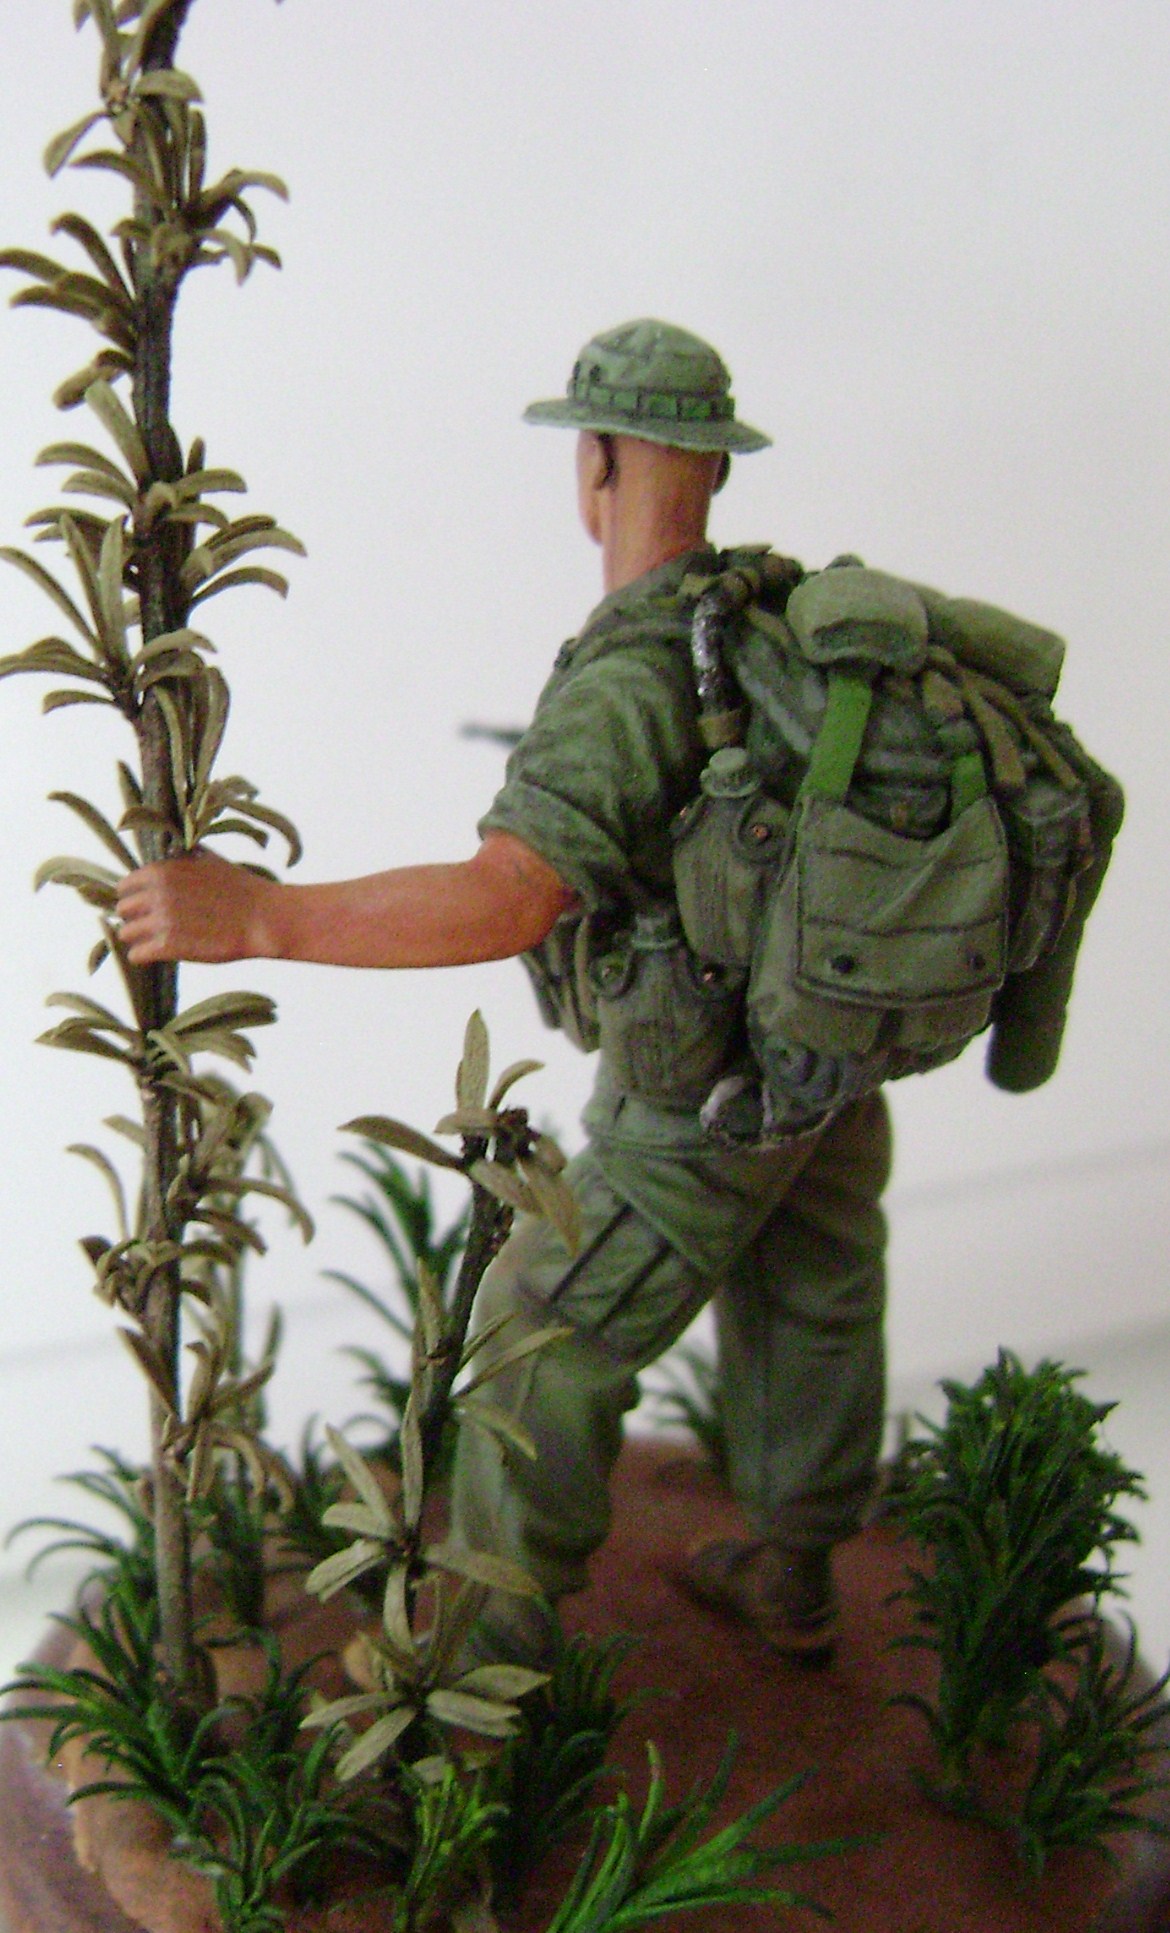
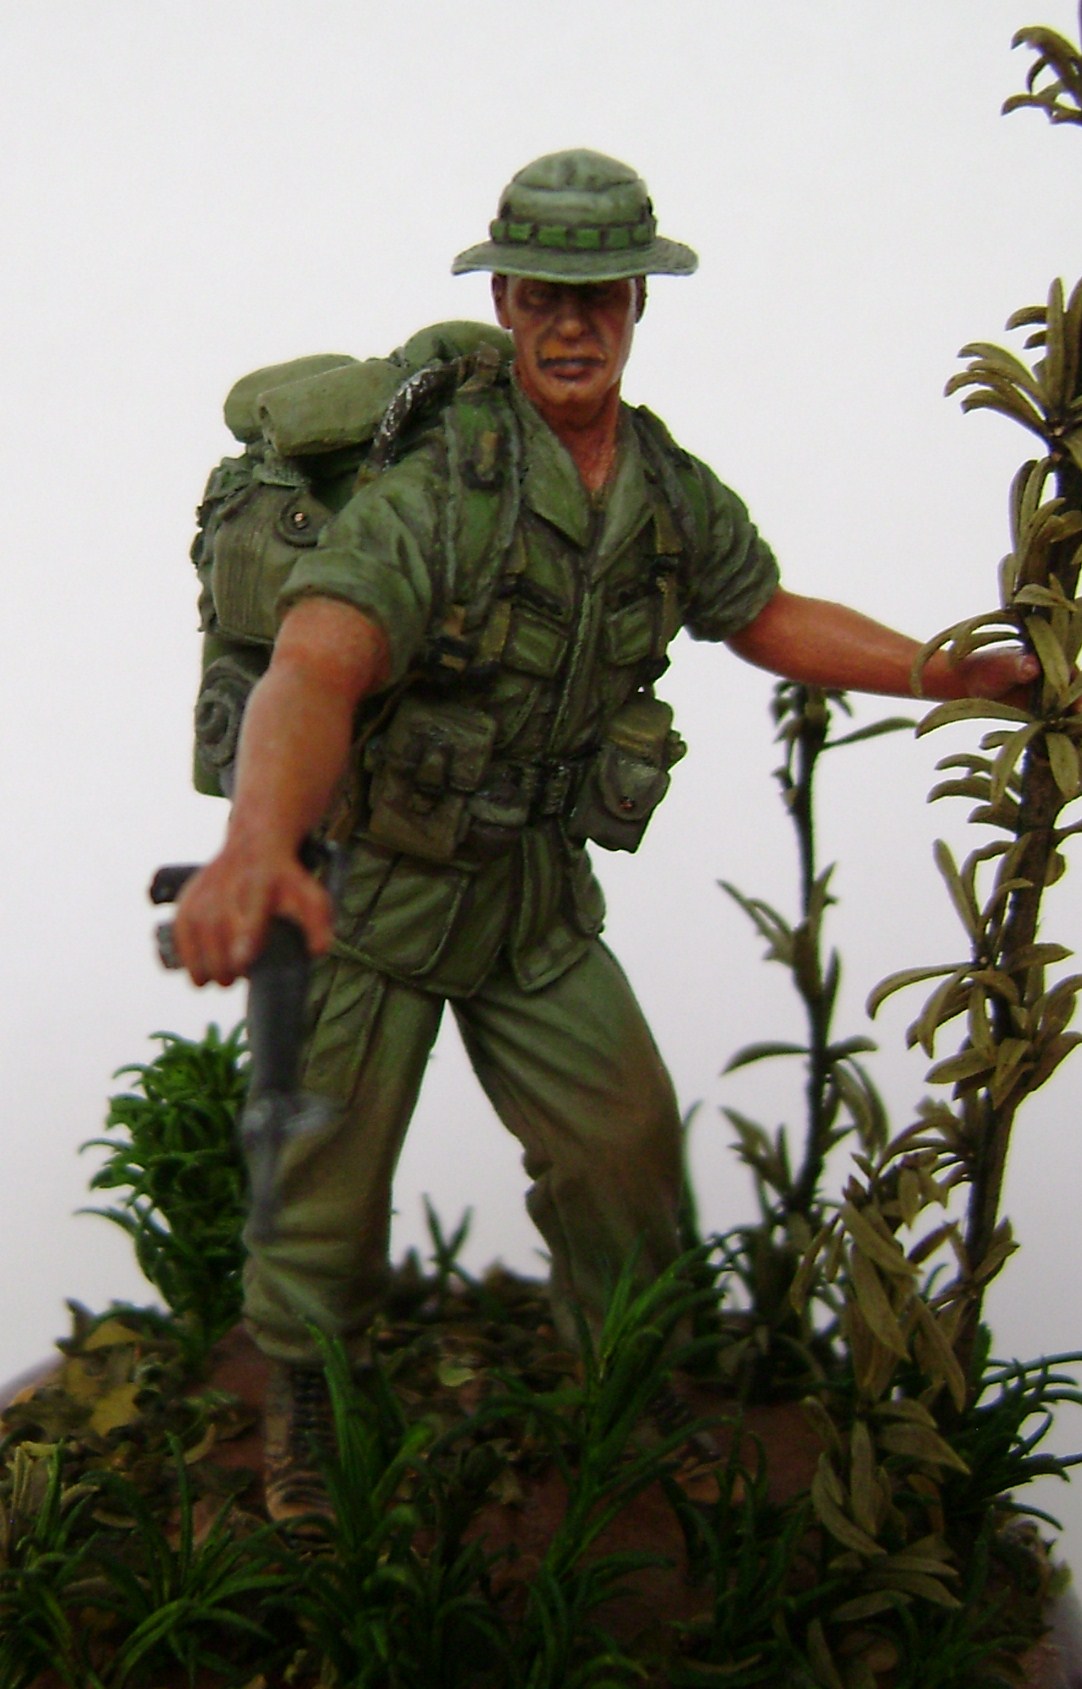
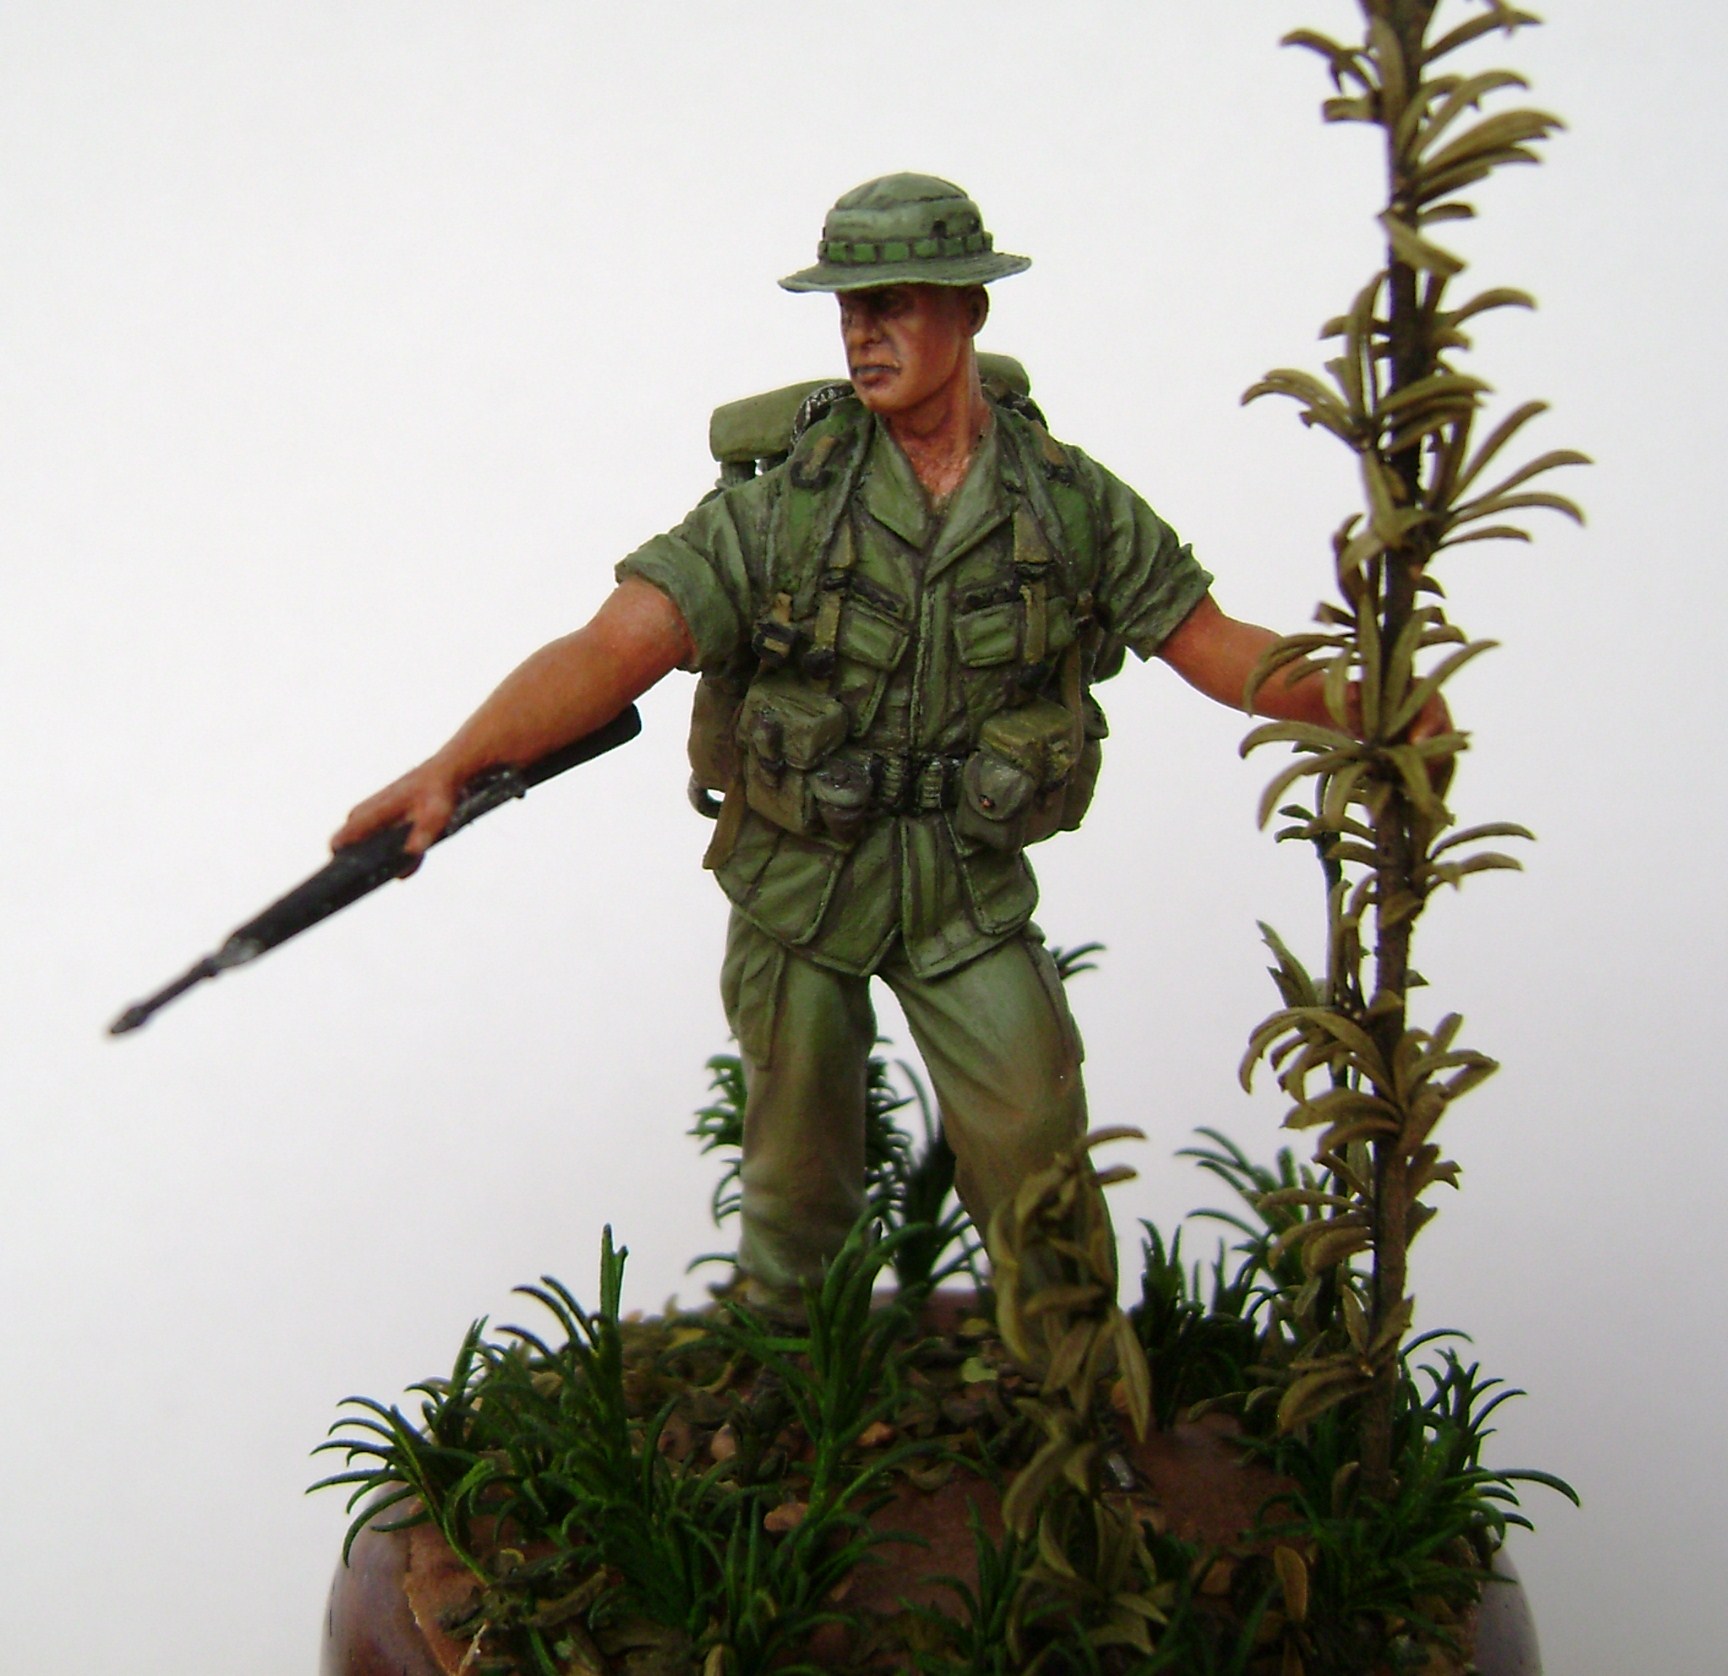
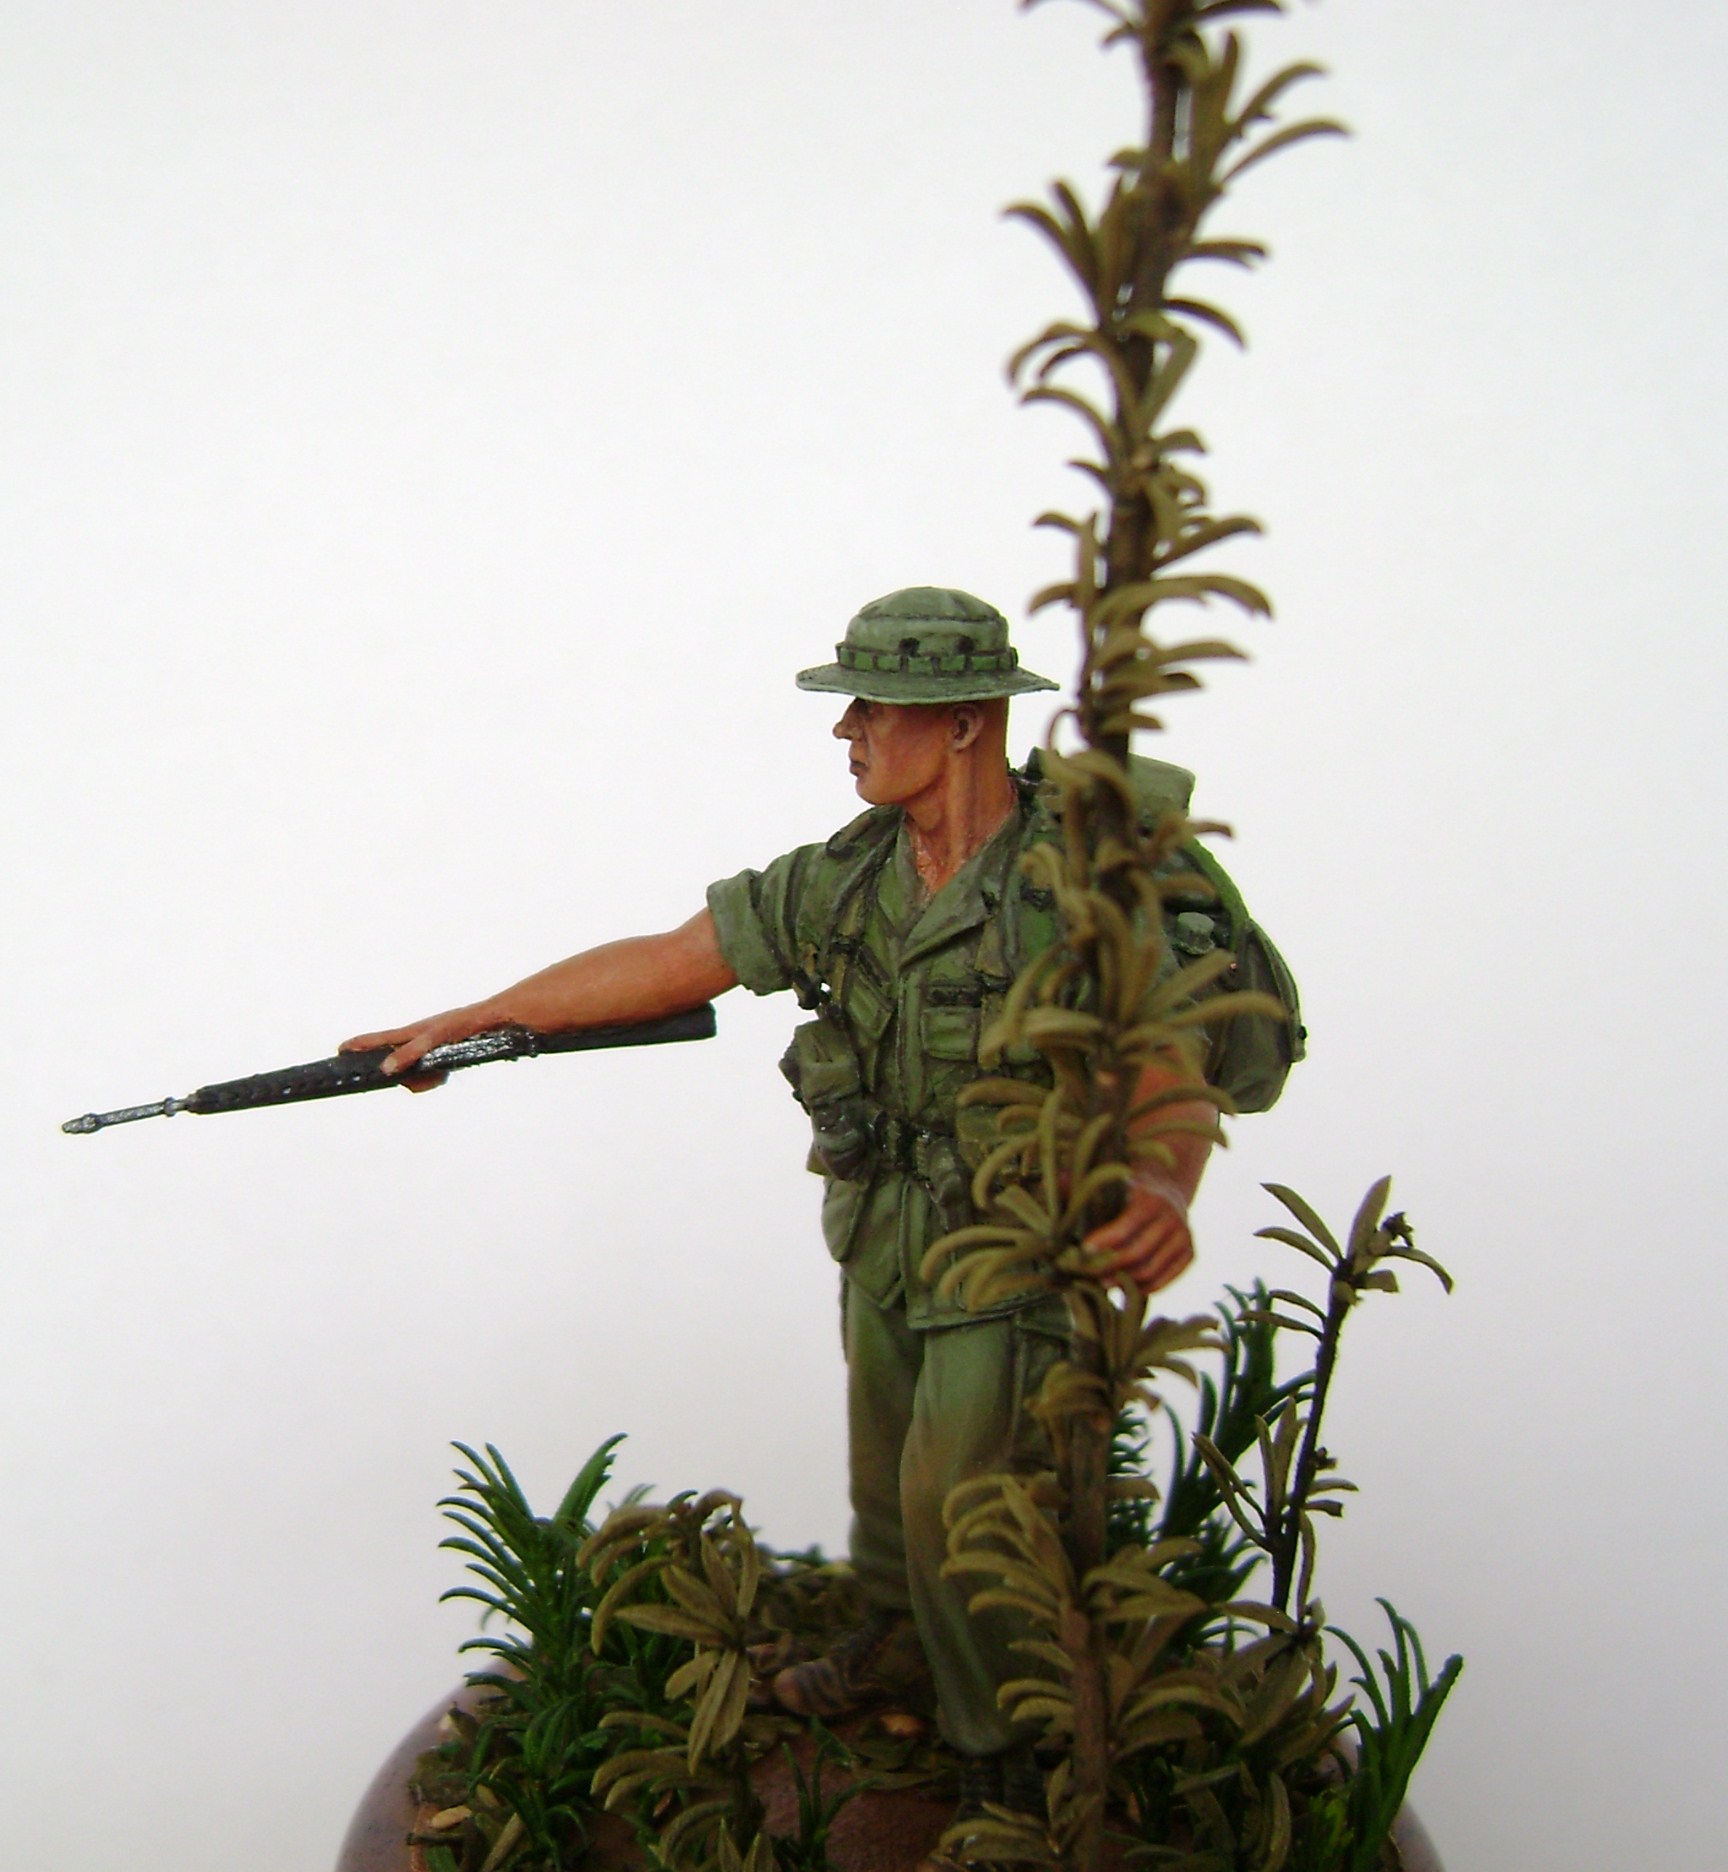
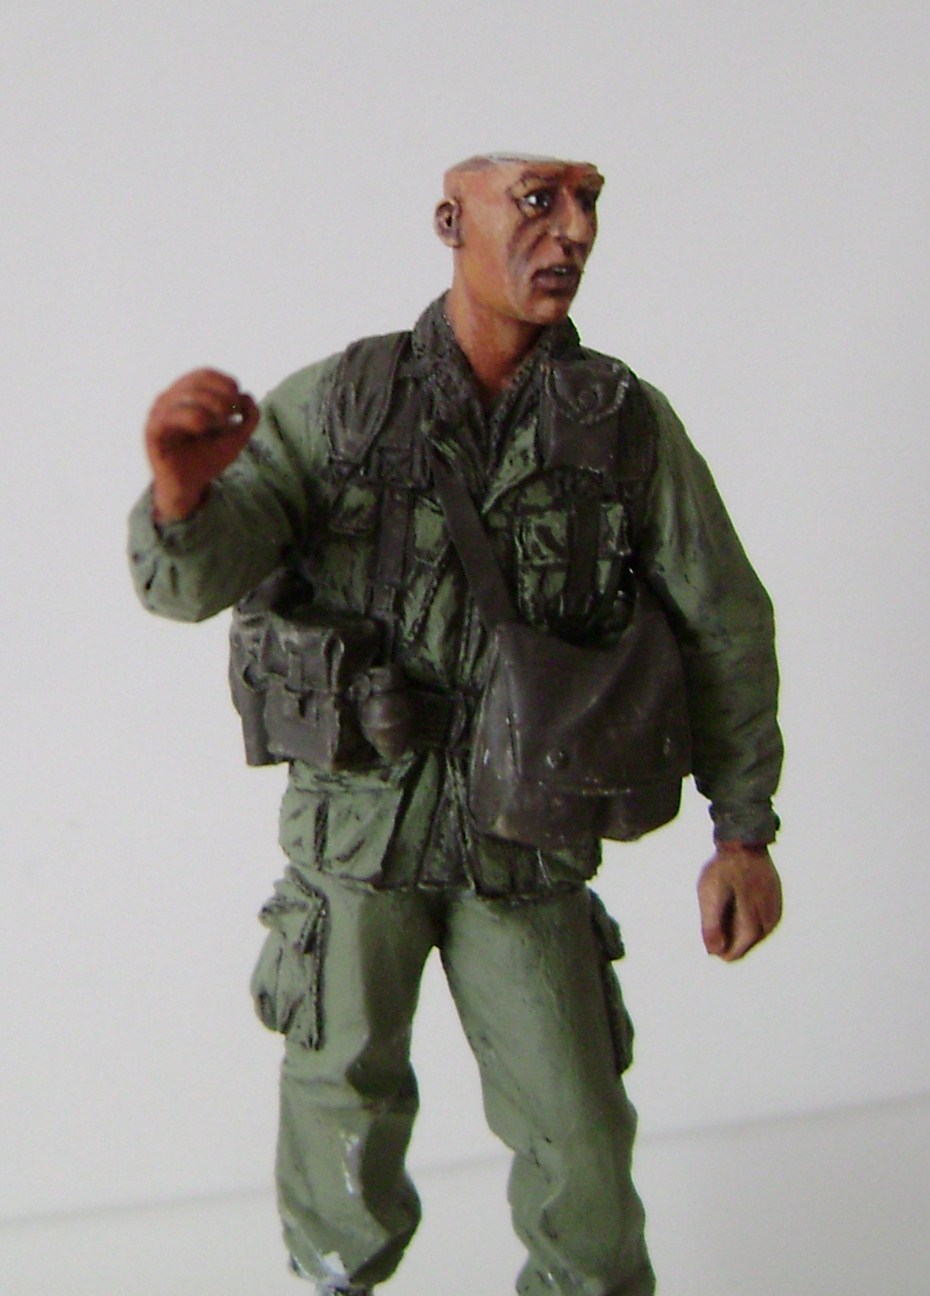
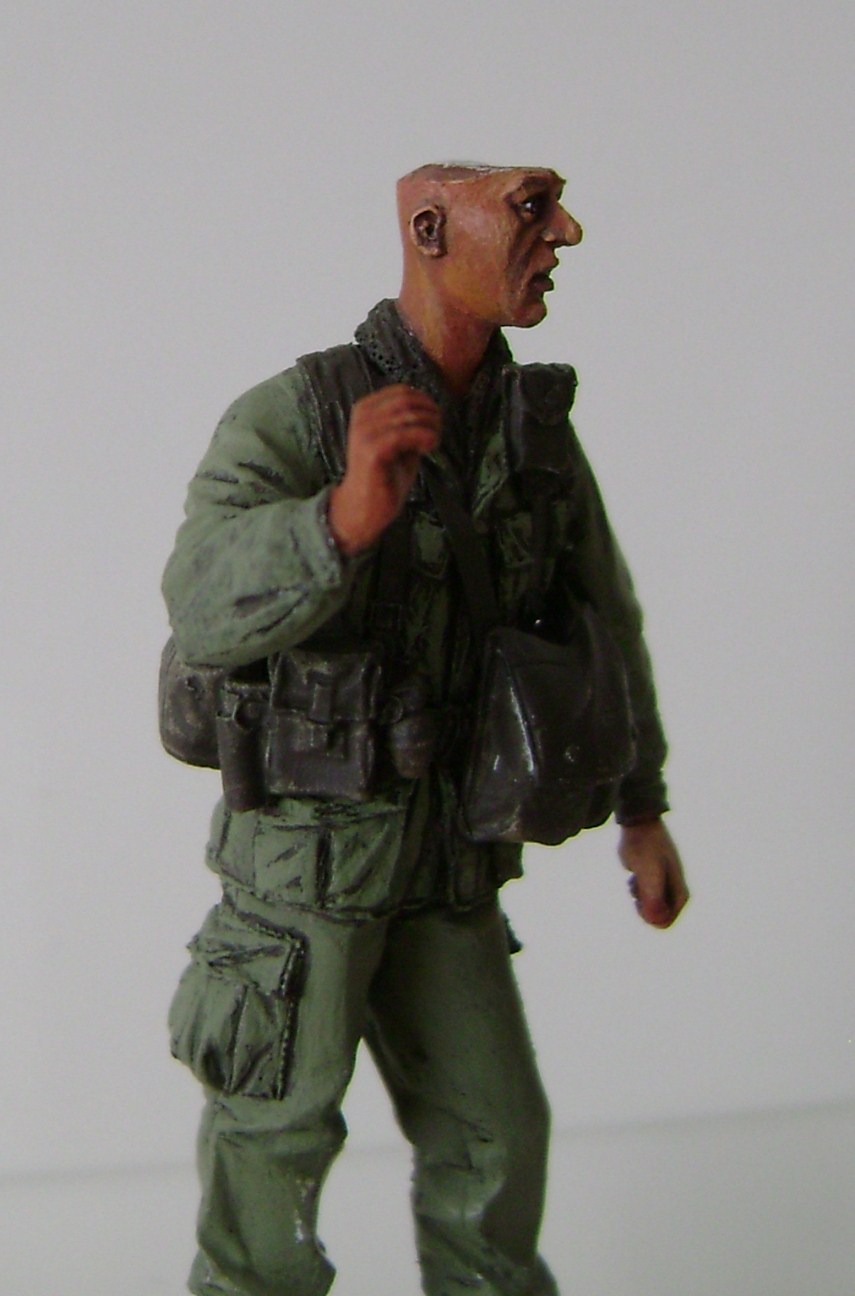
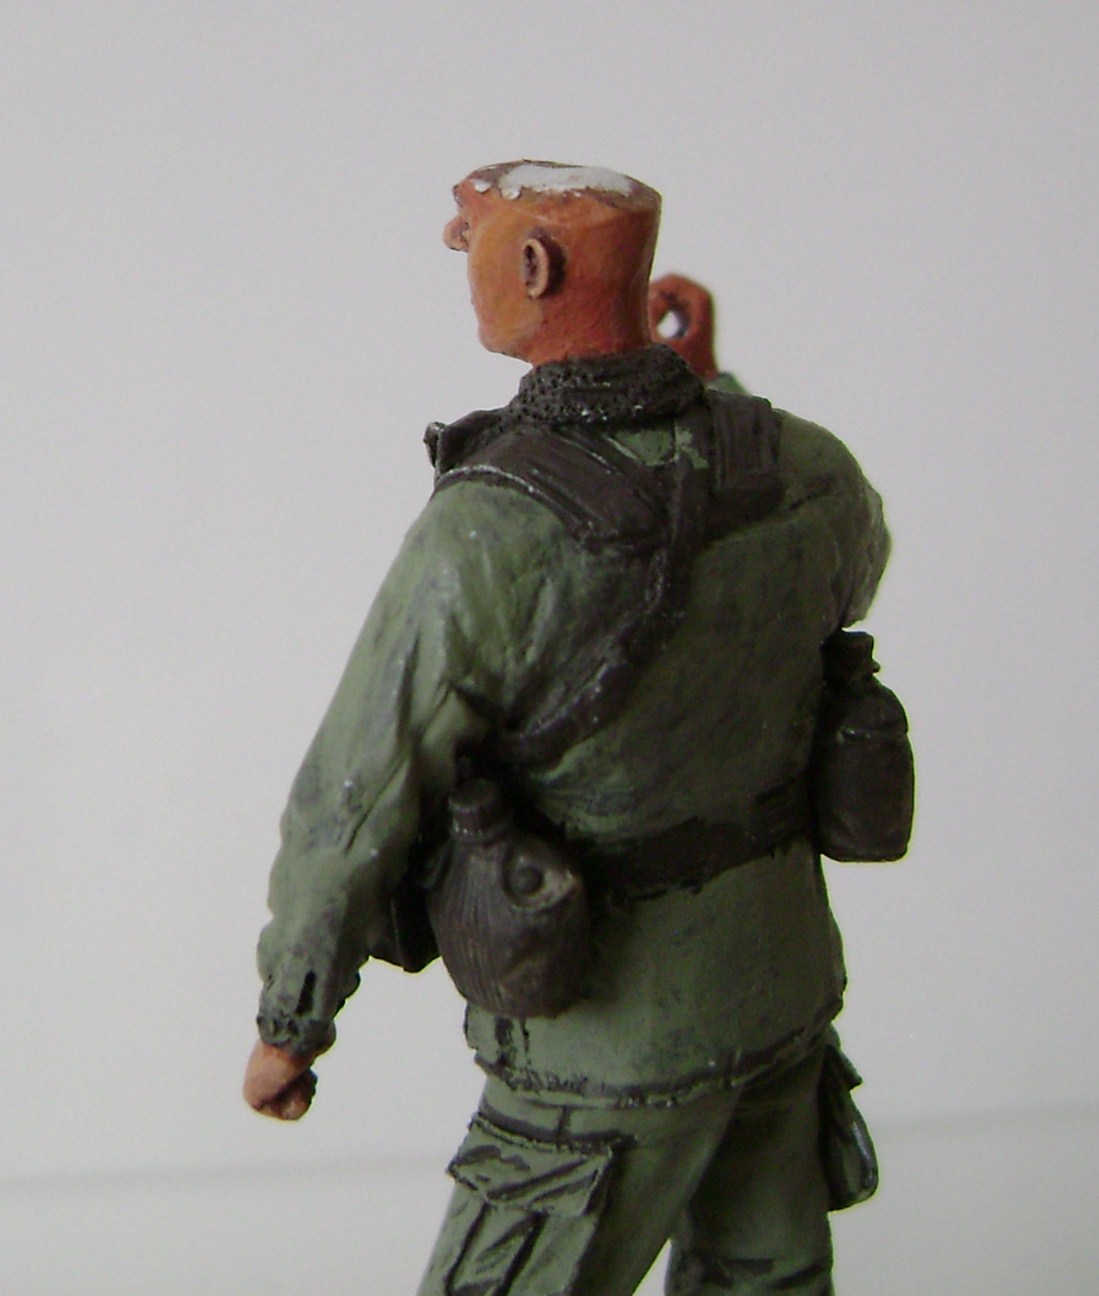
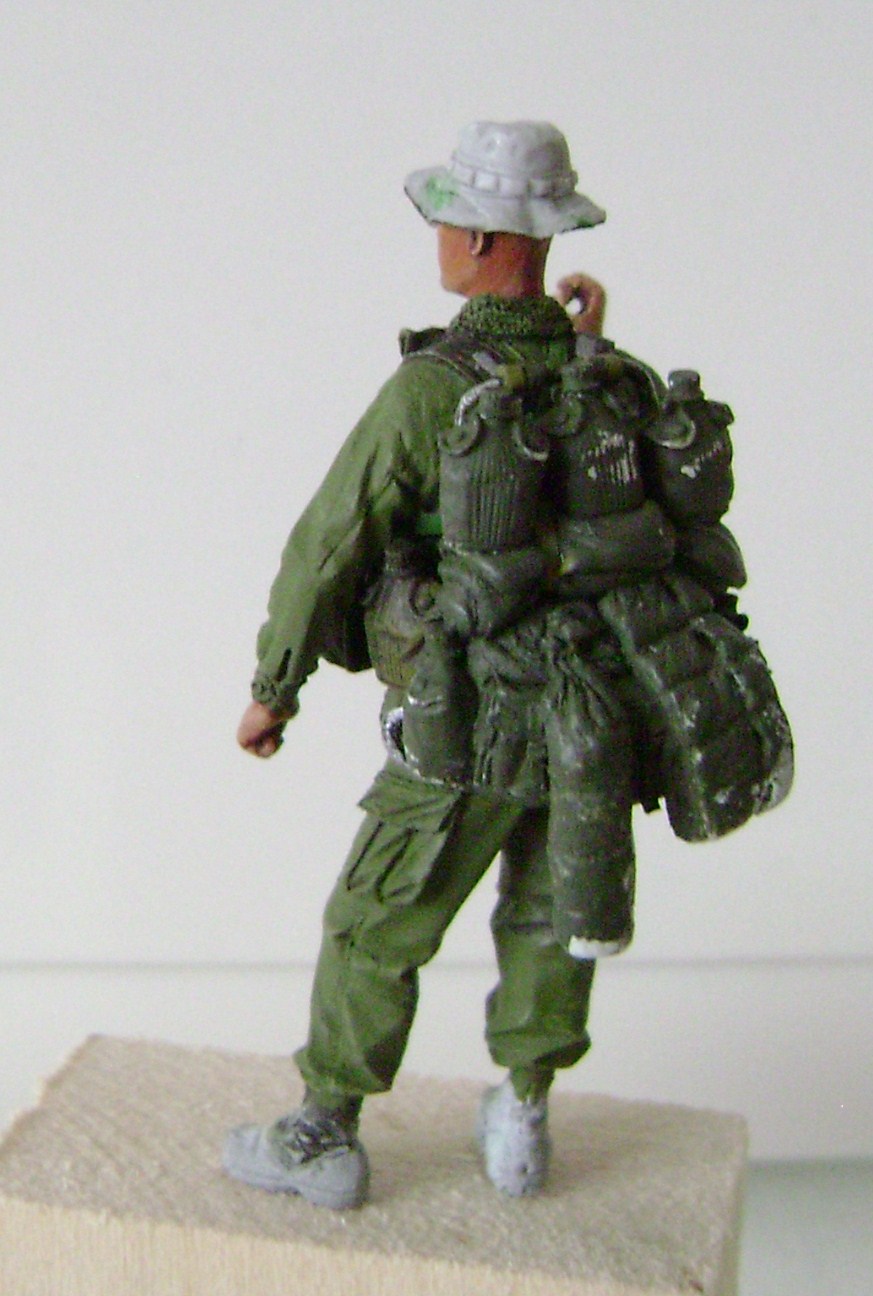
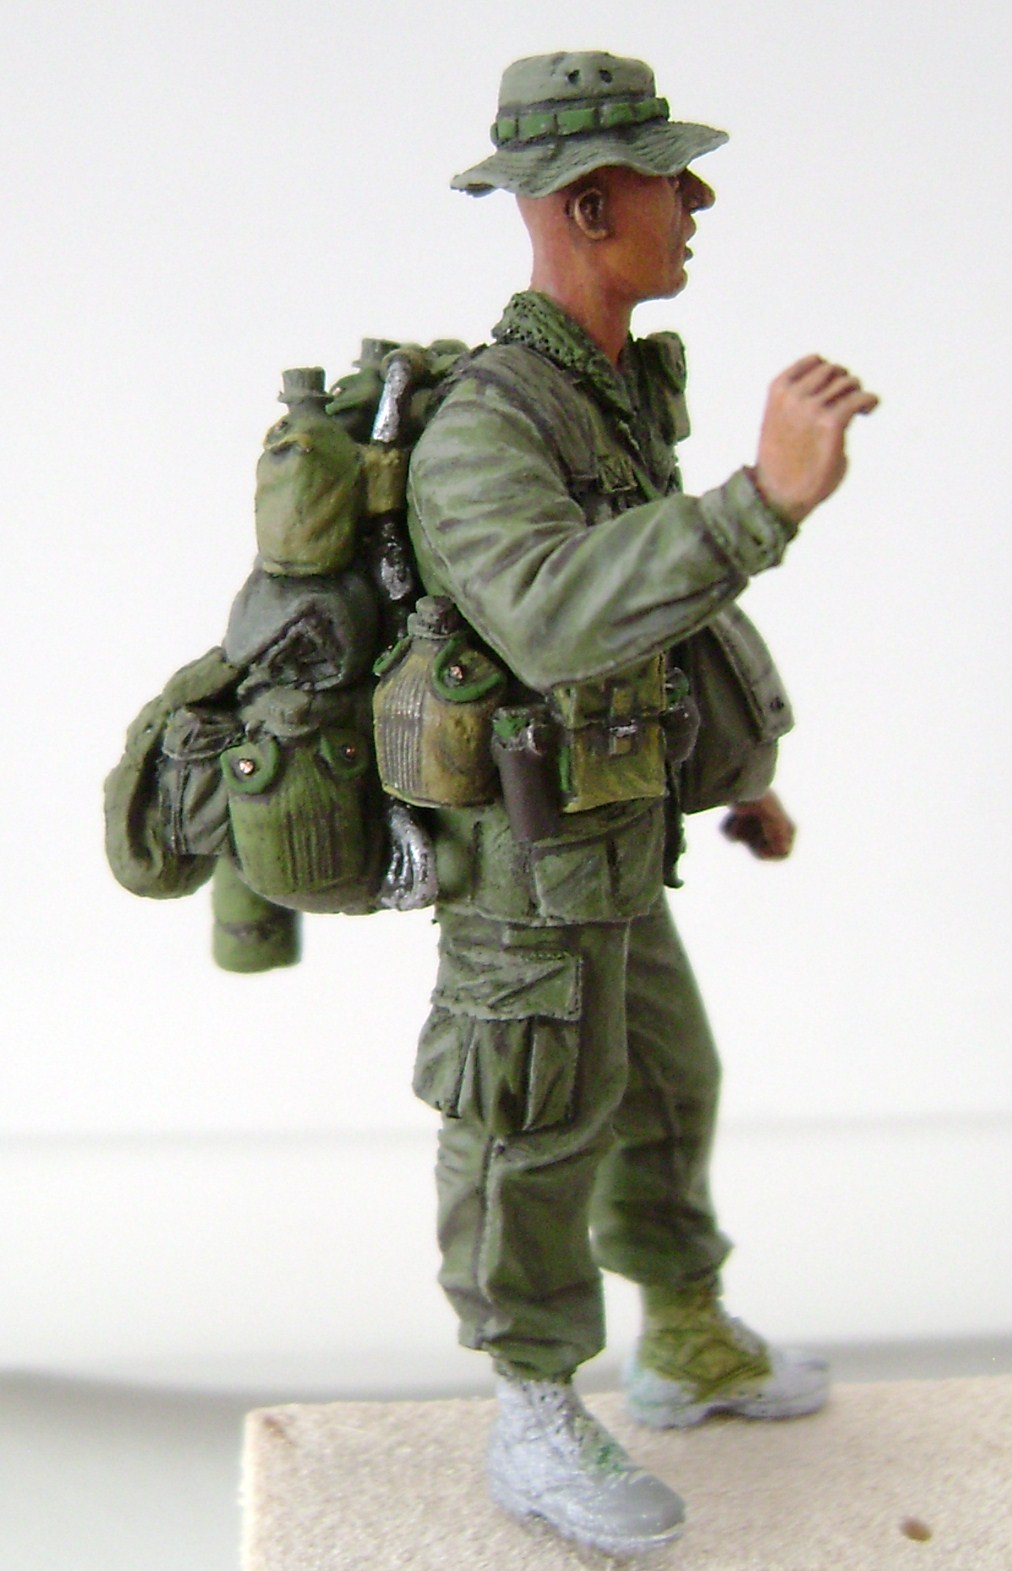
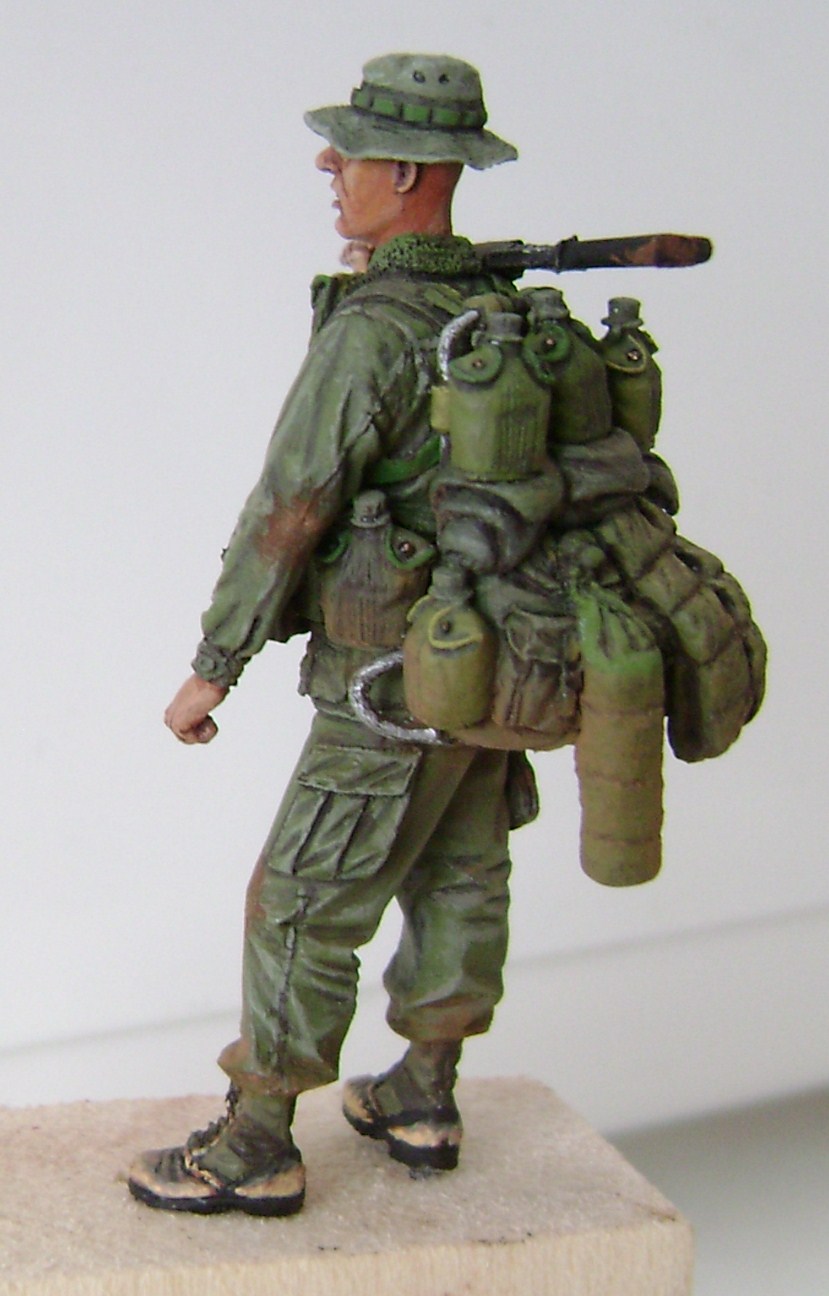
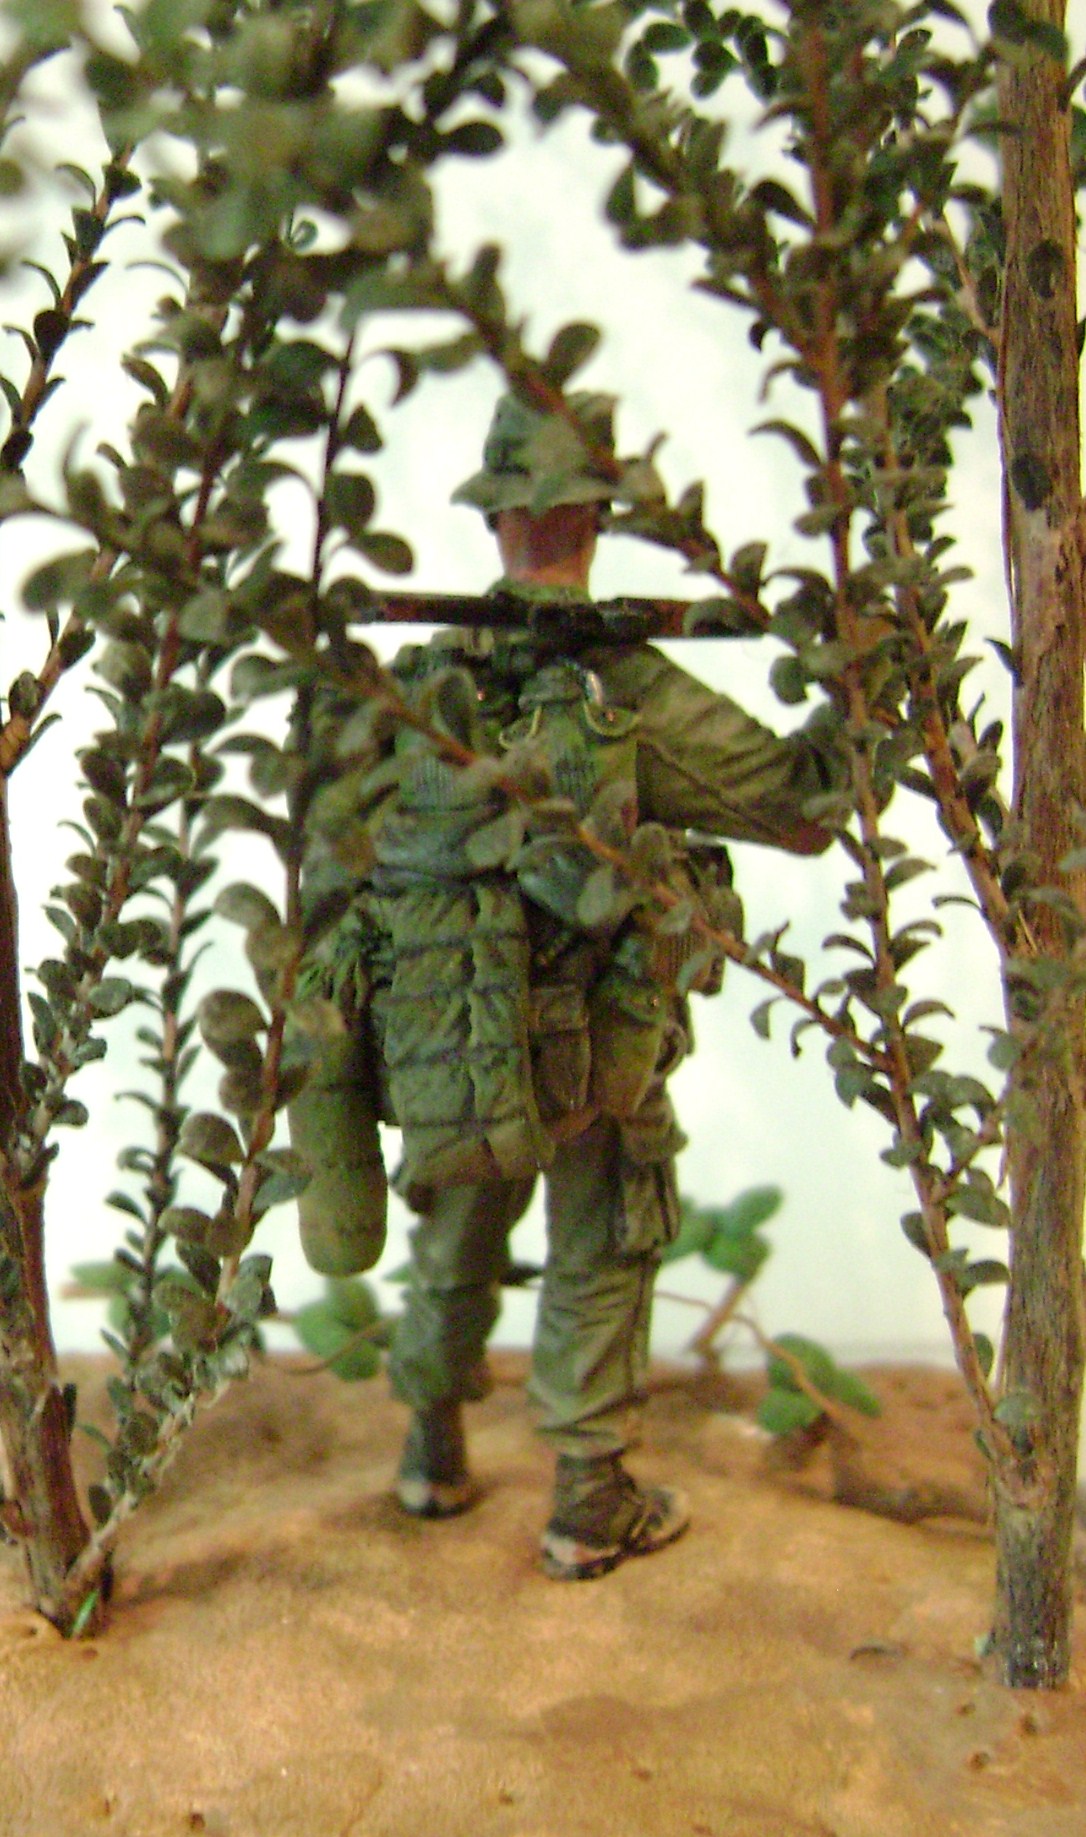
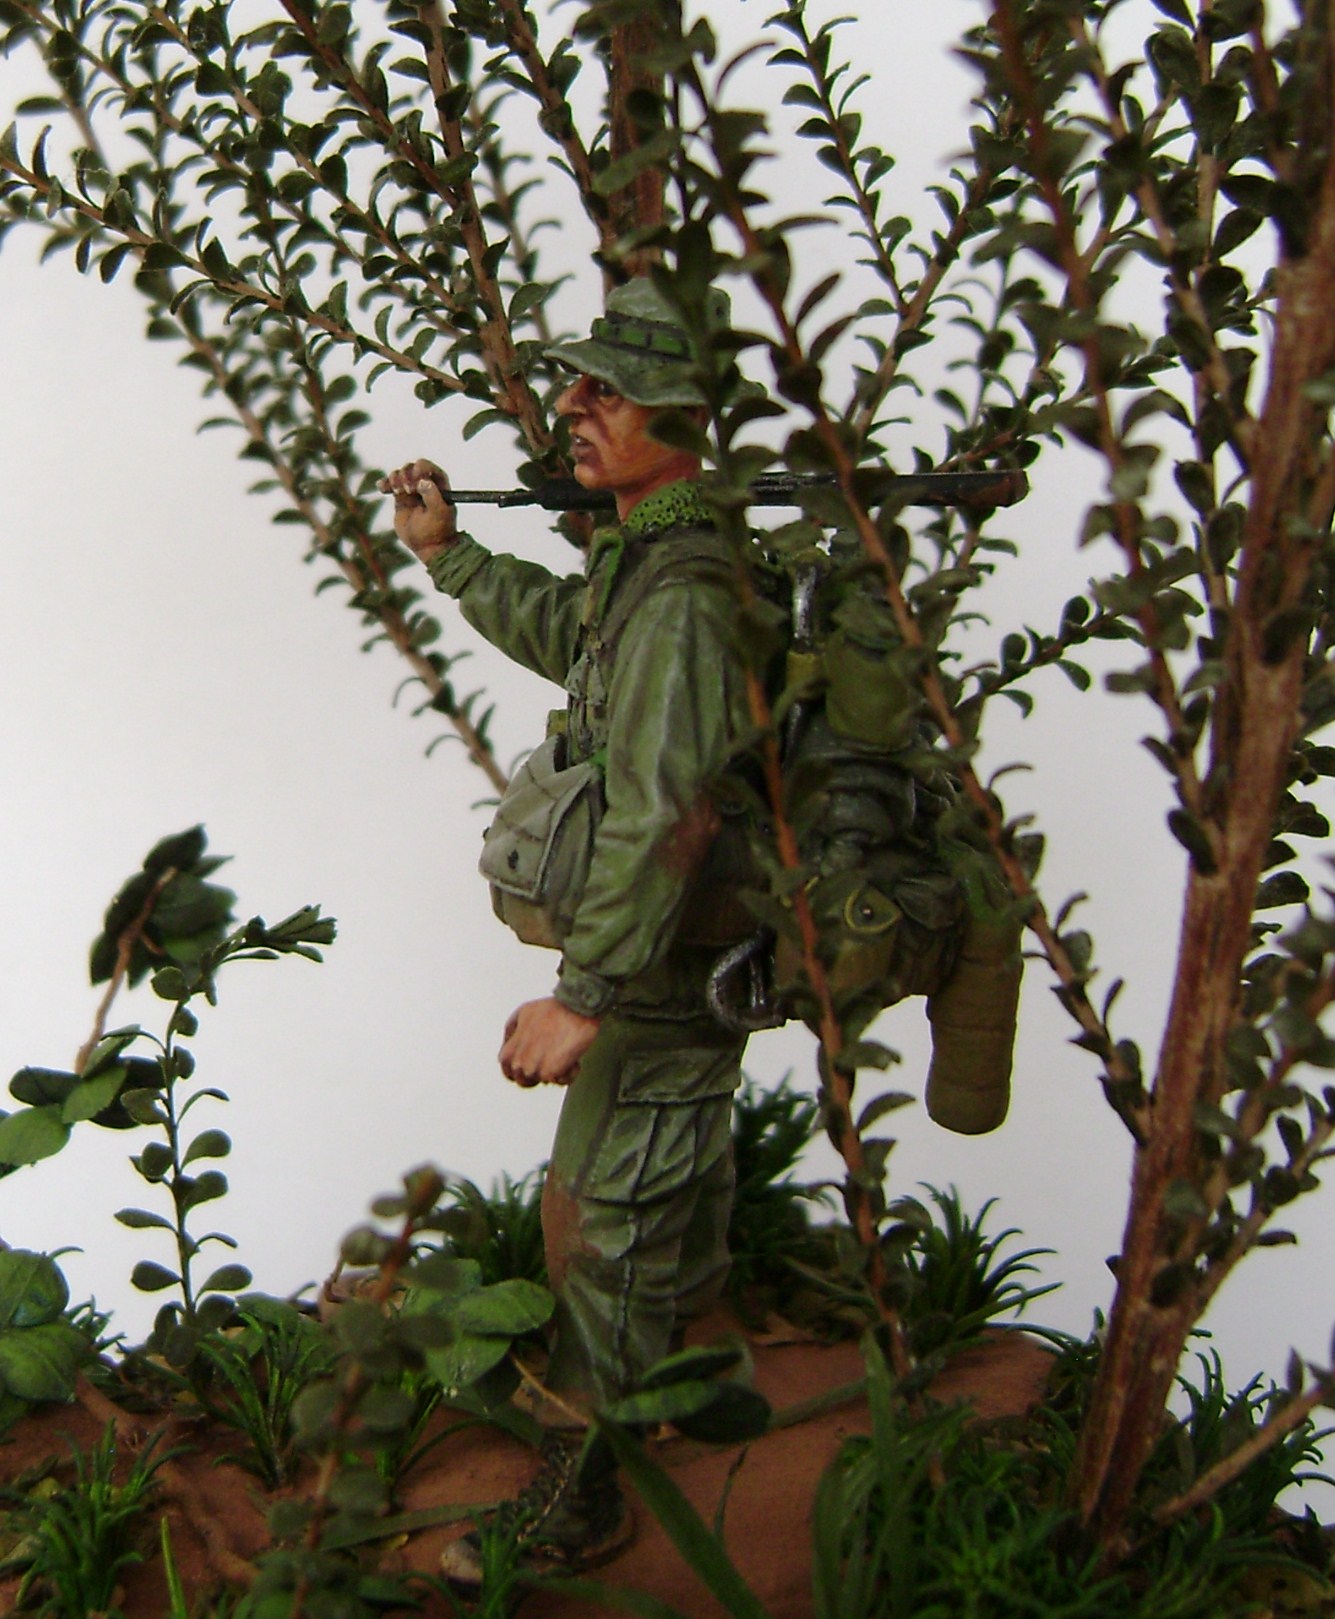
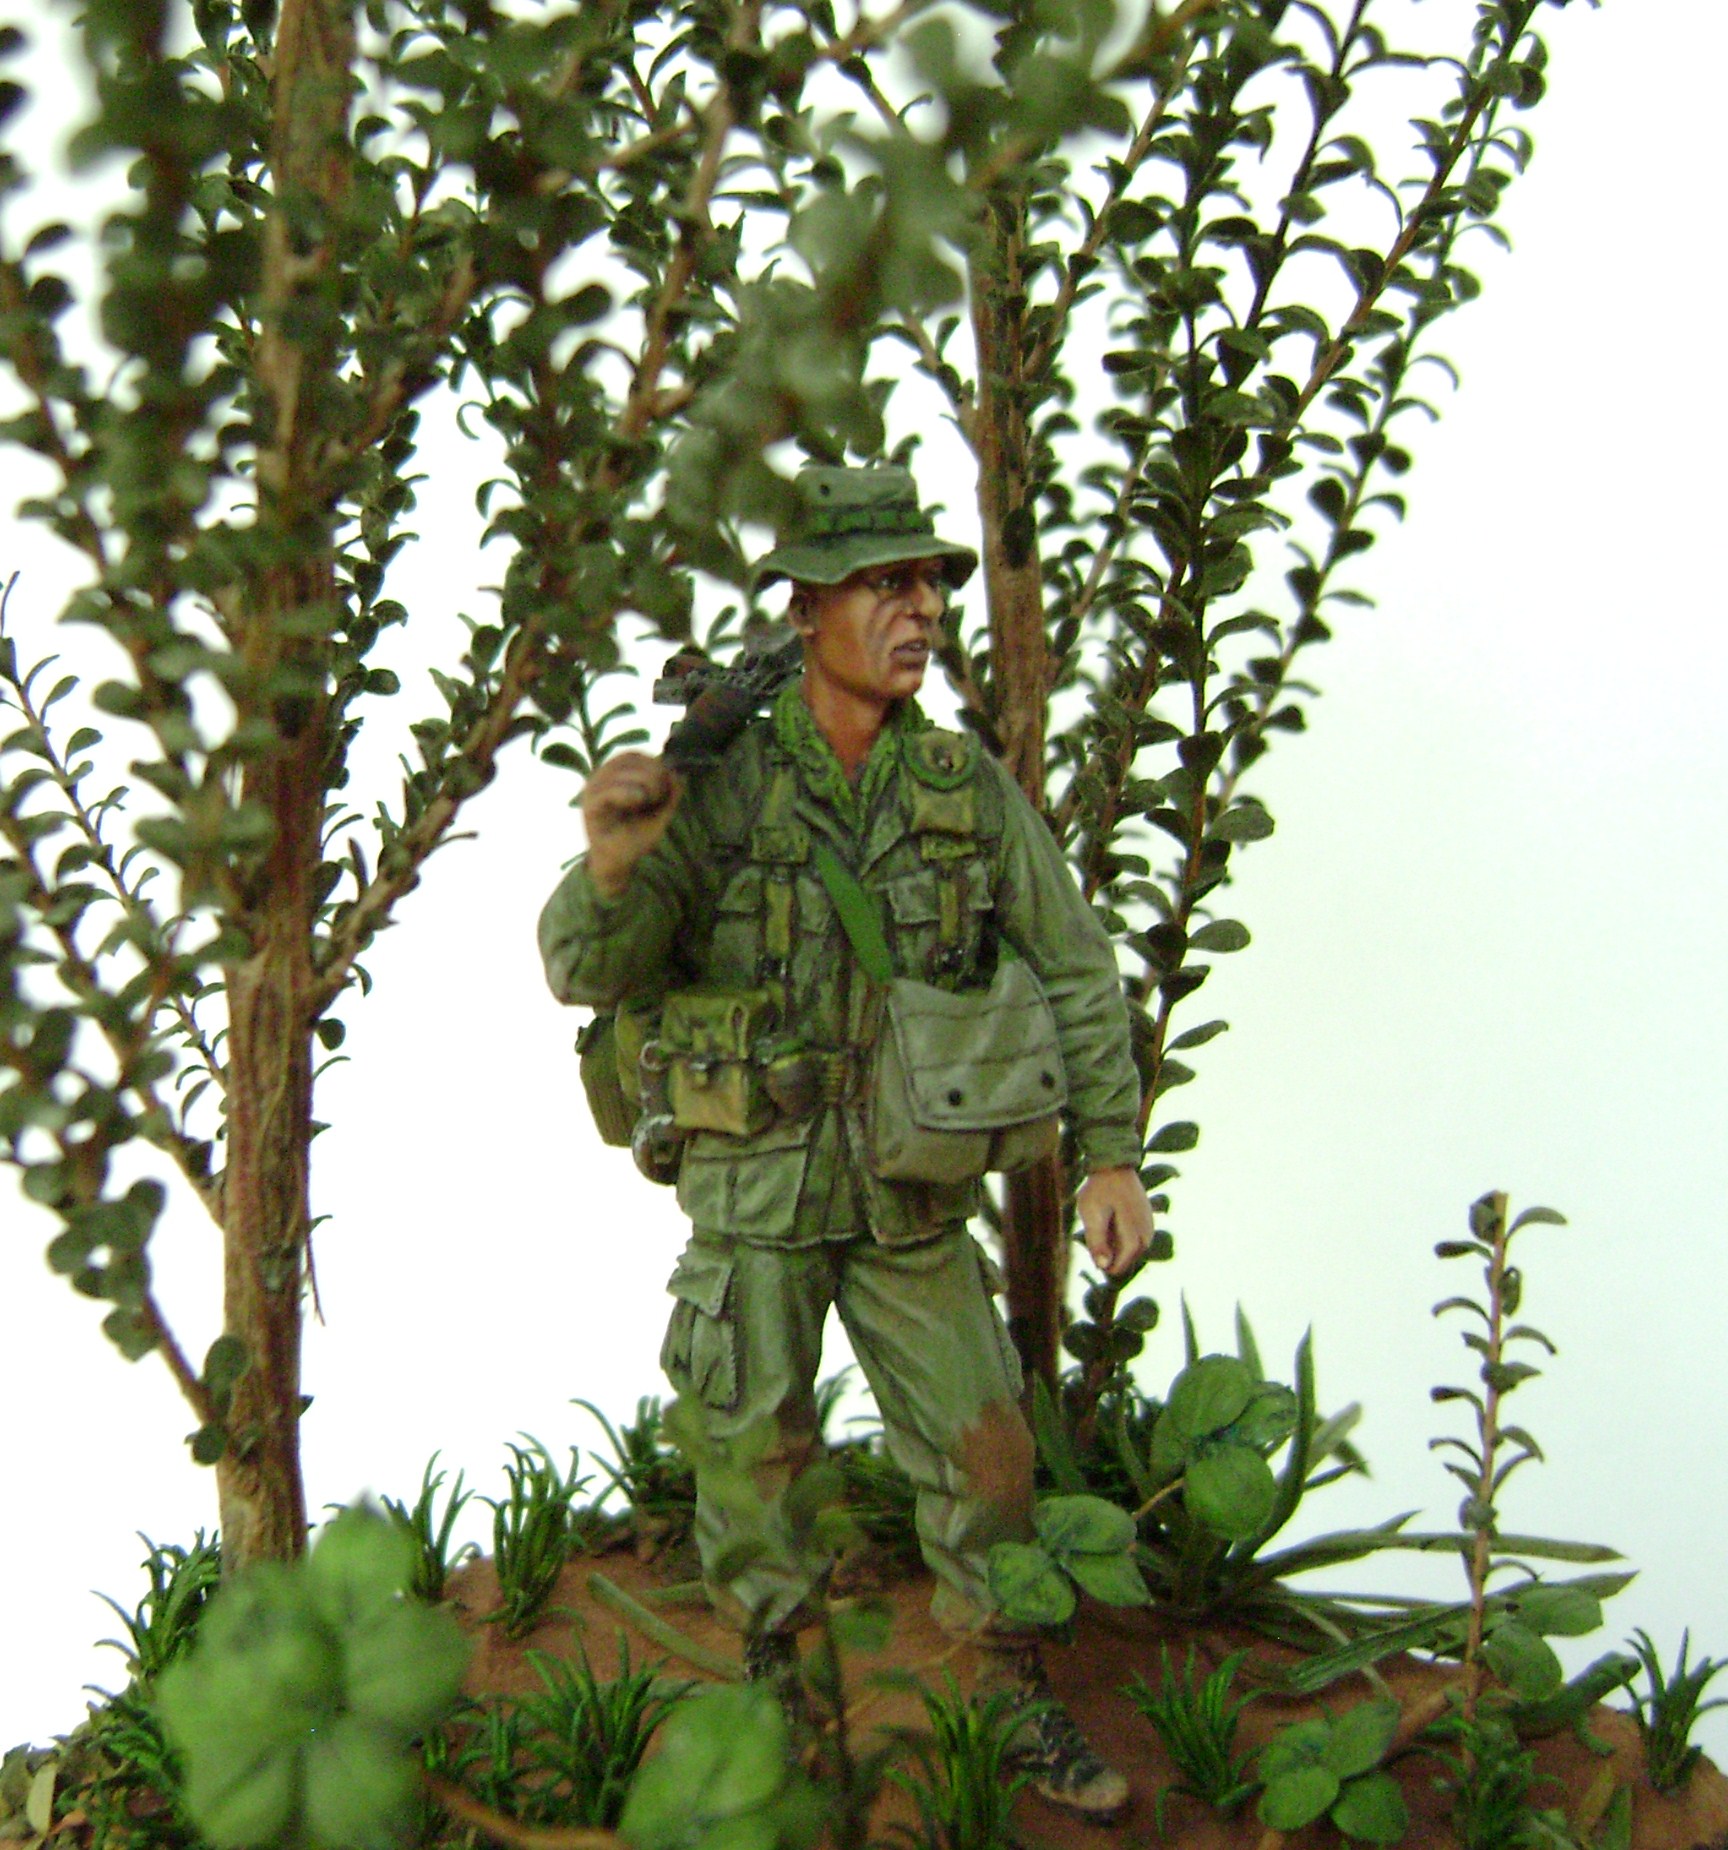
One figure is a conversion of one of the guys from Bravo 6's "Jungle Make Up" kit. I removed the ARVN rucksack and Austrailian ammo pouches so this guy can be an American Infantryman. The right arm is from the Bravo 6 Machine Gunner figure (King from Platoon) and the left arm is from the Bravo 6 SEAL with VC prisoner kit. The head is a Hornet head and the boonie hat is from the Evolution Miniatures US Infantryman figure. The equipment is a mix of Hobby Fan and scratchbuilt items. The figure is wearing the lightweight rucksack with tubular frame which is what was commonly issued to the US Army in Vietnam. Most pack items are scratchbuilt with the exception of the canteens which are from Hobby Fan. The M16 is one that was in the parts box, probably Dragon/DML.

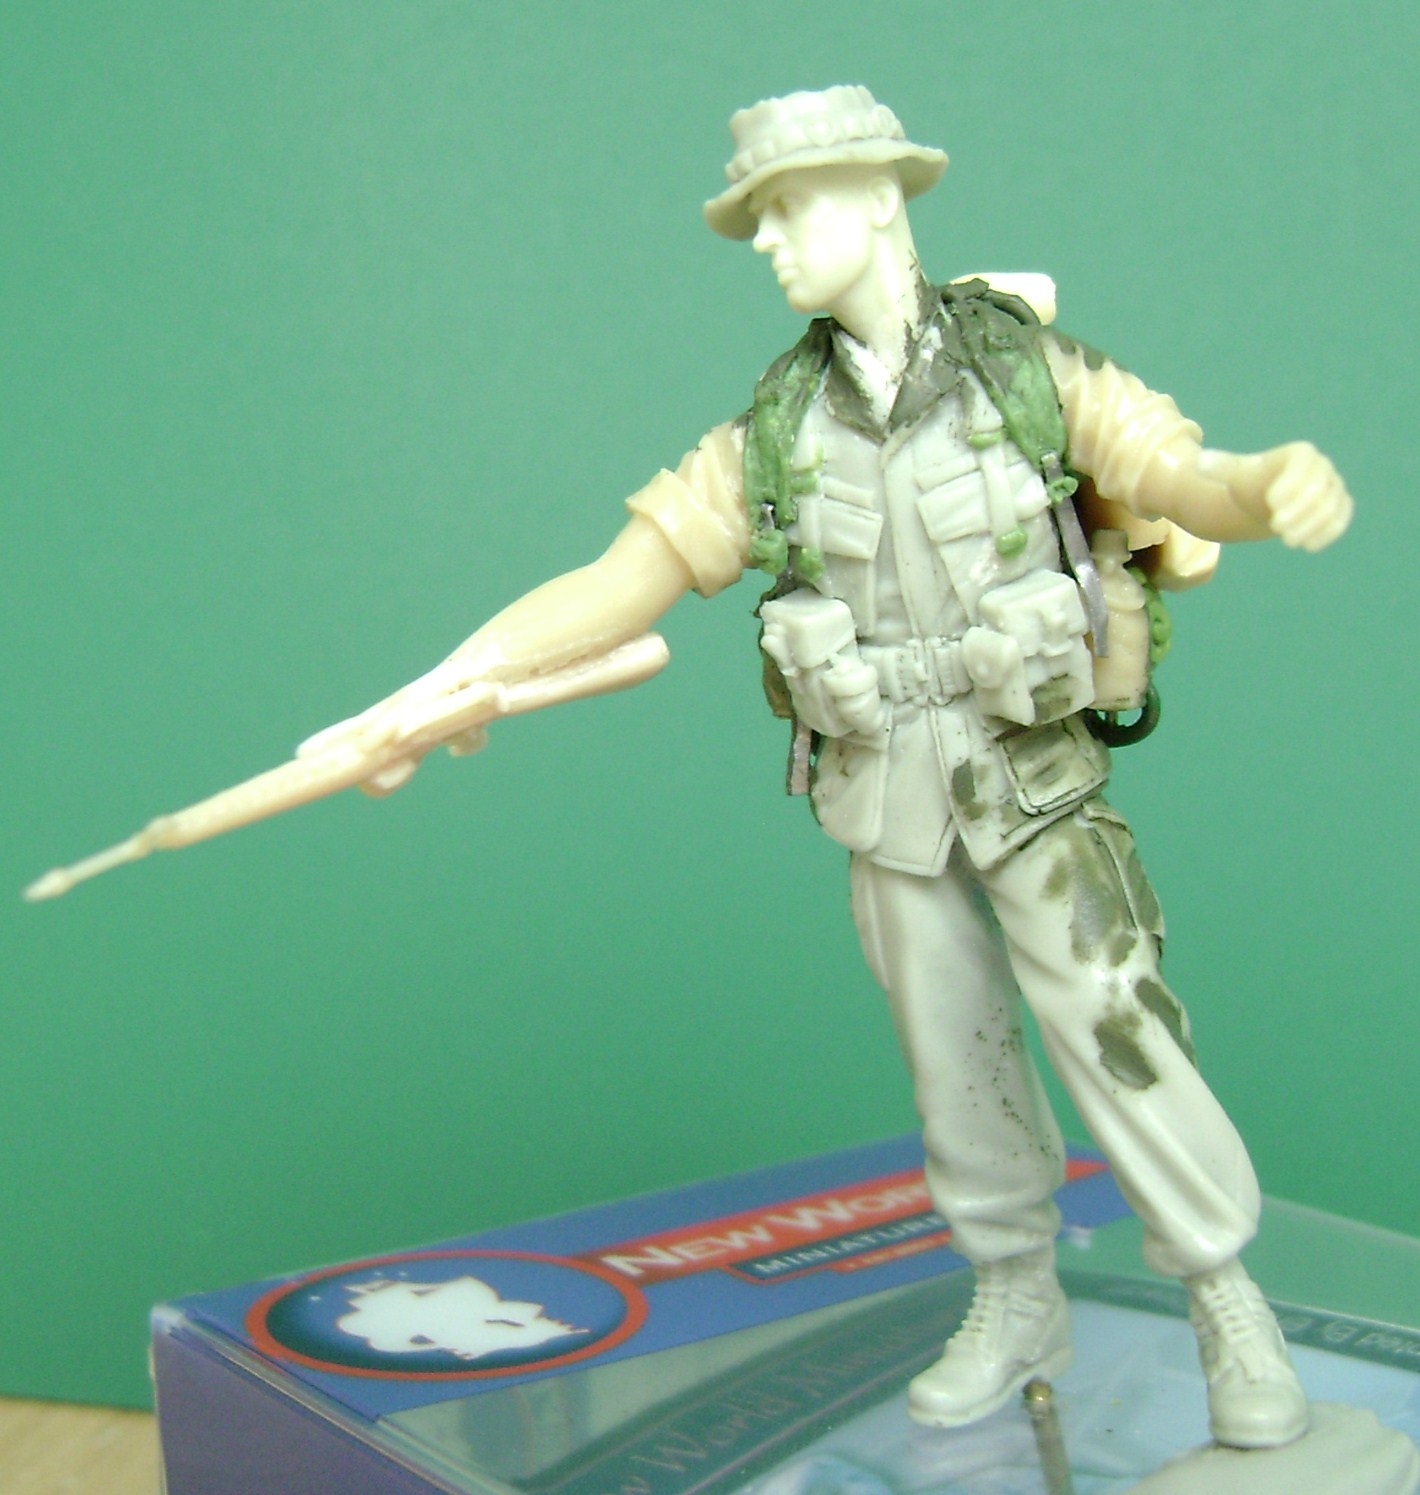
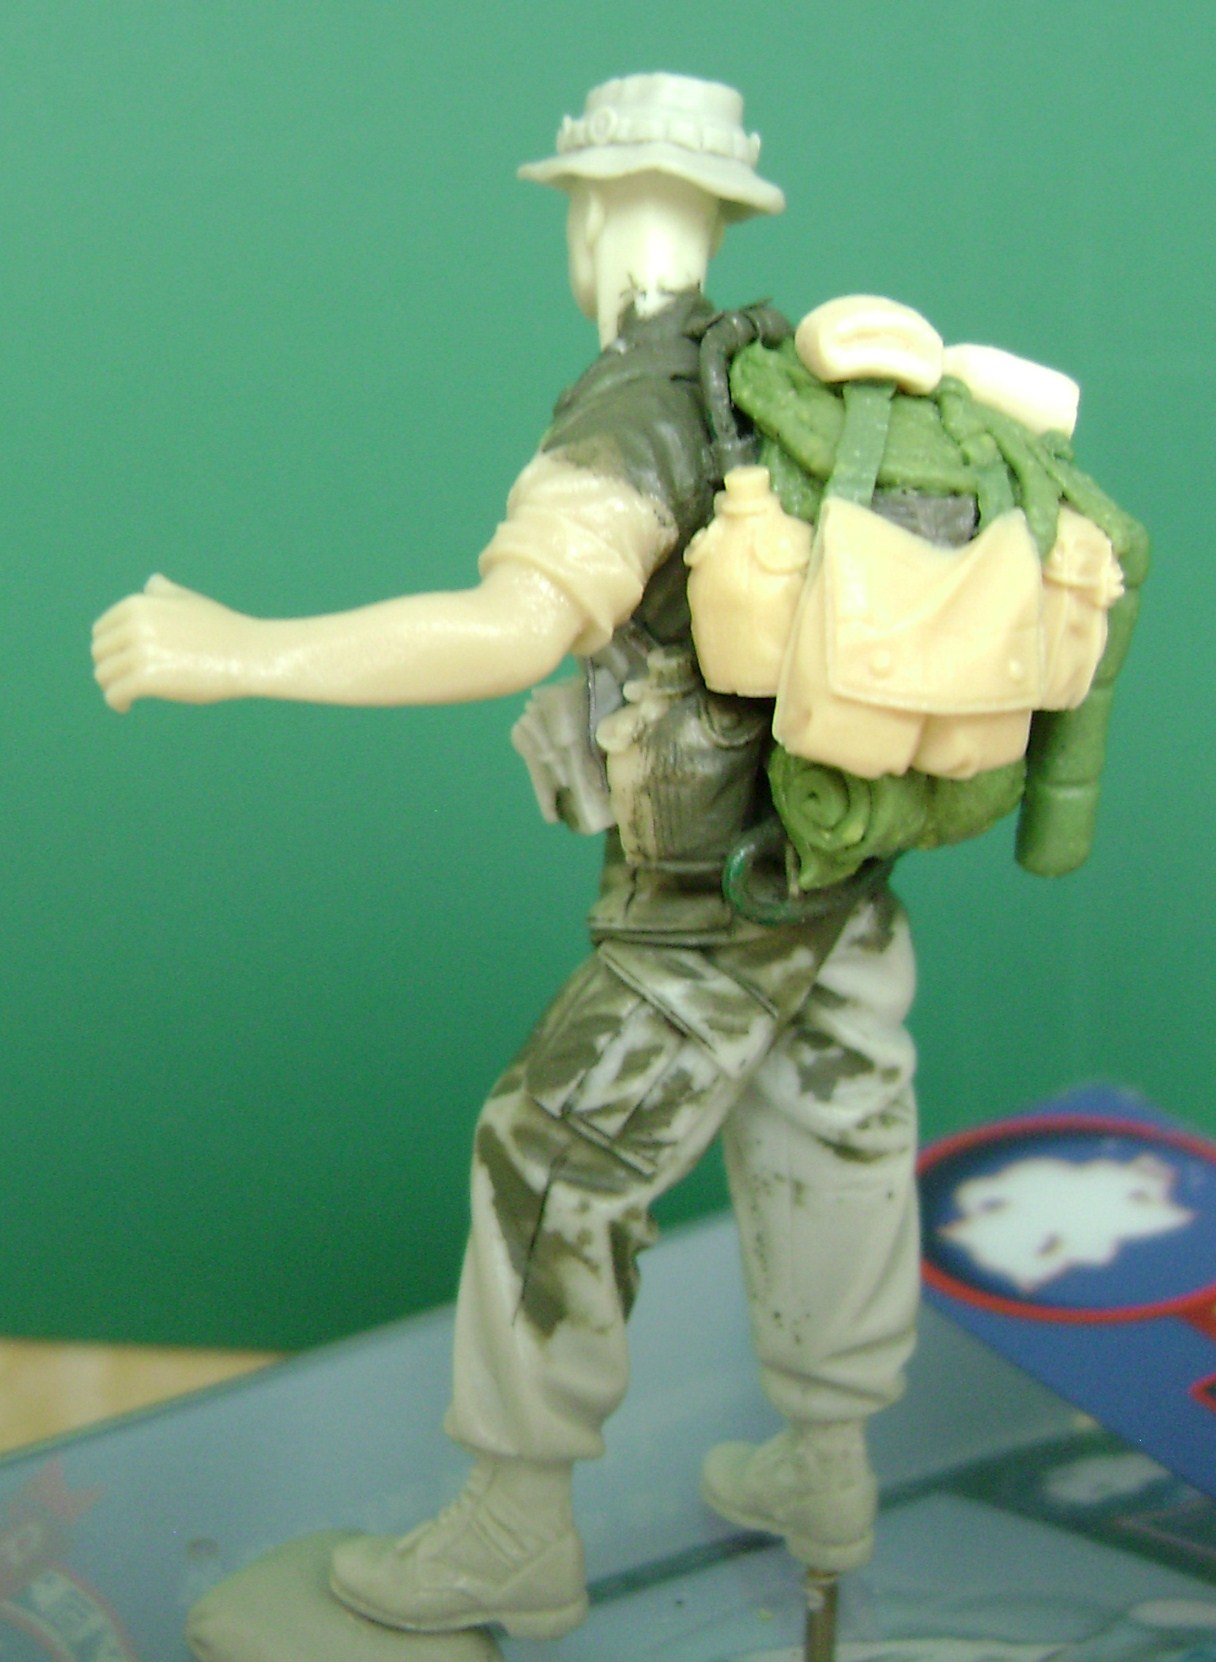
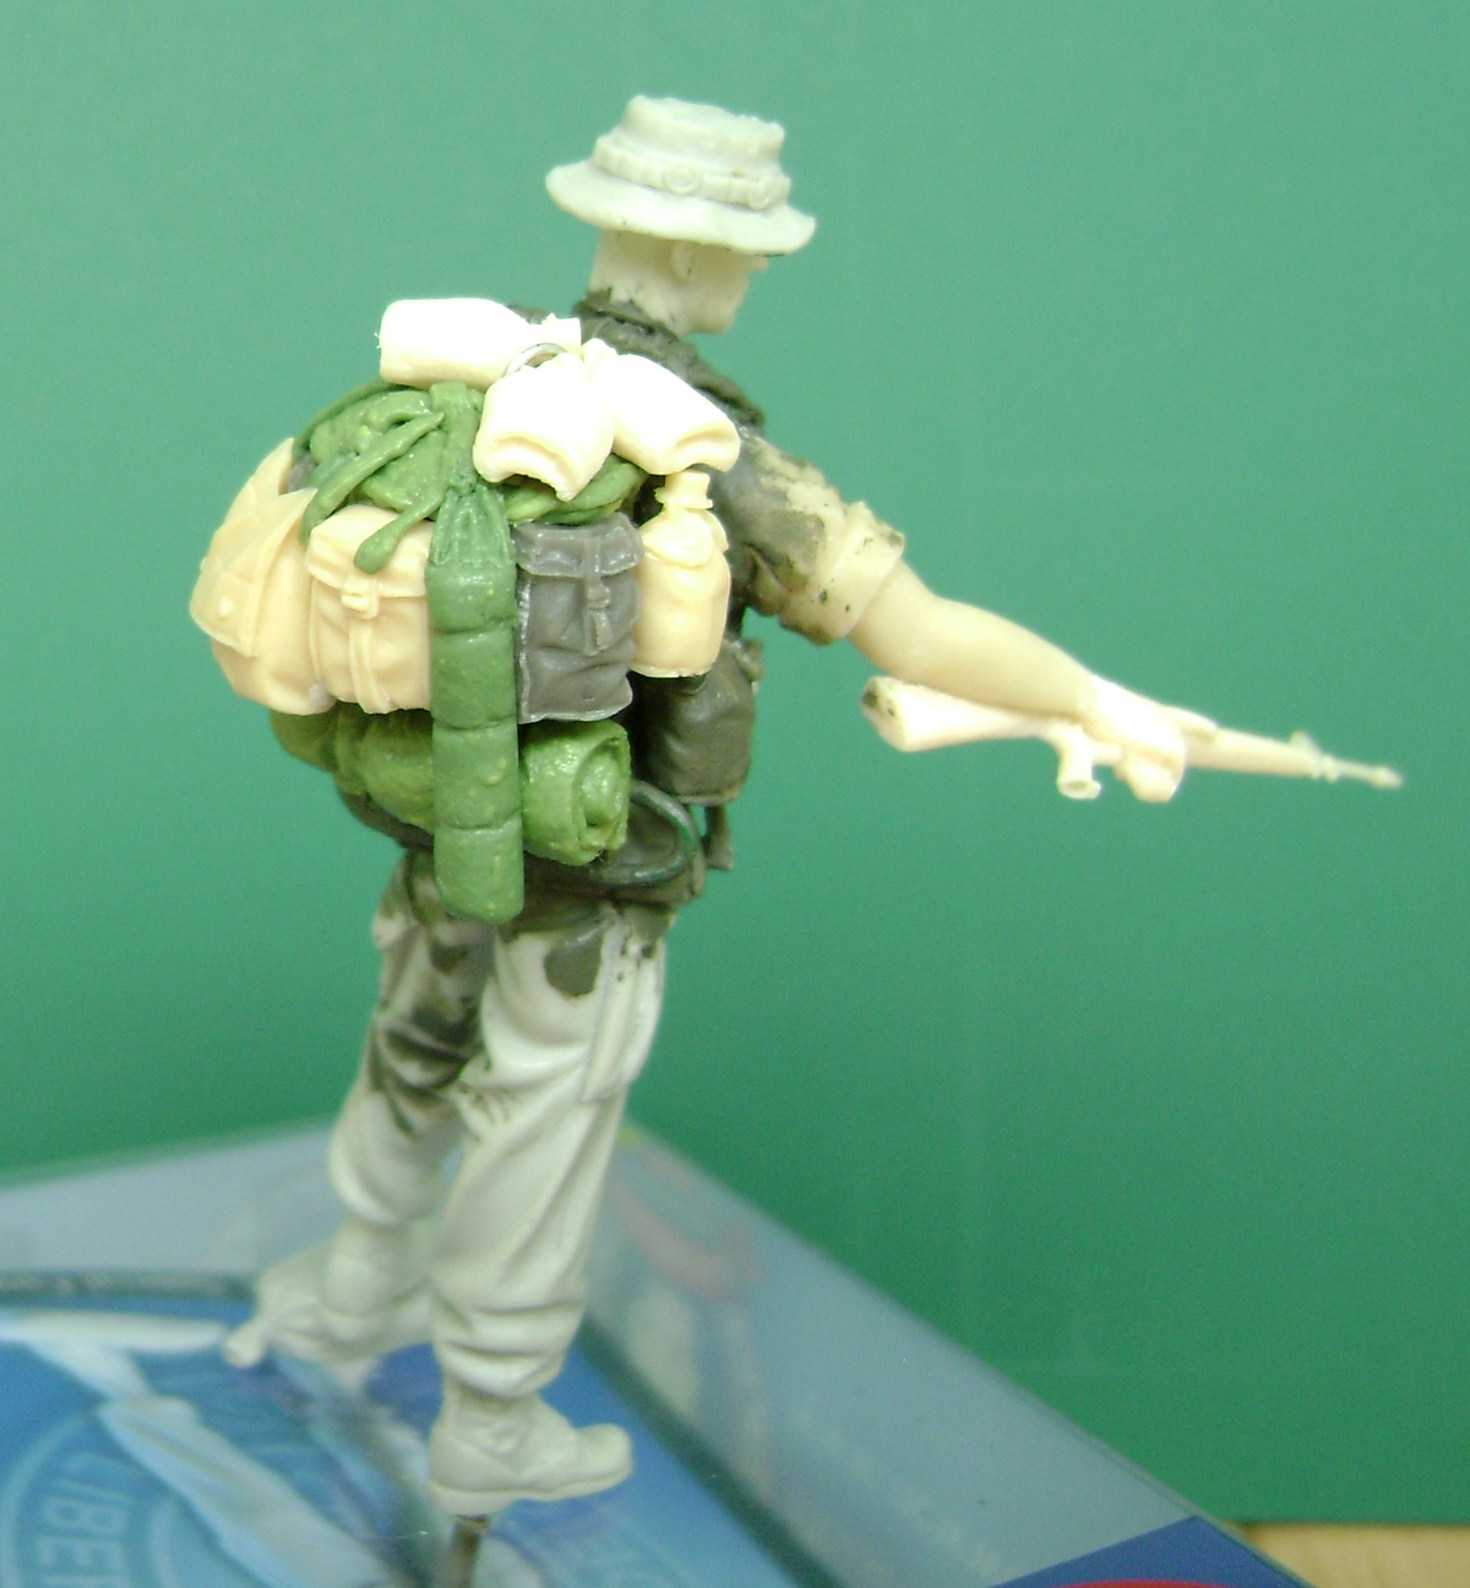
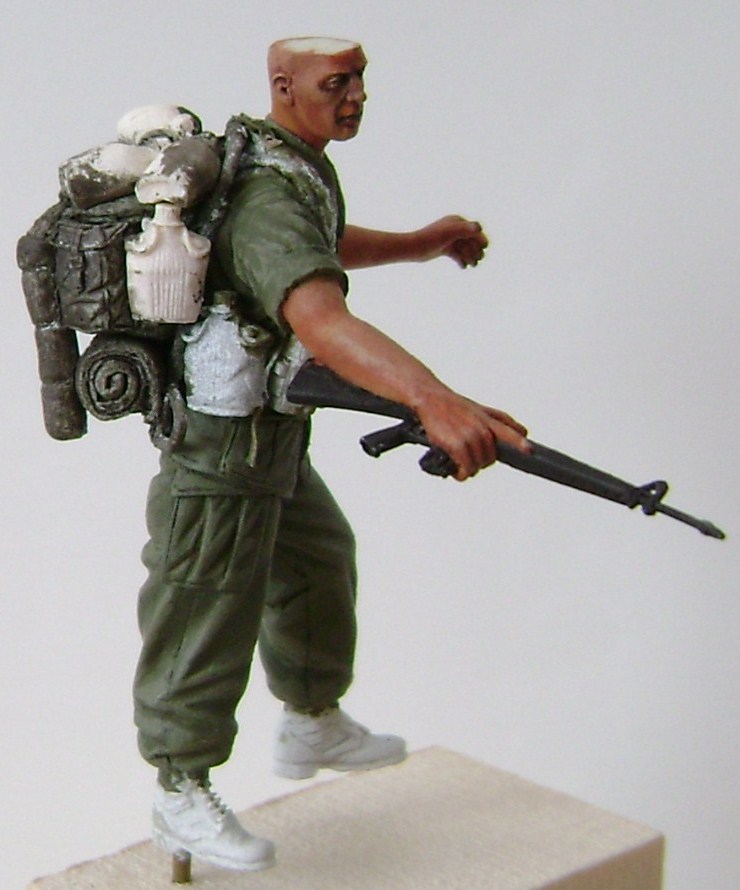
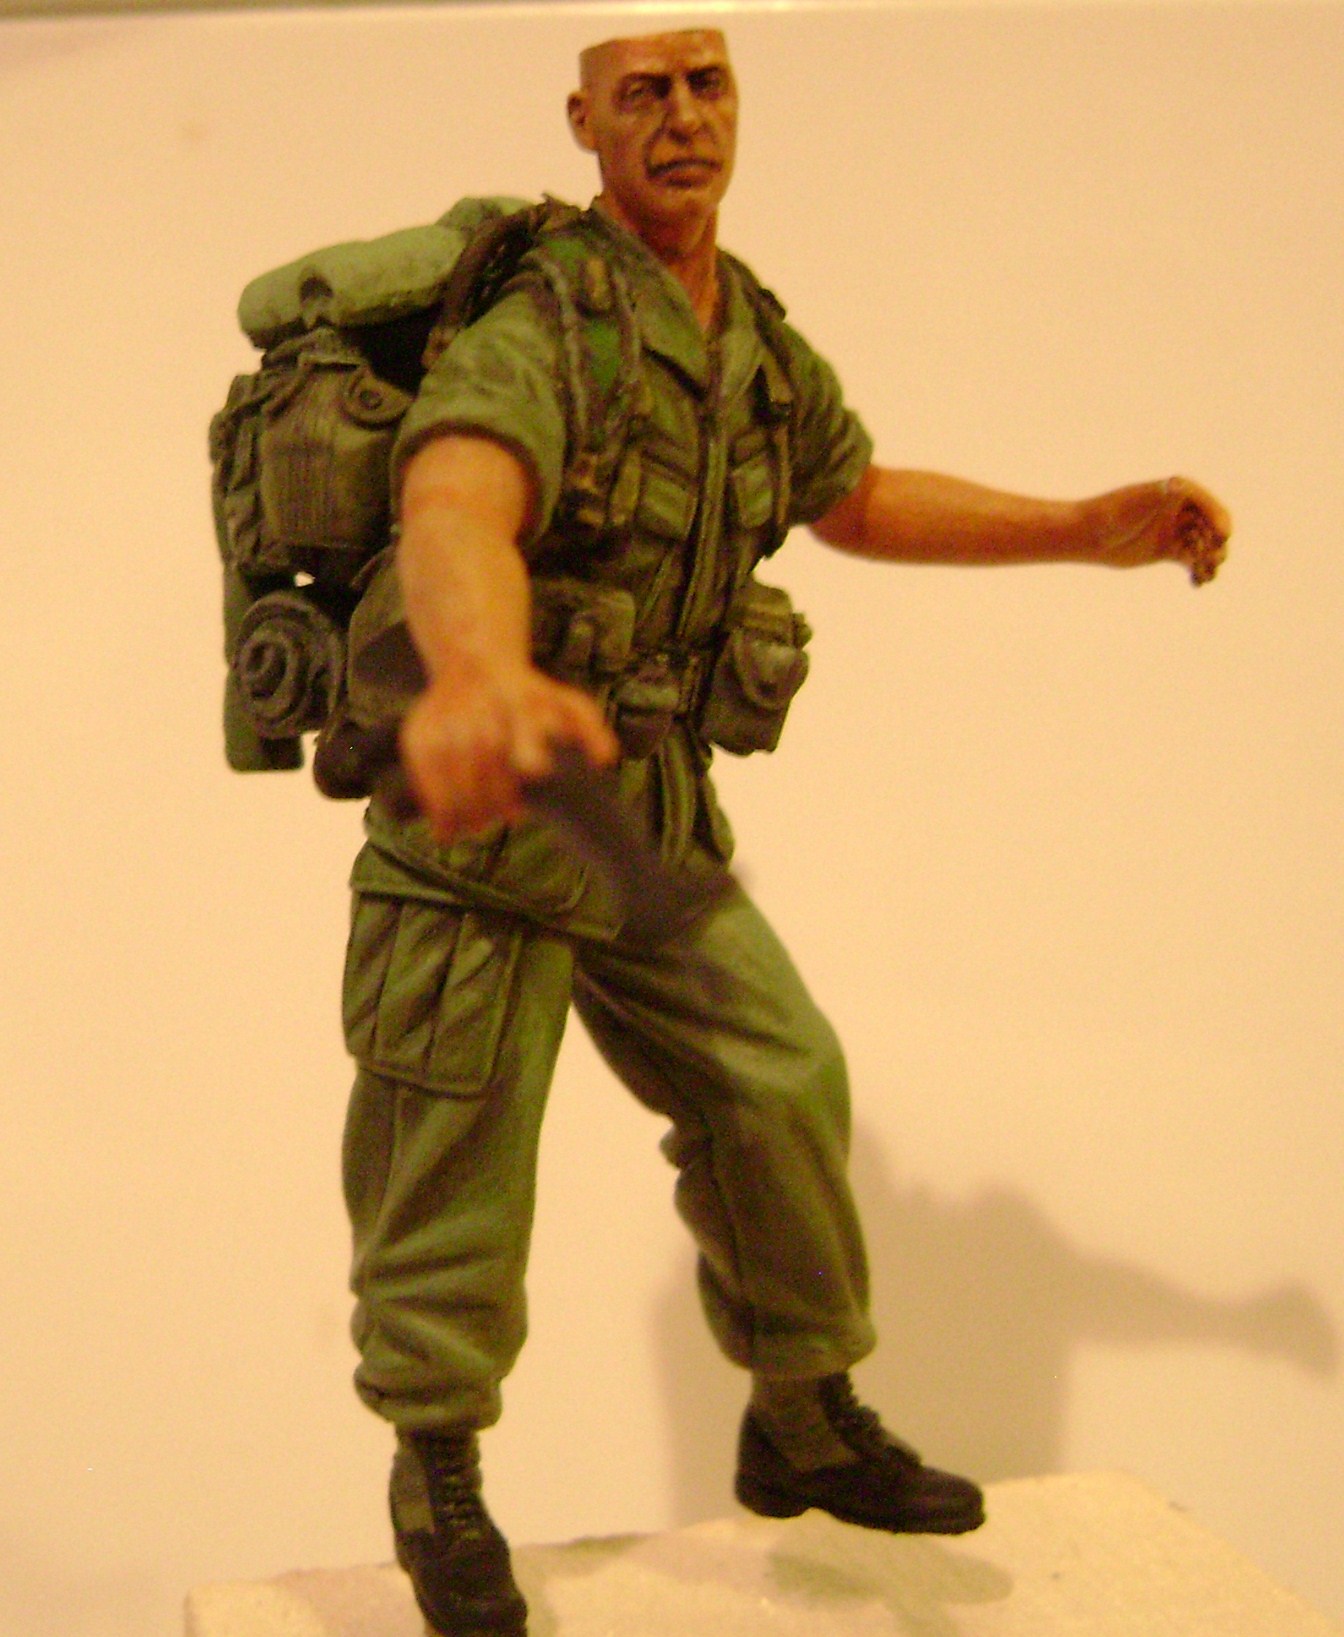
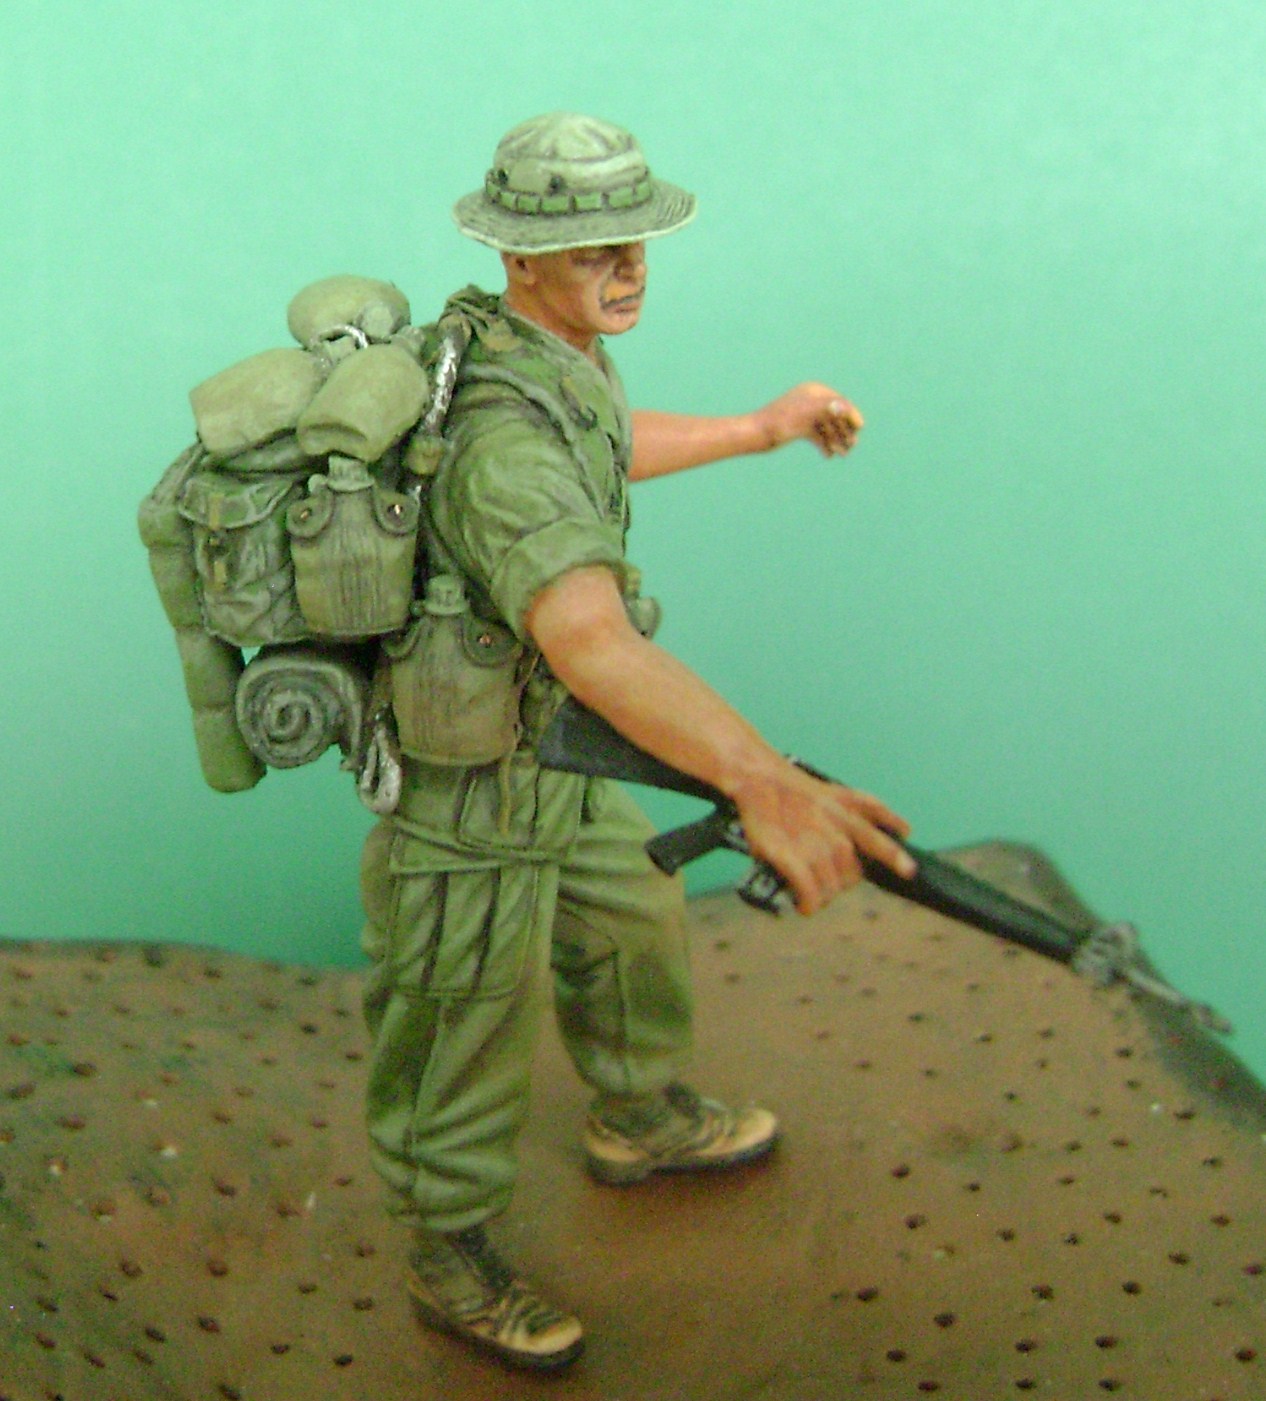
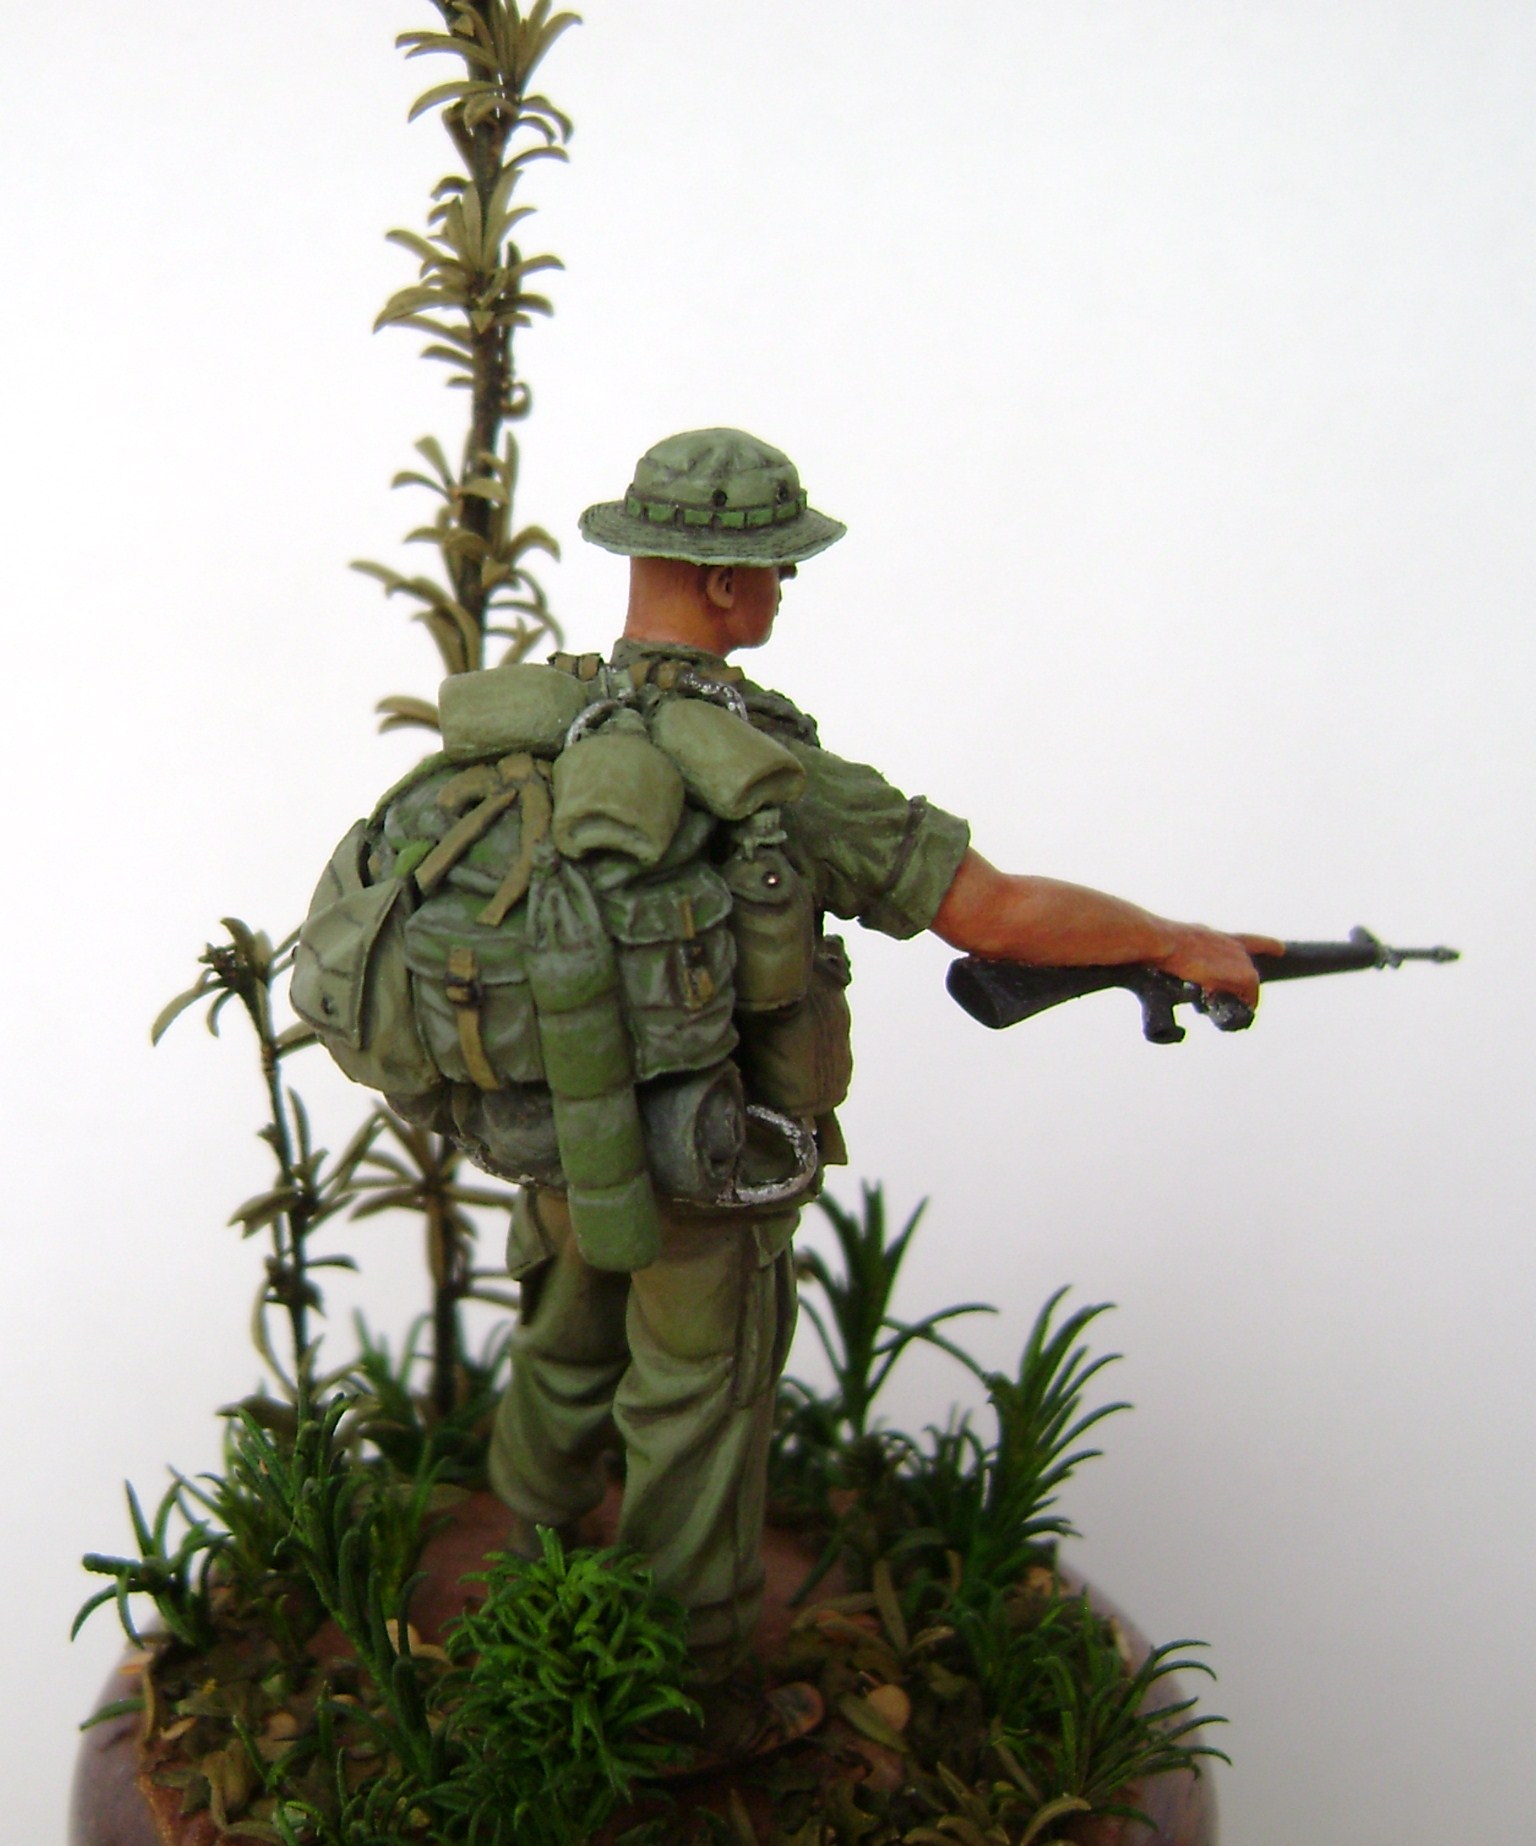
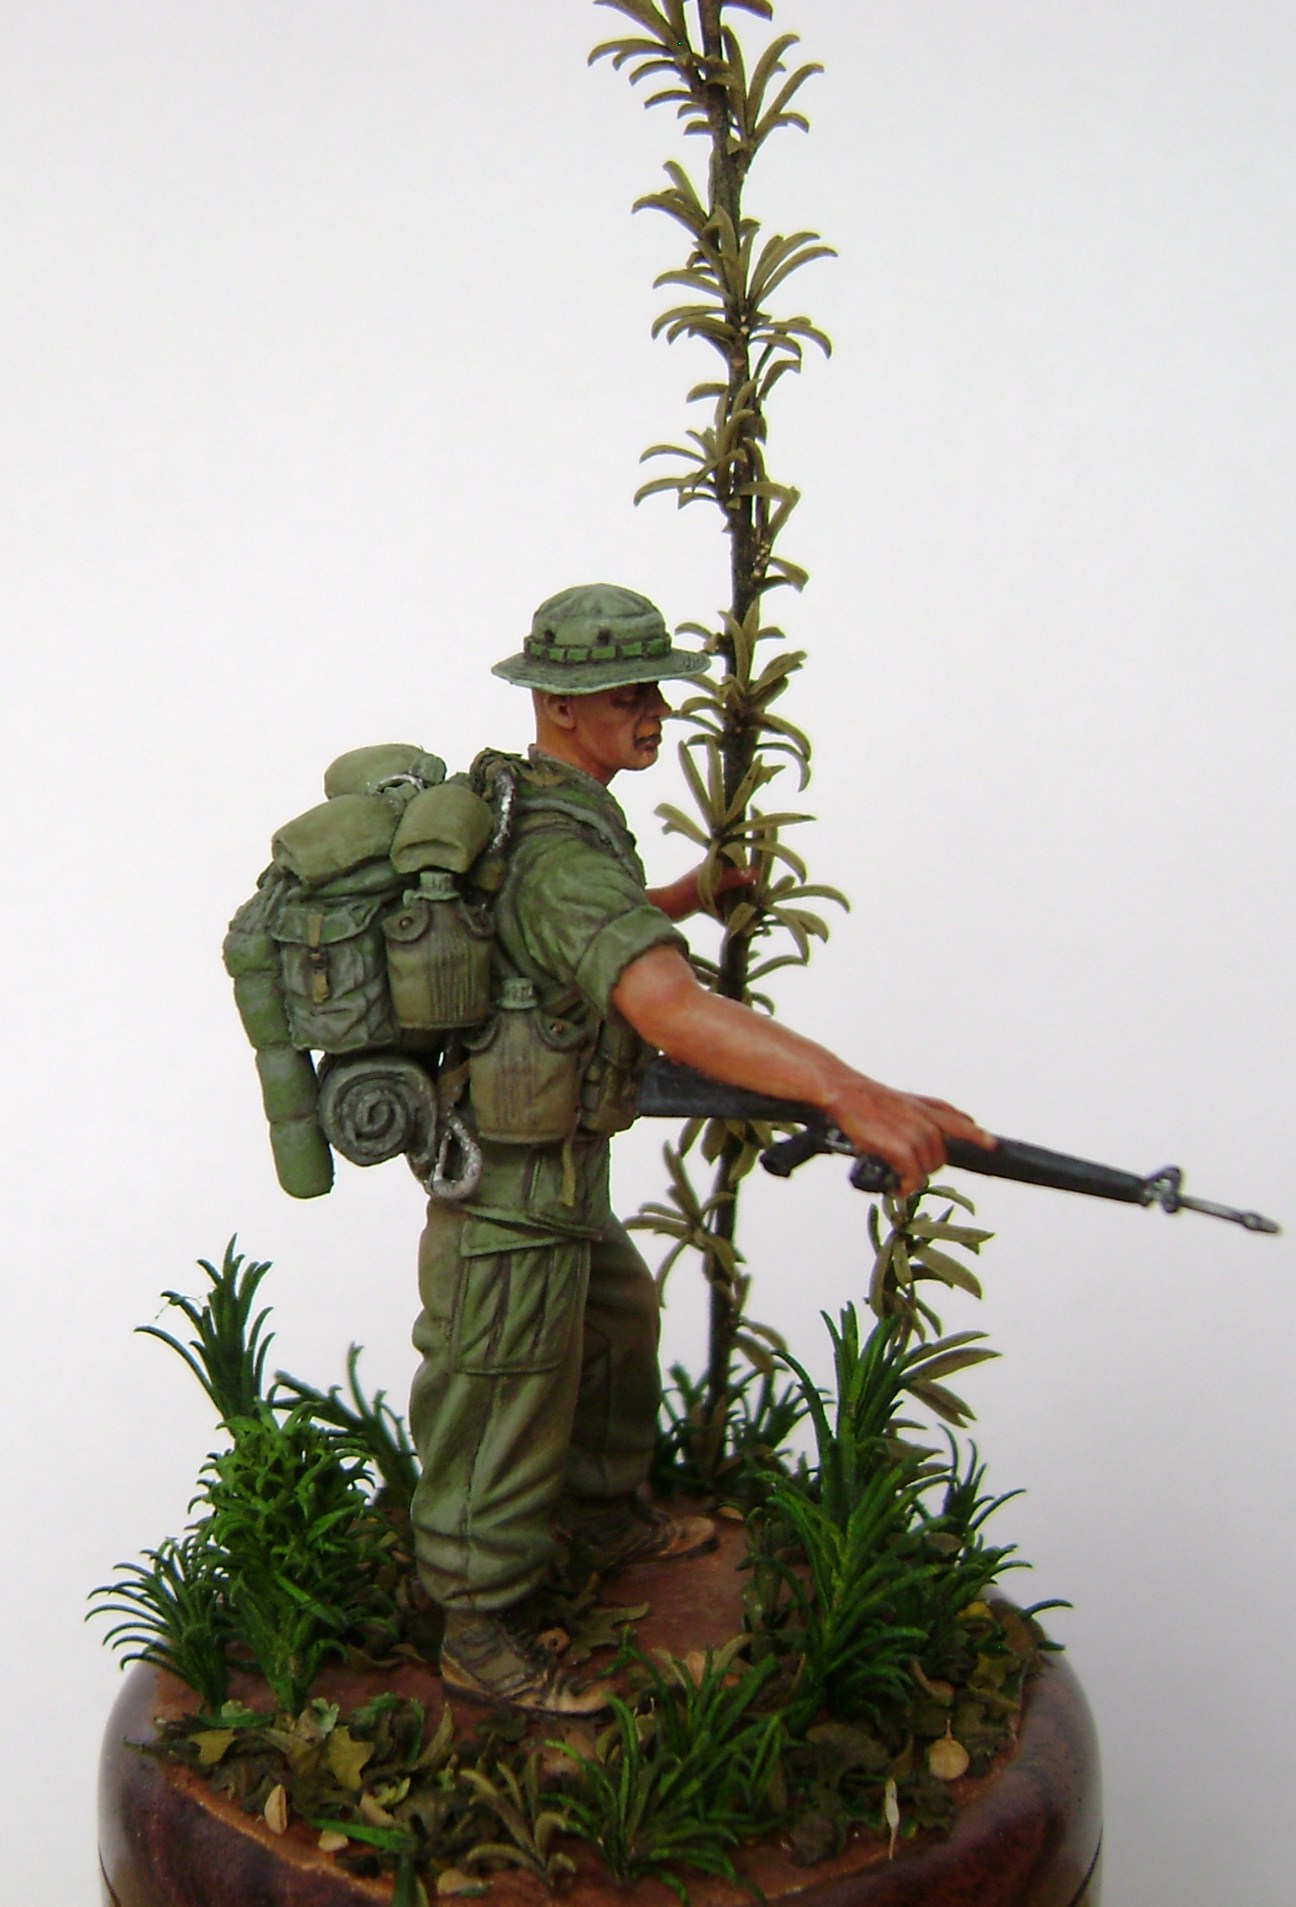
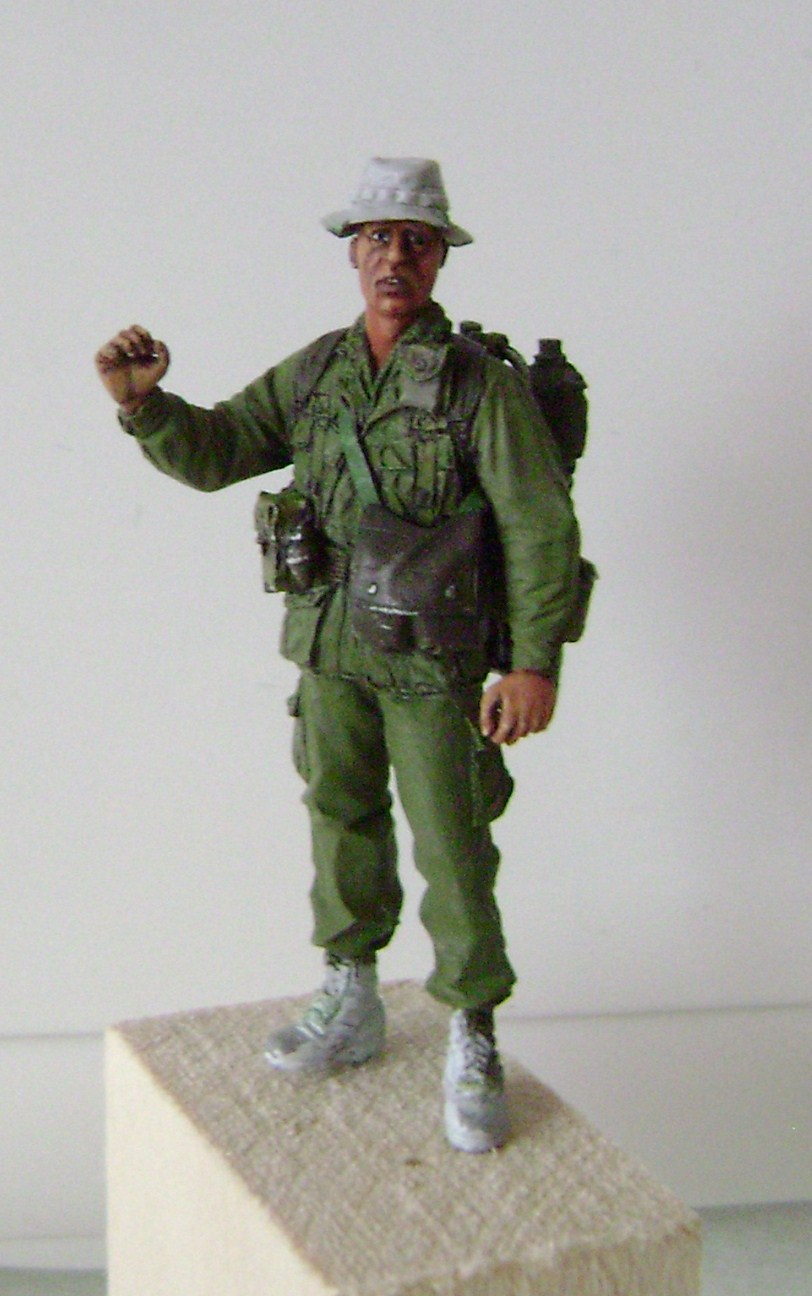
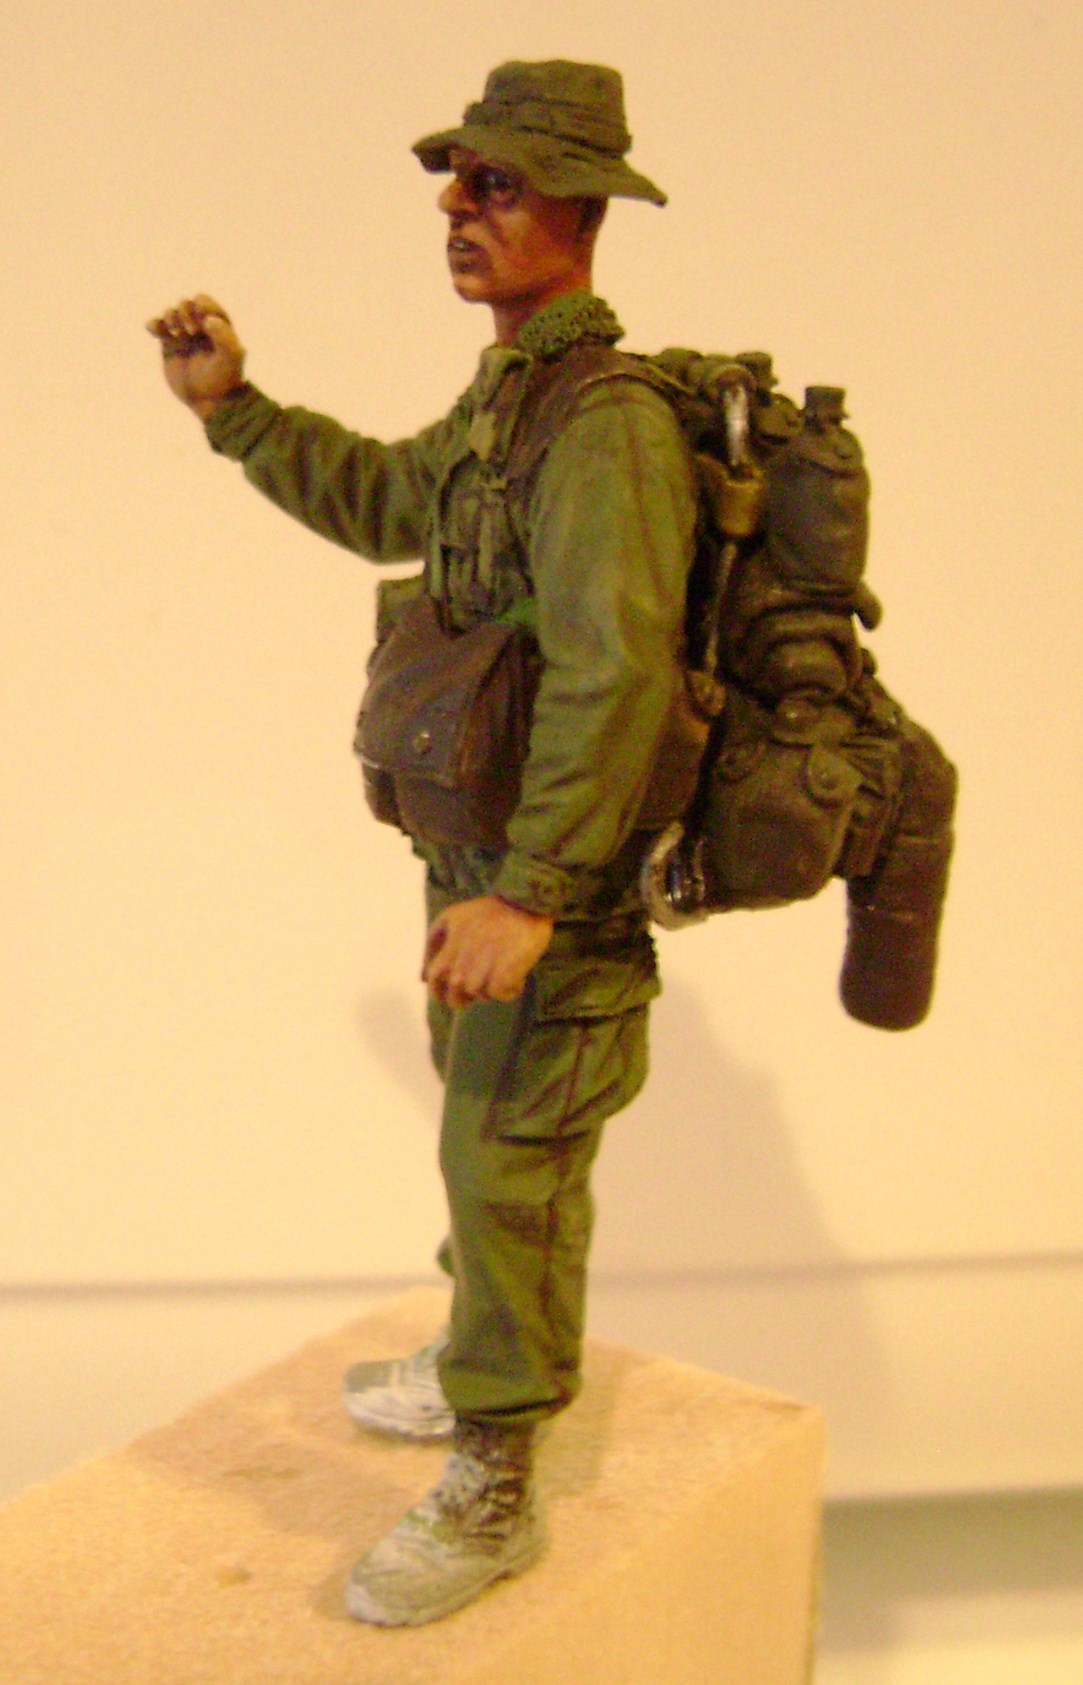
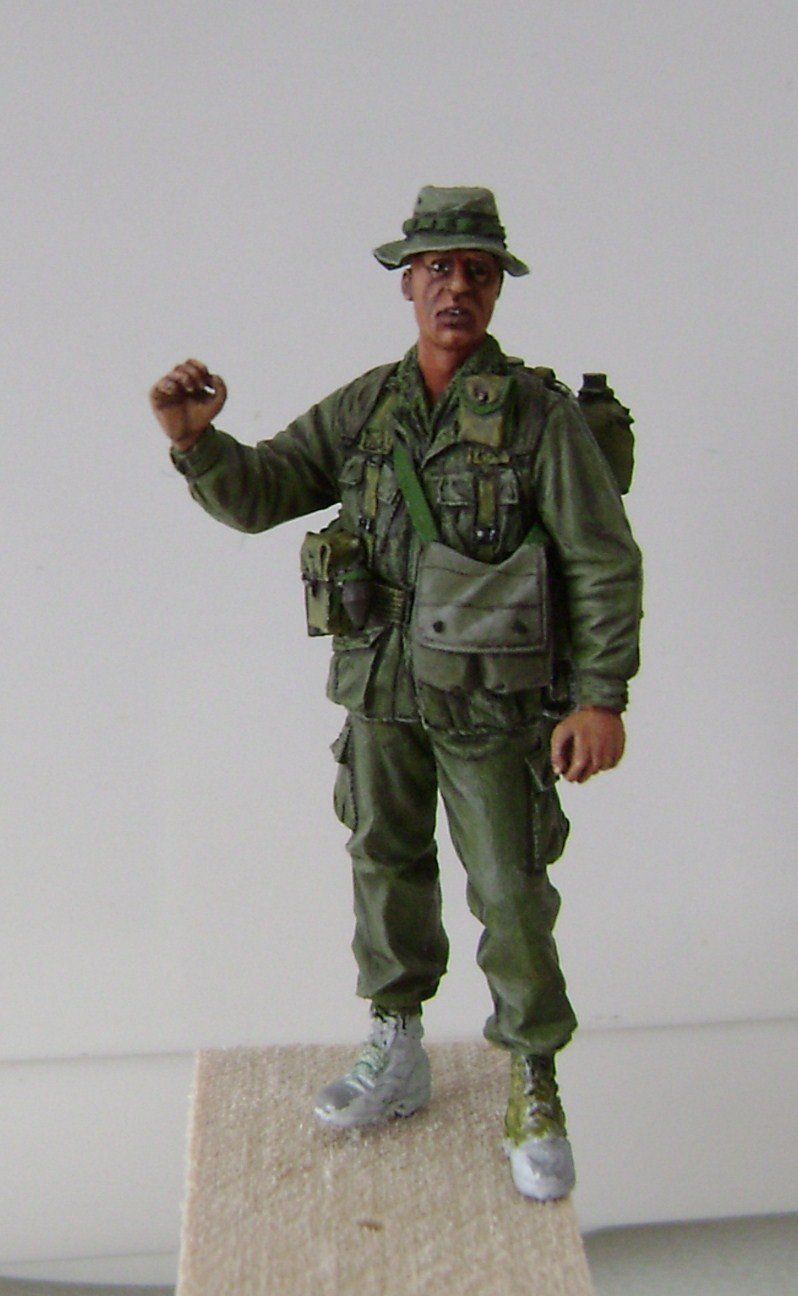
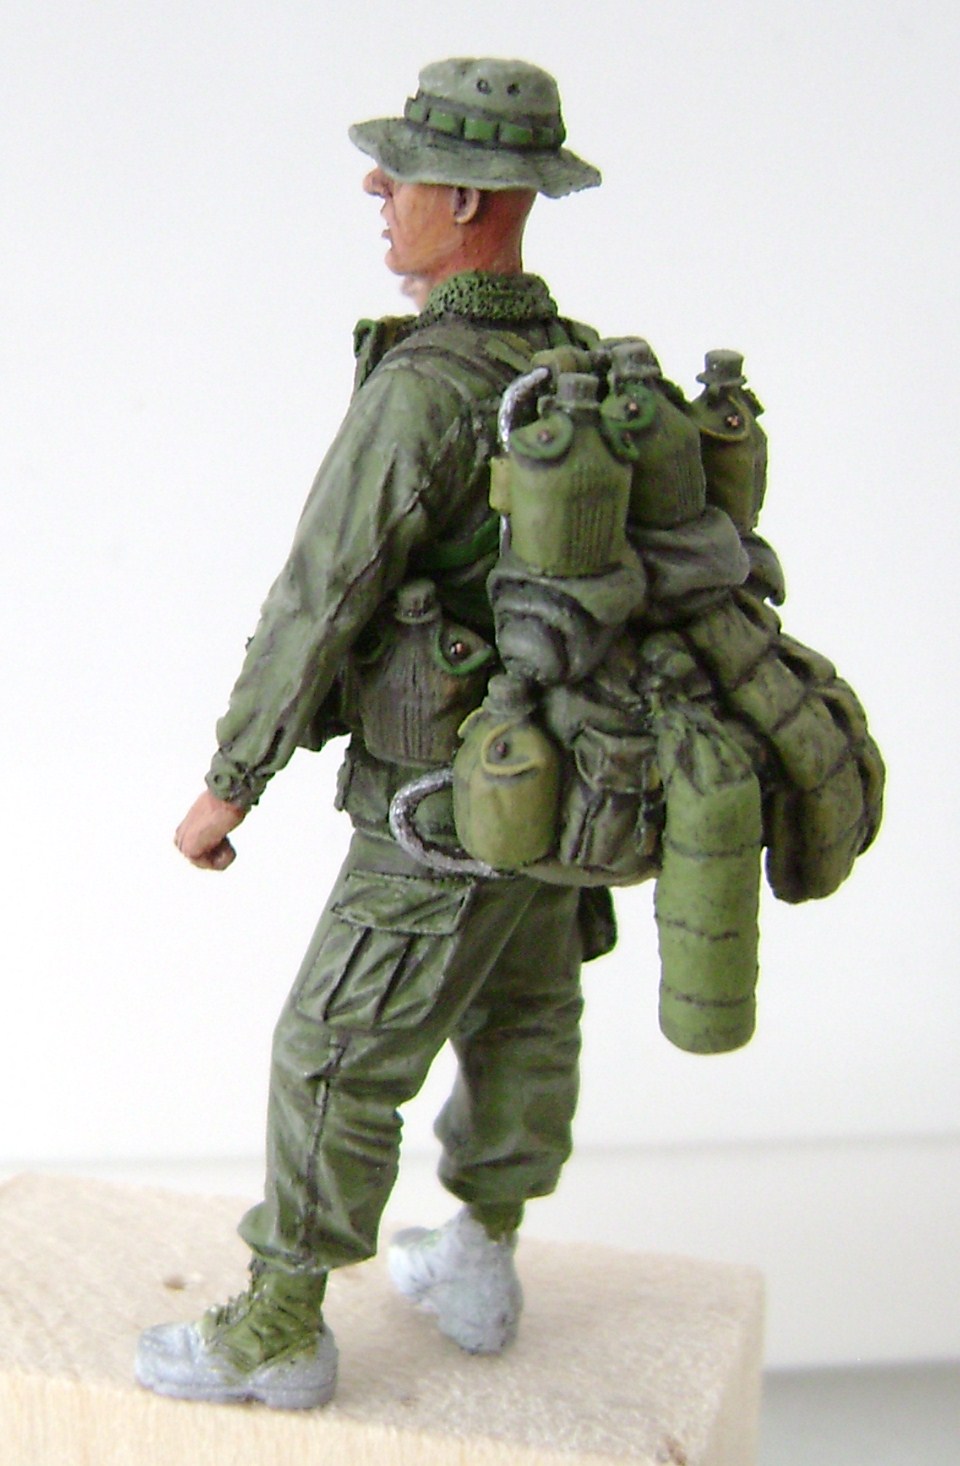
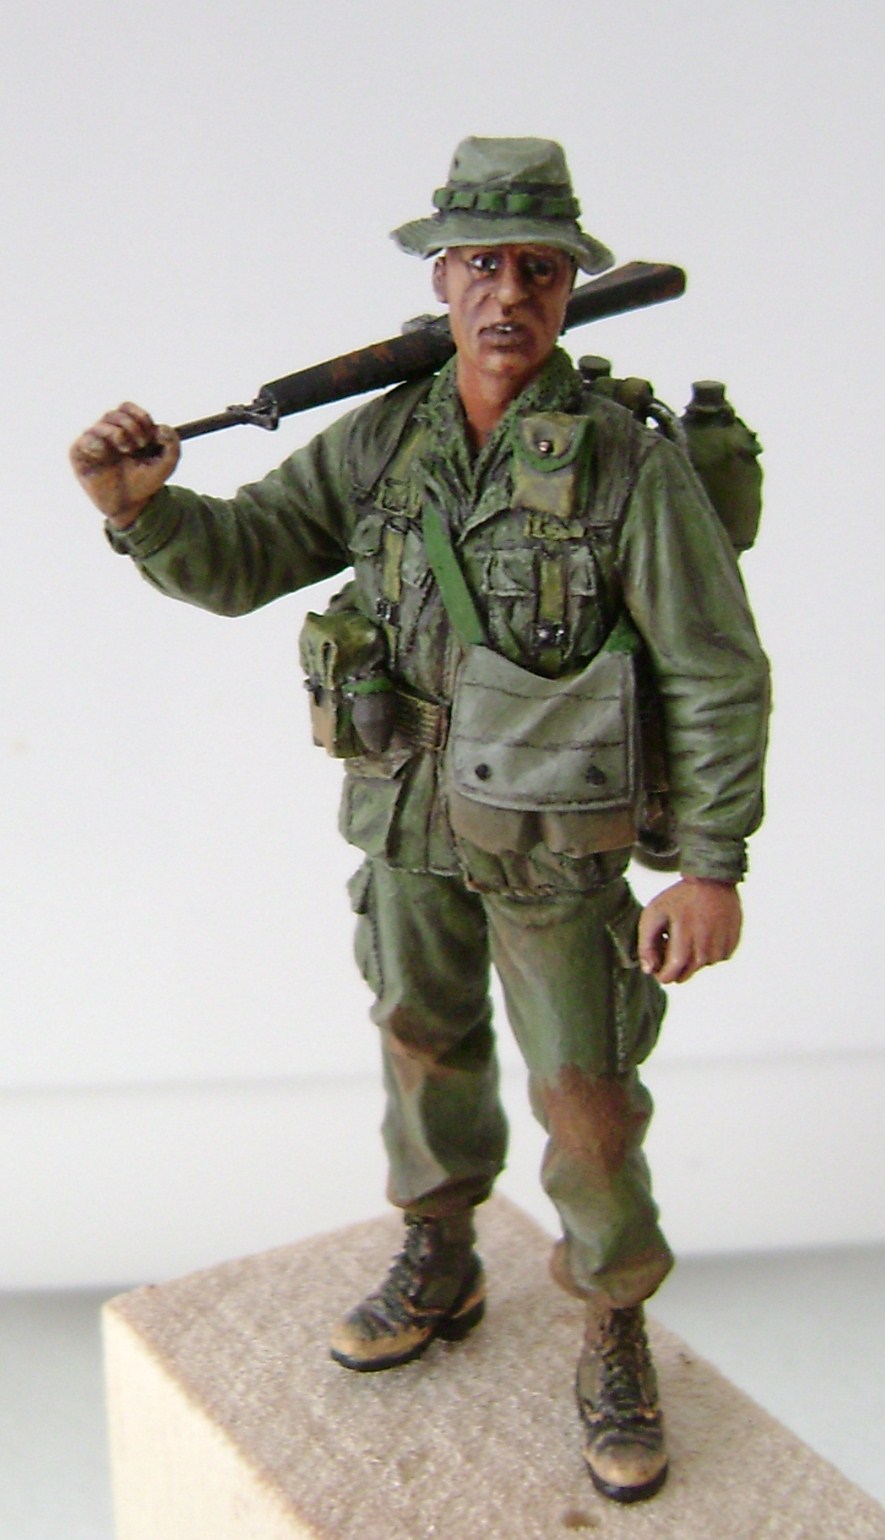
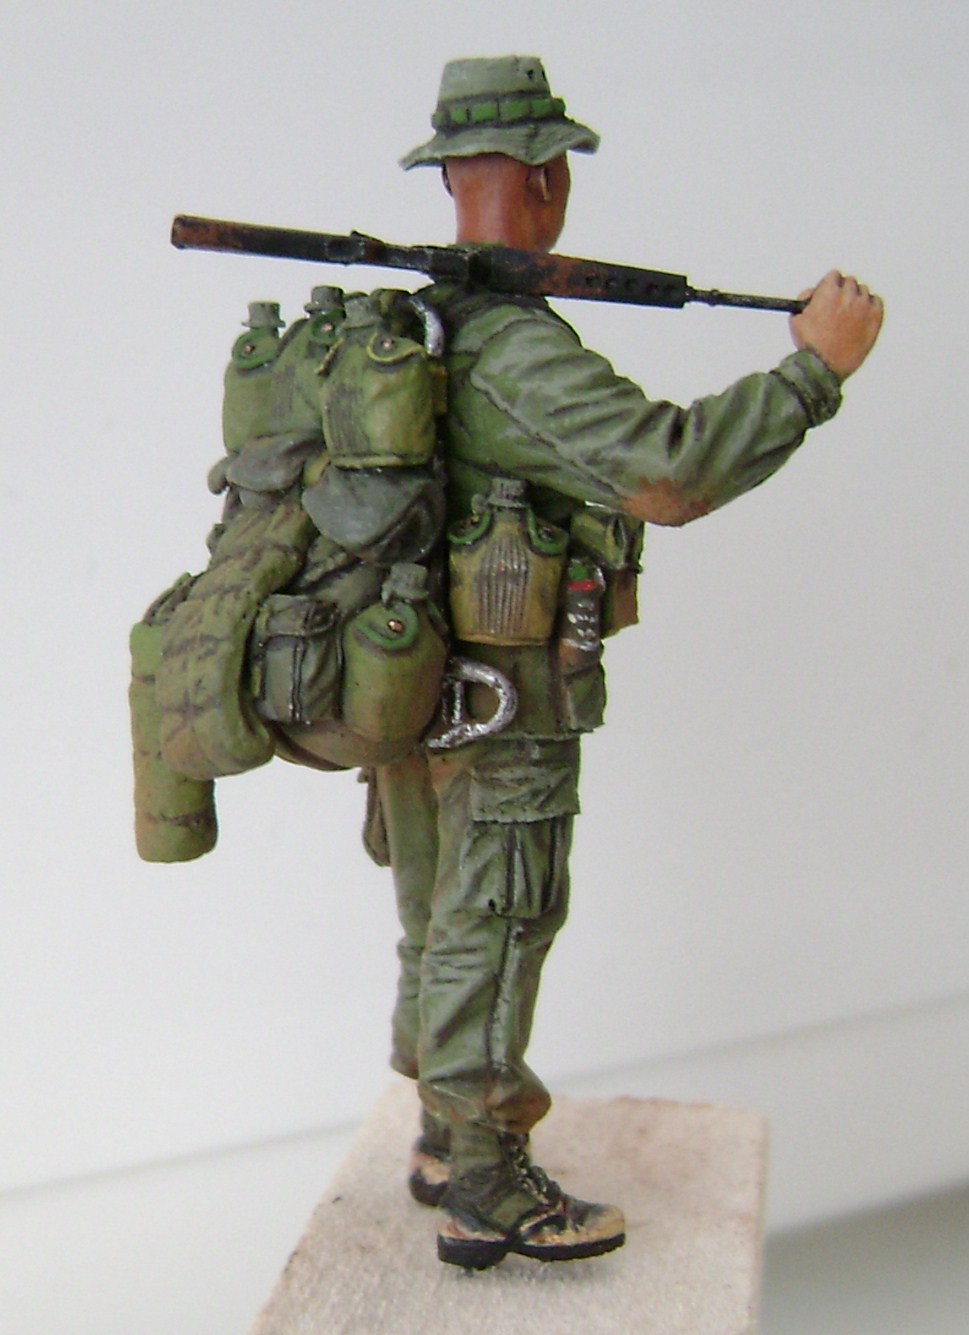
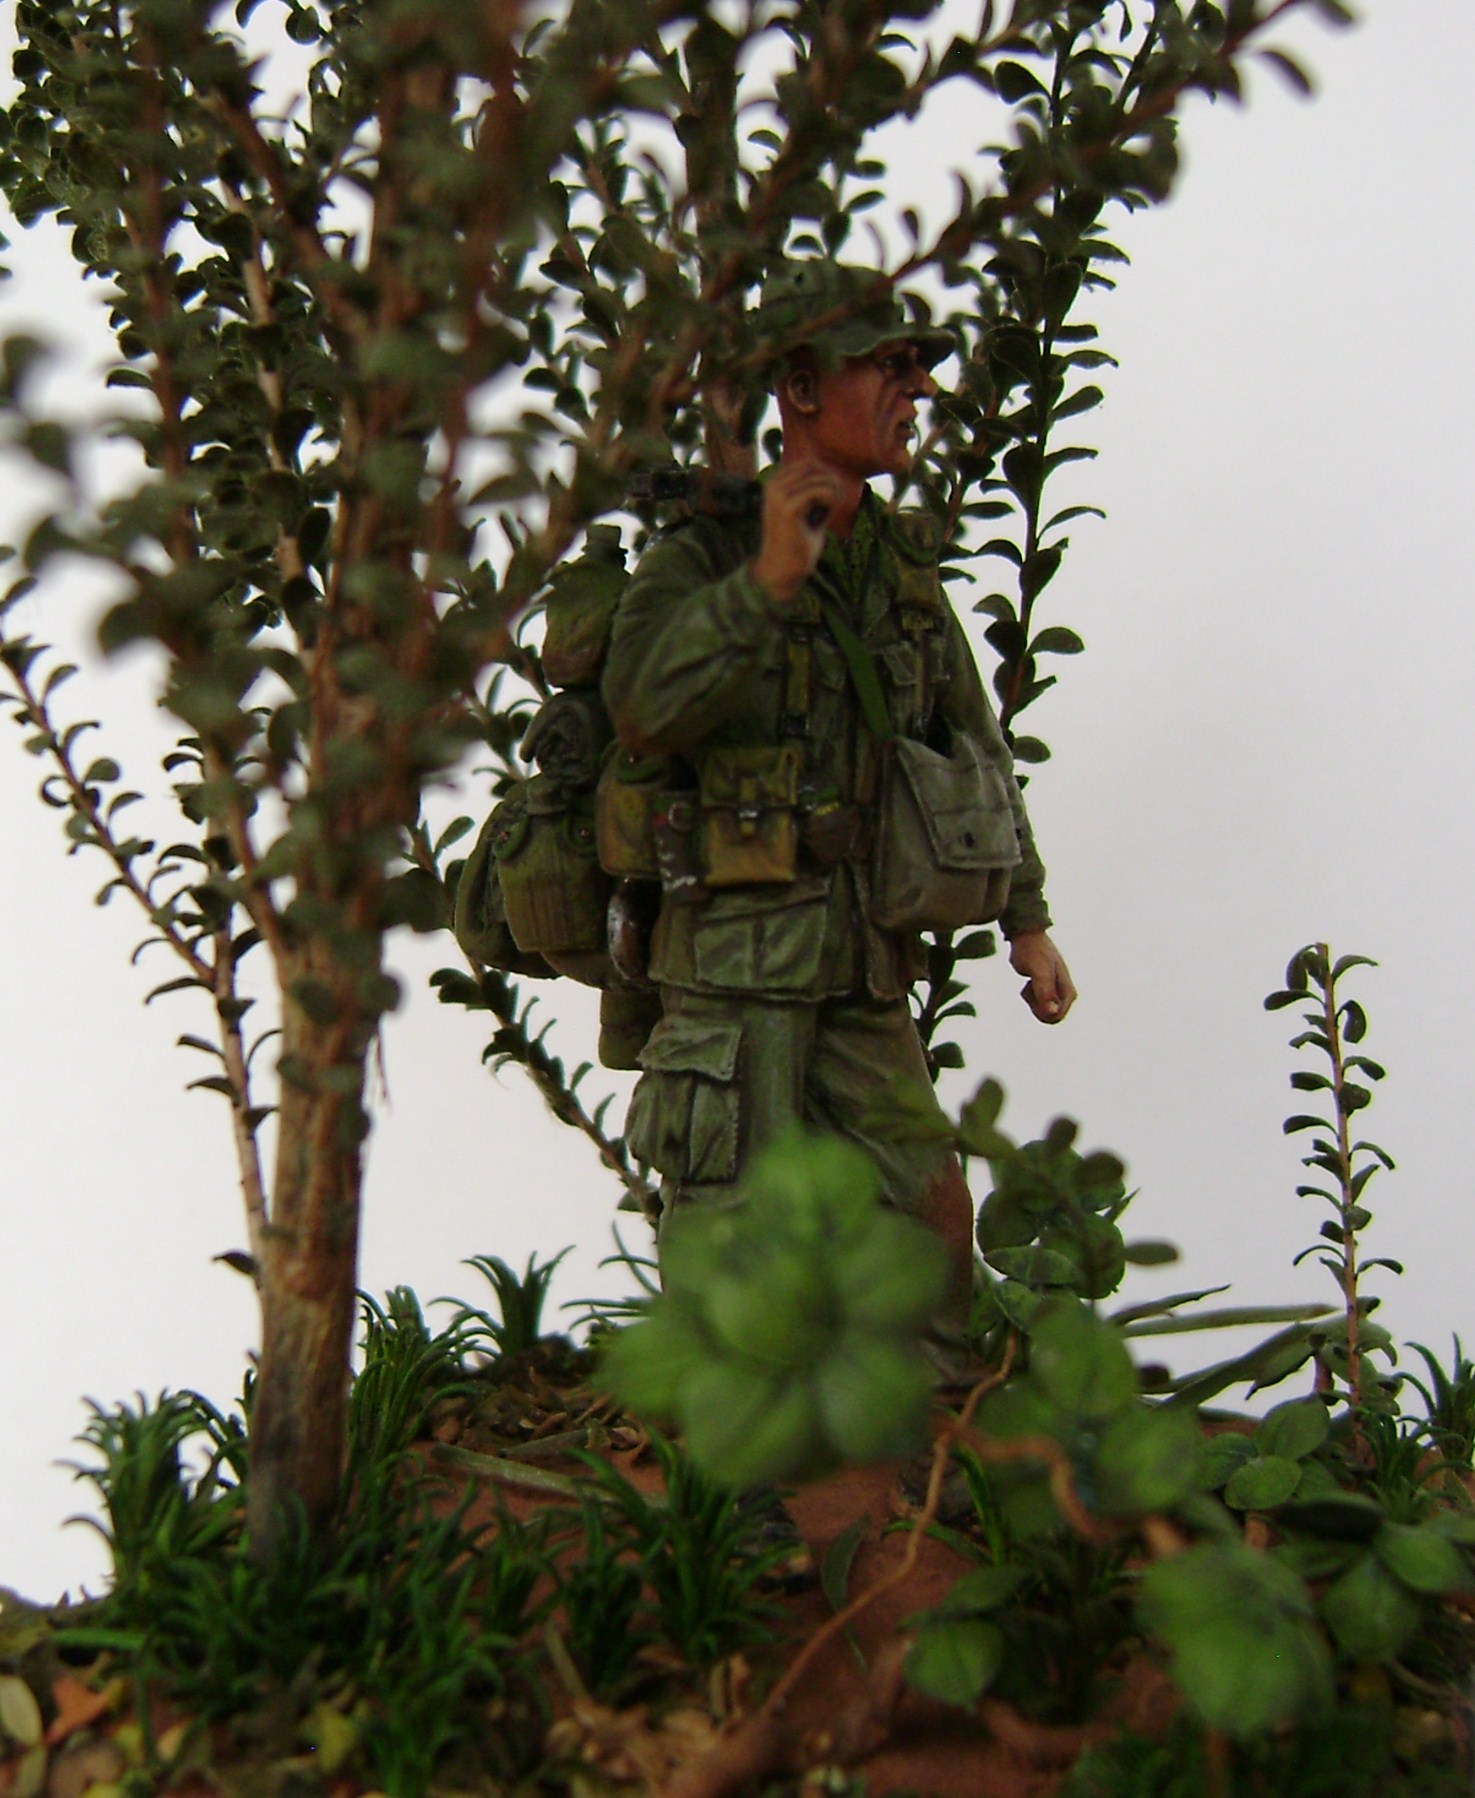
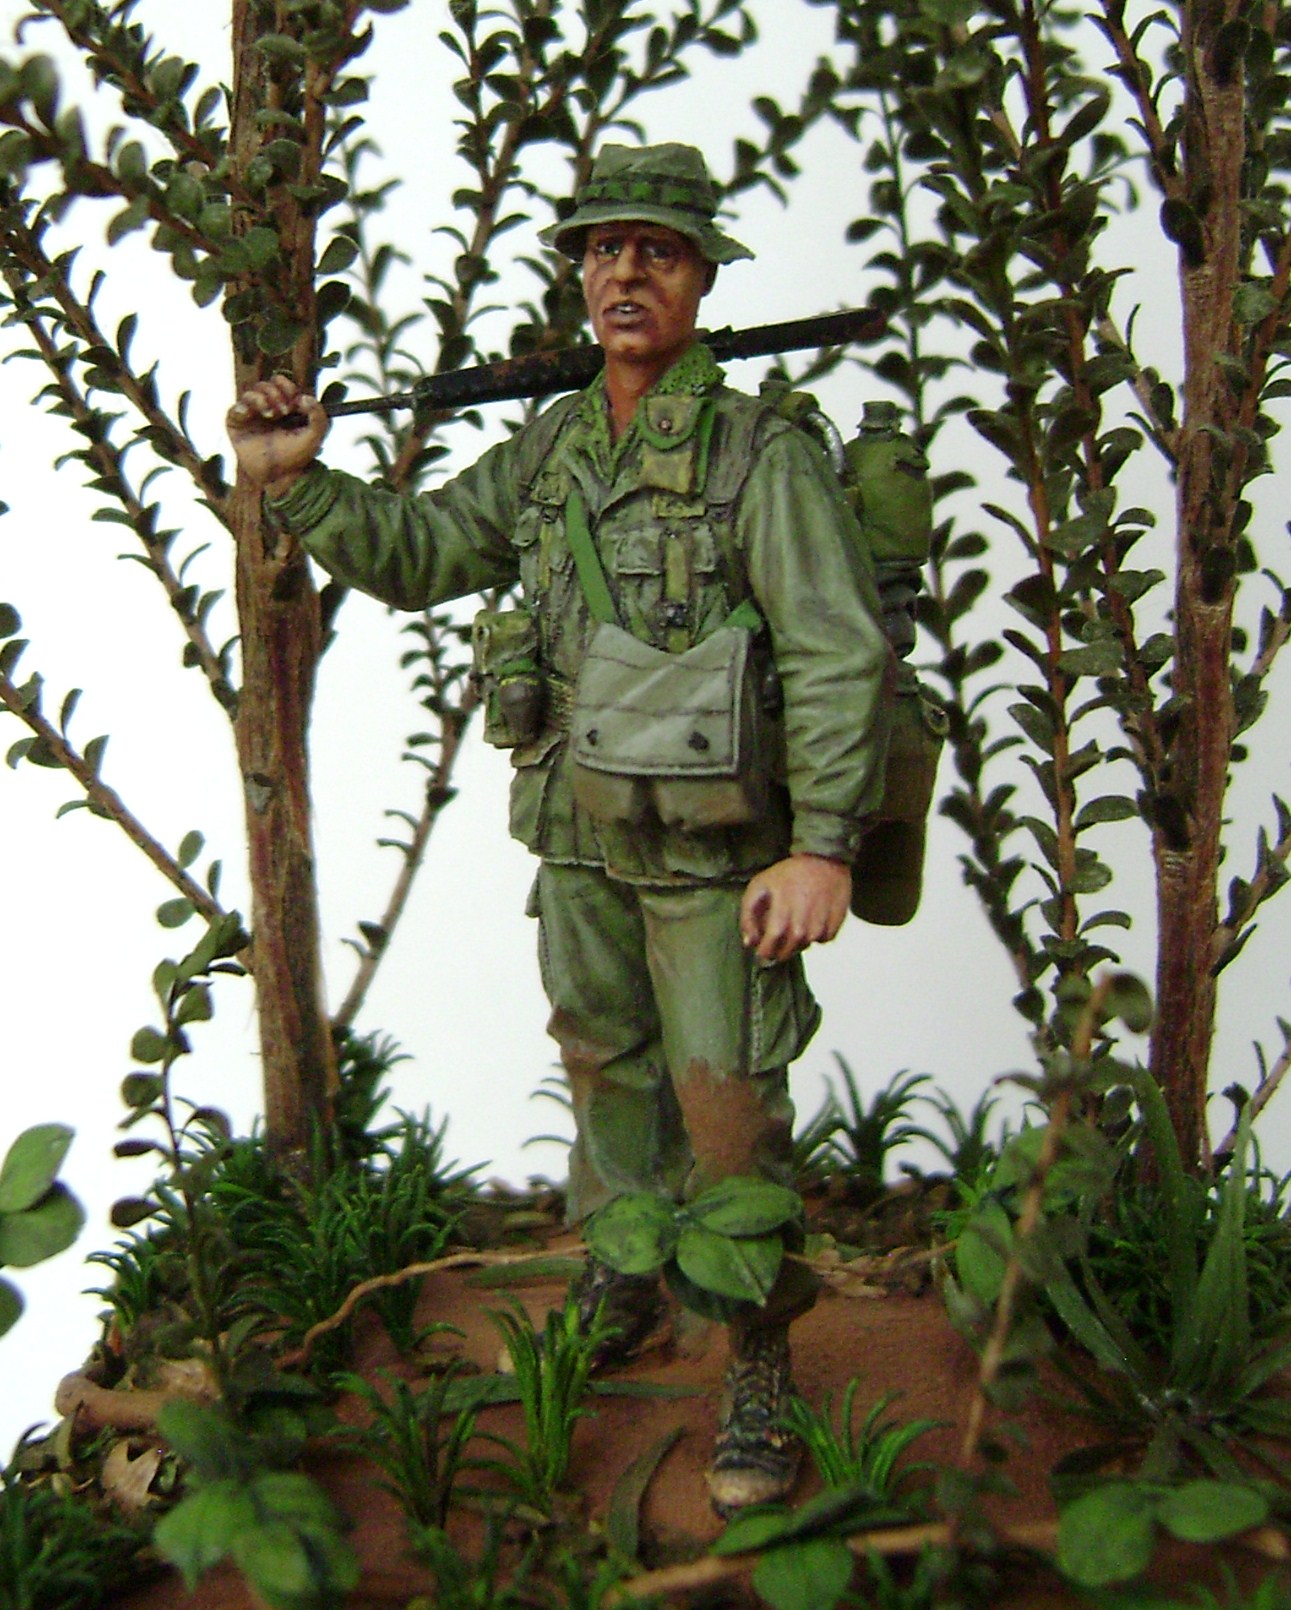
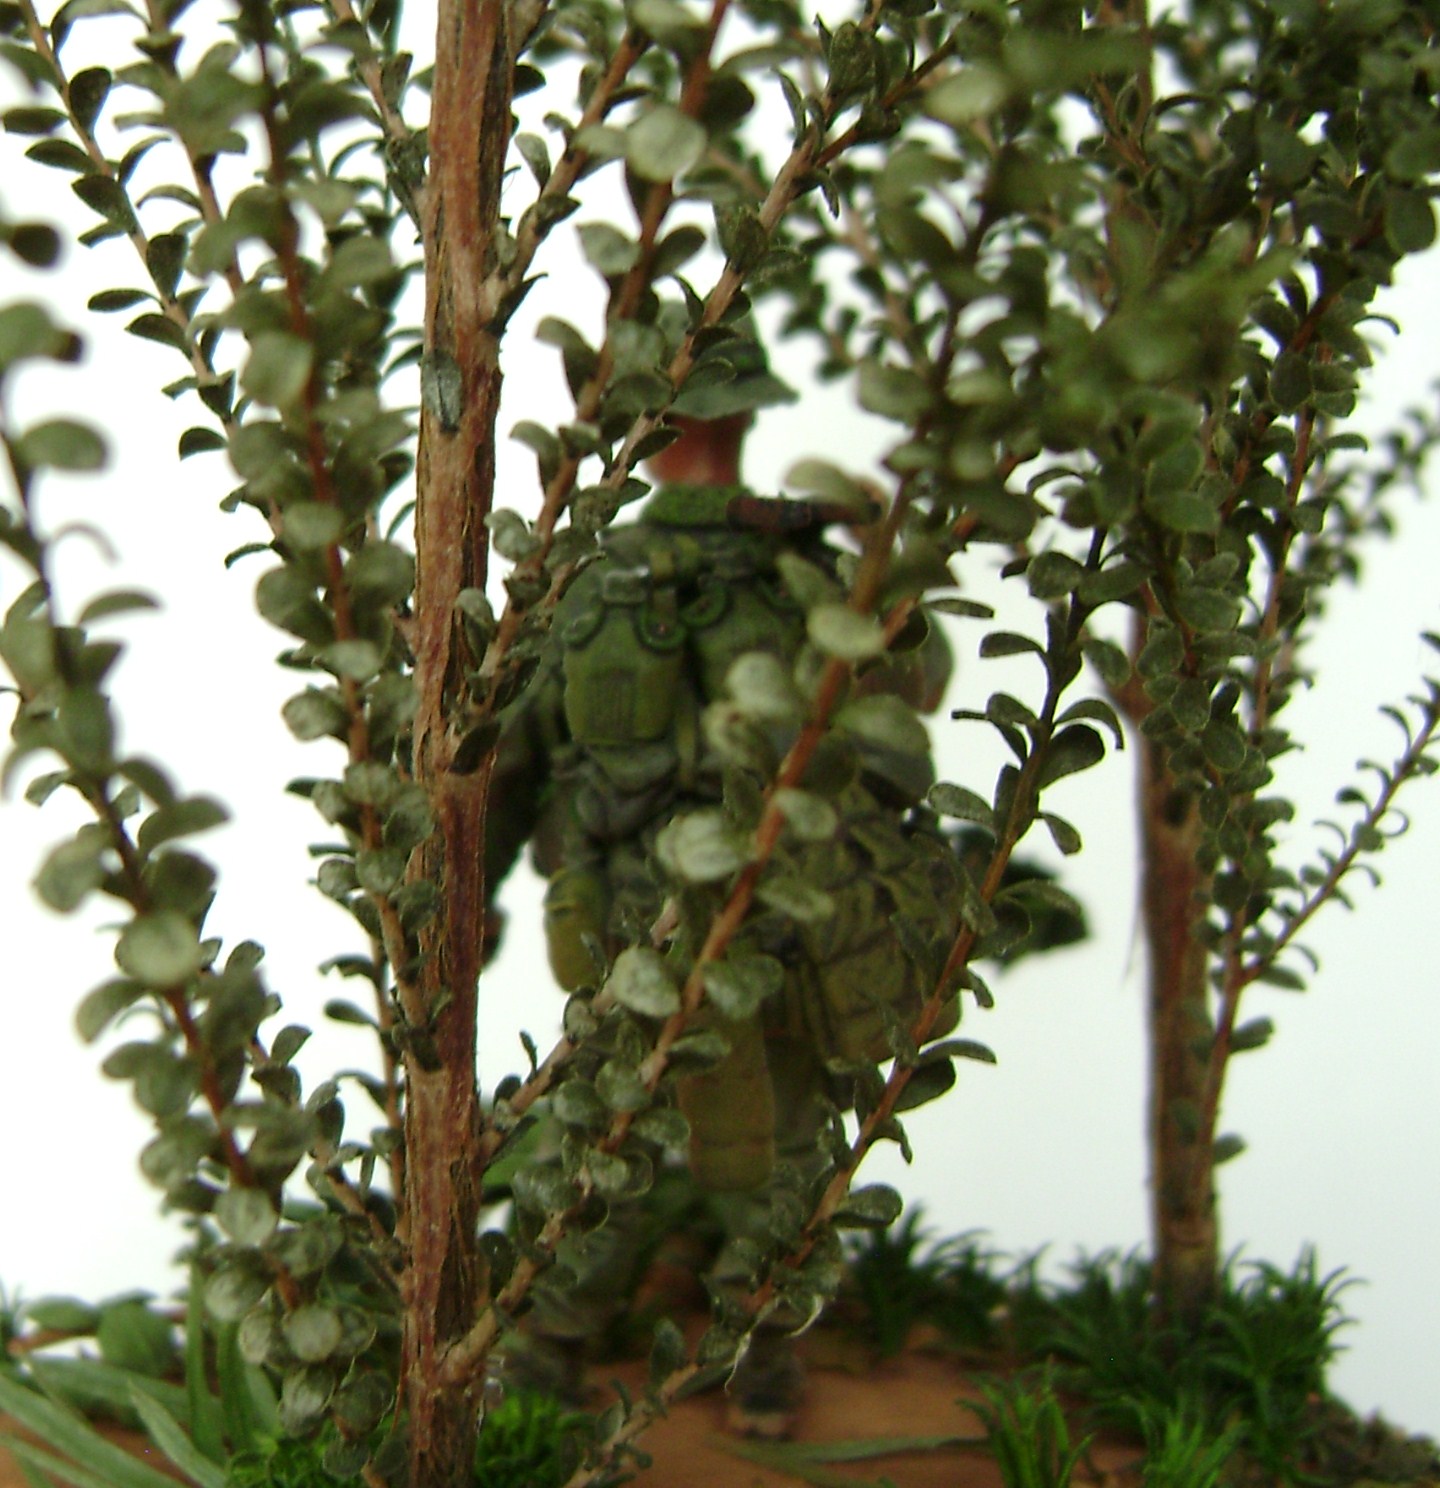
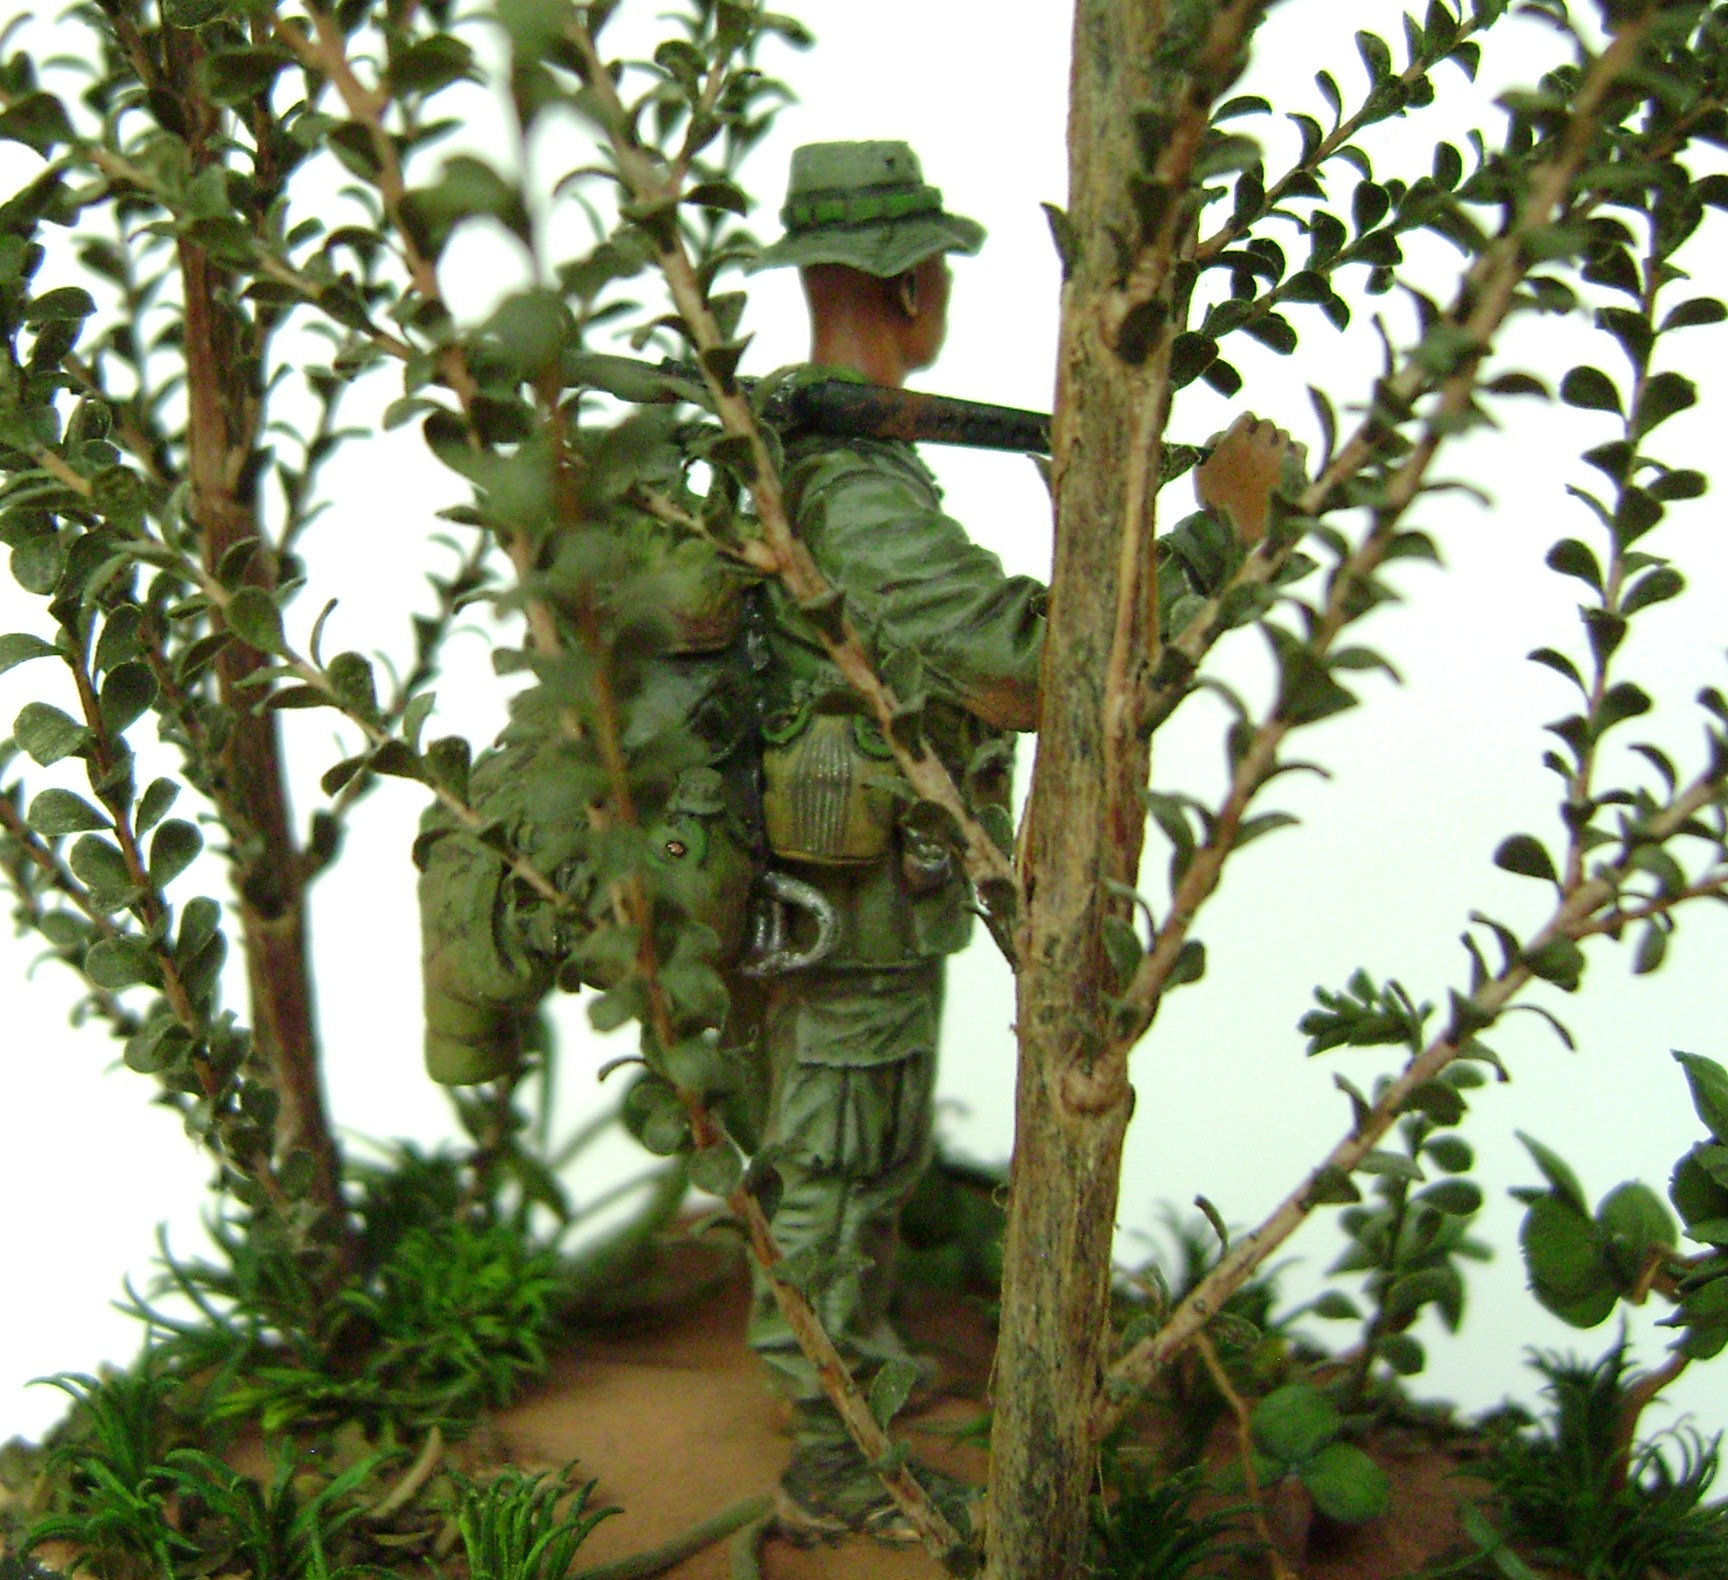
The other figure is a conversion of the New World Miniatures Special Forces Vietnam figure. I used arms from Hobby Fan kits that were in the parts box, hand with M16 from a kit that I don't remember, a hornet head, and boonie hat from the Bravo 6 figure of the character from platoon Rah. The rucksack and frame are scratchbuilt. The canteens without covers that are connected to a snap link/carabiner are from Hobby Fan and I just scraped off the covers and formed them into 1 quart canteen shapes.

Each figure took about three days to build/convert due to drying times of the putties used. They took an additional 3 days each to paint. I did the bases/groundwork simultaneously and that took about two days to complete. So all in all, these two figure displays took a total of 14 days from start to finish.

Like I mentioned ealier in the post, I will post the photos as soon as I can...and as soon as I can figure out how to insert them here.
 
James,
Well I'm glad you are here, but I don't see that start photo yet. :laugh:
Can't wait to see what you have in store for us.
Shawn
 
The Vietnam Experience in Miniature

Here are my project start photos (finally!!!) I didn't have a regular local newspaper when Shawn told me about having a start photo, so I used a local classsified ads shopper paper (Dated 9 August 2010) my wife had picked up at the grocery store and the receipt from Military Miniatures Warehouse (Dated 6 August 2010)where I had purchased several of the figures in the photos. I have even more trays of spare parts and figure parts, but they wouldn't all fit in a photo where you can see the date. There are alot of single figure projects as well as multiple figure vignettes just waiting to be built!

I plan on builing a collection of figures and vignettes that represent how each person's experience in Vietnam was slightly or quite a bit different from others depending on their position/job and their location and time period.

cdf_gb_newspaper_1_1_20100914_1937929615.jpg


cdf_gb_newspaper_cu_2_20100914_1951717564.jpg
 
Re:The Vietnam Experience in Miniature

I had taken a 5 or 6 year break from the hobby due to deployments and an increased OPTEMPO, and this is the first figure I have done since then. I started it in August as part of a larger diorama, but once I realized that I wouldn't have the diorama completed by the time of the show in Austin, Texas, I decided to display this figure as a single figure. He depicts an American Infantry Platoon Sergeant in the Central Highlands of the Republic Of Vietnam in late 1967 - early 1968.

Since I very rarely build and paint stock figures, this one is a conversion. I utilized New World Miniatures US Special Forces #1, Vietnam, NWM-35056 as the basis of the project. I utilized a Hornet head and some arms from Hobby Fan. The hand with the M16 in it is from Dynasty, I think. It came from the parts box, so I really don't remember what kit it originally came from.

In these photos, I have scratchbuilt a lightweight rucksack frame which was common issue for most US Army Infantrymen from 1966 onward. The frame is brass wire and the webbing is lead foil. I used various putties for the rucksack bag, the rolled up poncho/poncho liner/air mattress roll, and the shoulder straps. The canteens are Hobby Fan. A carabiner was fashioned out of some metal rod and canteens without covers were emplaced. The canteens are Hobby Fan items that have had the covers carved away and shaped to look like the plastic 1 quart canteen.

ip_psg_frontal_1_20100914_1141770265.jpg


ip_psg_3_qtr_frontal_2_20100914_1558819998.jpg


ip_psg_initial_rucksack_build_3_20100914_1459549628.jpg


ip_psg_canteens_attached_to_carabiner_4_20100914_1440964382.jpg
 
Re:The Vietnam Experience in Miniature

After making the basic rucksack and frame, I added a claymore mine bag that was from Hobby Fan and a sock full of C-ration cans to the rucksack. This was a fairly common practice since the rucksack bag itself really didn't carry all that much.

ip_psg_claymore_bag_5_20100914_1592441140.jpg


ip_psg_sock_of_c_rats_6_20100914_1221615789.jpg
 
Re:The Vietnam Experience in Miniature

I then started to paint the figure. I decided that I would attempt to paint with acrylics. I used to paint using enamel bases and oils for shading and highlights. It took me about a day to paint the face and arms and to lay in the base color for the uniform. I had tried to get the eyes done actually showing the eye, but after trial and error all day long, I decided to go with slits as if he were squinting in the sunlight.

ip_psg_skin_painted_uniform_base_1_7_20100914_1995512420.jpg


ip_psg_skin_painted_uniform_base_2_1_20100914_1073769822.jpg


The uniform with initial shading.

ip_psg_initial_shading_3_20100914_1172351918.jpg
 
Re:The Vietnam Experience in Miniature

Here's the figure with equipment base colors laid in.

ip_psg_apply_green_tint_to_uniform_4_20100914_2095989690.jpg


ip_psg_initial_ruck_colors_2_20100914_1579734369.jpg


Here's the figure after some tinting of the uniform with a very thin coat of olive green to tone it with a more greenish tint.

ip_psg_base_colors_laid_in_5_20100914_1332618947.jpg
 
Re:The Vietnam Experience in Miniature

Here's the figure weathered with powdered tempera paint for the dirt on the uniform and equipment. The scuffed up boots were accomplished with red leather and sunny skintone acrylics. I think they turned our fairly well.

ip_psg_boonie_added_weathered_1_6_20100914_1189755737.jpg


ip_psg_boonie_added_weathered_2_7_20100914_1039764288.jpg
 
Re:The Vietnam Experience in Miniature

Here is the figure on the base he will be displayed upon. This is the initial placement of vegetation.

Note the scratched-off paint on the rucksack frame. The paint on these frames was kind of crappy. I have several of the frames for references and they all have chipped paint on them from use.

ip_psg_figure_on_base_initial_veg_1_20100914_1869915240.jpg
 
Figure looks fantastic!! :huh: Never thought of using tempra powder weathering :duh

Terry B)
 
Re:The Vietnam Experience in Miniature

Here is the finished product.

This figure depicts an Infantry Platoon Sergeant directing Soldiers to go somewhere out of sight of the viewer/audience. He is wearing the 3rd pattern Jungle Utilities with jungle boots and a boonie hat. He is equipped with the standard M1956 web gear and the lightweight rucksack with frame. Since lots of water is required when in a jungle environment, he is carrying as many canteens as possible, some even attached to his ruck with a carrabiner since he didn't have any extra canteen covers for them. Since there is so little room in the rucksack bag itself, he has attached a poncho/poncho liner/air mattress roll under his rucksack and has stored some of his c-rations in a boot sock for easy access.

The groundwork is Miliput putty textured using an old toothbrush. Once dry, the groundwork was painted with tempera and acrylic reddish brown colors. The plants are various dried plants from a craft store that were glued to the holes that were put into the groundwork as it dried. The loose forest litter is comprised of various scraps of dried plants.

psg_2_2_20100914_1180154921.jpg


psg_3_3_20100914_1072396819.jpg


psg_5_5_20100914_1470496175.jpg


psg_6_6_20100914_2034703057.jpg


psg_7_7_20100914_1743332341.jpg


psg_11_4_20100914_1537528955.jpg


psg_9_2_20100914_2007398321.jpg
 
Re:James O'Leary's

MrT wrote:
Figure looks fantastic!! :huh: Never thought of using tempra powder weathering :duh

Terry B)

Thanks, Terry.

I actually stated using the tempra powder to mix with celluclay back when I was in high school. For most of my figures, I dip a dry brush into the powder and pat it onto the areas where I want the dust. For the second figure which I am about to post in a few minutes, I mixed the tempra powder with water and painted it on as dried mud. Since alot of the hobby shops around here have gone out of business, it's hard to find the MIG products unless if I get them on line. I haven't used any of those products nor seen them in person, so I figured I'd stick with the tempra powder for now.
 
Thanks, Andy.

I was afraid that it wasn't going to turn out very well since I had been out of practice due to the 5 - 6 year break. It took me a long time on the face, both because I hadn't painted for so long and because I was trying out a new medium - acrylics. I am pleased with how the acrylics turned out and how easy they were for me to work with once I got the hang of it.
 
Re:The Vietnam Experience in Miniature

Here is the second figure that I have done since my return to the hobby. I gained some confidence with the use of acrylics from painting the Infantry Platoon Sergeant.

This figure depicts an American Infantryman, a Boonie Rat, who has been humping the Central Highlands and is bone-weary tired from doing so for so long. While in the Marines, I spent alot of time in the jungle. It wasn't Vietnam, but Central and South American jungles are close enough for me to experience the physical aspects of humping heavy loads. For this figure, I had in mind to attempt to convey what an ass kicker just humping the boonies can be...and that is without having to do any fighting against an enemy. So hopefully I was successful making this guy look somewhat tired or dreadful of the day of humping the hills that he has ahead of him.

This figure, like the first, is a conversion of a commercially manufactured figure. In this case, the body is from Bravo 6's Australian SAS "Jungle Make Up" kit. It is the guy that his holding on to tow weapons while his buddy paints his face. I removed the head, Australian ammo pouches, and the rucksack so I could convert him to depict an American Infantryman. I chose a Hornet head that had a facial expression that I thought would depict someone who is tired. The left arm is from the Bravo 6 SEAL with Viet Cong prisoner kit. The right arm is from the Bravo 6 M60 gunner depicting King from Platoon. The boonie hat is from Evolution Miniatures Infantryman. The canteens, ammo pouches, and claymore bag are from Hobby Fan. The M16 is from the parts box, most likely a Dragon weapon. The rucksack and frame was constructed much like the one on the platoon sergeant figure, except I wanted to show the rucksack bag in its lower configuration. I added the sock of c-rations and a bandoleer of M16 magazines. I made the bandoleer slightly oversize to give the impression of a very heavy load.

Here is the figure after the face has been painted (which took alot less time than the platoon sergeant's face since I was starting to get a system going with the acrylics). He is posed out and is going throught he painting process prior to the attachment of the rucksack.

br_ip_1_1_20100914_1167653164.jpg


br_ip_2_2_20100914_1209785779.jpg


br_ip_3_3_20100914_1380315895.jpg


And now with the boonie hat and rucksack added...

br_ip_4_4_20100914_2012223071.jpg


br_ip_5_5_20100914_1810022424.jpg
 
Re:The Vietnam Experience in Miniature

Now with the boonie hat with a base coat and the uniform with the first shadows.

br_ip_6_6_20100914_1294733293.jpg


Now the boonie hat is painted and the web gear is starting to take shape through color.

br_ip_7__7_20100914_1543906778.jpg
 
Re:The Vietnam Experience in Miniature

Next is a series of photos as the rucksack and equipment is being painted. Note how not all of the equipment is the exact same color. For those of you who are not in the military, the people issuing you your equipment usually don't care what they give you, so you can end up with a mixture of new and used equipment. Added to that variation in wear and color, is the variance you can get from various lot numbers and manufacturers. I tried to replicate that with this figure by varying the shades and colors of the web gear. The highlights and outlining is being done at this stage.

br_ip_8_1_20100914_1711503682.jpg


br_ip_9_2_20100914_1688371484.jpg


And the pretty much completed figure with scuffed up jungle boots, dirty uniform and equipment, and his M16 over his shoulder that has dirt on the buttstock, pistol grip, and handguards where muddy hands have previously been. The working parts of the rifle have been kept clean, though.

br_ip_10_3_20100914_1153801322.jpg


br_ip_11_4_20100914_1667285995.jpg


br_ip_12_5_20100914_1376012066.jpg
 
Re:The Vietnam Experience in Miniature

Now it is time to put the figure on a base. Again, I used Miliput for the groundwork and textured it with an old toothbrush. I had previously drilled holes in the base for the rod in the figure's foot and the two trees. As I applied the groundwork, I had inserted toothpicks into the drilled out holes to keep their place. After the groudnwork was textured, I superglued the rod and placed the figure onto the groundwork. I then planed the trees and the root that has leaves on it. The trees are from a Christmas wreath that I bought at a craft store when I was stationed in Alaska. I wish I had bought more of them because I have never been able to find the same plants ever since. The leaves on the root are actually seeds from a dried flower type plant from a craft store that I have painted to look like leaves. The groundwork then received its initial coat of paint.

br_ip_13_6_20100914_2009833929.jpg


br_ip_14_7_20100914_1753900530.jpg


br_ip_15_1_20100914_1963916208.jpg
 
Re:The Vietnam Experience in Miniature

Here is the completed product. If you look closely at the lower right hand corner of some of these photos, you will see a lizard getting out of this Grunt's way.

dsc03161_1_20100910_1791966262.jpg


dsc03158_2_20100910_1097023088.jpg


dsc03156_3_20100910_1868924006.jpg


dsc03149_4_20100910_1402961676.jpg


dsc03133_5_20100910_1209686192.jpg


dsc03132_6_20100910_1883790267.jpg


dsc03131_7_20100910_1484384548.jpg


And this is what it would look like if you were behind him on patrol...

dsc03152_4_20100914_1709253183.jpg


dsc03151_3_20100914_1877406151.jpg


dsc03129_2_20100914_1253723832.jpg


dsc03128_1_20100914_1244922007.jpg
 
James,
I told you it would be like falling off a bike (I mean riding a bike) :evil:
:laugh: ;)
Glad to see my nagging has got you back in the saddle and working
on stuff again. (as with the old stuff you have showed me, your figures
are aces in my book). Mind you I still need to sit down and pick
your brain some time so you can get me out of the "looks like I
painted them with a trowel instead of a brush" look. :blush: :eek:hmy: :huh:
Glad you have embraced TnT and are sharing what you are now back
to building and painting. (Hope the wife doesn't get too mad at me
for re-corrupting you. :) :laugh:
Great job.
We may have to have you do some "how to's" so we can get a more
in depth look at how you are doing this stuff.
Shawn
 
Back
Top