• Modelers Alliance has updated the forum software on our website. We have migrated all post, content and user accounts but we could not migrate the passwords.
    This requires that you manually reset your password.
    Please click here, http://modelersalliance.org/forums/login to go to logon page and use the "Forgot your Password" option.

Hobbyboss Merkava IV w/Trophy

iambrb

Well-known member
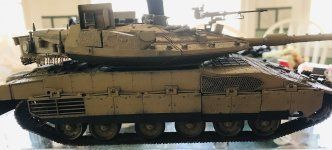
Well howdy ever-buddy! Some of y'all may note that I have been working on a Meng Magach kit and really praising that kit for it's incredibly well-engineered detail and instructions. I saw the Hobbyboss and wanted to try it, partly because it comes with great aftermarket items, consisting of a battering ram and the rear hull mount storage. I have actually had and been periodically working on this kit for awhile, so I am going to post where I am up to date, but be aware this is not going to be the fastest build in the world.
EXAtqt7.jpg

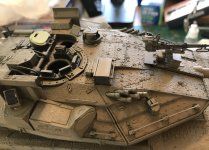
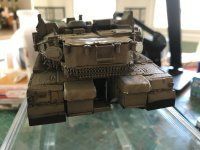
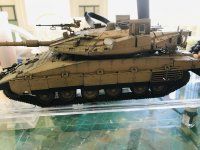
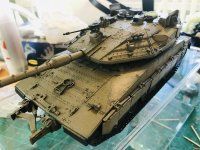
However, it wasn't until I had the kit in paw that I realized that Hobbyboss had made a pair of major errors. One ease to solve (skirt armor), the other, not so much. Hobby boss made a slightly modified version of thier Mk.IV M, simply adding the trophy armor. the issue here is that the early Mk IV M that H-B depicts lacks the loaders turret! Now I basically have two ways to work this animal; build as-is and don't worry about it, but sadly some of Saul has rubbed off on me, so it looks like that won't be happening. the other is to cut the turret and make the corrections. Anyone care to guess which one I had to go and choose?
 
OK so had to stop early, didn't want to be late to church!

Here is a pic of the top of the turret, with my special surgical marking device showing the area that must be removed.
eelGhU7.jpg

At first i was really concerned. I had noticed in a certa FB forum a guy that was trying to scratch-build his own, but then i found this correction set, intended for the Academy kit:
n2LjGbG.jpg

This looked quite doable, especially when I discussed it with the esteemed Eric Rains. After brief visit, and thorough consult, Surgeon Rains & I set a date. On the day, the patient was brought in to Eric's newly painted work space. This will have to be done in two different surgical session, and here you can see the indicated area to be cut
RnVpwzp.jpg

With the patient properly sedated, the initial holes were drilled, and cutting began
nyTFioQ.jpg

Here you can see the 'prosthetic' correction part being sized to determine fit
NCBvwSu.jpg

Lastly, you can see where the correction part is press fitted but not glued. Surgery went well and while not complete, is a very good start
6vEKzUh.jpg
 
So while waiting to get a second surgery booked, I went ahead and completed a number of tasks, building subassemblies and the like. one of the things I immediately noticed is that Hobbyboss did a poor job on the antiskid, it looks a bit smooth to me (repeat of earlier pic so you can compare)
NCBvwSu.jpg

So I decided to try the MIG Anti Slip
zDTF7QF.jpg

This is great stuff! I mean, you DO have to apply two coats, but it is really easy to do, simply using a dabbing motion on the brush as you apply.
13ggrRY.jpg

Wv31hNw.jpg

So this is where it pretty much sits.
ksJlmW0.jpg

I have basically completed the entire lower hull along with the wheels, built a few subassemblies, and done the anti-slip. The patient's next surgical session is scheduled for Tuesday, so I'll let everyone know how it goes!
 
OK so just because I haven't been posting on this is not to say that I have been steadily at work! The instructions are really vague on this, but besides that and it being just a tad fiddly, this is actually a really nice kit. Th detail is very high, and as a result the build is slow. Add to that the "Corrective Surgery" and you have your work cut out for you, let me tell ya!

So the first order of business was to build up the hull underneath the "prostetic". A few sheets of various thickness styrene gave it a good fit.

wCno6J1.jpg

LOLlyRJ.jpg

sZHWVnZ.jpg

HbHQRvQ.jpg


Ok so I didn't get the pics of cutting the hatch out, but it was the same as earlier. Dr. Rains reccommended a neat little wonder-product called Perfect Plastic Putty, and wow did it ever work great!

b5Fy0hu.jpg

3GJkL7C.jpg

MTIIViy.jpg


Next up I went to the lower hull, and got started on the tracks. Some may like them, but I did not care for the individual link tracks. Each tree had 12 tracks, and each track required 2 cuts and 2 clean up spots (so 4 total before assembly) per the vague instructions, there 105 links per side. That is 420 links to be cleaned per side (840 total)!!!

wOKCjJB.jpg

GXowjec.jpg


The detail on the .50 cal MG is really great! Not pictured is that the top cover that had the correct feed slot and tray underneath, and neat caveat is that the barrel has the hole in it, so nothing to drill out

2zcdYVm.jpg

3mchXkk.jpg

itzC9PR.jpg


And finally, just this afternoon it is really starting to FINALLY come together! I still have some paint to get on here before final assembly, & I do not have a pic of the corrected side skirt armor, but so far I am very-very pleased with this kit. let me know what ya think!

YdF9JOn.jpg

8enEJXM.jpg

aEJbDjx.jpg

MQGPShr.jpg

7alcuMg.jpg

Xd59b47.jpg
 
So as of late I haven't been posting much, but have been working. Am steadily working on stopped projects. I have 4+ atm and I think a big part of 2023 is going to be related to finishing these.

today I have been working on the ball chain armor. Hobbyboss gives you about 18 inches of chain and little metal balls (no jokes). I bought a set from FC Model trend in Spain, but upon opening found there would not be enough, so I ordered a second set. They had NO problem taking my money, but they never even shipped the part! had to get paypal involved so I think it's obvious I'm not going that route again, and you should REALLY think twice before doing business with them!

Via "another forum" (ahem...) I found a guy that can 3D print right here in the US, and he printed these for me. I had a very nominal amount invested and actually GOT the item! I've already cut individual sets and chucks off, the delivered well-packed product looks much nicer than shown in the pics

next I had to use a razor saw to remove the individual strands, then clean them up. here are 4, two cleaned and two not, beside a dime for size reference

Lastly I used that wonderful Harbor freight CA to attach them to a thinly cut bit of styrene (Plastic card, as you peeps across the pond call it) and after it set for about 5 min, I followed it up with a small amount placed on the attachment points to make it a bit more rigid. Now just to attach to the tank! Elapsed time for this was about 10 minutes under high magnification, so I took a break and posted this. more when I have complete!
 

Attachments

  • AZA1.jpg
    AZA1.jpg
    166.1 KB · Views: 19
  • AZA2.jpg
    AZA2.jpg
    147.4 KB · Views: 16
  • AZA3.jpg
    AZA3.jpg
    71.5 KB · Views: 16
Sweet! I wonder if he could do the same thing in 1/72 scale. I have five Merkavas that need ball and chain armor.
 
So here is aboot (as those Canadians say) 6 hours time. The ones in Gray are the installs and also the repairs from the FC Model Trend product which is super brittle. Just a bit (as we say in the US) more to go!
 

Attachments

  • 4106EB34-3430-4763-AE4D-29B311093EF8.jpeg
    4106EB34-3430-4763-AE4D-29B311093EF8.jpeg
    990.6 KB · Views: 15
Ok so now it was on to the ball chain armor. The kit provides you with chain and little metal balls (no jokes…) But that looked to be more pain than it was worth. So with only a bit of digging, I came up with this product from FC Model Trend in Spain
ZA5
ZA5500×700 82.2 KB

I ordered it and was very un-nerved that there was no tracking. Granted it was coming to the US and it took nearly 8 weeks to get it…but I got it. in looking it over I saw it was well printed, but this product is VERY fragile, and right away I realized there was not enough to cover the tank, so I ordered another set. FC had NO problem charging my Paypal, but after 12 weeks, with the model shelved waiting, I never got it. FC was unresponsive to the point that I had to contact Paypal in order to get a refund, so REALLY think twice before doing business with them
This however prompted me to post on here regarding 3D printing, and enter one Mr. James Lee, located right here in the US, and at a very moderate cost he printed a set of ball chain armor for me, and I got it in less than two weeks (bear in mind I ordered this during a holiday)
AZA1
AZA1810×1080 164 KB

Made from some different type of resin, these are not as fragile as the FC product, but you still must be careful removing them. Here are four, removed and ready for clean sp, alongside a US Dime/10 cent piece as size comparison
ZA2
ZA21468×878 144 KB

I found that it was easiest to cut a “half-link” off the chain, as you can see in some of these, then cut a small strip of styrene and apply CA to it, then seat the chain over the strip. hardens quickly and several in a row are easy to maneuver and glue in place. In this last pic you can see where I I have the FC product (Primed in black) along with the attached strip.
ZA3
ZA3810×1080 65.3 KB

Hope James sees this, as I think his only possible improvement is to print 2-4 on a strip as shown. His product is really well made, and holds up better than the FC product.
ZA4
ZA41080×670 78.7 KB

As you can see I still have a few more stirps to add, but here in South Carolina USA it is 14F/-10C & I have to paint outside, so it will be several days until I can even think about that!
 
That is fantastic! I would love to get several sets of those ball and chain armor in 1/72 scale too. I have four (or five) Merkavas that need them.

I'm glad you found such great prints!
 
Ok so now it was on to the ball chain armor. The kit provides you with chain and little metal balls (no jokes…) But that looked to be more pain than it was worth. So with only a bit of digging, I came up with this product from FC Model Trend in Spain
ZA5
ZA5500×700 82.2 KB
I ordered it and was very un-nerved that there was no tracking. Granted it was coming to the US and it took nearly 8 weeks to get it…but I got it. in looking it over I saw it was well printed, but this product is VERY fragile, and right away I realized there was not enough to cover the tank, so I ordered another set. FC had NO problem charging my Paypal, but after 12 weeks, with the model shelved waiting, I never got it. FC was unresponsive to the point that I had to contact Paypal in order to get a refund, so REALLY think twice before doing business with them
This however prompted me to post on here regarding 3D printing, and enter one Mr. James Lee, located right here in the US, and at a very moderate cost he printed a set of ball chain armor for me, and I got it in less than two weeks (bear in mind I ordered this during a holiday)
AZA1
AZA1810×1080 164 KB
Made from some different type of resin, these are not as fragile as the FC product, but you still must be careful removing them. Here are four, removed and ready for clean sp, alongside a US Dime/10 cent piece as size comparison
ZA2
ZA21468×878 144 KB
I found that it was easiest to cut a “half-link” off the chain, as you can see in some of these, then cut a small strip of styrene and apply CA to it, then seat the chain over the strip. hardens quickly and several in a row are easy to maneuver and glue in place. In this last pic you can see where I I have the FC product (Primed in black) along with the attached strip.
ZA3
ZA3810×1080 65.3 KB
Hope James sees this, as I think his only possible improvement is to print 2-4 on a strip as shown. His product is really well made, and holds up better than the FC product.
ZA4
ZA41080×670 78.7 KB
As you can see I still have a few more stirps to add, but here in South Carolina USA it is 14F/-10C & I have to paint outside, so it will be several days until I can even think about that!
Working on the chain gang.

 
Well yesterday it was warm enough that I was able to FINALLY get paint on this! One thing I mg I’m learning is that if you build a
Merkava, put the ball chain armor on LAST!!! More repair work to do but it came
Out nice, that Hataka paint is great stuff! Easy to mix and lays down flat and easy
 

Attachments

  • EC746474-CD66-41C2-8AB9-4467610BD46E.jpeg
    EC746474-CD66-41C2-8AB9-4467610BD46E.jpeg
    1.5 MB · Views: 11
  • 640DA0B7-CFC2-4527-8210-B188DF50DAFC.jpeg
    640DA0B7-CFC2-4527-8210-B188DF50DAFC.jpeg
    2.7 MB · Views: 13
  • C184DC8C-AC07-4ECE-93A8-40A913590FFF.jpeg
    C184DC8C-AC07-4ECE-93A8-40A913590FFF.jpeg
    2 MB · Views: 12
  • 750A0CF9-DAC2-491F-B11A-7D82B520B749.jpeg
    750A0CF9-DAC2-491F-B11A-7D82B520B749.jpeg
    2.3 MB · Views: 10
  • 5BB0C661-9F59-47A2-BC9D-9960988D64CF.jpeg
    5BB0C661-9F59-47A2-BC9D-9960988D64CF.jpeg
    2.7 MB · Views: 12
  • 964ECEE0-2ABD-42BD-92FE-7D4B558164DE.jpeg
    964ECEE0-2ABD-42BD-92FE-7D4B558164DE.jpeg
    2.2 MB · Views: 13
Back
Top