• Modelers Alliance has updated the forum software on our website. We have migrated all post, content and user accounts but we could not migrate the passwords.
    This requires that you manually reset your password.
    Please click here, http://modelersalliance.org/forums/login to go to logon page and use the "Forgot your Password" option.

Figure conversions for upcoming dioramas

JamesOLeary

Master at Arms
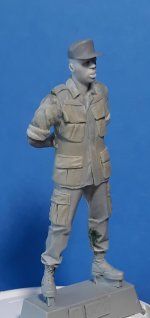
Not to long ago I had bought the IDF Tanker 1973 figure from Royal Models with the intention of converting him to a US GI in Vietnam. I scraped off the tanker coverall details, sculpted in the necessary details to transform the uniform into a set of 2d Pattern Jungle Fatigues. I then added the name and US Army tapes, CIB, and 9th Infantry Division patch to the figure. I took a smiling head from a German officer head set from Life Miniatures, cut his cap away, and replaced it with a short brim boonie hat from Bravo 6. I replaced the all leather boots with jungle boots from Bravo 6. The right arm is from the kneeling Tunnel Rat from Bravo 6's Tunnel Rat figure set. I cut off the hand holding a flashlight and replaced it with a hand from Royal Models. I need to do a little clean up work before priming, but I am pretty pleased how he turned out. Now I just have to further develop the story and composition of the diorama I want to place him in so I can start on the other figures and ensure they interact well with eachother.

20230801_210359.jpg20230801_210146.jpg20230801_210129.jpg20230801_210109.jpg20230801_210047.jpg20230801_210015.jpg20230801_205951.jpg20230801_205927.jpg20230801_205901.jpg20230801_204327.jpg20230801_204221.jpg

Thanks for looking.
Cheers,
James
 
Thanks, guys.

The direction that I think I will go with the figure above, this figure I am showing now, and the other figures I am working on will be a diorama of some dudes at a Conex container laying out equipment to inventory before signing for it and their Platoon Sergeant (the guy waving) showing up with two new guys for the squad conducting the layout.

This next figure is of one of the new guys. It is a conversion of one of the figures from the new ICM figure kit for their newly released CH54.

20230815_162106.jpg20230815_162214.jpg

The base figure is actually pretty good for an injection molded figure, but there were some things I had to change in order for it to be compatible with the other figures in the diorama. I am not sure how many people take notice of such things, but US Military clothing has to meet certain specifications that are set for the manufacturers to follow when producing uniforms. What this means in the case of the Tropical Combat Uniform or jungle fatigues is that the size, shape, and location of the pockets, epaulets and waist adjustment tabs if that version has them, collars, and sleeve closures will be a constant variable no matter the size or length of the uniform. Because of this factor, if one wants to realistically depict Soldiers wearing such a uniform, all of the pockets need to be the same from figure to figure. So, if one has figures from different manufacturers, and they want to be as realistic as possible in the depiction of guys wearing the same uniform, then one would have to ensure all of the pockets are the same size and shape among all of the figures and this can be done by shaving off all of the pockets and sculpting new ones. The same concept of a standard size, shape, construction etc, also applies to field equipment and boots.

I wanted to make this figure look young and a bit lost, so I chose a Hornet head that had the look I was looking for. I then started putting the figure together. I shaved off the cargo pockets on the legs and glued the legs together. I then shaved the top pockets off the torso as well as the epaulettes. Something I liked about the original torso is that the bottom skirt of the shirt is slightly open and the way that it mates up with the legs is pretty nice.

20230815_162132.jpg

I glued that on and then the back part of the skirt. When the glue dried, I sculpted the cargo pockets, let them cure, then the top pockets, let them cure, then the lower shirt pockets. I then glued the arms on an filled the gaps. Lastly, I glued on the head that has a well rendered cap from the ICM kit. I then sculpted name and US Army tapes and a 9th Infantry Division patch. When I mix up more putty for the next figure I will add the unit Crest to the cap. Notice how the bottom of the shirt does not touch the top flap of the cargo pocket like how the uniform is intended to fit. For the sake of the storyline, I am attributing it to not all sizes being available when this Soldier got issued the uniform. He was able to get the correct size trousers, but he ended up with a Small/Short shirt. This kind of stuff happens so thos ended up working out well. Another thing about this figure is that he is a bit shorter than the others and that works out well, too, since people are different sizes and shapes.

20230815_155025.jpg20230815_155048.jpg20230815_155120.jpg20230815_155146.jpg20230815_155216.jpg20230815_155259.jpg20230815_155317.jpg20230815_155331.jpg

Thanks for looking.
Cheers,
James
 
Here are two more that I am working on...one is a conversion of the Marine machine gunner from Evolution Miniatures to depict a guy named Russell Fant who was a member of 2-47 IN (Mech) who was KIA in 1969. It is a tribute piece that I am making for a family friend who was his fiance at the time of his death. The other is a conversion of a WW2 German Soldier from Bravo 6 that will be used to depict a GI painting a Panther on the trim vane of a M577 or M113. Instead of jungle fatigues, I have him wearing the stateside issue cotton OG-107 fatigues.

I still have some work to do on them before they are ready to paint, and I am also working on other figures, too. My work bench looks like Dr Frankenstein's laboratory.
 

Attachments

  • 20230821_191741.jpg
    20230821_191741.jpg
    975.3 KB · Views: 68
  • 20230821_191720.jpg
    20230821_191720.jpg
    833.8 KB · Views: 62
  • 20230821_191659.jpg
    20230821_191659.jpg
    598.3 KB · Views: 60
  • 20230821_191639.jpg
    20230821_191639.jpg
    637.6 KB · Views: 65
  • 20230820_210450.jpg
    20230820_210450.jpg
    662.3 KB · Views: 50
  • 20230819_150801.jpg
    20230819_150801.jpg
    346.6 KB · Views: 58
  • 20230819_150734.jpg
    20230819_150734.jpg
    384.4 KB · Views: 58
  • 20230819_150718.jpg
    20230819_150718.jpg
    390.4 KB · Views: 56
  • 20230819_150629.jpg
    20230819_150629.jpg
    385.4 KB · Views: 47
Last night and Wednesday I worked on another figure conversion of the second of two new guys for my upcoming diorama. The base figure was an MP from Bravo 6. I replaced the head with one from Hornet and the cap is from ICM. I sculpted the pockets, name and US Army tapes, and the waist adjustment tabs and buttons after I had filled in the area where the belt had been with Magic Sculpt. I still have to do the arms.

I also have a couple of photos of him with the other new guy. Not sure if you can tell from the photos because this last guy is still on the casting blocks, but the two guys are different heights.

20230825_205121.jpg20230825_205244.jpg20230825_205212.jpg20230825_205315.jpg20230825_205338.jpg20230825_205400.jpg20230825_205520.jpg20230825_205600.jpg

Thanks for looking.
Cheers,
James
 
Here are some photos of the 2d new guy/FNG/replacement with his arms. When I originally applied the putty to make the sleeves, it may have been a bit too thick and it just didn't look right, so last night and this morning I scraped away some of the excess, carved some new folds in the front, and applied some liquid cement to hopefully blend the remaining putty and underlying plastic. I will just have to see what he looks like after cleanup and priming. Overall, I think he turned out pretty decent.

20230829_095312.jpg20230829_095340.jpg20230829_095401.jpg20230829_095425.jpg20230829_095454.jpg20230829_095511.jpg20230829_095529.jpg20230829_095529.jpg20230829_095553.jpg20230829_095609.jpg20230829_095629.jpg

Thanks for looking.
Cheers,
James
 
After working on figure placement, posing, and overall diorama composition for my next diorama I found the waving right hand of the first converted figure in this thread just did not work with the current storyline, etc. I think the figure looked pretty darn good, but I did it before really having any idea of how I was going to use him. To fit the story better, I decided to replace the waving arm with one that is down by his side with his right hand holding a cigarette. I used an arm from one of Bravo 6's Germans from a graves registration kit and made the cigarette out of fine copper wire.

20230907_215722.jpg20230907_215652.jpg20230907_215625.jpg
 
When Alpine Miniatures recently released a couple of DAK figures, I found this one to peak my interest, not as a DAK Soldier, but as a US GI through a simple conversion because I liked the pose. I was originally going to have him wear the stateside OG-107 fatigues, but since the folds were pretty tight, I sculpted in jungle fatigue details instead. I also added a Hornet head.

20230907_221305.jpg20230907_215252.jpg20230907_215311.jpg20230907_215232.jpg20230907_215214.jpg20230907_215156.jpg20230907_215138.jpg20230907_215114.jpg
 
And I also started working on this guy who is waving at the new guys while working on something. The body is from the Bravo 6 kit of two dudes cleaning their weapons. The head is from Hornet, and the left arm is from Cosar Rex or the Bodi. I cannot remember which manufacturer but it was one of those two. To have the pockets match those of the other figures, I sculpted new breast pockets, lengthened the skirt of the shirt, and added the angle to the trouser cargo pocket flaps. Now I need to find a right arm. :)

20230907_215052.jpg20230907_215031.jpg20230907_215011.jpg

Thanks for looking.
Cheers,
James
 
Back
Top