Thanks, guys.
The direction that I think I will go with the figure above, this figure I am showing now, and the other figures I am working on will be a diorama of some dudes at a Conex container laying out equipment to inventory before signing for it and their Platoon Sergeant (the guy waving) showing up with two new guys for the squad conducting the layout.
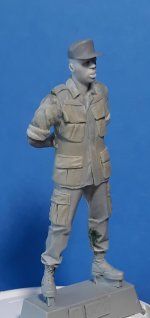
This next figure is of one of the new guys. It is a conversion of one of the figures from the new ICM figure kit for their newly released CH54.


The base figure is actually pretty good for an injection molded figure, but there were some things I had to change in order for it to be compatible with the other figures in the diorama. I am not sure how many people take notice of such things, but US Military clothing has to meet certain specifications that are set for the manufacturers to follow when producing uniforms. What this means in the case of the Tropical Combat Uniform or jungle fatigues is that the size, shape, and location of the pockets, epaulets and waist adjustment tabs if that version has them, collars, and sleeve closures will be a constant variable no matter the size or length of the uniform. Because of this factor, if one wants to realistically depict Soldiers wearing such a uniform, all of the pockets need to be the same from figure to figure. So, if one has figures from different manufacturers, and they want to be as realistic as possible in the depiction of guys wearing the same uniform, then one would have to ensure all of the pockets are the same size and shape among all of the figures and this can be done by shaving off all of the pockets and sculpting new ones. The same concept of a standard size, shape, construction etc, also applies to field equipment and boots.
I wanted to make this figure look young and a bit lost, so I chose a Hornet head that had the look I was looking for. I then started putting the figure together. I shaved off the cargo pockets on the legs and glued the legs together. I then shaved the top pockets off the torso as well as the epaulettes. Something I liked about the original torso is that the bottom skirt of the shirt is slightly open and the way that it mates up with the legs is pretty nice.

I glued that on and then the back part of the skirt. When the glue dried, I sculpted the cargo pockets, let them cure, then the top pockets, let them cure, then the lower shirt pockets. I then glued the arms on an filled the gaps. Lastly, I glued on the head that has a well rendered cap from the ICM kit. I then sculpted name and US Army tapes and a 9th Infantry Division patch. When I mix up more putty for the next figure I will add the unit Crest to the cap. Notice how the bottom of the shirt does not touch the top flap of the cargo pocket like how the uniform is intended to fit. For the sake of the storyline, I am attributing it to not all sizes being available when this Soldier got issued the uniform. He was able to get the correct size trousers, but he ended up with a Small/Short shirt. This kind of stuff happens so thos ended up working out well. Another thing about this figure is that he is a bit shorter than the others and that works out well, too, since people are different sizes and shapes.


Thanks for looking.
Cheers,
James


