
-
Modelers Alliance has updated the forum software on our website. We have migrated all post, content and user accounts but we could not migrate the passwords.
This requires that you manually reset your password.
Please click here, http://modelersalliance.org/forums/login to go to logon page and use the "Forgot your Password" option.
You are using an out of date browser. It may not display this or other websites correctly.
You should upgrade or use an alternative browser.
You should upgrade or use an alternative browser.
Down and dirty diorama
- Thread starter BradJ
- Start date

Rudi Richardson
Member
As you 'forgot' the Sherman and the base, and grabbed the 'wrong' figure on Sunday... sorry, I still don't believe that these exist. Confess sinner! Who's based work photos have you stolen and claimed your own?!?
Tankbuilder
Active member
Hi there Brad.
Thanks for the step-by-step instructions. I can see already that some of these techniques will be ideal for my 1/35 scale 25-pounder gun/howitzer trilogy of dioramas. There will be one specific diorama and possibly two in that trilogy where your technique will be extremely useful.
Thanks again and cheers from Peter
I can't wait to get some of the putty and try to work with it (soon I hope.)
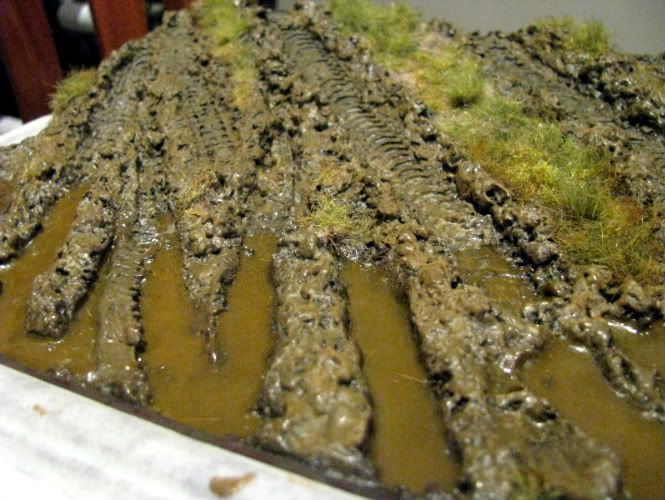
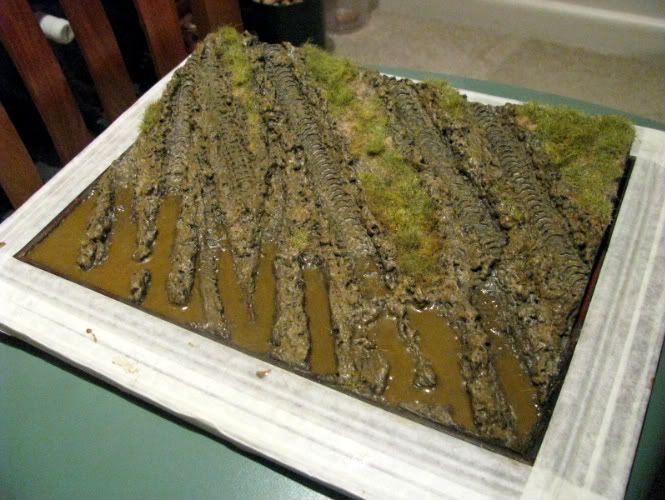
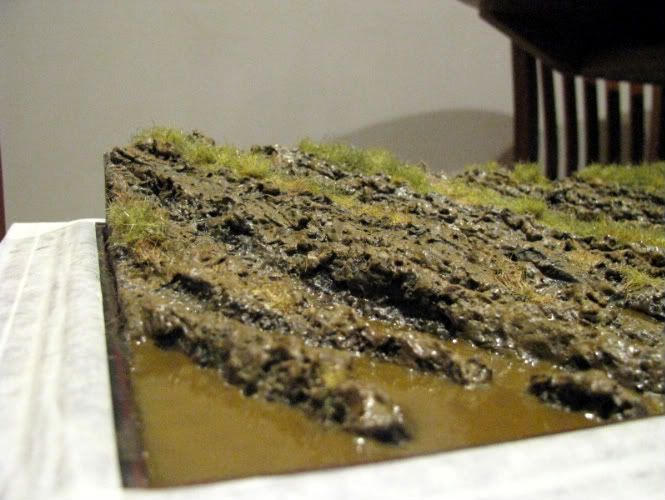
The water looks good, is the action going to go into or out of the water? Into and you're fine, out of and you could add some 'spashed' puddles farther up the tracks.
The grass to me is great, a bit of life and color - nice.
The water looks good, is the action going to go into or out of the water? Into and you're fine, out of and you could add some 'spashed' puddles farther up the tracks.
The grass to me is great, a bit of life and color - nice.
Hi Brad,
I have to admit when I saw your first application of the "mud", I was thinking, "Oh No"! Then you proceeded to pull off some minor miracles and it looks fantastic! Just a first class job! Beautiful!
Bob
I have to admit when I saw your first application of the "mud", I was thinking, "Oh No"! Then you proceeded to pull off some minor miracles and it looks fantastic! Just a first class job! Beautiful!
Bob
Brokeneagle
Master at Arms
That mud is sooo real. Fantastic result. As Ant said the water will bring it to life and it really has. I think the contrasting colors work well too.
Ian.
Ian.
Jenny Croft
Banned
Go Brad Go !!!!
Superbness and only gettin' better , now mail order that AB and compressor and into action !
Jenny :kiss:
Superbness and only gettin' better , now mail order that AB and compressor and into action !
Jenny :kiss:
Andre Teppers
Member
Ideed a great base, what did you use for grass??
Cheers,
André
Cheers,
André
Ant, Rany, Borat, Glenn, Rudi, Peter, Scott, MG, Bob, Ian, Jenny, Andre, thankyou one and all for having a peep.
Scott, the tank is to be placed more or less centrally facing down the slope facing the right front of the base.
Andre, the grass in all from Heki, and is a variety of colours of static and another style (of which the name escapes me) which has a flock attached to a fine mesh for laying out as a ground cover.
I have since added a gloss to most all the churned areas, and even in its early stages it has improved the overall look of the components.
Photos will follow soon!
Brad :side:
Rudi Richardson
Member
Very good, Bradree. So the Sherman is going up or down the slope?
The high point of the SBS is the fact that the mud looks so realistic. One of the shots had me thinking it could have been a reference pic taken for your diorama. The shift from matt dried patches of dirt to glossy wet mud and puddles is nice.
I am going to try the same type of wood filler you used instead of the P of P I have sitting in the cupboard.
I am going to try the same type of wood filler you used instead of the P of P I have sitting in the cupboard.
TREEMENDUS
Member
Yeah Brad
Very convincing groundwork. It looks very realistic. :cheer:
Very convincing groundwork. It looks very realistic. :cheer:
shawngehling
Active member
Brad,
I can hear the shermans sloshing around in the mud already...")
Shawn
I can hear the shermans sloshing around in the mud already...
Shawn
Claude Joachim
Beginner
Hi Bradley,
Back to your old mud making modus! Sorry that i missed the treat until now, but T&T is blocked in my office PC and my evening surfing is lately very limited .
You have done a wonderful job here, a very relistic, lifelike base. I think that's basically the best compliment a modeller can get!
Cheers
Claude
Legio Italica
Member
The groundwork looks very realistic...congratulations I like the mud and dark water a lot
Massimo
I like the mud and dark water a lot Massimo
Similar threads
- Replies
- 12
- Views
- 4K
- Replies
- 39
- Views
- 13K
- Replies
- 4
- Views
- 3K
- Replies
- 129
- Views
- 29K