• Modelers Alliance has updated the forum software on our website. We have migrated all post, content and user accounts but we could not migrate the passwords.
    This requires that you manually reset your password.
    Please click here, http://modelersalliance.org/forums/login to go to logon page and use the "Forgot your Password" option.

Dora 1/35

HI to all!

Time for another update, the work on the gun is almost complete by now, here are photos of the last
parts that needed to be installed, the ladders and hand rails in the sides and front of the main body

here the floor betwen the two main halves is glued in place
1666439787289.jpeg

1666439833639.jpeg


next all the remaining ladders and hand rails are installed
1666439932085.jpeg

1666440007539.jpeg

1666440031933.jpeg

1666440056464.jpeg


the side ladders in the front and back are hold in place with plates bolted to the body of the gun
1666440545809.jpeg


the ladders two brackets that bolts to the body to hold it, so I started to make it using 1mm styrene sheet, each measures 3.6mm x 9.4mm
1666457511547.jpeg


next I rounded one of the ends and drill a 1mm hole in each, then a semi diagonal cut so it can be attached to the ladder.
1666457773363.jpeg

1666457802834.jpeg


the each piece is glued to the ladder, then two resin bolts are added to each one.
1666457951843.jpeg


the ladders fittings are finished and painted
1666458084884.jpeg


the gun recuperators are painted, first using Alclad gloss black, and the next day I sprayed the Alclad chrome paint, it looks very nice!
1666458434405.jpeg

1666458448315.jpeg

1666458464336.jpeg


I did the same with the loading ram arm
1666489726774.jpeg


the elevators are finished, I used 0.45 diameter wire for the elevators cables
1666489967737.jpeg


the shell elevator is done first
1666490063487.jpeg


after the cables are glued in place I made a round cover to hide the hole for the pulleys shaft
1666490164353.jpeg

1666490238836.jpeg


the shell elevator is going to be in the up position, the charges elevator is going to be down
1666490556132.jpeg

1666490437415.jpeg

1666490455871.jpeg


1666490481345.jpeg


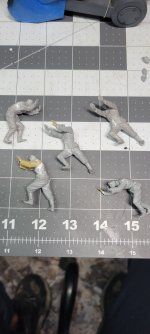
with the elevators finished I started to make the figures, here are the figures for the shell
1666490797688.jpeg


text fit of the figures
1666490834933.jpeg


the figures are a combination of dragon, miniart and tamiya plus some verlinden heads.
1666490989791.jpeg

still many figures to do and modify, getting there inch by inch
thanks for watching
Abdin
 

Attachments

  • 1666490666711.jpeg
    1666490666711.jpeg
    866.7 KB · Views: 16
Oh WoW! You are definitely almost at the finish line Abdin! It has been a long process, but the finished work is going to be fabulous!

awesome-minions.gif
 
Hello there! finally another update on the final stages of my Dora, have being working on making the figures and now starting the painting process,
meanwile I made new powder charges to replace the kit ones that I didnt like, I used oven clay to make the new charges, you just make the desired shape and put it in the oven for about 20 minutes to harden it.
20221116_074509.jpg

20221116_172428.jpg


each charge measures 43mm long x 24mm wide
20221117_075133.jpg


here I placed the charges on the cart to check it fits with no problems.
20221117_075223.jpg


here a comparison of the new charges with the kits ones, now just need to paint it
PSX_20230103_150308.jpg


PSX_20230103_150327.jpg


and some photos of the original charges, here the size of of the charges can be apresiated
Screenshot_20220912-220239.jpg


Screenshot_20220912-220425.jpg


20221116_100208.jpg

Screenshot_20230228_074130_Video Player.jpg


and just when I think I have finished doing mods to Dora I remembered that there are not firing or aiming controls on my Dora, so I started to look for info on this area, there is almost no info or photos of it , a friend from a facebook forum sent me two pictures that vagely showed the sight and aiming area plus another one or two I found on my Dora book, so I made the best I could with the little info I had.

here are some of the photos
FB_IMG_1669923600778.jpg


FB_IMG_1669923627025.jpg


20221206_204046.jpg

Screenshot_20221202-135507.jpg

20170424_134027.jpg


here is the aiming area, I just noticed that the molded on circle is supossed to be a handwheel
20221203_173526.jpg


so I started to remove the molded on details
20221205_130537.jpg

20221206_153757.jpg


next 3d printed the hand wheels and other parts needed to detail the area
PSX_20230102_075651.jpg


the gun sight, make it I used the Karl morser one as a model
PSX_20230102_143949.jpg


PSX_20230102_075720.jpg


more missing details added
PSX_20230102_075924.jpg


so here is my interpretation of this area from looking at the few photos I have
20230130_071346.jpg


20230130_071406.jpg


the handrail bases are repaired as many broke during the process of fitting the new parts, then painting of the parts started, the area looks much better now
20230225_075724.jpg


20230228_125208.jpg

the gauges are printed and ready to install, now to finish painting the figures.

thanks for watching!

Abdin
 
Last edited:
Just absolutely amazing work. Your attention to detail is fantastic. I hope you might consider writing a book about this model and all the extra work you have done to it. I know I would buy it despite not having the kit. Just so much good information and fantastic modeling :)
James
 
:notworthy :popcorn I am just loving this post. I amgoing to need to save this as a pdf ref I think, for when I build mine!
Outstanding Abdin.
 
Hi my friends
another update on this project, last time the aiming area received some extrra details, I finished the area by installing the gauges decals. also did some repair work to the hand rail as I broke the supports while working on the aiming details, at first I just glued it back, but did not liked how it looked so I went on and 3d printed new bases in resin.

the gauges decal are installed
20230307_072925.jpg


20230307_072945.jpg


20230307_073048.jpg


the broken rail bases where removed and replaced with 3d printed ones
20230502_103314.jpg


20230502_103320.jpg


20230502_103325.jpg


the new bases
20230503_204345.jpg


20230503_204608.jpg


20230503_204637.jpg


painted and ready to install
20230523_073507.jpg


the hand rail needed to be repaired also due to some pieces breaking loose
20230503_204300.jpg


the handrails fixed and glued to the new bases
20230524_140647.jpg


20230524_143437.jpg


now the barrel is finally installed and the trunnions glued in place
20230311_130358.jpg


20230311_130407.jpg


20230311_130440.jpg


and when I thought I was done with detailing I saw this detail of a big cable hanging under the generator going from the front door acces hatch, through the floor and on to the back. so well, lets do it.
20170331-225458.png


used a 1.75mm cooper wire to make the cable and with pieces of photo eched carrier I did the brackets to hold it.
20230411_123354.jpg


20230411_124041.jpg


20230410_075204.jpg


20230410_075810~2.jpg


20230413_101620.jpg


the hanging cable under the generator is finished.
20230414_073948.jpg


with the cable done, the generator is glued in place under the main platform.
20230425_073758.jpg


20230425_074802.jpg


the main platform is glued in place, the breach block and hydraulic ram base are attached
20230324_075020.jpg


20230328_072227.jpg


the platform in front of the trunnions and the front ladders are installed.
20230328_072244.jpg


20230328_073659.jpg


every time I say its finished a new detail pops out and Im tempted to make it, thats one of the main reasons it has taken so long to finish this work, but now I think its over with detail work, the beast is at last on the base and the work now turns to finish painting the figures and some other details, cant belive the end is very near.

thanks for watching and more soo!
Abdin
 
Last edited:
Back
Top