
-
Modelers Alliance has updated the forum software on our website. We have migrated all post, content and user accounts but we could not migrate the passwords.
This requires that you manually reset your password.
Please click here, http://modelersalliance.org/forums/login to go to logon page and use the "Forgot your Password" option.
You are using an out of date browser. It may not display this or other websites correctly.
You should upgrade or use an alternative browser.
You should upgrade or use an alternative browser.
A couple of 1/48 Tamiya F-16s in FMS colors
- Thread starter Skinny_Mike
- Start date
Skinny_Mike
Well-known member
Hey Guys, I am back with some more progress on the F-16. Unfortunately I was sent out of town for work last week, rather unexpectedly, so I didn’t get it finished like I had hoped.
Let’s get to the progress!
First up the airframe received 2 coats of future after letting the paint sit for a couple of days. I pretty much have a love/hate relationship with future, especially lately, but I think I figured out what my past issues have been. All of my problems seem to happen when I use Model Master Paints. I noticed a lot of places on this build where the paint was very rough and grainy. No way future was going to help smooth that out. I used some very fine grit sand paper to take out the rough spots and then I rubbed the whole thing down with a paper towel to kind of polish the surface a bit. After that I sprayed 2 coats of future and everything went down just fine. After the future cured over night, I put down the decals. I used the Two Bobs set for Hellenic Vipers. Typically, Tow Bob’s decals are great, but these I found to be a little sub-par. The two colors for the flags on the tails did not align horizontally and there were other alignment issues with outlines and the like. I also had some problems getting the roundel on the top of the wing to tuck down. Usually MicroSol/Set is enough for Two Bobs, but I had to resort to some Solvaset for these. In the end, they are all down and look the part. I also chose to use the high visibility markings instead of the lo-vis grey. Just wanted to be different, and I was afraid the grey would get lost in the rest of the grey.


During the decaling I accidentally dropped the model, breaking the pitot tube from the nose. This is why I have started using brass pitots wherever possible. Instead of breaking in some awkward place that is impossible to fix, the brass part just pops out. So I used some CA glue to reinstall it and puttied up the broken parts of the radome. Here are the steps in photo form!

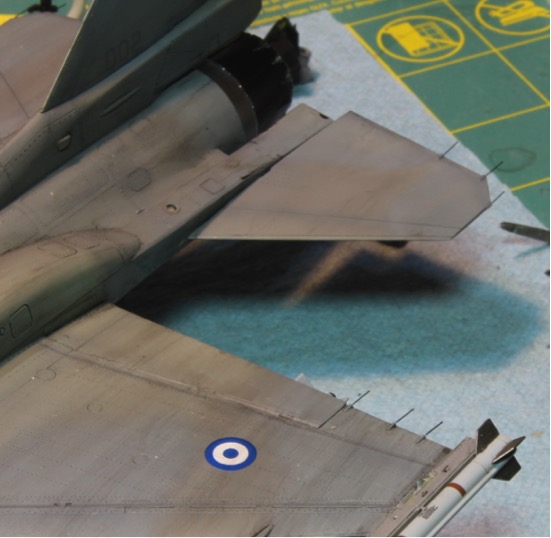
After the decals set for a couple of days, and after fixing up the nose, I sprayed another layer of future to prep for the following weathering. Another thing I did to set up the weathering was on the lower wing. F-16s rarely fly without extra fuel tanks. When I was working in flight test, the biggest asset that was always fought over was the F-16 wing tanks for the chase planes. Otherwise an F-16 really just doesn’t have much range. That being said, the HAF F-16s with conformal fuel tanks do not fly with wing tanks and ordnance at the same time. Since I’m installing some bombs, I left off the wing tanks and the 4/6 wing pylons. I did want to try to represent the dirt that would accumulate around the tanks and sort of shadow the pylons in place if you will. To attempt this, I traced a pylon onto some Tamiya tape and masked the installed location of the pylons on the lower wings, prior to starting weathering.

I really wanted to show that super dirty look that most of the HAF F-16s seem to have, so I decided to try a heavy wash using artist oils. I mixed some Lamp Black, Payne’s Gray and Raw Umber then thinned the mix with some AK odorless thinners. Then I bushed the wash over the entire airframe. Once this had set for about 30 minutes I wiped it off using some makeup applicators dampened in some AK odorless thinners. I also sprayed some Tamiya Smoke paint, heavily thinned around the wing pylon masks. I was going for subtle, but unfortunately I was a little two heavy handed in my opinion.


Over all, I’m not really happy with the end result. It’s a very dirty looking airframe, but its got some off streaks and some other problems that only became apparent after the fat coat went on the top. Its just things I missed while working the washes. Also the ghosting around the pylon is too dark. Like I said, its not my best work, but this is how we learn. I think I have better ideas for my next attempt at a heavily weathered airframe so its still a plus.
With the airframe pretty much completes, I started working on the landing gear and some of the sub-assemblies. First up, was the centerline fuel tank. If you look back at my last post, I was asking for some thoughts on my weathering of the bottom of the tank. I had decided to leave it as is, but after some more consideration I decided to add a little overspray of Tamiya smoke. I think it really enhanced the look. Here is a before (top) and after (bottom).

And the top of the tank.

The tank was painted in model master light ghost gray, was given a future coat, decaled using a spare set of Tamiya decals then futures and given a wash with the same mix as the airframe. I was pretty happy overall until I realized that when I was working the wash, I apparently missed a few spots with the future wash, and the paint was removed. After touching up the paint, I reapplied a wash and had to go a little heavier this time to try to blend in the correction, so the top of the tanked ended up a little dirtier then I wanted it to be. Not super pleased, but it will be entirely hidden so I’ll move on.
Next step was the wing tip pylons. These are the parts provided in the kit. I wanted then to look a little worn so after cleaning up the seams, I painted then in Mr. Color Yellow Green, which is a pretty good match for the Zinc Chromate primer coat. I protected that with a quick gloss coat and then sprayed an even layer of Mig Chipping fluid. Once the fluid was dry, I painted the pylons in LifeColor FS36270 Gray then waited for them to dry. Once the top layer had dried, I used a wet brush to work away the top layer of paint to reveal the primer underneath. I liked the end result. A gloss coat, decals, and a wash using MIG Panel Line Wash in Blue Black followed the paint work.

And they were installed on the wing tips, followed by an acrylic flat coat on the top of the airframe to lock it all in. I’ll flat coat the bottom after I get the landing completed.

So that is the progress to today. Next step is to get the bird up on her feet, then finish up the sub-assemblies. More to follow, soon – I hope!
Thanks for the interest and as always, comments are always welcome!
Mike
Let’s get to the progress!
First up the airframe received 2 coats of future after letting the paint sit for a couple of days. I pretty much have a love/hate relationship with future, especially lately, but I think I figured out what my past issues have been. All of my problems seem to happen when I use Model Master Paints. I noticed a lot of places on this build where the paint was very rough and grainy. No way future was going to help smooth that out. I used some very fine grit sand paper to take out the rough spots and then I rubbed the whole thing down with a paper towel to kind of polish the surface a bit. After that I sprayed 2 coats of future and everything went down just fine. After the future cured over night, I put down the decals. I used the Two Bobs set for Hellenic Vipers. Typically, Tow Bob’s decals are great, but these I found to be a little sub-par. The two colors for the flags on the tails did not align horizontally and there were other alignment issues with outlines and the like. I also had some problems getting the roundel on the top of the wing to tuck down. Usually MicroSol/Set is enough for Two Bobs, but I had to resort to some Solvaset for these. In the end, they are all down and look the part. I also chose to use the high visibility markings instead of the lo-vis grey. Just wanted to be different, and I was afraid the grey would get lost in the rest of the grey.
During the decaling I accidentally dropped the model, breaking the pitot tube from the nose. This is why I have started using brass pitots wherever possible. Instead of breaking in some awkward place that is impossible to fix, the brass part just pops out. So I used some CA glue to reinstall it and puttied up the broken parts of the radome. Here are the steps in photo form!
After the decals set for a couple of days, and after fixing up the nose, I sprayed another layer of future to prep for the following weathering. Another thing I did to set up the weathering was on the lower wing. F-16s rarely fly without extra fuel tanks. When I was working in flight test, the biggest asset that was always fought over was the F-16 wing tanks for the chase planes. Otherwise an F-16 really just doesn’t have much range. That being said, the HAF F-16s with conformal fuel tanks do not fly with wing tanks and ordnance at the same time. Since I’m installing some bombs, I left off the wing tanks and the 4/6 wing pylons. I did want to try to represent the dirt that would accumulate around the tanks and sort of shadow the pylons in place if you will. To attempt this, I traced a pylon onto some Tamiya tape and masked the installed location of the pylons on the lower wings, prior to starting weathering.
I really wanted to show that super dirty look that most of the HAF F-16s seem to have, so I decided to try a heavy wash using artist oils. I mixed some Lamp Black, Payne’s Gray and Raw Umber then thinned the mix with some AK odorless thinners. Then I bushed the wash over the entire airframe. Once this had set for about 30 minutes I wiped it off using some makeup applicators dampened in some AK odorless thinners. I also sprayed some Tamiya Smoke paint, heavily thinned around the wing pylon masks. I was going for subtle, but unfortunately I was a little two heavy handed in my opinion.
Over all, I’m not really happy with the end result. It’s a very dirty looking airframe, but its got some off streaks and some other problems that only became apparent after the fat coat went on the top. Its just things I missed while working the washes. Also the ghosting around the pylon is too dark. Like I said, its not my best work, but this is how we learn. I think I have better ideas for my next attempt at a heavily weathered airframe so its still a plus.
With the airframe pretty much completes, I started working on the landing gear and some of the sub-assemblies. First up, was the centerline fuel tank. If you look back at my last post, I was asking for some thoughts on my weathering of the bottom of the tank. I had decided to leave it as is, but after some more consideration I decided to add a little overspray of Tamiya smoke. I think it really enhanced the look. Here is a before (top) and after (bottom).
And the top of the tank.
The tank was painted in model master light ghost gray, was given a future coat, decaled using a spare set of Tamiya decals then futures and given a wash with the same mix as the airframe. I was pretty happy overall until I realized that when I was working the wash, I apparently missed a few spots with the future wash, and the paint was removed. After touching up the paint, I reapplied a wash and had to go a little heavier this time to try to blend in the correction, so the top of the tanked ended up a little dirtier then I wanted it to be. Not super pleased, but it will be entirely hidden so I’ll move on.
Next step was the wing tip pylons. These are the parts provided in the kit. I wanted then to look a little worn so after cleaning up the seams, I painted then in Mr. Color Yellow Green, which is a pretty good match for the Zinc Chromate primer coat. I protected that with a quick gloss coat and then sprayed an even layer of Mig Chipping fluid. Once the fluid was dry, I painted the pylons in LifeColor FS36270 Gray then waited for them to dry. Once the top layer had dried, I used a wet brush to work away the top layer of paint to reveal the primer underneath. I liked the end result. A gloss coat, decals, and a wash using MIG Panel Line Wash in Blue Black followed the paint work.
And they were installed on the wing tips, followed by an acrylic flat coat on the top of the airframe to lock it all in. I’ll flat coat the bottom after I get the landing completed.
So that is the progress to today. Next step is to get the bird up on her feet, then finish up the sub-assemblies. More to follow, soon – I hope!
Thanks for the interest and as always, comments are always welcome!
Mike
I think you're your own worse critic, she's looking sharp! 
Skinny_Mike
Well-known member
I think you're your own worse critic, she's looking sharp!
 There probably is some truth to that Bob...
But thanks for the kind words.
Mike
Skinny_Mike
Well-known member
Beautiful job!...love the painting
Luiz.
Thanks Luiz! That means a lot.
Mike
Skinny_Mike
Well-known member
Hey guys! Back with some progress on my Viper!
The next steps in the build are basically all the finishing touches. I figured I would start with the landing gear, so I could set the plane down as I worked on it, and then I would start at the back and work forward.
The landing gear was done with the kit parts. Everything was painted white, given a light gray wash and then a semi-gloss coat. The metal parts where painted chrome silver. The wheels are a set of Royale Resin Block 50/52 wheels. I didn’t take any intermediate pictures along the way. Momentum kept me moving. Once the landing gear was on, I installed the centerline fuel tank as well.

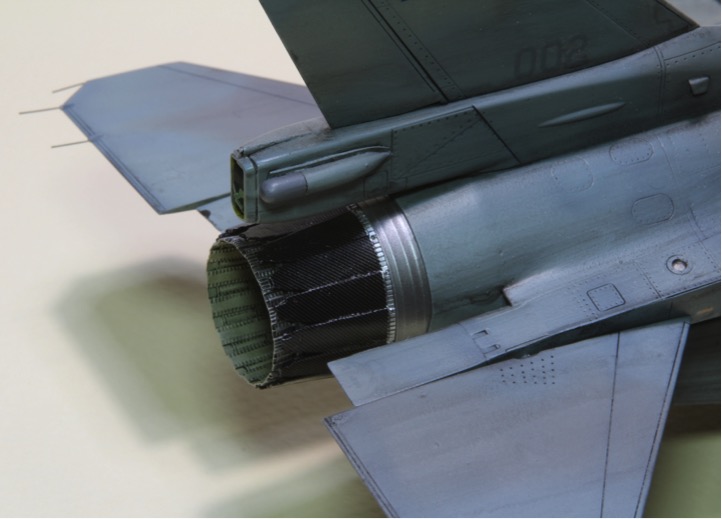
Now that the F-16 is on its wheels, I am going to start at the back and work forward, starting with the engine. I ended up using the Aires Pratt and Whitney motor as its actually correctly molded as I mentioned earlier. After a bath and primer, all the parts were painted and weathered. The exhaust petals were painted in Tamiya semi-gloss black to prep for decals.

The exhaust petals on the Pratt and Whitney F100-PW-229 engine are made from carbon fiber and have a pretty distinct black color. I replicated this with some carbon fiber decals from Hobby Design. I traced out a template of each petal on some Tamiya tape and used that template to cut out the decals. The decal sheet responded well to MicroSol and MicroSet. I’m really happy with the end result. Hopefully it shows up ok in the photos.

After the decals had set for a couple of days, I assembled and installed the exhaust.

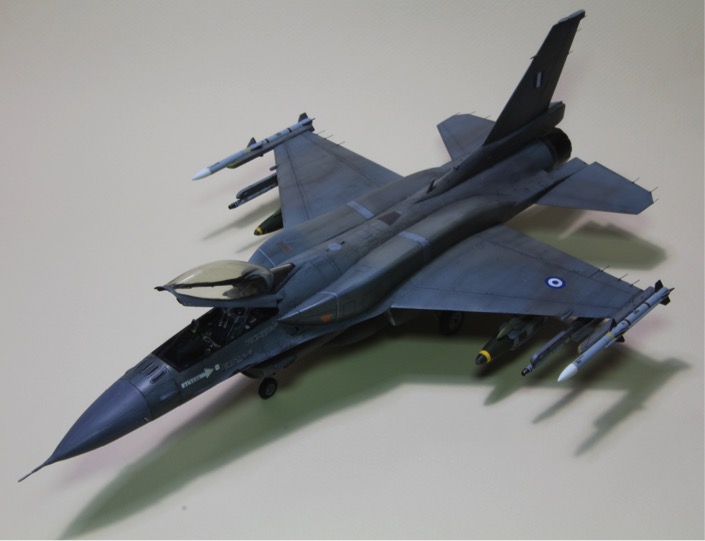
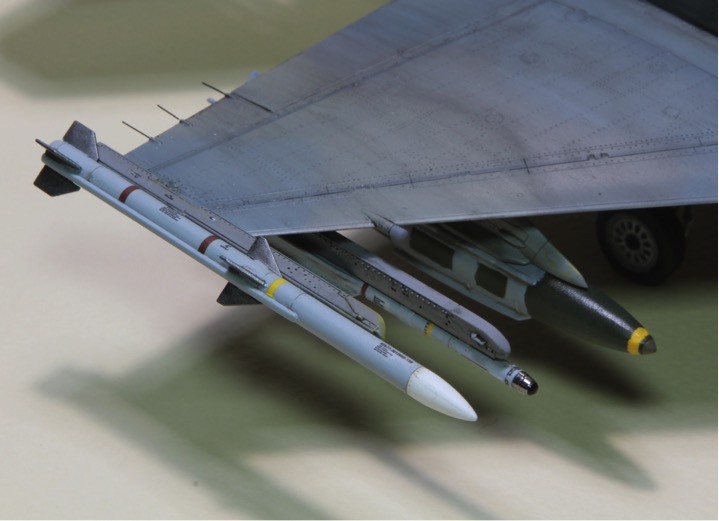
Next up was the ordnance. My load out is 2 AMRAAMs, 2 IRIS-T and 2 GBU-31 JDAMs. The AMRAAMs are from the kit, the IRIS-T are from Eduard and the JDAMs came from a Kinetic kit. The missiles were painted in Mr. Color light ghost gray got a wash in Ammos medium gray wash. The decals are from the kit for the AMRAAM and the IRIS-T decals are supplied by Eduard. The JDAMs were painted using Vallejo NATO green and LifeColor Light Ghost Gray. The decals came from Afterburner Decals.

The wing pylons were also painted like the wingtip missile pylons. They started as Yellow Green, followed by chipping effects fluid and then painted LifeColor Neutral Gray. After the paint dried, they were chipped up, with the wear around all the access doors and the nose of the pylon. Then a little Tamiya smoke overspray to dirty them up followed by a wash and a flat coat.

All the ordnance was then installed.

I was hoping to be done this weekend, but unfortunately that’s as far as I got. I’ve only got the ejection seat, instrument panel and the canopy left to go, shouldn’t bee too much longer!
Thanks for watching. Be back soon.
Mike

The next steps in the build are basically all the finishing touches. I figured I would start with the landing gear, so I could set the plane down as I worked on it, and then I would start at the back and work forward.
The landing gear was done with the kit parts. Everything was painted white, given a light gray wash and then a semi-gloss coat. The metal parts where painted chrome silver. The wheels are a set of Royale Resin Block 50/52 wheels. I didn’t take any intermediate pictures along the way. Momentum kept me moving. Once the landing gear was on, I installed the centerline fuel tank as well.
Now that the F-16 is on its wheels, I am going to start at the back and work forward, starting with the engine. I ended up using the Aires Pratt and Whitney motor as its actually correctly molded as I mentioned earlier. After a bath and primer, all the parts were painted and weathered. The exhaust petals were painted in Tamiya semi-gloss black to prep for decals.
The exhaust petals on the Pratt and Whitney F100-PW-229 engine are made from carbon fiber and have a pretty distinct black color. I replicated this with some carbon fiber decals from Hobby Design. I traced out a template of each petal on some Tamiya tape and used that template to cut out the decals. The decal sheet responded well to MicroSol and MicroSet. I’m really happy with the end result. Hopefully it shows up ok in the photos.
After the decals had set for a couple of days, I assembled and installed the exhaust.
Next up was the ordnance. My load out is 2 AMRAAMs, 2 IRIS-T and 2 GBU-31 JDAMs. The AMRAAMs are from the kit, the IRIS-T are from Eduard and the JDAMs came from a Kinetic kit. The missiles were painted in Mr. Color light ghost gray got a wash in Ammos medium gray wash. The decals are from the kit for the AMRAAM and the IRIS-T decals are supplied by Eduard. The JDAMs were painted using Vallejo NATO green and LifeColor Light Ghost Gray. The decals came from Afterburner Decals.
The wing pylons were also painted like the wingtip missile pylons. They started as Yellow Green, followed by chipping effects fluid and then painted LifeColor Neutral Gray. After the paint dried, they were chipped up, with the wear around all the access doors and the nose of the pylon. Then a little Tamiya smoke overspray to dirty them up followed by a wash and a flat coat.
All the ordnance was then installed.
I was hoping to be done this weekend, but unfortunately that’s as far as I got. I’ve only got the ejection seat, instrument panel and the canopy left to go, shouldn’t bee too much longer!
Thanks for watching. Be back soon.
Mike
I don't know any of those weapons. Man I'm old.  ldguy I use to load weapons, trained on these and none of those are familiar.
Looks great Mike, really dig the burner!
ldguy I use to load weapons, trained on these and none of those are familiar. Looks great Mike, really dig the burner!
centaur567
Well-known member
Very realistic looking. Nice work. Gary
Skinny_Mike
Well-known member
Hellenic AF F-16 Block 52+
Thank you all very much for the kind words. I think I agree with you all, the exhaust is really one of my favorite parts of this build. :geek
Bob - if you need a tutorial, I'm sure I can help you out! :coolio
Well progress continues to be made on this little Viper. Certainly can see the finish line. Lets get to it.
The first thing I did was one last run over the model and the instructions to make sure I didn’t miss any of the fiddly bits. The pitot tube and AOA sensors were added and then I added the static dischargers. I had previously drilled out the tiny holes in the back of the wings and the tail so I just inserted some bristles from a cheap toothbrush, trimmed them to length and painted them flat black.
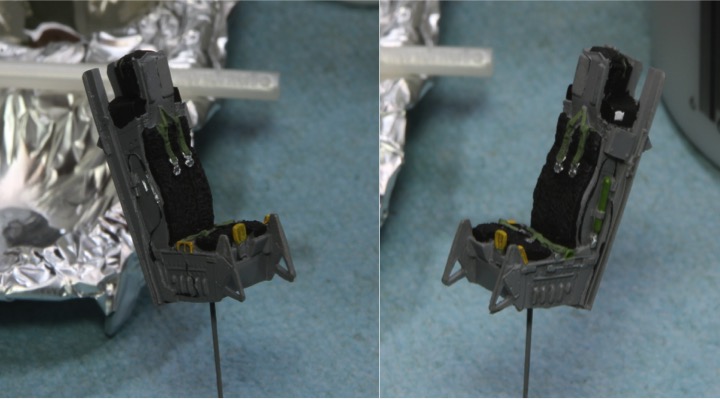
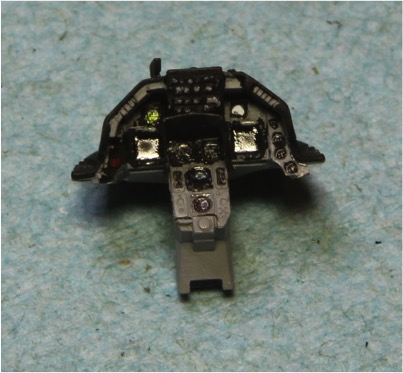
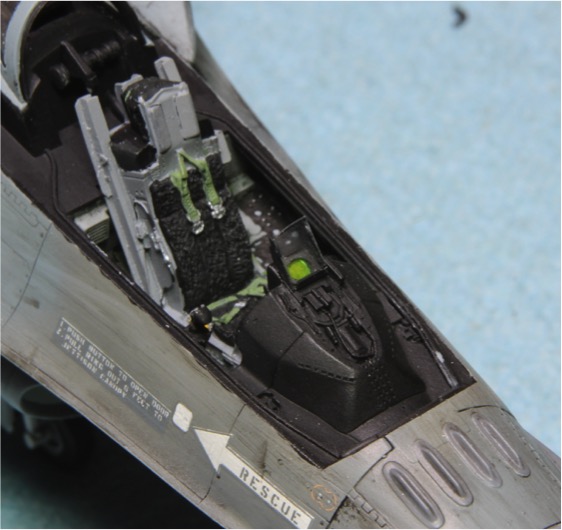
All that remained at this point was the cockpit. I started with the ejection seat. Wolfpack did a pretty good job on the ACES seat. They even included the black sheepskin seat cushion that is used which so many manufactures seem to neglect. The seat was painted using acrylics following my references.
Next up was the glare shield and instrument panel. My plan was to use the Wolfpack resin piece as the details are pretty good. Unfortunately it left a fairly large gap at the front of the cockpit.
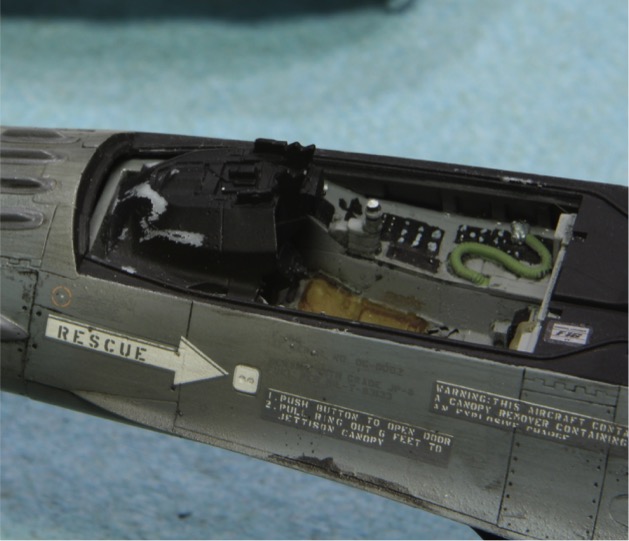
Truthfully, I don’t know what happened here. Looking at the pictures from the instructions it seems that I installed the cockpit tub further aft then Wolfpack intended, but that left a fairly large step at the back. Since I planned to leave the canopy open, this gap needed a solution. I tried the kit part, but it also leaves a fairly obvious gap. I contacted my friends over at Sierra Hotel to try to get one of their F-16 cockpit update sets (these are fantastic) but unfortunately they were not available just this minute. Hunting through the spares box I found a partially started Aires F-16 pit. It has an interesting piece in front o the glare shield that in real life isn’t there, but it filled the gap nicely.
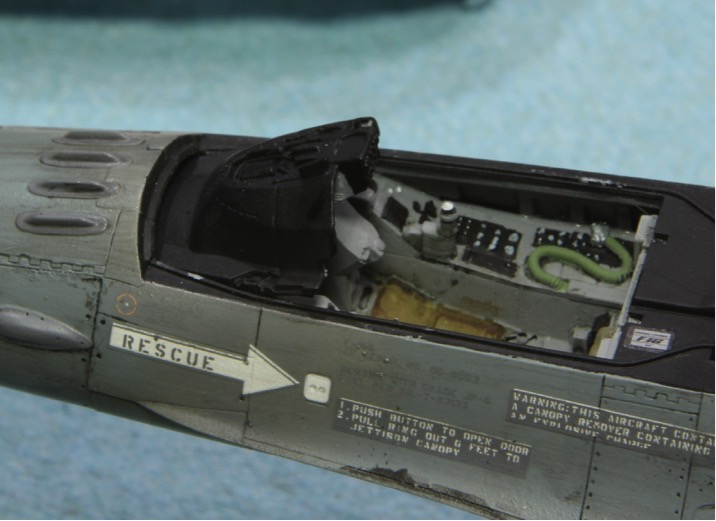
After the test fit I finished up the instrument panel.
I discovered another little problem. The HUD that Aires supplies for their F-16C cockpit, is the WAR HUD used on the block 40/42 airplanes. This would not be right for a Block52+. I weighed a couple of options and finally decided to pick up an Eduard photo etch set that includes the correct HUD. Unfortunately its not here yet.
In the mean time I finished everything up. I also used the spare control stick from the Aires set, after I noticed that the original was somehow broken off.
I have the HUD and the canopy frame to go. Both are just waiting on some bits from the Eduard set. Its still fighting, but I should be able to declare victory in a couple of days!
Thanks for the continued interest!
Mike
Thank you all very much for the kind words. I think I agree with you all, the exhaust is really one of my favorite parts of this build. :geek
Bob - if you need a tutorial, I'm sure I can help you out! :coolio
Well progress continues to be made on this little Viper. Certainly can see the finish line. Lets get to it.
The first thing I did was one last run over the model and the instructions to make sure I didn’t miss any of the fiddly bits. The pitot tube and AOA sensors were added and then I added the static dischargers. I had previously drilled out the tiny holes in the back of the wings and the tail so I just inserted some bristles from a cheap toothbrush, trimmed them to length and painted them flat black.
All that remained at this point was the cockpit. I started with the ejection seat. Wolfpack did a pretty good job on the ACES seat. They even included the black sheepskin seat cushion that is used which so many manufactures seem to neglect. The seat was painted using acrylics following my references.
Next up was the glare shield and instrument panel. My plan was to use the Wolfpack resin piece as the details are pretty good. Unfortunately it left a fairly large gap at the front of the cockpit.
Truthfully, I don’t know what happened here. Looking at the pictures from the instructions it seems that I installed the cockpit tub further aft then Wolfpack intended, but that left a fairly large step at the back. Since I planned to leave the canopy open, this gap needed a solution. I tried the kit part, but it also leaves a fairly obvious gap. I contacted my friends over at Sierra Hotel to try to get one of their F-16 cockpit update sets (these are fantastic) but unfortunately they were not available just this minute. Hunting through the spares box I found a partially started Aires F-16 pit. It has an interesting piece in front o the glare shield that in real life isn’t there, but it filled the gap nicely.
After the test fit I finished up the instrument panel.
I discovered another little problem. The HUD that Aires supplies for their F-16C cockpit, is the WAR HUD used on the block 40/42 airplanes. This would not be right for a Block52+. I weighed a couple of options and finally decided to pick up an Eduard photo etch set that includes the correct HUD. Unfortunately its not here yet.
In the mean time I finished everything up. I also used the spare control stick from the Aires set, after I noticed that the original was somehow broken off.
I have the HUD and the canopy frame to go. Both are just waiting on some bits from the Eduard set. Its still fighting, but I should be able to declare victory in a couple of days!
Thanks for the continued interest!
Mike
Skinny_Mike
Well-known member
James
Thanks James! Almost there!
Outstanding! 
Skinny_Mike
Well-known member
Thanks Bob and Luiz. Its starting to grow on me a bit.
The eduard etch showed up this evening. I hope to have some time tomorrow to get her all wrapped up.
The eduard etch showed up this evening. I hope to have some time tomorrow to get her all wrapped up.
Skinny_Mike
Well-known member
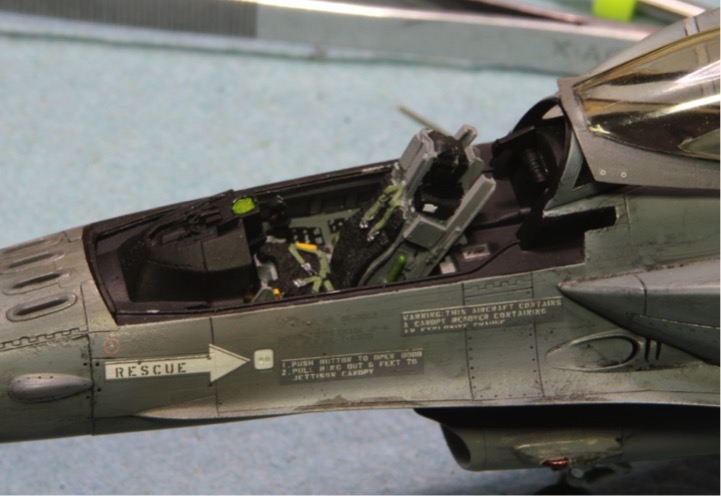
Howdy Folks! My photo etch has arrived and I can finally wrap up this build.
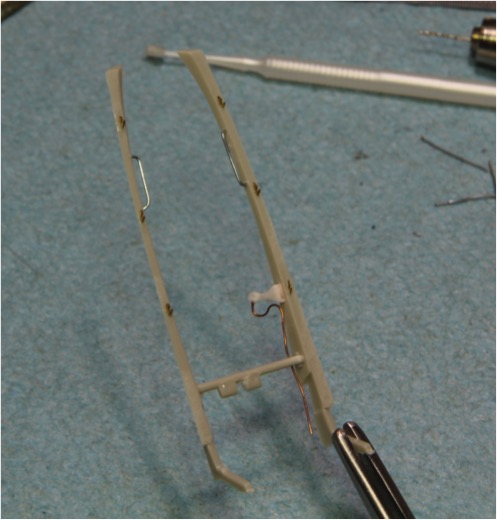
I started with the canopy frame. I added the JHMCS that I had cast a copy of earlier. Then I added a wire running from the sensor to the rear of the canopy using some copper wire. After that I added the handles using some smaller wire, using the photo etched handles as a guide. The wire gives a much better 3D shape. The handles were bent with my new handle-bending tool. Then I added the canopy locks from the Eduard set.
The whole thing was primed using Alclad Gray Primer, followed by a coat of MM Acryl Interior Black. Once dried I installed it into the canopy. Sorry – forgot to take a photo of that.
Next up was the HUD. I folded the photoetch HUD, primed and painted it then installed it on the glare shield. It fit perfectly.
Then I added the canopy.
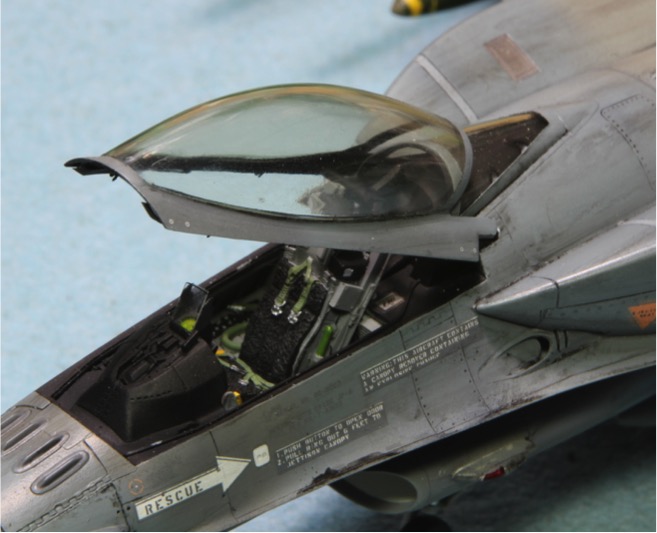
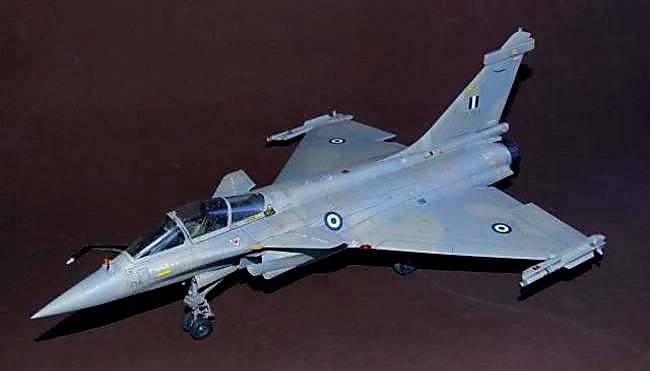
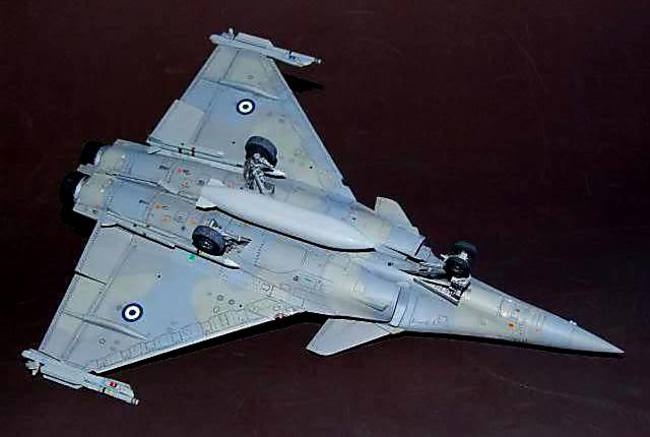
And that’s it folks! All done. Overall I’m happy overall with the build. I just wish I had gone a little lighter on the weathering, and I think it would have turned out much better.
Here are the glamor shots…
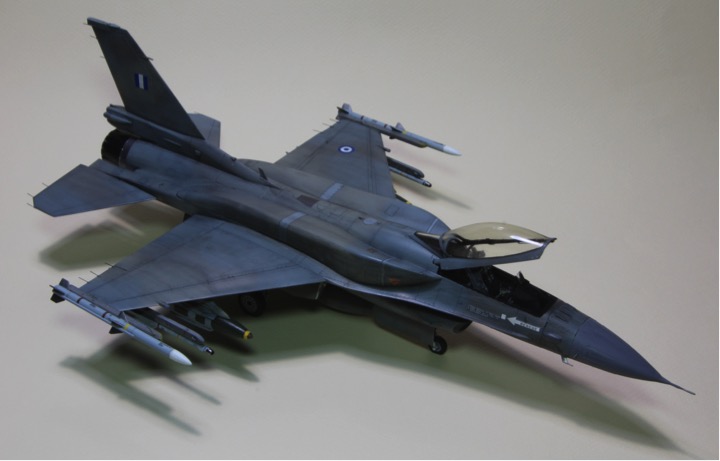


Thanks for following along! And thanks for all of the encouragement and assistance along the way, I really do appreciate it.
Skinny Mike
I started with the canopy frame. I added the JHMCS that I had cast a copy of earlier. Then I added a wire running from the sensor to the rear of the canopy using some copper wire. After that I added the handles using some smaller wire, using the photo etched handles as a guide. The wire gives a much better 3D shape. The handles were bent with my new handle-bending tool. Then I added the canopy locks from the Eduard set.
The whole thing was primed using Alclad Gray Primer, followed by a coat of MM Acryl Interior Black. Once dried I installed it into the canopy. Sorry – forgot to take a photo of that.
Next up was the HUD. I folded the photoetch HUD, primed and painted it then installed it on the glare shield. It fit perfectly.
Then I added the canopy.
And that’s it folks! All done. Overall I’m happy overall with the build. I just wish I had gone a little lighter on the weathering, and I think it would have turned out much better.
Here are the glamor shots…
Thanks for following along! And thanks for all of the encouragement and assistance along the way, I really do appreciate it.
Skinny Mike
Similar threads
- Replies
- 23
- Views
- 2K