
-
Modelers Alliance has updated the forum software on our website. We have migrated all post, content and user accounts but we could not migrate the passwords.
This requires that you manually reset your password.
Please click here, http://modelersalliance.org/forums/login to go to logon page and use the "Forgot your Password" option.
You are using an out of date browser. It may not display this or other websites correctly.
You should upgrade or use an alternative browser.
You should upgrade or use an alternative browser.
2012 Aircraft Models in Progress by the Duke.
- Thread starter Duke Maddog
- Start date
 the privateer.
 Duke Maddog
Well-known member
Thanks Mr. T! Not much done on the Privateer this week; hopefully this weekend I'll get further along on it.
This week I have a very, very small update to show since most of my work this week was mostly sanding and filling and sanding and filling; mostly on my Dora rail gun's wheel trucks. Now they are smooth enough for a coat of paint, and I've even skipped ahead a bit to add more parts to the wheel truck assemblies to further complete them. I also worked on another railroad subject that you can check out in the Ground Power Forums.
So, after all the aforementioned sanding and filling etc. with the Dora, I decided to pull out something simple to build. I had gotten a Hobby Boss 1/72 scale UH-1C Huey from the San Diego Model Show so out it came.
First thing of course is the cockpit and cabin interior:

I then painted it up after it had dried a bit:

Here's a shot of the Instrument Panel dry-brushed with a bit of light gray:

Just for kicks, I decided to dry-fit this interior assembly into the fuselage halves to see how it fit. Much better than I anticipated:

Now to dip the clear parts in Future and install them so I can make that last pic permanent.
Yeah, it was a slow week for me. This coming weekend I'll be picking up the pace. After all, I have 7 models all ready for paint, so my spray booth will be humming this weekend!
Until then, thanks for looking in and remember that comments are always welcome.
This week I have a very, very small update to show since most of my work this week was mostly sanding and filling and sanding and filling; mostly on my Dora rail gun's wheel trucks. Now they are smooth enough for a coat of paint, and I've even skipped ahead a bit to add more parts to the wheel truck assemblies to further complete them. I also worked on another railroad subject that you can check out in the Ground Power Forums.
So, after all the aforementioned sanding and filling etc. with the Dora, I decided to pull out something simple to build. I had gotten a Hobby Boss 1/72 scale UH-1C Huey from the San Diego Model Show so out it came.
First thing of course is the cockpit and cabin interior:
I then painted it up after it had dried a bit:
Here's a shot of the Instrument Panel dry-brushed with a bit of light gray:
Just for kicks, I decided to dry-fit this interior assembly into the fuselage halves to see how it fit. Much better than I anticipated:
Now to dip the clear parts in Future and install them so I can make that last pic permanent.
Yeah, it was a slow week for me. This coming weekend I'll be picking up the pace. After all, I have 7 models all ready for paint, so my spray booth will be humming this weekend!
Until then, thanks for looking in and remember that comments are always welcome.
Duke Maddog
Well-known member
Wow, it's been a month and I've been working my tail off. In between times, I've tried to find a few hours to slip into my hobby room and get some progress done on some of these models that have been sitting on my workbench for far too long!
Okay, today I've managed to find some time to finally get some pics and get them posted. I've also managed to complete three more models; two armor and one aircraft. You an see them in their respective Forums.
Okay, I'll start with the aircraft I've been working on.
These are all the large aircraft I've been working on to try and get rid of some of the big boxes that are taking up space in my hobby room. This first one is the C-160 Transall which has been detail painted and is now ready for decals. I may even get them on later tonight..... maybe.
Here it is in the spray booth after being shot with Future:

Next is a little Trumpeter helicopter I got that has finally gotten it's basecoat. Now to detail paint it and then apply the decals:

This next one is my Privateer that I finally managed to get sanded down enough to make it look okay. I went ahead and installed the wings. They were a bear to try and line up for some reason. This model seems so much harder to build than it should be!

Later I'll mask off all the clear parts and wheel wells and paint this beastie. Near the end, I'll fix all the stupid guns that I couldn't keep intact for some reason!
Moving along to my last aircraft, I decaled the cockpit for the Valiant, and then added weight to the nose of this aircraft. First pic is the back of the 'pit, the second shows the instrument panel


Here it is all test-fit together to see if it would sit on it's landing gear properly:

Yes, I did have enough weight in the nose for this to sit right.
Okay, that's my Update for now. Hopefully the next one won't take a month to do. Hopefully also, I'll have more finished models to post next time I have the time! Feel free to check out Ground Power as well for my latest progress on my armor models.
Thanks all for looking in; comments are very welcome.
Okay, today I've managed to find some time to finally get some pics and get them posted. I've also managed to complete three more models; two armor and one aircraft. You an see them in their respective Forums.
Okay, I'll start with the aircraft I've been working on.
These are all the large aircraft I've been working on to try and get rid of some of the big boxes that are taking up space in my hobby room. This first one is the C-160 Transall which has been detail painted and is now ready for decals. I may even get them on later tonight..... maybe.
Here it is in the spray booth after being shot with Future:
Next is a little Trumpeter helicopter I got that has finally gotten it's basecoat. Now to detail paint it and then apply the decals:
This next one is my Privateer that I finally managed to get sanded down enough to make it look okay. I went ahead and installed the wings. They were a bear to try and line up for some reason. This model seems so much harder to build than it should be!
Later I'll mask off all the clear parts and wheel wells and paint this beastie. Near the end, I'll fix all the stupid guns that I couldn't keep intact for some reason!
Moving along to my last aircraft, I decaled the cockpit for the Valiant, and then added weight to the nose of this aircraft. First pic is the back of the 'pit, the second shows the instrument panel
Here it is all test-fit together to see if it would sit on it's landing gear properly:
Yes, I did have enough weight in the nose for this to sit right.
Okay, that's my Update for now. Hopefully the next one won't take a month to do. Hopefully also, I'll have more finished models to post next time I have the time! Feel free to check out Ground Power as well for my latest progress on my armor models.
Thanks all for looking in; comments are very welcome.
Duke Maddog
Well-known member
Thanks guys!
Actually Dave, I think I'm the only sane person in this mad world! :woohoo:
I like t think that maybe it's because I'm working like a Maddog on all these projects!
Actually Dave, I think I'm the only sane person in this mad world!
:woohoo: I like t think that maybe it's because I'm working like a Maddog on all these projects!
Duke Maddog
Well-known member
Well, it's been awhile and now I have a little time to post the progress I've made from stolen workbench time. I've managed to get a lot more done than I expected, so without further ado, here is my latest work.
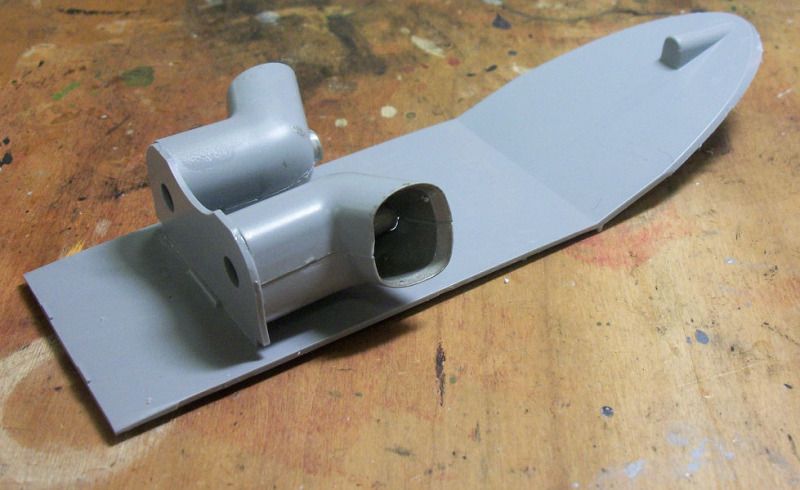
I'll start with my aircraft. I only worked on one; it is the 1/72 scale DC-6 from Heller that I just started for a friend who needs it for an aircraft display. It was a fairly quick and easy build at first; there was no internal details to speak of after all. Cockpit looked okay; better than the C-160 one. I got it all assembled pretty quickly:

You can see how big this puppy is; it won't even fit on the bench anymore!
Anyway, soon after that pic was taken; I went to add the main landing gear to the plane and found the forward landing gear yoke was missing!

I looked everywhere for hours and couldn't find it. So, I figured I guess it was time to scratchbuild a new yoke.
Because of this; my DC-6 will no longer ever be an award winner. I'm really bad at this, but at least this stupid model now has all it's wheels!
I started out by drilling a hole for metal rod:

Next I cut a section of plastic rod for an axle:

After that, I measured a length of larger diameter plastic rod for the yoke and bent it into something close to the shape. I had also drilled holes in the ends for the axle to fit into:

Next I installed it on the main landing gear using small wire and bracing it with strips of scrap P/E to hold it into place. After gluing it with the CA glue, I added Gator Grip Glue to the outside to give some added sheer strength:

Another view:

The Gator Grip Glue is sill wet here in these pics. You can see why this will never be an award winner; that main landing gear will knock it out of contention in the first cut. Still; I'm going to do my best to finish this with as much of an eye-catching finish as I can to make up for it! It may not win, but I'm gonna bust my tail to get those "Wow! What a finish!" comments!
The next day after this had dried overnight, I added the main wheel to the new yoke:

Here she is sitting on all her landing gear now:

I got a set of American Airlines decals for this model from a friend which I will be using for this model. It will be in a complete bare metal finish overall. Once I get this puppy sanded down and all the gaps and seams smoothed out, I'll shoot some paint on this.
EDIT: Four days after all this work, I found the stupid yoke piece in a box of Samurai warriors I'd built for a friend's Samurai Battles game! Now I have to figure out whether I want to scrap all my scratchbuilding work and try to re-install this with metal reinforcement, or just leave it as it is!
Okay, that's it for aircraft so far Stay tuned for more. Now feel free to check out the Ground Power Forum for the latest progress on my armor.
Thanks all for looking in!
I'll start with my aircraft. I only worked on one; it is the 1/72 scale DC-6 from Heller that I just started for a friend who needs it for an aircraft display. It was a fairly quick and easy build at first; there was no internal details to speak of after all. Cockpit looked okay; better than the C-160 one. I got it all assembled pretty quickly:
You can see how big this puppy is; it won't even fit on the bench anymore!
Anyway, soon after that pic was taken; I went to add the main landing gear to the plane and found the forward landing gear yoke was missing!
I looked everywhere for hours and couldn't find it. So, I figured I guess it was time to scratchbuild a new yoke.
Because of this; my DC-6 will no longer ever be an award winner. I'm really bad at this, but at least this stupid model now has all it's wheels!
I started out by drilling a hole for metal rod:
Next I cut a section of plastic rod for an axle:
After that, I measured a length of larger diameter plastic rod for the yoke and bent it into something close to the shape. I had also drilled holes in the ends for the axle to fit into:
Next I installed it on the main landing gear using small wire and bracing it with strips of scrap P/E to hold it into place. After gluing it with the CA glue, I added Gator Grip Glue to the outside to give some added sheer strength:
Another view:
The Gator Grip Glue is sill wet here in these pics. You can see why this will never be an award winner; that main landing gear will knock it out of contention in the first cut. Still; I'm going to do my best to finish this with as much of an eye-catching finish as I can to make up for it! It may not win, but I'm gonna bust my tail to get those "Wow! What a finish!" comments!
The next day after this had dried overnight, I added the main wheel to the new yoke:
Here she is sitting on all her landing gear now:
I got a set of American Airlines decals for this model from a friend which I will be using for this model. It will be in a complete bare metal finish overall. Once I get this puppy sanded down and all the gaps and seams smoothed out, I'll shoot some paint on this.
EDIT: Four days after all this work, I found the stupid yoke piece in a box of Samurai warriors I'd built for a friend's Samurai Battles game! Now I have to figure out whether I want to scrap all my scratchbuilding work and try to re-install this with metal reinforcement, or just leave it as it is!
Okay, that's it for aircraft so far Stay tuned for more. Now feel free to check out the Ground Power Forum for the latest progress on my armor.
Thanks all for looking in!
Plastik Smurff
Well-known member
Crikey your a busy boy. Nice work though.
That production line is never still and with such variety too!
Regards,
Regards,
Duke Maddog
Well-known member
Thanks Saul! I do like to throw in some variety to keep my (and other's) interest peaked.
The DC-6 is now sanded smooth (I hope!) and waiting for paint. The An-12 Cub is finished, and I hope to get pics of it soon. Now on to my latest aircraft I started. This is the Zvezda 1/72 scale Mil Mi-26 Halo helicopter. I'm doing this for the Call to Arms Group Build, but posting it here too for those who may not see it on my Build Blog there.
First thing I did, naturally; was build the cockpit. Got it all done and ready for paint:
The roof pieces are just dry-fit in there to help the bulkheads glue properly. I left them removable to make it easier to paint this cockpit assembly as you can see here:
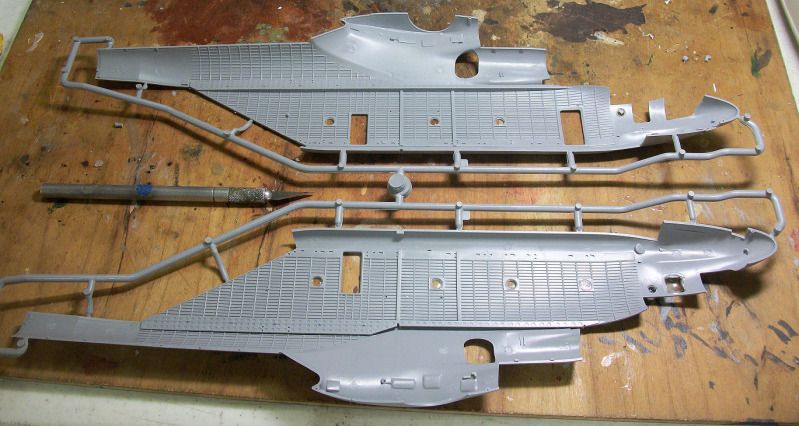
While that was drying; I assembled some of the detail parts to the interior of the fuselage halves, and added the windows to them as well. You can see how big this horse will be by the Exacto blade sitting between them for a size reference:
Finally, I got the engine exhausts assembled and attached to the interior roof section in the main cargo bay:
That's about all I got done so far on this. Hopefully, I'll have some more progress to show soon.
Thanks all for looking in, comments are welcome.
The DC-6 is now sanded smooth (I hope!) and waiting for paint. The An-12 Cub is finished, and I hope to get pics of it soon. Now on to my latest aircraft I started. This is the Zvezda 1/72 scale Mil Mi-26 Halo helicopter. I'm doing this for the Call to Arms Group Build, but posting it here too for those who may not see it on my Build Blog there.
First thing I did, naturally; was build the cockpit. Got it all done and ready for paint:
The roof pieces are just dry-fit in there to help the bulkheads glue properly. I left them removable to make it easier to paint this cockpit assembly as you can see here:
While that was drying; I assembled some of the detail parts to the interior of the fuselage halves, and added the windows to them as well. You can see how big this horse will be by the Exacto blade sitting between them for a size reference:
Finally, I got the engine exhausts assembled and attached to the interior roof section in the main cargo bay:
That's about all I got done so far on this. Hopefully, I'll have some more progress to show soon.
Thanks all for looking in, comments are welcome.
Duke Maddog
Well-known member
Well, here is my latest work on the helicopter I'm building for the Call to Arms campaign.
I got the cockpit painted and decaled here:

Then I painted and added the crew:

Here is the cockpit all closed up and ready for the fuselage:

These are some of the extra small sub-assemblies I also built while waiting for the cockpit to dry. I also added filler to the seam of the exhaust pipes inside and out:

I may have some more progress later to show on other aircraft I'm working on so stay tuned.
That's all for now. Thanks all for looking in, comments are welcome.
I got the cockpit painted and decaled here:
Then I painted and added the crew:
Here is the cockpit all closed up and ready for the fuselage:
These are some of the extra small sub-assemblies I also built while waiting for the cockpit to dry. I also added filler to the seam of the exhaust pipes inside and out:
I may have some more progress later to show on other aircraft I'm working on so stay tuned.
That's all for now. Thanks all for looking in, comments are welcome.
Duke Maddog
Well-known member
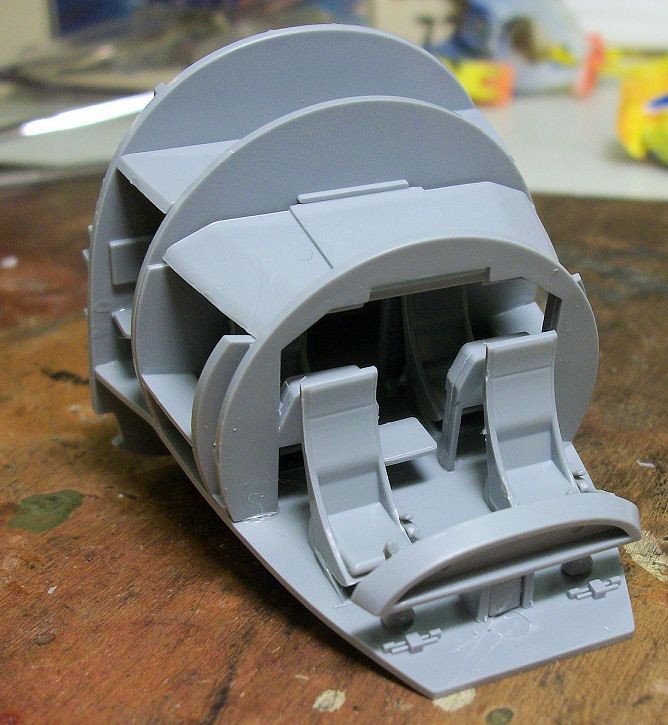
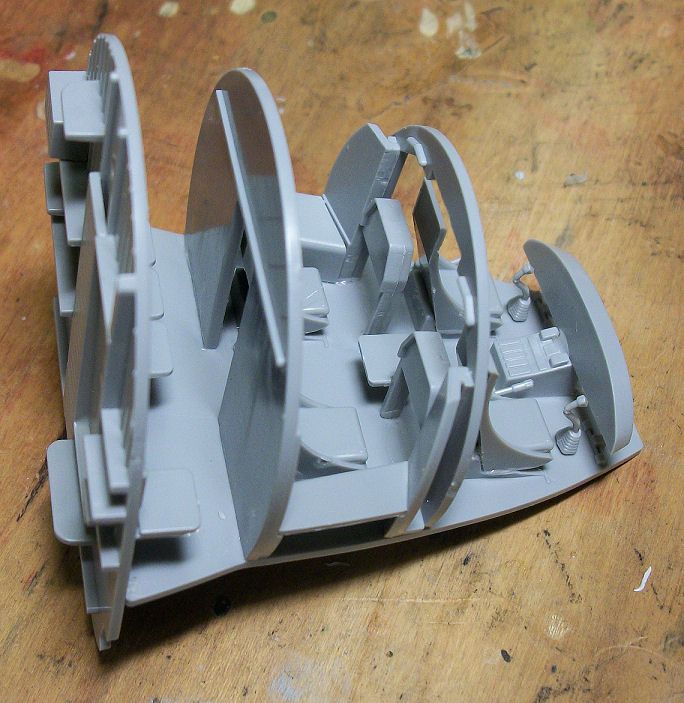
This week has seen some real slow progress for me. In addition to improving my German armored train and progressing on the Russian Drasine, I managed to make good progress on my Mi-26 Halo. I'm building this for the Call to Arms campaign, but posting here as well for those who aren't browsing that campaign.
First thing I did was to paint the interior a dark "africa brown" as the instructions stated. Then I drybrushed it with successive layers of a lighter brown then a tan. Here is the interior of the two main fuselage parts:

The underside of the engine deck is also the ceiling for the interior, and it has several lights on it. I got these painted before installing this inside one of the fuselage halves:

Here is a shot of the fuselage with all the parts installed in it and ready to be closed up:

It's amazing how many of these parts had to fit inside this thing. Not only that, but there are about five other additional fuselage parts that go on this after the fuselage had been closed up! Here it is all closed up and drying:

You can see how big this monster is by the Exacto blade sitting next to it. My next step is to smooth out the seams and add some Mr. Surfacer 500 to places that need it. Then we'll be able to proceed further.
That's all I was able to get done this week. Feel free to check out my armor progress on two of my rail subjects in the Armoured Fury Forum. Meanwhile, comments are welcome, thanks for looking in.
First thing I did was to paint the interior a dark "africa brown" as the instructions stated. Then I drybrushed it with successive layers of a lighter brown then a tan. Here is the interior of the two main fuselage parts:
The underside of the engine deck is also the ceiling for the interior, and it has several lights on it. I got these painted before installing this inside one of the fuselage halves:
Here is a shot of the fuselage with all the parts installed in it and ready to be closed up:
It's amazing how many of these parts had to fit inside this thing. Not only that, but there are about five other additional fuselage parts that go on this after the fuselage had been closed up! Here it is all closed up and drying:
You can see how big this monster is by the Exacto blade sitting next to it. My next step is to smooth out the seams and add some Mr. Surfacer 500 to places that need it. Then we'll be able to proceed further.
That's all I was able to get done this week. Feel free to check out my armor progress on two of my rail subjects in the Armoured Fury Forum. Meanwhile, comments are welcome, thanks for looking in.
Duke Maddog
Well-known member
Well, here it is five weeks later and I finally have some time to post some pics! These are pics of progress done whenever I've been able to snatch some time from the jaws of life to get some building done.
Okay, I'll start out with my aircraft....
At Orangecon, I picked up this little Cessna 172 on floats for about $3.00, so I figured, 'I have one with wheels, let's build this little guy with floats'. So I got it started. Here it is after I've gotten the fuselage together and the wings and stabilizers on. She's been sanded down and her floats are also nicely assembled and sanded smooth. Now to find a propeller for her. No wonder it was only $3.00.....

Next, I decided to start an F-84 Thunderjet that a friend of mine from San Diego gave me at one of our Hobby Days. This is only the second Tamiya kit I've ever built; the first was an F4 Skyray.
I got the cockpit finished first:

Then I got the wings assembled:

Since these pics were taken, I'd gotten the 'pit and the wheel wells painted but I didn't get pics of that yet. Maybe on the next update...
Now all I have to do is find some weight for the nose of this little beastie and I'll be able to get the whole fuselage assembled.
Onward we go to look at my Monster MiL, the Mi-26 Halo. I have the whole thing fully assembled except for engine exhaust shrouds. Once they are on, she'll be ready for paint:

I had also gotten the main rotor hub assembled, as well as painting one of the three colors on the main rotors. Maybe soon I'll have more done to show.
Well, that's all I've been ale to do these last five weeks one these and my armor models shown in Armoured Fury. I had to steal the time when I could but this is the result. Now if only I can finish some of these!
Meanwhile, thanks all for looking in; comments are always welcome!
Okay, I'll start out with my aircraft....
At Orangecon, I picked up this little Cessna 172 on floats for about $3.00, so I figured, 'I have one with wheels, let's build this little guy with floats'. So I got it started. Here it is after I've gotten the fuselage together and the wings and stabilizers on. She's been sanded down and her floats are also nicely assembled and sanded smooth. Now to find a propeller for her. No wonder it was only $3.00.....
Next, I decided to start an F-84 Thunderjet that a friend of mine from San Diego gave me at one of our Hobby Days. This is only the second Tamiya kit I've ever built; the first was an F4 Skyray.
I got the cockpit finished first:
Then I got the wings assembled:
Since these pics were taken, I'd gotten the 'pit and the wheel wells painted but I didn't get pics of that yet. Maybe on the next update...
Now all I have to do is find some weight for the nose of this little beastie and I'll be able to get the whole fuselage assembled.
Onward we go to look at my Monster MiL, the Mi-26 Halo. I have the whole thing fully assembled except for engine exhaust shrouds. Once they are on, she'll be ready for paint:
I had also gotten the main rotor hub assembled, as well as painting one of the three colors on the main rotors. Maybe soon I'll have more done to show.
Well, that's all I've been ale to do these last five weeks one these and my armor models shown in Armoured Fury. I had to steal the time when I could but this is the result. Now if only I can finish some of these!
Meanwhile, thanks all for looking in; comments are always welcome!
Duke Maddog
Well-known member
Well, I managed to 'steal' a little more time to 'play' in my hobby room. Here's my latest progress so far.
I'll start with my aircraft.
I shot some Tamiya Gloss Aluminum on my DC-6 from the spray can. Not a good coat. It ran some and also orange peeled. Gee, I thought this stuff was supposed to go on smooth!

So, I sanded down the rough spots and the runs; sanded down even more of the poor seams and joins, buffed off the whole thing (breaking off the nose gear and one main gear wheel) and I re-shot the coat of Aluminum.
My second attempt at a smooth coat:

A little better, but I still need to shoot it again. Man, I wonder how these other guys do such a smooth, blemish-free coat of metal!
While I was at it; I shot the parts for the Thunderjet as well:

That's all I got done on these. Check out my other progress on my armor in the Armoured Fury Forums next. Meanwhile, thanks for looking in, comments are welcome.
I'll start with my aircraft.
I shot some Tamiya Gloss Aluminum on my DC-6 from the spray can. Not a good coat. It ran some and also orange peeled. Gee, I thought this stuff was supposed to go on smooth!
So, I sanded down the rough spots and the runs; sanded down even more of the poor seams and joins, buffed off the whole thing (breaking off the nose gear and one main gear wheel) and I re-shot the coat of Aluminum.
My second attempt at a smooth coat:
A little better, but I still need to shoot it again. Man, I wonder how these other guys do such a smooth, blemish-free coat of metal!
While I was at it; I shot the parts for the Thunderjet as well:
That's all I got done on these. Check out my other progress on my armor in the Armoured Fury Forums next. Meanwhile, thanks for looking in, comments are welcome.
Tankbuilder
Active member
I don't think a spray can gives as smooth a finish as an airbrush does. Spray can finishes are also very dependent on distance and temperature of the contents when being sprayed. If spraying outide you need to block off the \rea you are spraying in to protect from breezes as even a light breeze can cause a rough texture because the spray takes longer to get o the surface or it starts to dry before contactingthe surface. I like to use a large cardboard box if spraying outside.
I hope you figure out a way to get the finish you want.
Cheers
I hope you figure out a way to get the finish you want.
Cheers
Duke Maddog
Well-known member
Thanks for the suggestions guys. I should have shot a gloss black undercoat first, but I forgot to. Three other guys in my IPMS club have had no problems shooting metallic colors from spraycans. Two of them don't even undercoat them, yet they have perfect coats every time. I've followed their directions and suggestions and still come nowhere near as good as they do.
Anyway, I'm just gonna have to keep trying.
Got more progress done on the MiL; pics are forthcoming. Stay tuned guys!
Anyway, I'm just gonna have to keep trying.
Got more progress done on the MiL; pics are forthcoming. Stay tuned guys!
Similar threads
- Replies
- 44
- Views
- 4K