
-
Modelers Alliance has updated the forum software on our website. We have migrated all post, content and user accounts but we could not migrate the passwords.
This requires that you manually reset your password.
Please click here, http://modelersalliance.org/forums/login to go to logon page and use the "Forgot your Password" option.
You are using an out of date browser. It may not display this or other websites correctly.
You should upgrade or use an alternative browser.
You should upgrade or use an alternative browser.
1/35 Emhar Mk. V Hermaphrodite
- Thread starter Tankbuilder
- Start date
Tankbuilder
Active member
Gee, with a Mk. V there are a lot of variants you could build.
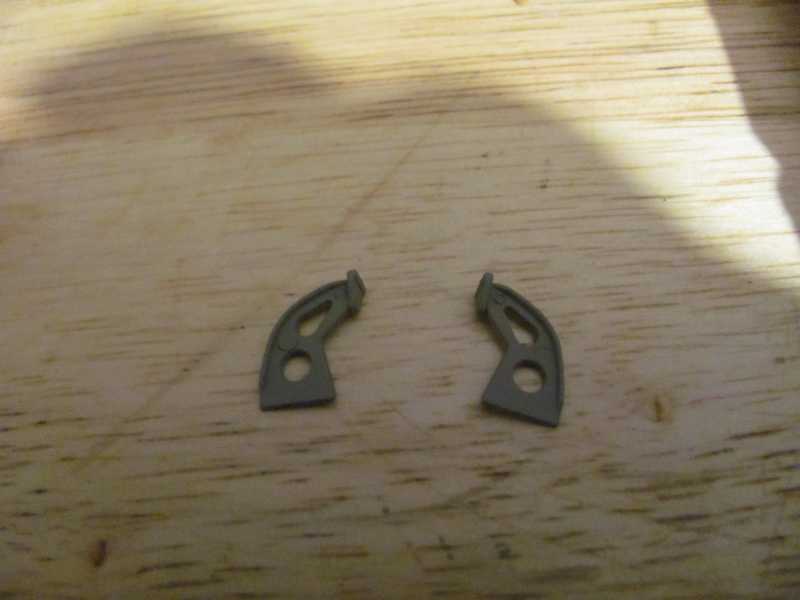
I decided to forgo the unditching rails since they are not in the kit but I did decide to improve a bit on that rear cargo rack. That cargo rack in real life could be folded up against the rear of the hull.
The first thing I did was thin down the kit rack so that it looks like it's made from strap iron not square iron. Then I used some Evergreen Styrene 'L' bracket to make the part where the rack mounts to the tank. Next I stole two shackles from an old Italeri Crusader tank I have and then I took two Styrene chains and hooks from a Academy Tank Supplies II kit of accessories. I very carefully cut a link and a half off the Academy chain and then again very carefully split the last open link and carefully slipped it over the shackle and then glud the shackle to the rack. There is no eyebolt or such on the rack - the shackle bolts directly to the rack.
I have the rack and Styrene chain sitting up against the rear of the tank now allowing the shackle to cure in the right position. This is what it looks like so far.
Original rack

Modified rack
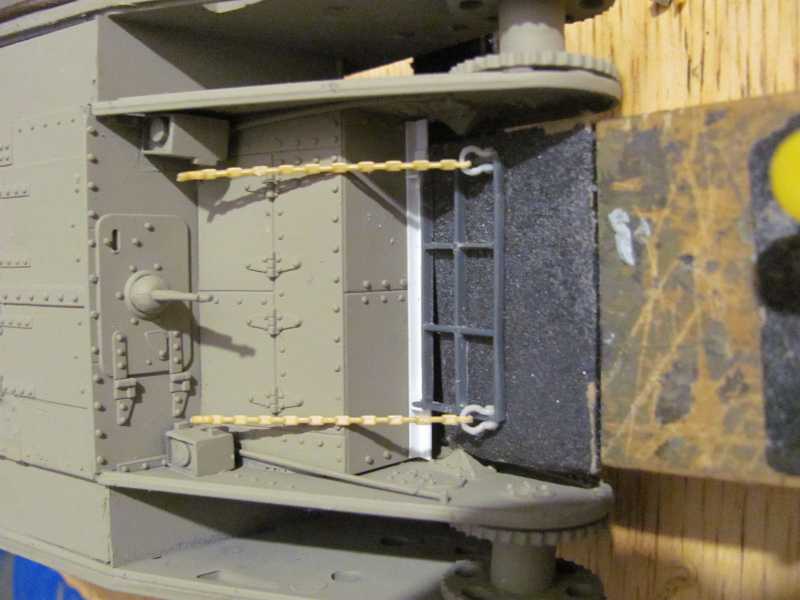
Btw, I removed these two parts from the top of the tank as these are the supports for the unditching rails and are not on any Mk. V tanks I've seen images of where the unditching rails were not on the tank.
So, the final painting is slightly delayed.
It's an interesting kit but outdated by the high price of about $55.00 on the web. I think the newer kits are far better for the bit more money you pay for them.
Cheers
Anyone know where I can get some 1/35 scale British 2 gal Flimsies fuel cans? Wherever it is I need a quick delivery of them after I order them.
Thanks
I decided to forgo the unditching rails since they are not in the kit but I did decide to improve a bit on that rear cargo rack. That cargo rack in real life could be folded up against the rear of the hull.
The first thing I did was thin down the kit rack so that it looks like it's made from strap iron not square iron. Then I used some Evergreen Styrene 'L' bracket to make the part where the rack mounts to the tank. Next I stole two shackles from an old Italeri Crusader tank I have and then I took two Styrene chains and hooks from a Academy Tank Supplies II kit of accessories. I very carefully cut a link and a half off the Academy chain and then again very carefully split the last open link and carefully slipped it over the shackle and then glud the shackle to the rack. There is no eyebolt or such on the rack - the shackle bolts directly to the rack.
I have the rack and Styrene chain sitting up against the rear of the tank now allowing the shackle to cure in the right position. This is what it looks like so far.
Original rack
Modified rack
Btw, I removed these two parts from the top of the tank as these are the supports for the unditching rails and are not on any Mk. V tanks I've seen images of where the unditching rails were not on the tank.
So, the final painting is slightly delayed.
It's an interesting kit but outdated by the high price of about $55.00 on the web. I think the newer kits are far better for the bit more money you pay for them.
Cheers
Anyone know where I can get some 1/35 scale British 2 gal Flimsies fuel cans? Wherever it is I need a quick delivery of them after I order them.
Thanks
")
Tankbuilder
Active member
A bit more progress.
I got the rear cargo rack finished and attached to the tank hull. Ialso added to handles above the hinges on the rear hull plate.

I also started modifying some Academy Tank Supplies Set II WW2 British 2 Gallon Petrol Tins to look more like WW1 ones. So far I have 6 done. I have another 18 I can use if I desire to but they need to be assembled yet.

Here's something some of you might find interesting about the Mk. V tank and fueling up or refueling.
All fueling/refueling was done only with the 2 gallon petrol tins. The Mk.V tank had a capacity of 70 gallons which means that it took 140 of the 2 gallon fuel cans to fill up ONE tank.
Oh, 2 gallons fuel cans were used for tanks, water and aircraft with cans for tanks a grey or a green colour, water cans were black and aviation fuel cans were red.
Early war 2 gallons fuel cans were whatever colour the civilian cans were.
Cheers
I got the rear cargo rack finished and attached to the tank hull. Ialso added to handles above the hinges on the rear hull plate.
I also started modifying some Academy Tank Supplies Set II WW2 British 2 Gallon Petrol Tins to look more like WW1 ones. So far I have 6 done. I have another 18 I can use if I desire to but they need to be assembled yet.
Here's something some of you might find interesting about the Mk. V tank and fueling up or refueling.
All fueling/refueling was done only with the 2 gallon petrol tins. The Mk.V tank had a capacity of 70 gallons which means that it took 140 of the 2 gallon fuel cans to fill up ONE tank.
Oh, 2 gallons fuel cans were used for tanks, water and aircraft with cans for tanks a grey or a green colour, water cans were black and aviation fuel cans were red.
Early war 2 gallons fuel cans were whatever colour the civilian cans were.
Cheers
Looking good 
Tankbuilder
Active member
Hello there people.
I want to use a couple of figures with this tank on a base to give a sense of scale and also because I really enjoy making bases. With that in mind I bought two Tamiya WW1 British figures sets. The sets are #35339 and #32409. #32409 is NOT a Tamiya item but is simply the ICM WW1 British Infantry set ans ICM WW1 British Infantry Weapons in a Tamiya box.
I am very disappointed in the #35339 set as the standing figures scale up to only around 5 feet 2 inches. The ICM figures are more true to scale in height but are quite relaxed in their poses.
In my opinion the 2 kneeling figures and the prone Lewis machine gunner in #35339 are the most useful figures if one is using them in a scene with a WW1 vehicle such as a tank. That's too bad about the standing officer and running infantryman being only about 5'2" tall in real life. I guess I'll use the kneeling figures from #35339 and standing figures from the Tamiya/ICM kit. I just have to modify my ideas for the base and scene I wanted to depict.
I wish I could get the Master Box WW1 British figures here or delivered within the next week.
Cheers
Well you gotta remember, folks back then were not as tall as we are.
I knew a Veteran of the 3rd army, he was a tank platoon commander, he was maybe 5'2 110 lbs wet.
I knew a Veteran of the 3rd army, he was a tank platoon commander, he was maybe 5'2 110 lbs wet.
Tankbuilder
Active member
Well you gotta remember, folks back then were not as tall as we are.
I knew a Veteran of the 3rd army, he was a tank platoon commander, he was maybe 5'2 110 lbs wet.
My grand father on my mother's side served with the Canadian army at Passchendale and also at Vimy Ridge amongst other battles he fought in and he was 6 feet plus. I can see figures scaling up to 5'6" or so but man 5'2 is just short.
If I do use those vertical Tamiya 35339 figures I'll have to have the tank in a bit of a depression otherwise the tank will look huge next to the figures. At least the weapons in the 35339 set scale up okay.
Got the cargo rack base coated last night. Later today I'll start the final painting of the tank. Then I'll weather it and build up the base for it.
Cheers
Tankbuilder
Active member
I just figured out a way to add rifling to the muzzle of my 6-pounder cannon.
I took a triangular sharp point metal Dremel cutting tool and pressed it into the muzzle of the cannon. Voila! Rifling at the muzzle.
Sorry for the poor focus of the muzzle end but at least you can see the grooves left by the cutting tool also shown in the image.
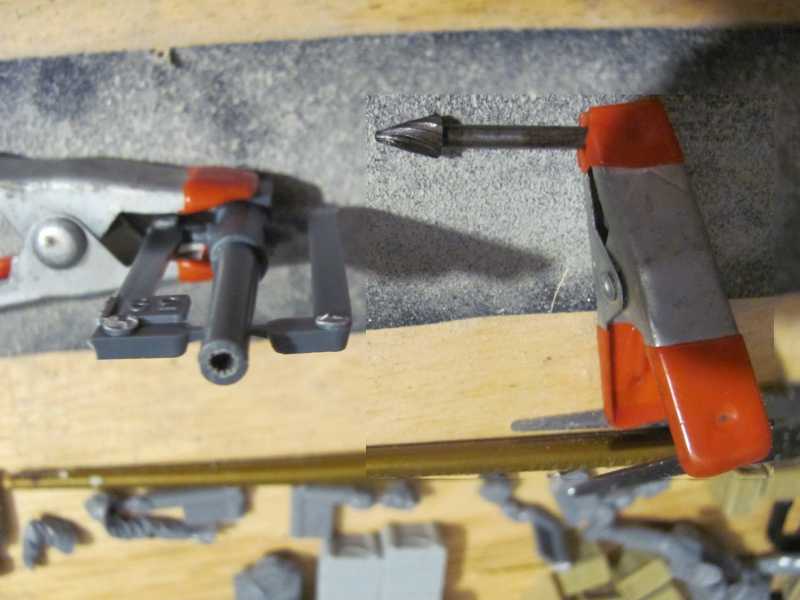
Cheers
I took a triangular sharp point metal Dremel cutting tool and pressed it into the muzzle of the cannon. Voila! Rifling at the muzzle.
Sorry for the poor focus of the muzzle end but at least you can see the grooves left by the cutting tool also shown in the image.
Cheers
Tankbuilder
Active member
Good job!
Luiz.
Thanks.
I just need to do that to the 6-pounder that's on the tank. I think I'll do it to the two 6-pounders that are on my previously built Emhar Mk.IV Male tank too.
Cheers
Nice job! 
Tankbuilder
Active member
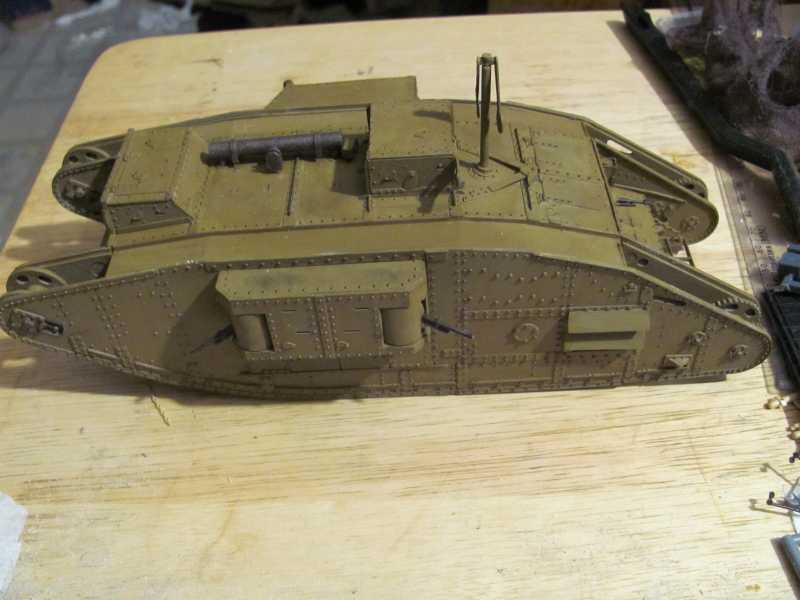
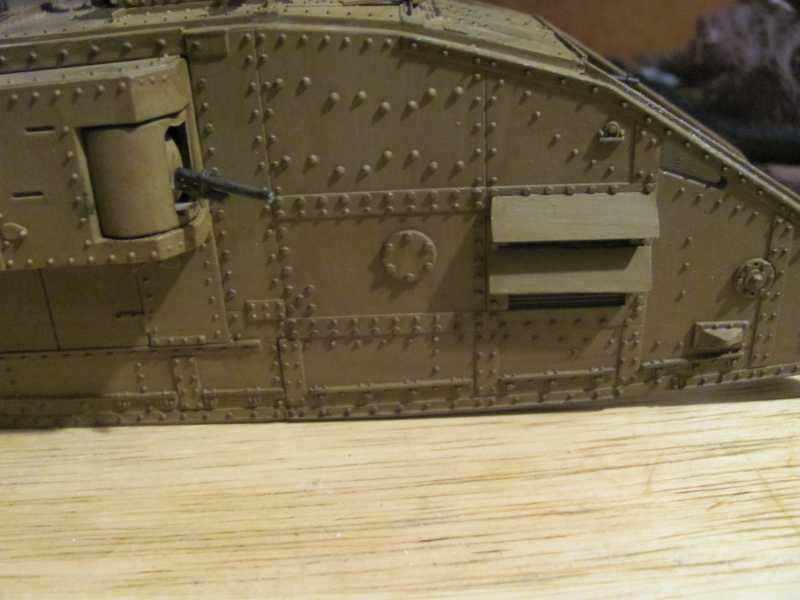
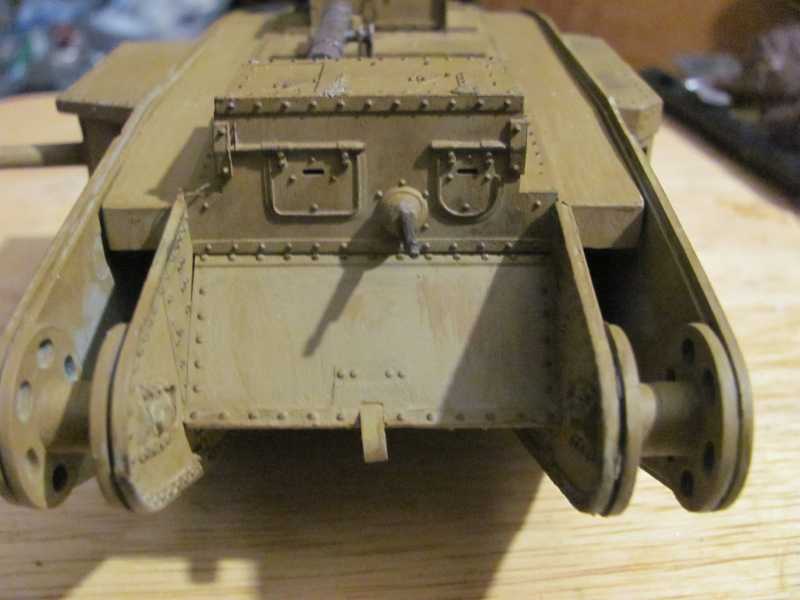
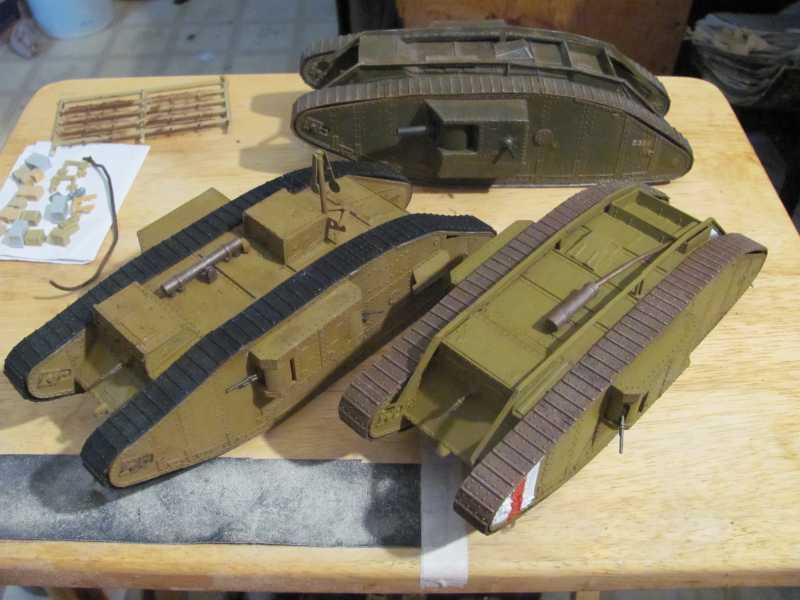
Some more progress on the painting of this model.
I mixed up what I wanted to be the final body colour, applied it, weathered it a bit and then drybrushed the model to highlight the rivets and such other items. I need to paint the identity stripes on the forward sides and maybe the cab too. I haven't decided to put those white-red-white stripes on the cab yet.
Once I get the identity stripes painted I'll attach the tracks, paint and then weather them.
Here's where I'm at now.
Rear with cargo rack.
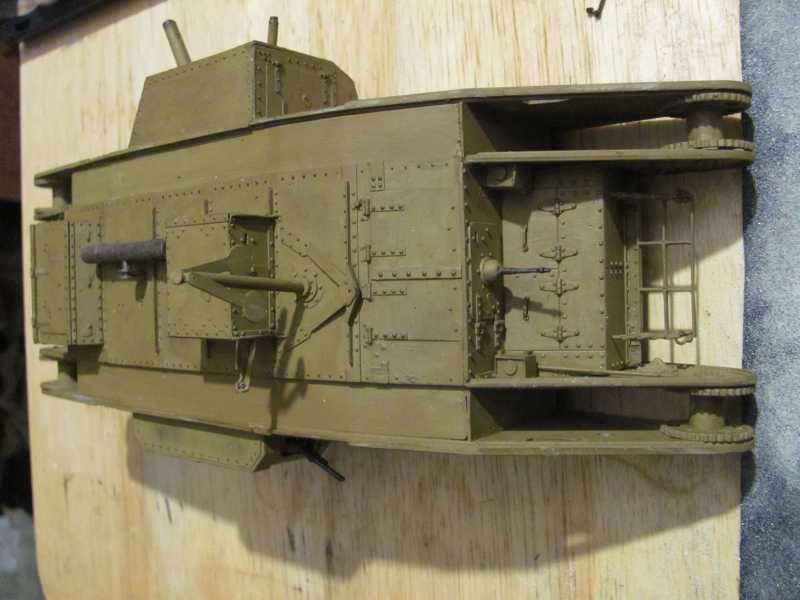
Right side Male sponson.
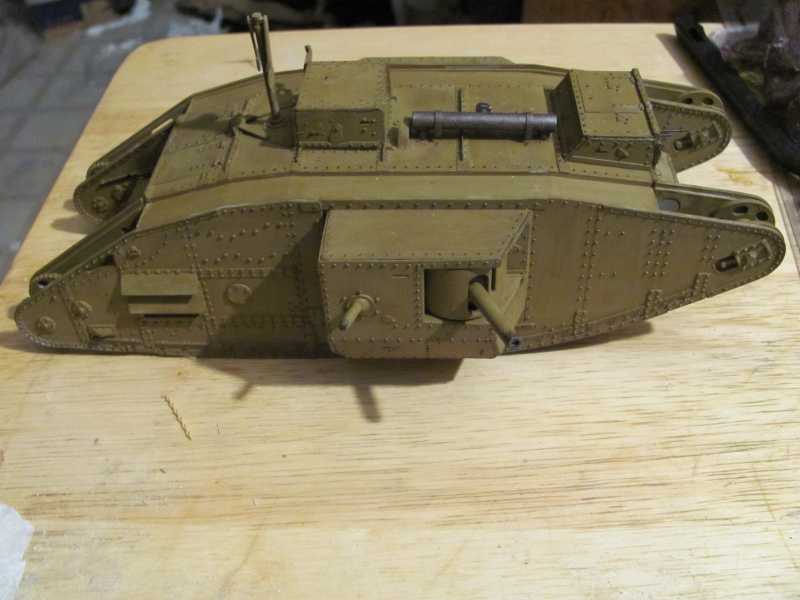
Front top view.

Left side Female sponson.
Left side closeup.
Front closeup.
Right side Male sponson closeup.

Rear and cargo rack closeup.

This will be finished soon.
Cheers
I mixed up what I wanted to be the final body colour, applied it, weathered it a bit and then drybrushed the model to highlight the rivets and such other items. I need to paint the identity stripes on the forward sides and maybe the cab too. I haven't decided to put those white-red-white stripes on the cab yet.
Once I get the identity stripes painted I'll attach the tracks, paint and then weather them.
Here's where I'm at now.
Rear with cargo rack.
Right side Male sponson.
Front top view.
Left side Female sponson.
Left side closeup.
Front closeup.
Right side Male sponson closeup.
Rear and cargo rack closeup.
This will be finished soon.
Cheers
Nice
Skinny_Mike
Well-known member
Nice work so far!
I had a devil of a time trying to mask the identification strips over all the raised details. In the end I gave up and went green all over. Interested to see if you can get better results.
:drinks
I had a devil of a time trying to mask the identification strips over all the raised details. In the end I gave up and went green all over. Interested to see if you can get better results.
:drinks
Tankbuilder
Active member
Nice work so far!
I had a devil of a time trying to mask the identification strips over all the raised details. In the end I gave up and went green all over. Interested to see if you can get better results.
:drinks
Hi Skinny Mike.
I mask mine with green painter's masking tape of even regular masking tape and then paint the ID stripes. Here's an image of my 1/35 scale Emhar Mk. IV Female and an image of my 1/35 scale Emhar Whippet both with hand brush painted ID stripes.


Cheers
Tankbuilder
Active member
Got the tracks on last night.
Interestingly enough, the tracks are about ONE LINK too short.
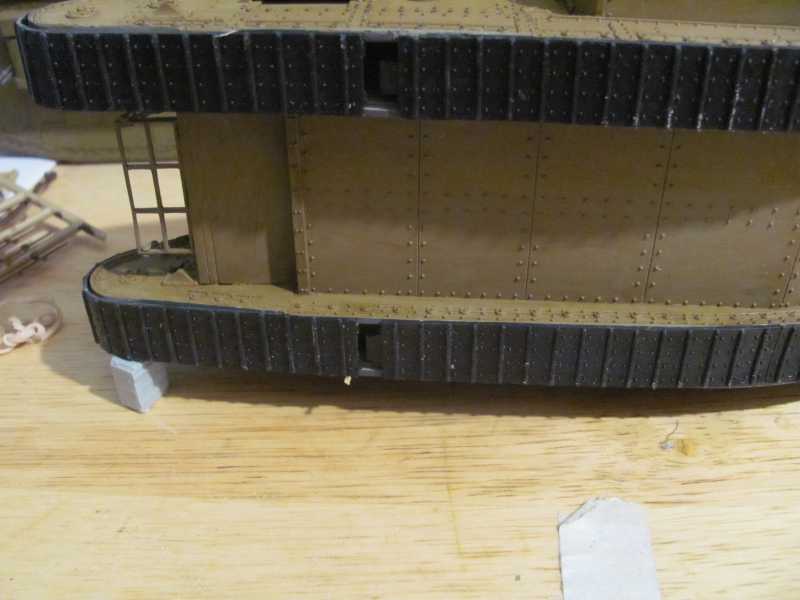
Fortunately there are a couple of short track lengths included in the kit. I'm going to cut what I need off of them to fill in the gap in the lower run of the tank. I've built both the Mk. IV Female and the Mk. V Male tanks by Emhar and never had the problem of the tracks being too short.
So here's where it's at now.

Cheers
Interestingly enough, the tracks are about ONE LINK too short.
Fortunately there are a couple of short track lengths included in the kit. I'm going to cut what I need off of them to fill in the gap in the lower run of the tank. I've built both the Mk. IV Female and the Mk. V Male tanks by Emhar and never had the problem of the tracks being too short.
So here's where it's at now.
Cheers
Similar threads
- Replies
- 7
- Views
- 858