
-
Modelers Alliance has updated the forum software on our website. We have migrated all post, content and user accounts but we could not migrate the passwords.
This requires that you manually reset your password.
Please click here, http://modelersalliance.org/forums/login to go to logon page and use the "Forgot your Password" option.
You are using an out of date browser. It may not display this or other websites correctly.
You should upgrade or use an alternative browser.
You should upgrade or use an alternative browser.
"Easy Pickins"
- Thread starter Steve Ski
- Start date
Steve Ski
Well-known member
Nose to the Grinding Wheel
There’s really no way of getting around it, this will be a slow-going process, placing ivy leaves on the vine. I don’t think it’ll be too bad, it’s not like trying to put individual leaves on a tree, right?
These leaves had been cut out and accumulated over time, so this wasn’t really a show stopper, per se, but each leaf does require a slight bend in it for realism. I did this whole bunch in just over an hour, not too bad. I have four sizes to work with. I’ve found super glue works best when placing these, but in some cases I am using Elmer’s glue as well.
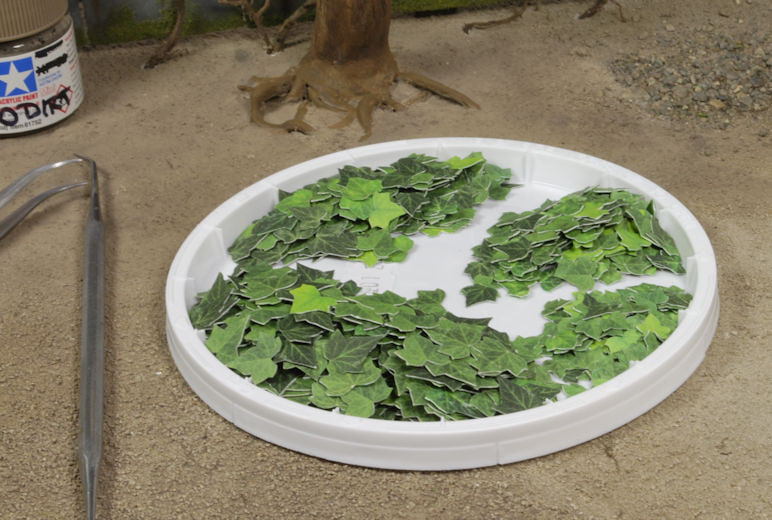
The vines, (tomato plant root) have been attached in a random manner making sure to keep them within reason, not over-done. Once the leaves start to be placed, I will have a better idea of just how much needs to go where.
This last little bit of “clutter bits” should round things out nicely. If more is needed later, I’ll think of something to add. But right now I’ve got to get to work finishing this up.
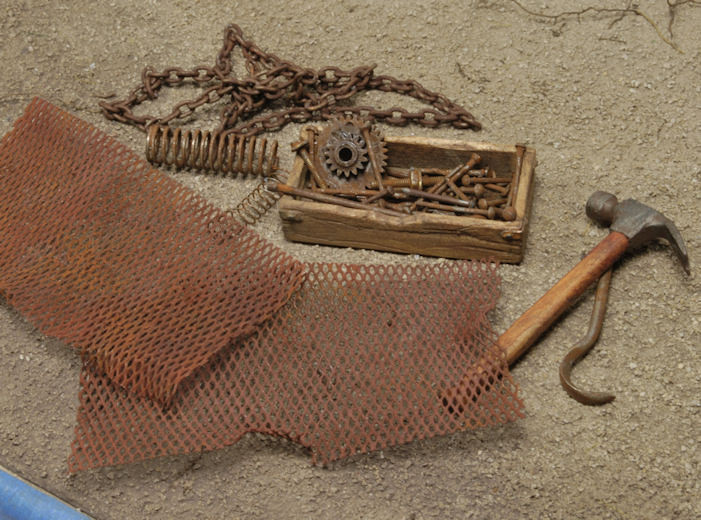
We’ve got expanded metal, a scratch made hammer, nails, gears, chain, springs, etc. Looks like a junk box to me.
More to follow soon and thanks for watchin. Cheers, Ski.
There’s really no way of getting around it, this will be a slow-going process, placing ivy leaves on the vine. I don’t think it’ll be too bad, it’s not like trying to put individual leaves on a tree, right?
These leaves had been cut out and accumulated over time, so this wasn’t really a show stopper, per se, but each leaf does require a slight bend in it for realism. I did this whole bunch in just over an hour, not too bad. I have four sizes to work with. I’ve found super glue works best when placing these, but in some cases I am using Elmer’s glue as well.
The vines, (tomato plant root) have been attached in a random manner making sure to keep them within reason, not over-done. Once the leaves start to be placed, I will have a better idea of just how much needs to go where.
This last little bit of “clutter bits” should round things out nicely. If more is needed later, I’ll think of something to add. But right now I’ve got to get to work finishing this up.
We’ve got expanded metal, a scratch made hammer, nails, gears, chain, springs, etc. Looks like a junk box to me.
More to follow soon and thanks for watchin. Cheers, Ski.
Heavens Eagle
Well-known member
Looking good Steve!
Steve Ski
Well-known member
D’Vine Inspiration
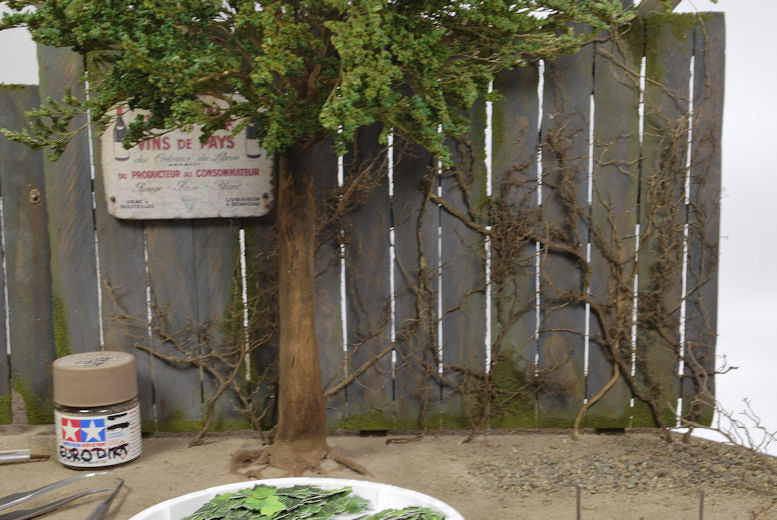
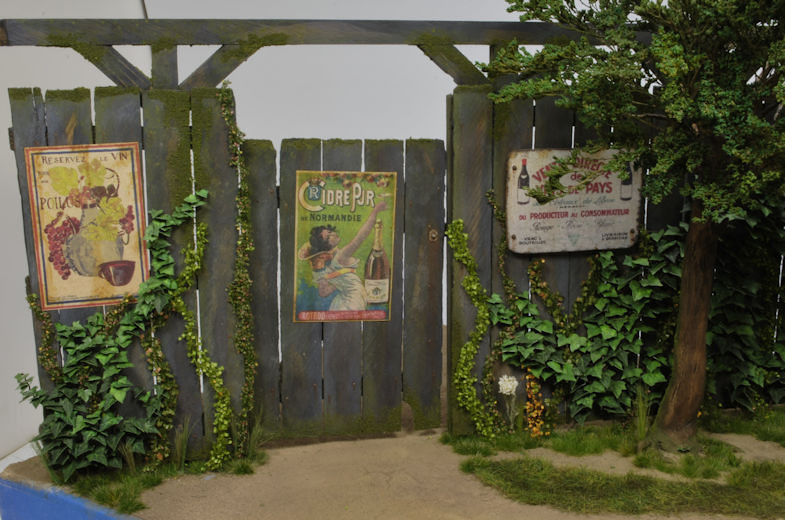
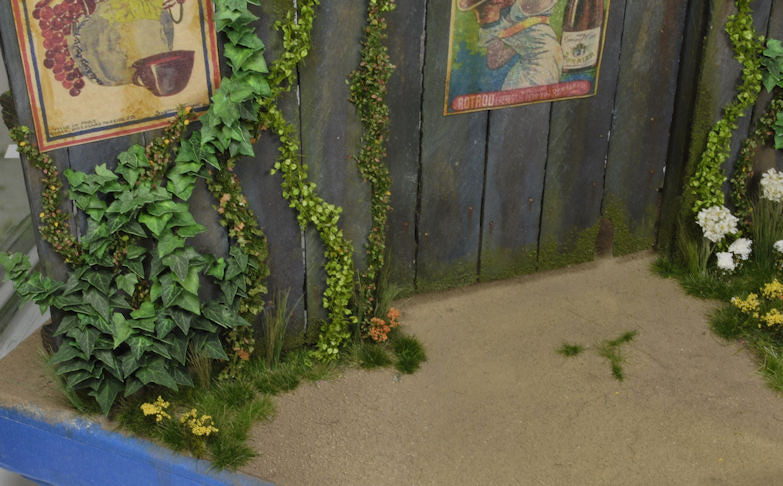
The moment I’ve been waiting for, placing the ivy leaves. This has been a long time in coming, years in fact. I started cutting these leaves probably 6yrs ago in preparation for this moment. I know, right? What a moment to be waiting for, but here it is, finally. HA! This dio was started 12yrs ago, so it’s only been half the time.
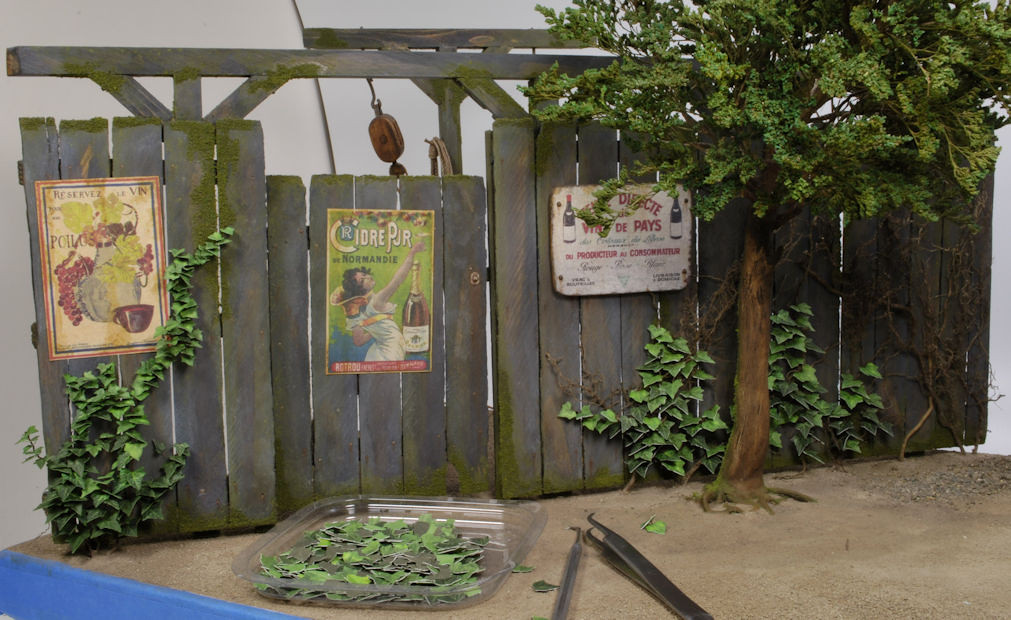
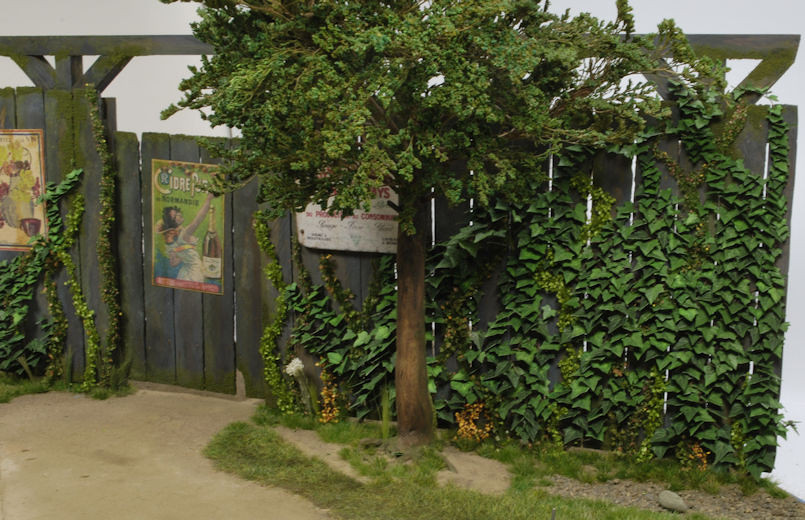
Using my curved fine point tweezers, I began to work the left fence section to get a feel for how this would flow. As expected, no issues, just a few vines breaking, but they were pretty small anyway. Once you get a feel for what colors go where, as in, dark green lower, light green higher, the process moves quickly. It moves quickly as long as you can reach into the tight spots, and then it’s a matter of getting the leaves to stay put. Behind the tree has been a bit of a pain, but not undoable.
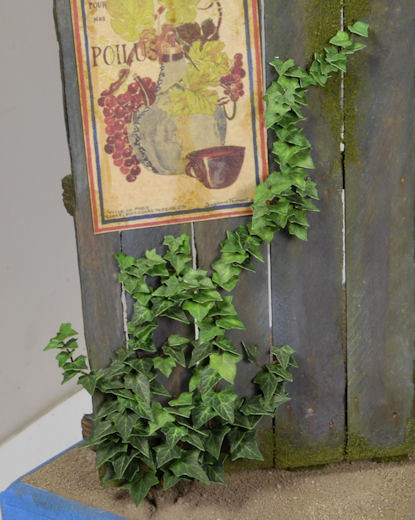

You may also notice that the leaf edges have already been touched up on the left cluster, but not behind the tree, not yet. This is not very difficult but does require a light touch to avoid flicking the leaves off the vines. When applying the green acrylics paint that is also the time to hide any shiny glue spots or discolorations on any of the leaves.
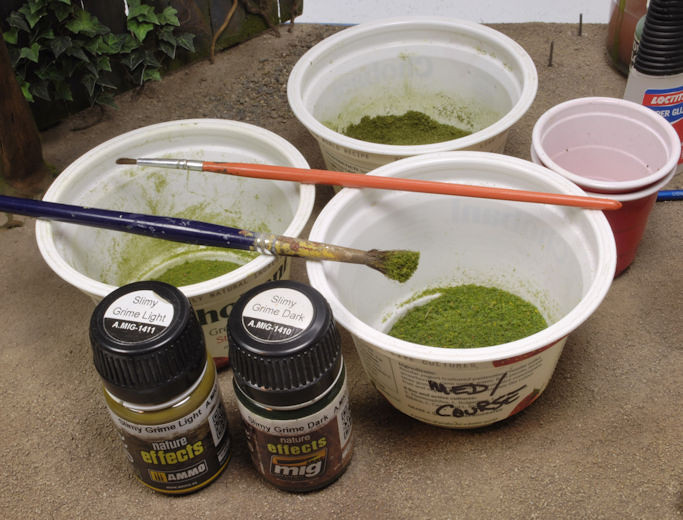
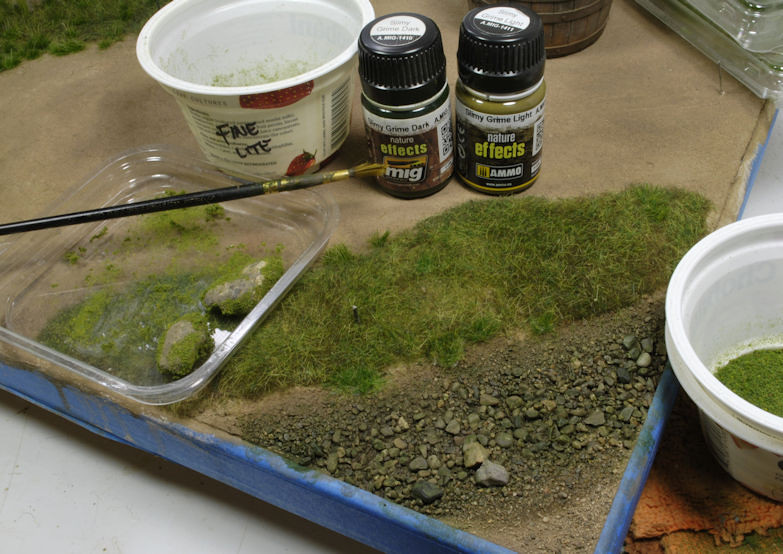
Hind sight is crystal clear, right? Right! I forgot to add moss to the backside of the tree and had to apply it after starting the vines because? Well, that’s when I remembered it, HA! My buddy Simon had mentioned it before, but I forgot to add it to the list. Not a real issue, just brush on watered down Elmer’s School glue where needed and then apply the flock. Scenic Express Flock and Turf in various shades of green works great for this. I crush the flock very fine so it won’t appear blotchy or out of proportion and unrealistic.
Before any flock can be applied there has to be a base tone added for depth and realism. I used Mig’s Slimy Grime Light and Dark paint. I thinned the dark and spread it carefully without going everywhere, then lightly blotched on the light green. That gave a really nice base on it’s own, but I still needed the flock.

So,……….do I tilt the base to the side and risk a major disaster, or figure out how to apply the flock in a safer manner? I already have a slight bend in the tree, so I tried using a small spoon to tip it in place. That was not going to work, but using a fat worn out brush did. I just held it above the area and tapped it lightly, flock falling into place nicely, just like I wanted it.
I’ll keep working the leaf placement over the next few days, as time allows, and then start on other foliage around the base.
More to follow soon and thanks for watchin. Cheers, Ski.
The moment I’ve been waiting for, placing the ivy leaves. This has been a long time in coming, years in fact. I started cutting these leaves probably 6yrs ago in preparation for this moment. I know, right? What a moment to be waiting for, but here it is, finally. HA! This dio was started 12yrs ago, so it’s only been half the time.
Using my curved fine point tweezers, I began to work the left fence section to get a feel for how this would flow. As expected, no issues, just a few vines breaking, but they were pretty small anyway. Once you get a feel for what colors go where, as in, dark green lower, light green higher, the process moves quickly. It moves quickly as long as you can reach into the tight spots, and then it’s a matter of getting the leaves to stay put. Behind the tree has been a bit of a pain, but not undoable.
You may also notice that the leaf edges have already been touched up on the left cluster, but not behind the tree, not yet. This is not very difficult but does require a light touch to avoid flicking the leaves off the vines. When applying the green acrylics paint that is also the time to hide any shiny glue spots or discolorations on any of the leaves.
Hind sight is crystal clear, right? Right! I forgot to add moss to the backside of the tree and had to apply it after starting the vines because? Well, that’s when I remembered it, HA! My buddy Simon had mentioned it before, but I forgot to add it to the list. Not a real issue, just brush on watered down Elmer’s School glue where needed and then apply the flock. Scenic Express Flock and Turf in various shades of green works great for this. I crush the flock very fine so it won’t appear blotchy or out of proportion and unrealistic.
Before any flock can be applied there has to be a base tone added for depth and realism. I used Mig’s Slimy Grime Light and Dark paint. I thinned the dark and spread it carefully without going everywhere, then lightly blotched on the light green. That gave a really nice base on it’s own, but I still needed the flock.
So,……….do I tilt the base to the side and risk a major disaster, or figure out how to apply the flock in a safer manner? I already have a slight bend in the tree, so I tried using a small spoon to tip it in place. That was not going to work, but using a fat worn out brush did. I just held it above the area and tapped it lightly, flock falling into place nicely, just like I wanted it.
I’ll keep working the leaf placement over the next few days, as time allows, and then start on other foliage around the base.
More to follow soon and thanks for watchin. Cheers, Ski.
Very inspiring Steve! Love this 
Steve Ski
Well-known member
Still at it!
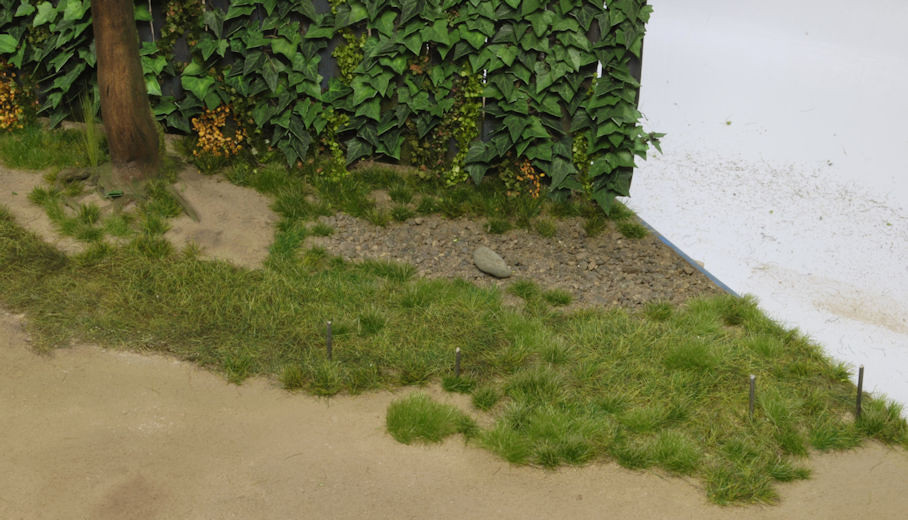
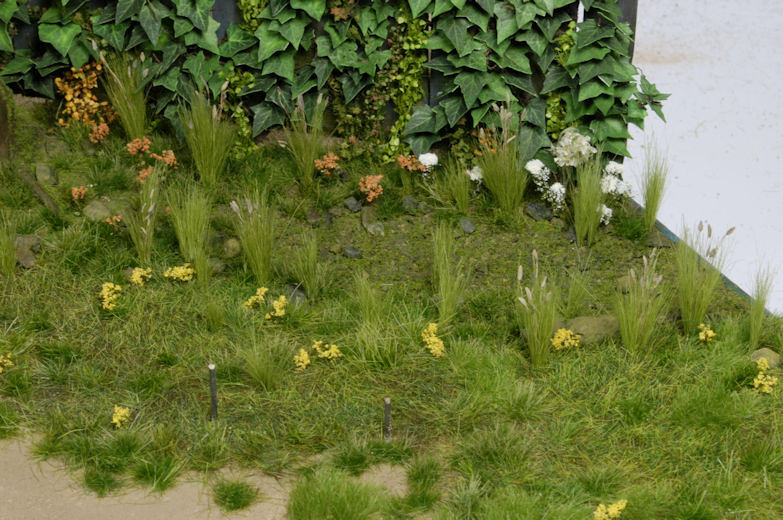
This is certainly taking longer than I had anticipated, but it’s a steady roll. I’m still waiting on some static grass to arrive, but working other parts to fill the gap in time. We’ll get there, eventually.
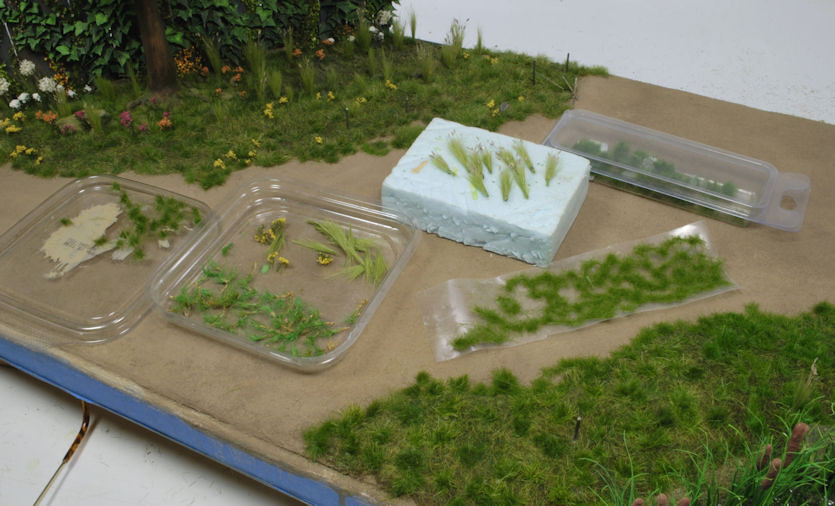
As you can see, there’s quite a lot of stuff used to work this veggie detail. The Heki grass was used for the base with a lot of grass clumps from Min-atur. I have made quite a bit of it myself from left over Heki scrap and will make more once the other grass arrives. I need long, short, in between, for a more realistic appearance.
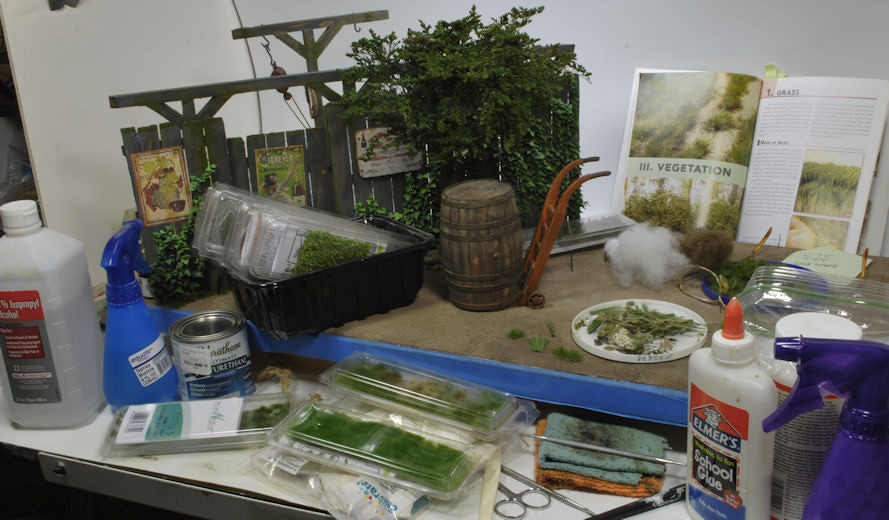
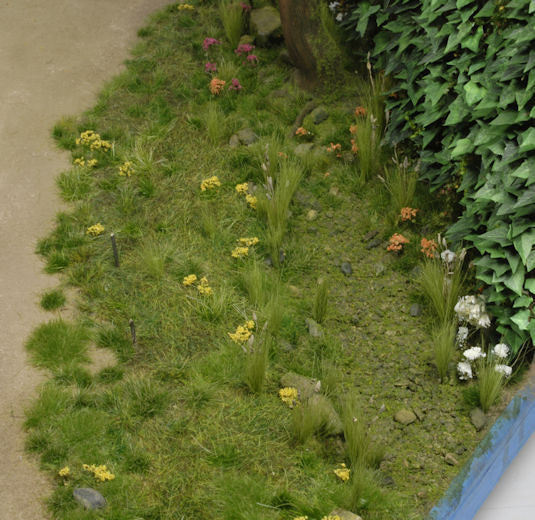
I’ve used some of the Min-atur foliage to fill in gaps on the fence to add some interest in the vine category. They seem to fit just fine. More will be added as time goes on. I have a large inventory of real foliage from outside, so I will mix it up a bit. I’m finding the layering method seems to work best. As in, build it up, don’t cluster a mess. Trying to get a realistic appearance and not over-do it is what I’m working towards.
The grass area is only half done. When the other clusters are made, they will fill in the voids of the Heki grass and add some variety and realism, but right now it looks pretty weak as is. That rock is there to remind me to add rocks in the appropriate locations later on.
Once this side of the fence is done, I’ll be working the shop side. There will be a lot less foliage, of course, but weeds do grow in the darndest places. The shop side will need it’s own special attention to get the realism correct. I keep Chuck Doan’s pics handy, very helpful.
All comments are welcome and any suggestions as well. I’ve got time to do this right, so holler if you see anything needing attention.
Thanks for watchin. Cheers, Ski.
P.S. Laszlo Adoba has a great set of dio books that would be great for anybody's work bench.
https://www.adobaminiatures.com/index.php?route=product/category&path=24
This is certainly taking longer than I had anticipated, but it’s a steady roll. I’m still waiting on some static grass to arrive, but working other parts to fill the gap in time. We’ll get there, eventually.
As you can see, there’s quite a lot of stuff used to work this veggie detail. The Heki grass was used for the base with a lot of grass clumps from Min-atur. I have made quite a bit of it myself from left over Heki scrap and will make more once the other grass arrives. I need long, short, in between, for a more realistic appearance.
I’ve used some of the Min-atur foliage to fill in gaps on the fence to add some interest in the vine category. They seem to fit just fine. More will be added as time goes on. I have a large inventory of real foliage from outside, so I will mix it up a bit. I’m finding the layering method seems to work best. As in, build it up, don’t cluster a mess. Trying to get a realistic appearance and not over-do it is what I’m working towards.
The grass area is only half done. When the other clusters are made, they will fill in the voids of the Heki grass and add some variety and realism, but right now it looks pretty weak as is. That rock is there to remind me to add rocks in the appropriate locations later on.
Once this side of the fence is done, I’ll be working the shop side. There will be a lot less foliage, of course, but weeds do grow in the darndest places. The shop side will need it’s own special attention to get the realism correct. I keep Chuck Doan’s pics handy, very helpful.
All comments are welcome and any suggestions as well. I’ve got time to do this right, so holler if you see anything needing attention.
Thanks for watchin. Cheers, Ski.
P.S. Laszlo Adoba has a great set of dio books that would be great for anybody's work bench.
https://www.adobaminiatures.com/index.php?route=product/category&path=24
Dang Steve! 

Steve Ski
Well-known member
Ok, that's a good thing, I think. The dog that is, but I've got four big outsiders and two ankle biters inside, so he's gotta wait his turn. HA! I must be doing something right. Tell the Boss I said Thank You very much!Holy OMG! This is fantastic work. I've showed it to SWMBO (She who must be obeyed) and she gave it a huge thumbs up and my dog wants to pee on the tree. WOW!
Someone else said that not long ago, HA!Don't water that stuff!
Thank you, Gents. Ya know, I'm always been amazed at some of the veggie work I see out there, never really understanding just how they did it until someone said, "layer it." Ok, now that makes sense, and don't be in a rush to clutter it up. So far so good, and thanks for the thumbs up, Gents!
Steve Ski
Well-known member
What’s the hold up?
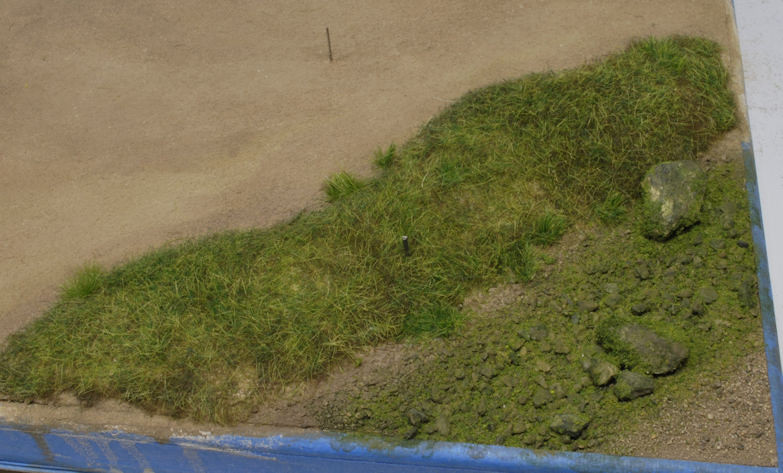
Hold up it ain’t, but slow it is, since January 31. We’re at a turning point now, as in, turn the base and work the lean-to/shop, HA! Making grass and creek foliage was a very slow process and just when I thought I had enough, I had to make more. So, now that this portion of the base is complete, I’ll give a quick run-down on the process.
A lot has happened since the last update, but it doesn’t really look like it, so I avoided piddly updates and chose to combine all of it into one. You can see the front of the lean-to has more grass, small flowers, and the wash area has moss added. I still need to apply a wet look to it, but avoid a standing water appearance. I just need it looking wet.
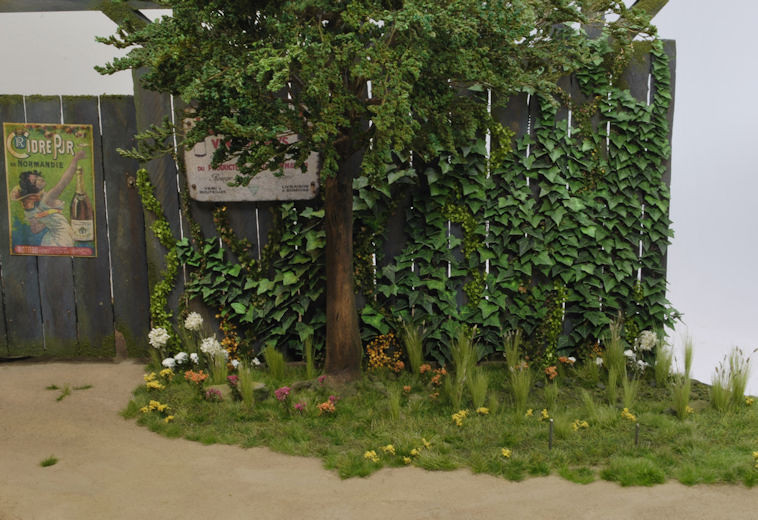
I also decided to ditch the huge pinkish and yellow fern type flowers, they were just way too big and would have detracted from the scene. Keeping the base foliage on the down-low as much as possible and still giving a decent appearance of realism was the direction I chose. All of the tall grass had to be bundled and some even have seed pods for an added feature.
The Heki Grass I initially used had way too many voids so I had to produce quite a few grass clumps myself. I tried to disperse the scratch clumps in a random fashion and mixed up the colors to add visual interest. After close scrutiny I felt the area looked natural enough to move on.
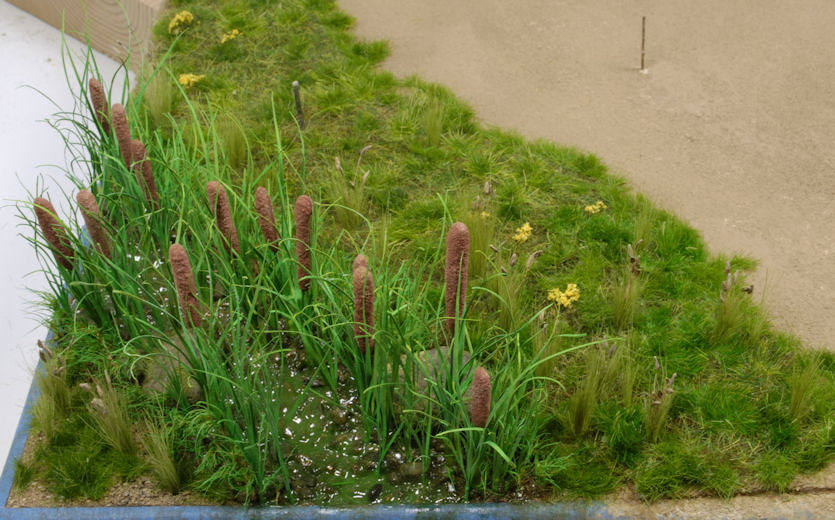
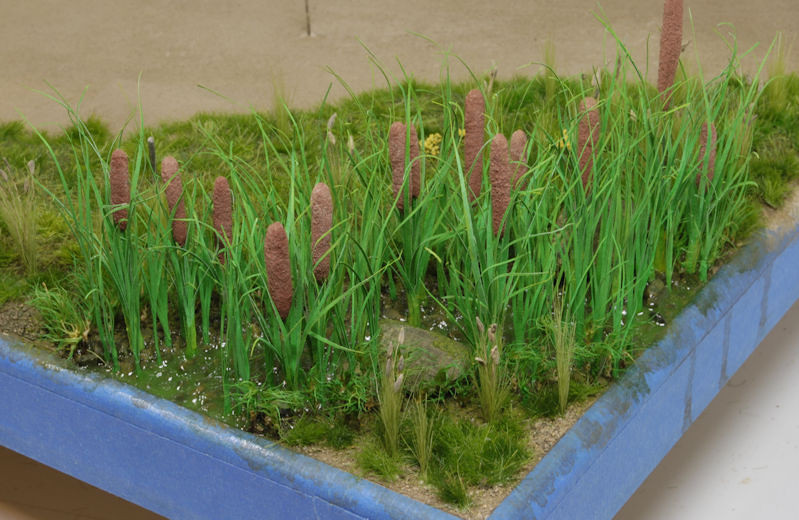
The small water feature on the edge of the base board was treated with Mig’s Slimy Grime, Dark and Light. I did this to add depth before the moss was added to the wash area. I drew the light tone out and up the edge of the wash to simulate water elevations according to seasonal flow. So far, so good.
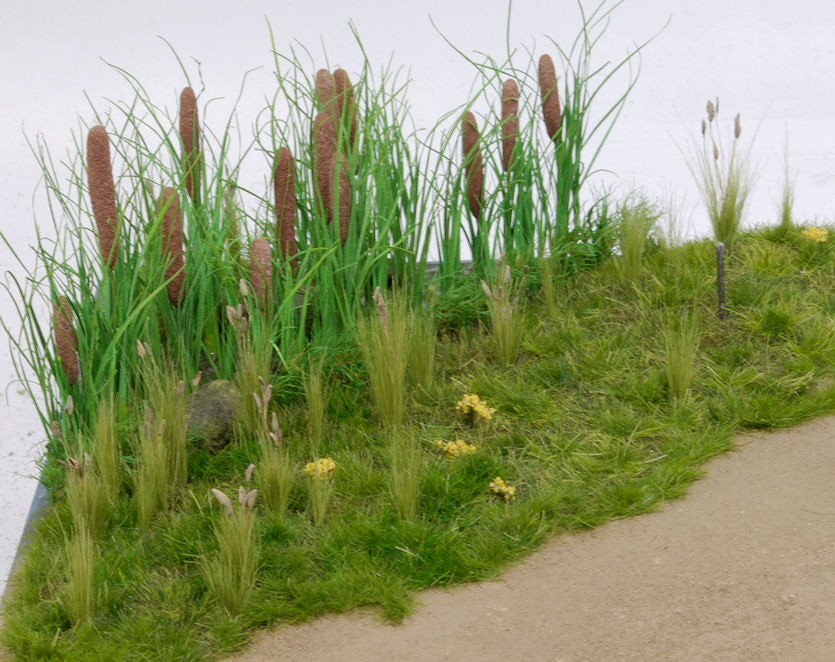
There aren’t any photos of the upgraded Cat Tails that were made earlier, but the method for making those is quite simple. FYI, having a decent paper cutter does help, btw. For the Cat Tail placement I used a thin punch for each hole and glued them in place. I went back through the area with plain reeds, no Cat Tails, and filled any voids on both sides of the wash. Reviewing photos of Cat Tails from all over the globe I found it necessary to really fill in as much as I could along the water’s edge for realism.
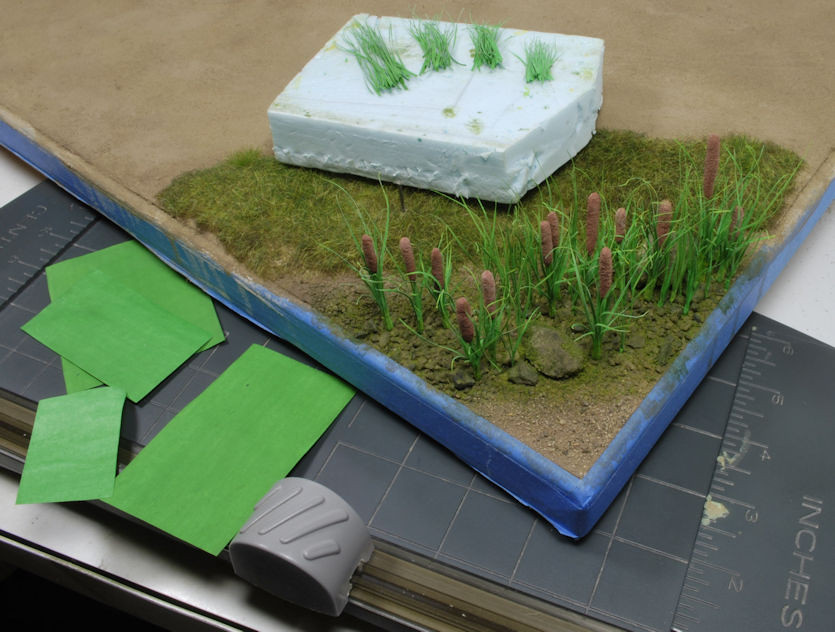
Once the Cat Tail details were finished, I poured the water effect using Woodland Scenic’s Realistic Water. This water effect will leave voids if you don’t catch all the bubbles, and it does creep up everywhere it has a chance, so plan ahead. I avoided the appearance of most of the creep by pouring in several layers even though this is way less than the maximum pour depth recommended. I tinted the water slightly, or so I thought, but it’s a bit deep in color. Oh well, too late to change that, HA! Onward,…………
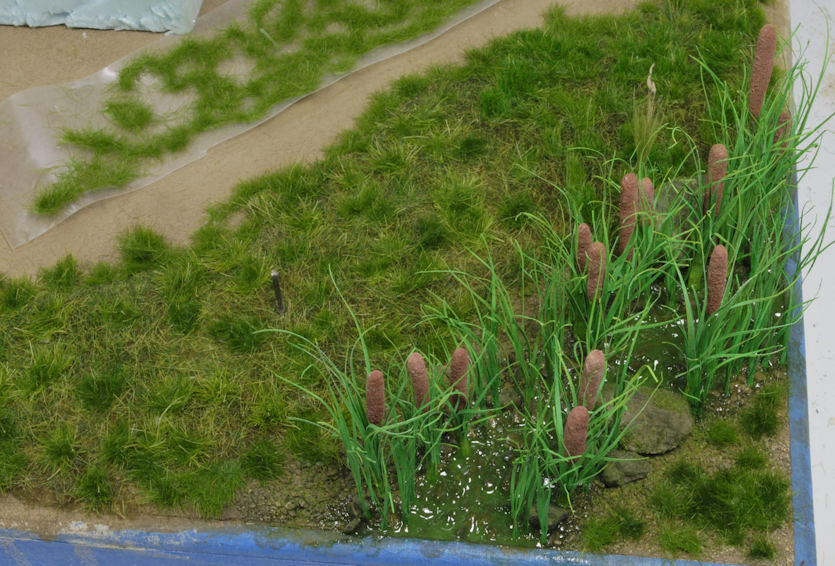
Once the wash area was complete, I worked my way outward from the Cat Tails. You will notice a furry type foliage right after the Cat Tails, this being a type of moss I found way up high in the local mountains right at the edge of a stream busting out of the roadside rock face. It seemed to fit the part and worked great for this aquatic scenery, so I ran with it.
After the moss I again filled in any voids that came with the Heki Grass and did so as random as possible. I then added the tall grass and yellow flowers. Keep in mind, one of the German figures is located within this corner, so I couldn’t get too carried away with the tall grass or flowers.
Now that this portion of the base has been completed, finally, I can work the lean-to in the same manner. I will place all of the extras, as well as the Ranger and Harley, and check for any spatial conflicts. I still feel like I’m missing more junk, small junk, to add to the effect. But, once I get the grass growth under the fencing, oils spills in the dirt, and moss hanging from the rafters, I just might call it good.
More to follow and thanks for watchin. Cheers, Ski.
Hold up it ain’t, but slow it is, since January 31. We’re at a turning point now, as in, turn the base and work the lean-to/shop, HA! Making grass and creek foliage was a very slow process and just when I thought I had enough, I had to make more. So, now that this portion of the base is complete, I’ll give a quick run-down on the process.
A lot has happened since the last update, but it doesn’t really look like it, so I avoided piddly updates and chose to combine all of it into one. You can see the front of the lean-to has more grass, small flowers, and the wash area has moss added. I still need to apply a wet look to it, but avoid a standing water appearance. I just need it looking wet.
I also decided to ditch the huge pinkish and yellow fern type flowers, they were just way too big and would have detracted from the scene. Keeping the base foliage on the down-low as much as possible and still giving a decent appearance of realism was the direction I chose. All of the tall grass had to be bundled and some even have seed pods for an added feature.
The Heki Grass I initially used had way too many voids so I had to produce quite a few grass clumps myself. I tried to disperse the scratch clumps in a random fashion and mixed up the colors to add visual interest. After close scrutiny I felt the area looked natural enough to move on.
The small water feature on the edge of the base board was treated with Mig’s Slimy Grime, Dark and Light. I did this to add depth before the moss was added to the wash area. I drew the light tone out and up the edge of the wash to simulate water elevations according to seasonal flow. So far, so good.
There aren’t any photos of the upgraded Cat Tails that were made earlier, but the method for making those is quite simple. FYI, having a decent paper cutter does help, btw. For the Cat Tail placement I used a thin punch for each hole and glued them in place. I went back through the area with plain reeds, no Cat Tails, and filled any voids on both sides of the wash. Reviewing photos of Cat Tails from all over the globe I found it necessary to really fill in as much as I could along the water’s edge for realism.
Once the Cat Tail details were finished, I poured the water effect using Woodland Scenic’s Realistic Water. This water effect will leave voids if you don’t catch all the bubbles, and it does creep up everywhere it has a chance, so plan ahead. I avoided the appearance of most of the creep by pouring in several layers even though this is way less than the maximum pour depth recommended. I tinted the water slightly, or so I thought, but it’s a bit deep in color. Oh well, too late to change that, HA! Onward,…………
Once the wash area was complete, I worked my way outward from the Cat Tails. You will notice a furry type foliage right after the Cat Tails, this being a type of moss I found way up high in the local mountains right at the edge of a stream busting out of the roadside rock face. It seemed to fit the part and worked great for this aquatic scenery, so I ran with it.
After the moss I again filled in any voids that came with the Heki Grass and did so as random as possible. I then added the tall grass and yellow flowers. Keep in mind, one of the German figures is located within this corner, so I couldn’t get too carried away with the tall grass or flowers.
Now that this portion of the base has been completed, finally, I can work the lean-to in the same manner. I will place all of the extras, as well as the Ranger and Harley, and check for any spatial conflicts. I still feel like I’m missing more junk, small junk, to add to the effect. But, once I get the grass growth under the fencing, oils spills in the dirt, and moss hanging from the rafters, I just might call it good.
More to follow and thanks for watchin. Cheers, Ski.
paddy
Well-known member
Very impressive steve, I particularly like the ivy on the fence. you have completely sold me on the idea of bases, i have only ever done one for my Bugatti a while back and i have to say it was as much fun as building the car, mainly i think because you can let your imagination go and you are not following instructions.
This is the great thing about these forums for me, other peoples work inspires me to have a go at things i wouldn't have even considered before.

This is the great thing about these forums for me, other peoples work inspires me to have a go at things i wouldn't have even considered before.
Greg Kimsey
Well-known member
This is one of the most well thought out dioramas I have ever seen. Everything has a place and purpose. I LOVE IT!
Similar threads
- Replies
- 5
- Views
- 2K
- Replies
- 106
- Views
- 15K