
Brokeneagle
Master at Arms
So the base for this scene was basically 80% finished but I wanted to update it further and show you the transition.
Initially this was a base that I had already constructed and painted in 2010, with the building and some of the ground work nearly completed.
I decided to give the building an Update with paint and pigments and further small details such as texture and better rubble to make the base more suitable for a Jagd Tiger today(2021).
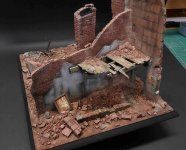
The base in its original form (2010) without any of my updates.

I started by adding further rubble with better detail to the open section of the building at the front, making sure to allocate an appropriate area for the tank to sit. This area has to be decided upon early, with the fit and balance set and then regularly checked as each step proceeds, squashing down the rubble with the track base of the tank - a Jagd Tiger is a very heavy tank so I had to make sure that weight was applied accordingly to the base rubble. I also needed to build-up the rubble at the back of the pavement. The picture shows the original state before I added more rubble and other small details. Keep an eye on the changes with the loose bricks on top of the walls - more are added for better detail.
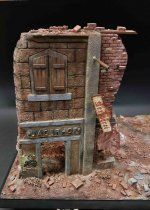
The base today(2021) with my additional rubble and extra details such as the posters and new pieces of broken building in the interior behind.


The rubble above has been spread by using a small tea spoon and smaller quantities using my fingers. It is made up of a number of different materials that I store seperately from clean cat litter, fine sand, very small stones and dirt from the road outside and finally rubble mix from custom dioramics and bricks/tiles from VLS. Be very discerning when using the bricks and tiles as thses are the 'main attraction' and should not be squandered or over done - they are the highlights. I also have a container of broken plaster buildings from old dioramas and broken VLS kits that I keep for occaisions such as this.
I covered the paper printed cobblestone (VLS) with Maskol(lavender liquid) to protect it from the airbrush work and pigments to follow.

Next was the process of turning the multi-colored mess into a base color for rubble and adding some shadows to the building, all done in acrylics with an airbrush. After this stage I will adjust the colors of the building to something more suitable with the update but mainly giving them more depth. What yo can't see here is the original front which was very stone yellow - I never liked it. I solved it with heavy washes and brought it back to a brown.


I have sprayed down an acrylic mixture of red brown and Nato Brown, then proceeded to add patches of a ligher version (adding a light Deck Tan - do not use white) in places that are higher than the rest of the ground work. The intial highlight layer was only slightly lighter, then I proceeded to make each additional layer lighter again, reducing the area being painted, with one layer actually going a little more to the pink. I sprayed this mainly where the brick and tiles details were. I finished with a light spray of black brown in the corners for shadows and on the track marks to make it easy to see where the tank was going to go during the pigment phase.
I do this so that I don't spend to much time adding paint and pigment effects where they are not needed under the tank. It also helps when adding some addition brick details in the rubble.
Note: When spraying these layers do not think of them as the finished effect but more of a quality base with subtle variation to be enhanced further by pigments.
Once that dried I peeled off the Maskol so that the pigment and dust effects could be added to the cobblestone. I do it this way because the printed cobblestone is already completed and does not need the previous stages, only the weathering and dusting from this point to match it up with the rubble.
So, now some extra work with the plaster was needed to take it from its original look [which I felt had to much blue] and bring across to a more brownish grey. It also needed more staining and depth. The airbrushed, dark streaks needed to be blended in as well so it was time to get out the stubby but soft 'blender brush.
* 'Keep it soft and stubby, I say' - this is the best kind of brush for this kind of work (broad flat, smooth walls) because the bristles need to be short and wide to give you good coverage with total control but medium soft, so it is applied smoothly and not scrubbed.
I mixed up a very light grey that had a hint of the Nato Brown(TAMIYA) and a lot of the deck tan(TAMIYA) and scrubbed it onto the plaster section of the wall, making sure to blend the dark streaks in. This is done using the old 'Dry Brushing' method with acrylic paints.
The floor boards in the rear section were treated in a similar way but with a wood color (VALLEJO natural wood).

The whole base is now given a flat acrylic overspray to seal it before the next layers are added.
Now I add the pigments in wash layers that are very thin and build-up the colors on the rubble using pigments in a fixative solution such as rubble dust, brick dust and factory dirt (I favor the original Mig pigments but any pigments should do the job). I also added some Euro Dirt as well. In a few selected areas I added some very light rubble dust, such as around the fallen eagle near the tank obsticle and in between the bricks on the walls. I also added a thicker brown wash to the building front, adjusting its color as I did not like the yellow.
The washes are added at varying strengths via the ratio of pigment versus solution(fixative), the more pigment the more the color dominates when it dries. Its a great effect but some time and practice is needed to understand how it varies - always test it first.


The pavement and some of the rubble recieved a concrete wash layer followed by a subtle light rubble dust layer. I then added dry pigment dust effects to selected areas such as the cobblestones, plaster walls and pavement. The whole process is finished off with very fine hand painting using acrylics for chips and highlighted edges on the bricks and stones, then staining and some darker colors for shadows beside the brick details using oil paints that are applied like fine drybrushing. These shadow colors are darker versions of the rubble but are also acentuated with Raw Umber, Raw Sienna and Burnt Umber.


So this is what it looks like when all the layers are finished but the tank is not stuck down as yet. Some additions in the final process were the piece of wood, rusted iron sheet at the front of the building, posters, a broken window at the rear, the VLS sign(cardboard added to plastic sheet) and some more whole bricks here and there, especially on top of the walls to give them a little more life. Light grey acrylic was added to the doorway and cross members to highlight it against the wall color better.
The final step needed was to respray the black boundary around the base, as it gets pretty messy after the groundwork is finished. You can tape it off before starting the groundwork colors but if you leave it there through the whole process but I find the masking tape tends to leave a residue on the painted edge if it stays there to long. It seems to be effected by time and the amount of overspray etc that ends up on top.
I have included some images below that compare the before and after right next to each other so that you can see the change better. As I always say the change is more dramatic when seen in person ; photos always seem to take something away.
Questions on the different aspects of the stages welcome.


Initially this was a base that I had already constructed and painted in 2010, with the building and some of the ground work nearly completed.
I decided to give the building an Update with paint and pigments and further small details such as texture and better rubble to make the base more suitable for a Jagd Tiger today(2021).
The base in its original form (2010) without any of my updates.
I started by adding further rubble with better detail to the open section of the building at the front, making sure to allocate an appropriate area for the tank to sit. This area has to be decided upon early, with the fit and balance set and then regularly checked as each step proceeds, squashing down the rubble with the track base of the tank - a Jagd Tiger is a very heavy tank so I had to make sure that weight was applied accordingly to the base rubble. I also needed to build-up the rubble at the back of the pavement. The picture shows the original state before I added more rubble and other small details. Keep an eye on the changes with the loose bricks on top of the walls - more are added for better detail.
The base today(2021) with my additional rubble and extra details such as the posters and new pieces of broken building in the interior behind.
The rubble above has been spread by using a small tea spoon and smaller quantities using my fingers. It is made up of a number of different materials that I store seperately from clean cat litter, fine sand, very small stones and dirt from the road outside and finally rubble mix from custom dioramics and bricks/tiles from VLS. Be very discerning when using the bricks and tiles as thses are the 'main attraction' and should not be squandered or over done - they are the highlights. I also have a container of broken plaster buildings from old dioramas and broken VLS kits that I keep for occaisions such as this.
I covered the paper printed cobblestone (VLS) with Maskol(lavender liquid) to protect it from the airbrush work and pigments to follow.
Next was the process of turning the multi-colored mess into a base color for rubble and adding some shadows to the building, all done in acrylics with an airbrush. After this stage I will adjust the colors of the building to something more suitable with the update but mainly giving them more depth. What yo can't see here is the original front which was very stone yellow - I never liked it. I solved it with heavy washes and brought it back to a brown.
I have sprayed down an acrylic mixture of red brown and Nato Brown, then proceeded to add patches of a ligher version (adding a light Deck Tan - do not use white) in places that are higher than the rest of the ground work. The intial highlight layer was only slightly lighter, then I proceeded to make each additional layer lighter again, reducing the area being painted, with one layer actually going a little more to the pink. I sprayed this mainly where the brick and tiles details were. I finished with a light spray of black brown in the corners for shadows and on the track marks to make it easy to see where the tank was going to go during the pigment phase.
I do this so that I don't spend to much time adding paint and pigment effects where they are not needed under the tank. It also helps when adding some addition brick details in the rubble.
Note: When spraying these layers do not think of them as the finished effect but more of a quality base with subtle variation to be enhanced further by pigments.
Once that dried I peeled off the Maskol so that the pigment and dust effects could be added to the cobblestone. I do it this way because the printed cobblestone is already completed and does not need the previous stages, only the weathering and dusting from this point to match it up with the rubble.
So, now some extra work with the plaster was needed to take it from its original look [which I felt had to much blue] and bring across to a more brownish grey. It also needed more staining and depth. The airbrushed, dark streaks needed to be blended in as well so it was time to get out the stubby but soft 'blender brush.
* 'Keep it soft and stubby, I say' - this is the best kind of brush for this kind of work (broad flat, smooth walls) because the bristles need to be short and wide to give you good coverage with total control but medium soft, so it is applied smoothly and not scrubbed.
I mixed up a very light grey that had a hint of the Nato Brown(TAMIYA) and a lot of the deck tan(TAMIYA) and scrubbed it onto the plaster section of the wall, making sure to blend the dark streaks in. This is done using the old 'Dry Brushing' method with acrylic paints.
The floor boards in the rear section were treated in a similar way but with a wood color (VALLEJO natural wood).
The whole base is now given a flat acrylic overspray to seal it before the next layers are added.
Now I add the pigments in wash layers that are very thin and build-up the colors on the rubble using pigments in a fixative solution such as rubble dust, brick dust and factory dirt (I favor the original Mig pigments but any pigments should do the job). I also added some Euro Dirt as well. In a few selected areas I added some very light rubble dust, such as around the fallen eagle near the tank obsticle and in between the bricks on the walls. I also added a thicker brown wash to the building front, adjusting its color as I did not like the yellow.
The washes are added at varying strengths via the ratio of pigment versus solution(fixative), the more pigment the more the color dominates when it dries. Its a great effect but some time and practice is needed to understand how it varies - always test it first.
The pavement and some of the rubble recieved a concrete wash layer followed by a subtle light rubble dust layer. I then added dry pigment dust effects to selected areas such as the cobblestones, plaster walls and pavement. The whole process is finished off with very fine hand painting using acrylics for chips and highlighted edges on the bricks and stones, then staining and some darker colors for shadows beside the brick details using oil paints that are applied like fine drybrushing. These shadow colors are darker versions of the rubble but are also acentuated with Raw Umber, Raw Sienna and Burnt Umber.
So this is what it looks like when all the layers are finished but the tank is not stuck down as yet. Some additions in the final process were the piece of wood, rusted iron sheet at the front of the building, posters, a broken window at the rear, the VLS sign(cardboard added to plastic sheet) and some more whole bricks here and there, especially on top of the walls to give them a little more life. Light grey acrylic was added to the doorway and cross members to highlight it against the wall color better.
The final step needed was to respray the black boundary around the base, as it gets pretty messy after the groundwork is finished. You can tape it off before starting the groundwork colors but if you leave it there through the whole process but I find the masking tape tends to leave a residue on the painted edge if it stays there to long. It seems to be effected by time and the amount of overspray etc that ends up on top.
I have included some images below that compare the before and after right next to each other so that you can see the change better. As I always say the change is more dramatic when seen in person ; photos always seem to take something away.
Questions on the different aspects of the stages welcome.
Attachments

Last edited:


