• Modelers Alliance has updated the forum software on our website. We have migrated all post, content and user accounts but we could not migrate the passwords.
    This requires that you manually reset your password.
    Please click here, http://modelersalliance.org/forums/login to go to logon page and use the "Forgot your Password" option.

This is my BIG project redoing a car that has been in storage for years.

Heavens Eagle

Well-known member
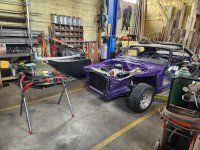
In some ways this is like a full size type model with perfect detail. You even get to play with it when it is done.
In some ways the disassembly part of this project can be a big help for detail and reference. Dirt, dust, and a tiny bit of rust. @moon puppy Bob if you don't want this posting, or there is no interest, we can remove it. I probably won't go into a lot of the details of the details on this, but hopefully you all might enjoy something a little different.

77 bug restore-000.jpg


77 bug restore-001.jpg


77 bug restore-002.jpg


77 bug restore-003.jpg


77 bug restore-004.jpg


77 bug restore-005.jpg


77 bug restore-006.jpg


Years ago I had a friend that did what I am getting ready to do. He sanded all this down and put a really nice hot pink paint job on the car. It was all painted and detailed up even down in this hole. No the black pan wasn't pink but was super clean and black like it was supposed to be. The car was a gem. He sold it and then bought a near basket case 1952 Porsche Cabriolet from a little know but authentic coachbuilder. He spent years doing a meticulous restoration of it to the point where it was better than new. This will not be anywhere near that, but hopefully I will be able to get it really nice.
 
Wow this is NEAT!


There’s a kinda local guy here (closer to Bob than Eric & I) that used to cut these engines into two pieces, making 2 - 2 cylinder engines for ultralight airplanes!
 
Gonna be a fun little project!
Thanks Mike! Seems you have been away for a little bit, welcome back.


Cool Paul! It looks to be in very good shape!

Those pin strips scream, "80's" :bigrin:

I'm still working on my own, decided to completely replace the floor and sills

View attachment 169372

View attachment 169371

WOW Warren! That is one involved rebuild. Reminds me a bit of Ely's '52 Porsche restoration. He built a turnstile and spent hours welding up the rocker panels, replacing rusted parts and cleaning up poorly done factory work.
 
Yes, it needed a new floor and once I dove in I found the sills were pretty bad.

It was a choice of repair what I can for now and do the sills later or try and do it all at once and have a good solid car! I should have done more research before buying but still happy with it!

Looks like you'll have no major issues getting yours back on the road!
 
Very cool! I love watching car restoration shows on the weekend, dreaming about what I could do to Renee’s Yukon on my F150. I will definitely be following along.
 
I spent tonight cleaning up the garage a little bit. Needs more clean up yet, but thought I would share something that I had not yet tried on my old bug. It has not been started or run since about 1986 or '87. I had not even thought to try and turn it over even by hand as I had figured that the engine was probably seized up.

Tonight I grabbed a 21mm socket and a driver and gave it a try. Lo and behold the generator and crankshaft turned a little, but only a little. Then I remembered I had it in gear to keep it from rolling. I learned a very long time ago (the hard way) to NEVER set the hand/parking brake on a vehicle in storage. The brake shoes will bond to the drums and it will be a real pain to get them back apart.

Anyway, kicked the manual transmission out of gear, went back and the engine rotates smooth as silk even by hand.

awesome-minions.gif


77 bug restore-008.jpg
 
'Round here, that counts as a finished car! My bug was so rusted I removed most of the floor pan without any tools. This one looks like a piece of cake.

A couple years ago, this was a basket case too. Takes a lot of money when you start from nothing. Its also why I build aircraft and armor in scale, gets my head away from cars.
 

Attachments

  • 20240416_105535.jpg
    20240416_105535.jpg
    4.7 MB · Views: 7
@sevendeuce I look at it this way, it was in storage for I guess about 33 years. I did a custom paint job with the help of a friend that had a body shop back in the day. Got the paint finished and assembled it, went to install the front bumper and on the replacement fender the hole for the bumper mount was so far off that it wouldn't line up. He was closing his shop at that point so it was towed home. I did find a good used fender from another bug and got it stripped and primed. Shortly thereafter the ex wanted a divorce and this bug and a 55 that was in great shape both went in storage. I ended up selling the 55 but one thing or another this one just kept gathering dust. Yeah a lot of $$ over the years but for most of that It was a garage since I was in apartments. Then I moved to Memphis and it was even harder. Finally bought a house here, and got it all moved. If not for all that this old car might not even exist. Kind of like having a barn find under my nose and now I get to play with it.

The paint I put on 30ish years ago is still solid but some things have popped up and it will need new paint. This time just a single color. (Those stripes were a pain in the butt!!!) In the long run I just don't really like the look and with the other little issues it will need new paint. This time I think it will be fine to just sand it down real good, do the repairs and give it another layer.
If you don't mind Nate, I would like to get some current suggestions on primers, paint, and application. When the time comes. I still remember a lot of the sanding and process, but paints are a bit different now than they were 30 years ago.
 
Back
Top