• Modelers Alliance has updated the forum software on our website. We have migrated all post, content and user accounts but we could not migrate the passwords.
    This requires that you manually reset your password.
    Please click here, http://modelersalliance.org/forums/login to go to logon page and use the "Forgot your Password" option.

The Maus that squeaked.

Thanks guys I really appreciate the comments!
thank-you.gif


I didn't really plan on how to assemble it different, I just looked over the assembly then the parts and saw a different order to things so as to help parts align "more better". It was just kind of a step here and then this next part should be this for fit and alignment and so forth.

Looking at the instructions their order would have probably been a disaster. I found too many things that had minor alignment and fit problems. Nothing big or bad on it's own. BUT! By changing the assembly order I broke a huge batch of fit problems into small groups that were fairly easy to deal with.

My only screw ups were I missed drilling 4 holes in the top armor to locate some splinter shields by the front corners. Ended up that it was just as easy to clip the pins on the shields and align them from what I saw in the drawing. Looked fine.

Then there was a periscope on top of the front glacis plate for the driver to look through. It was supposed to insert from underneath and I missed it until well after the hull was assembled. Luckily though I had not glued the hatch in place just behind it and was able to use a piece of bent sprue and blue tack to easily place it in from underneath.

Have not done anything as I have been working on the preview for the B-36 kit. Have found some problems with things HPH did. (Incorrect details) I will include those with the review as well as some info for cutting fiber glass as the wings and fuselage are resin over a fiberglass shell for strength. Makes them light strong and warp resistant. Also makes steel tools get dull very fast.
 
This is a great presentation Paul, I can imagine it takes some effort to make it look professional. This is something I need to do myself :blush:

You make that build look nice and easy :notworthy


Laurence
 
This is a great presentation Paul, I can imagine it takes some effort to make it look professional. This is something I need to do myself :blush:

You make that build look nice and easy :notworthy


Laurence

Thanks Laurence. It actually has been a fairly easy build. It took some time to do all the small parts. Wasn't anything difficult, just time consuming. Watched some movies and DVDs while I clipped, filed, and sanded parts. 80% of this build is tracks and running gear. Turn it right side up and it is a chamfered box with very little detail. All the running gear and plastic in the chassis does give the kit a little heft. If it weighed in scale wise it would be about 8 pounds or 3 1/2 kilos. No it doesn't weigh in that much, but it does have a little mass.

As for the format, I have a basic layout file for posting. It just makes it much quicker and easier. The program I use is Canvas and I have been using it for many years. I also use it for doing scale cad drawings and since it works with photos there are many times I can import a photo to assist with making a scale drawing.

With the format preset these days I can do 8 to 10 photos in 1 to 2 hours. Last night I spent 3 hours going through and doing the basic photo setups for the B-36 review. At this point there are 43 photos in the review. There will probably be a few more added but I expect it to be less than 50 at this point. Overall that isn't a bad kit, but it shouldn't have any flaws to speak up with what it costs. The good thing is that the flaws will be minimized due to pre-build research. While it will be tempting to jump into it, I need to do some practice building in resin first.
 
B) :popcorn
Great post Paul - this looks way better than the old Dragon one. The wheel assembly on that was a nightmare!

Ian.
 
Paul, you are an animal. All those road wheels and links would make me cringe, however, it is nice to see you get something going.
 
With Wonderfest last weekend and some jobs around the house needing to be done I have not been in the hobby room much the last couple of weeks.

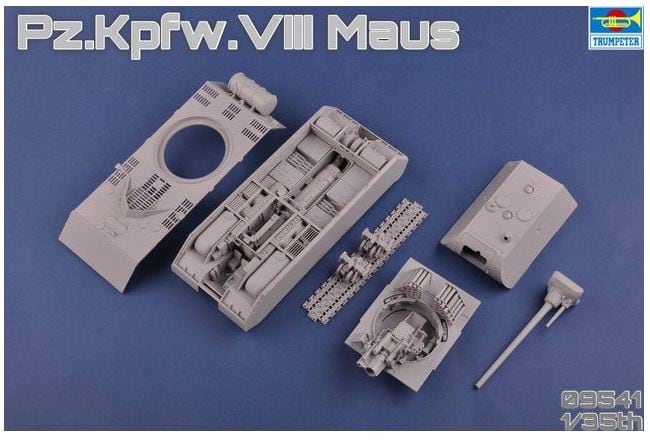
However, I did run across this today when looking around the internet. I guess Trumpy is getting in on the interior bandwagon. Since the original in the Russian museum is a stripped out shell it is kind of interesting what they decided to put inside. Besides who can really argue I guess. Hope it is better than their Ju87A kits which were just horrible messes.


h5b97940.jpg
 
The Russians captured manuals with plenty of interior illustrations plus the captured vehicles were gutted while dissecting them. It shouldn't be too hard to tell if they did their research.

Regards,
 
By far, the best books in my library on this vehicle are:
1. Panzer Tracts 6-3 Schwere Panzerkampfwagen Maus and E 100, development and productions from 1942 to 1945, created by Thomas L. Jentz and Hilary Louis Doyle ($24.95USD) - extremely accurate scale plans and drawing plus images form the manuals and Kubinka's example.

2. Model Art Special German Super Heavy Tank Maus - Drawn from Russian archives, plans, photographs, and illustrations of the vehicles when captured and during dissection.


3. Panzerkampfwagen Maus by Thomas L. Jentz ($15.95USD) - Older information but no scale plans as in Panzer Tracts 6-3


Regards,
 
I wasn't commenting on the available reference, I was just commenting on the fact that some of my experience with Trumpeter is that they screw up even with the reference. The Ju87A kit was a complete joke and then they copied it in larger format for the 1/24 scale kit.

I know a number of other Trumpy kits are screw ups as well, so I reserve my reservations on if they get it reasonably close or not. Only positive with them is that they do tend to fit together.
 
I was just commenting on the fact that some of my experience with Trumpeter is that they screw up even with the reference.


My point was that it isn't hard to tell if they screwed up. I did, at one time, provide them with references for Russian subjects. All those kits are amongst their best still.

Regards,
 
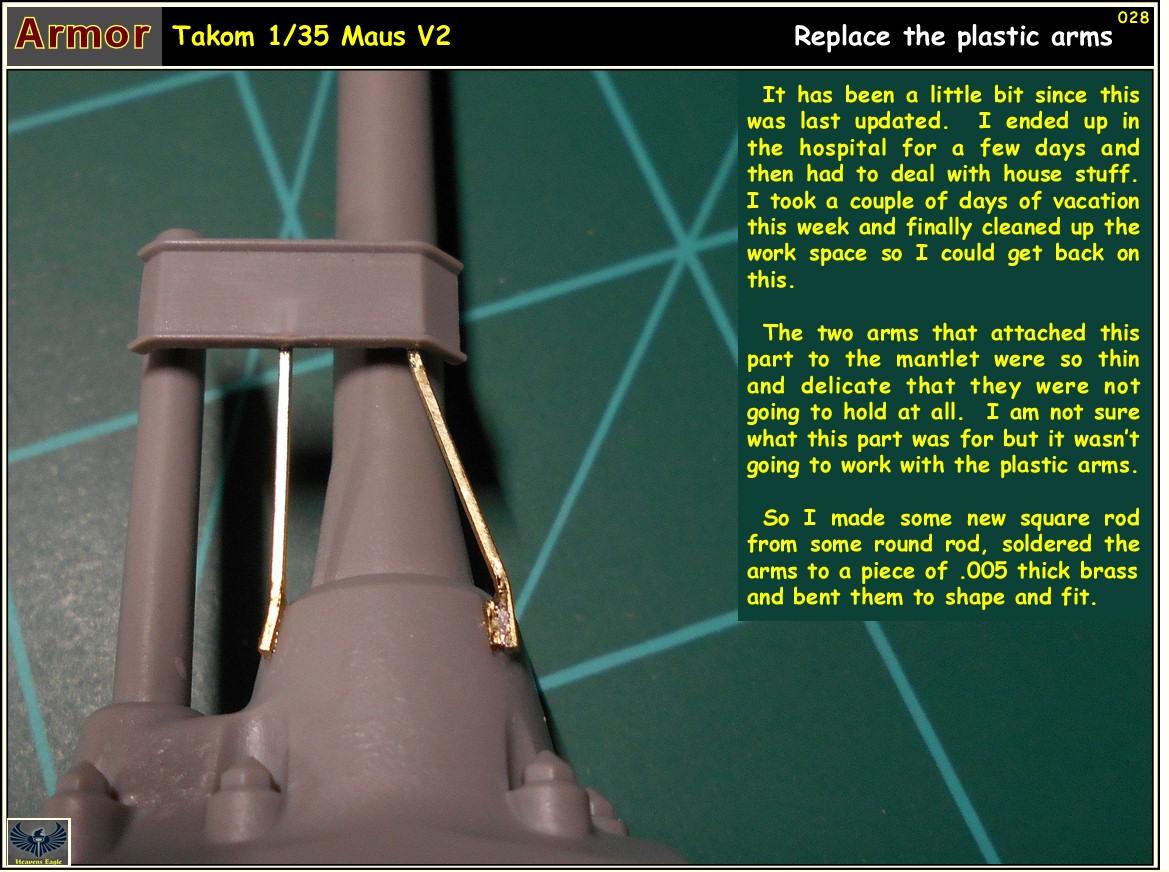
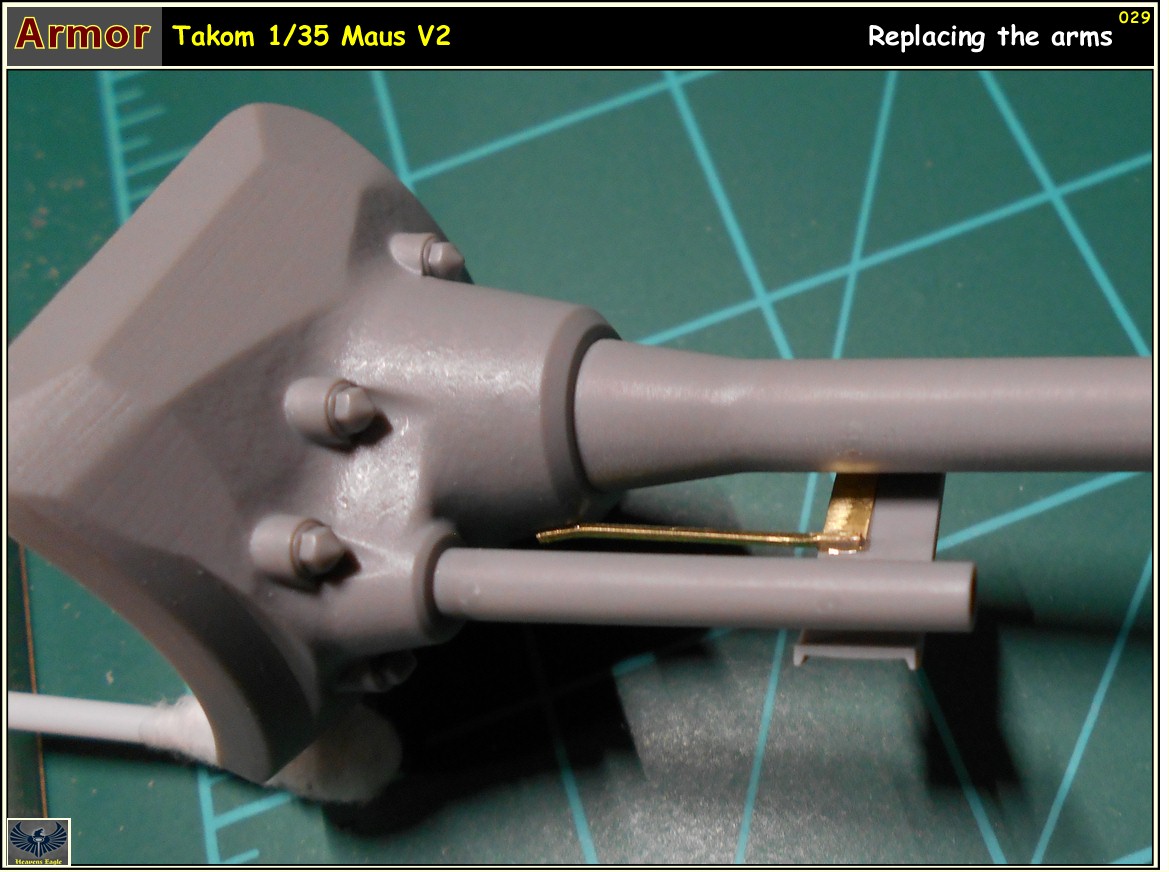
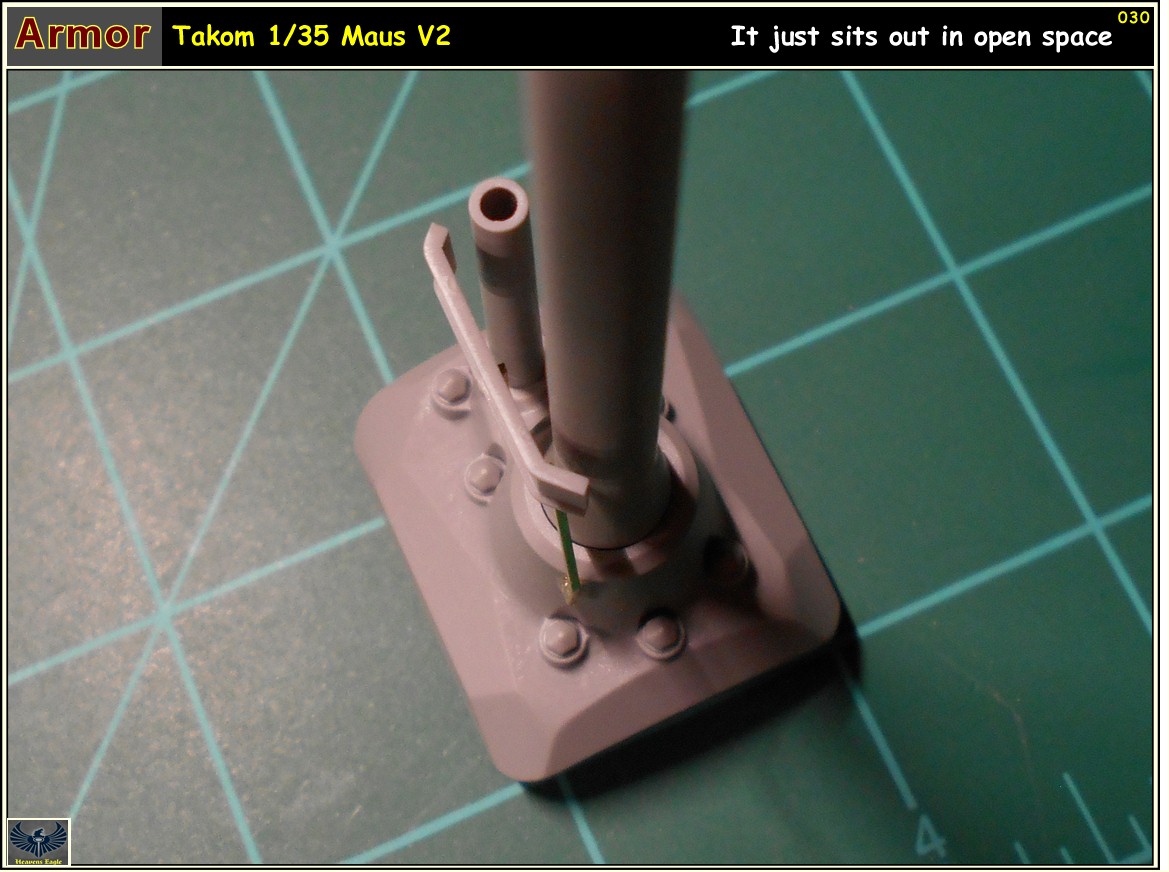
I took a couple of days off this week and managed to do a little work on this beast. The antenna deflector is a very delicate item and the struts for it were just a bit too delicate. No strength at all so I made some brass parts.

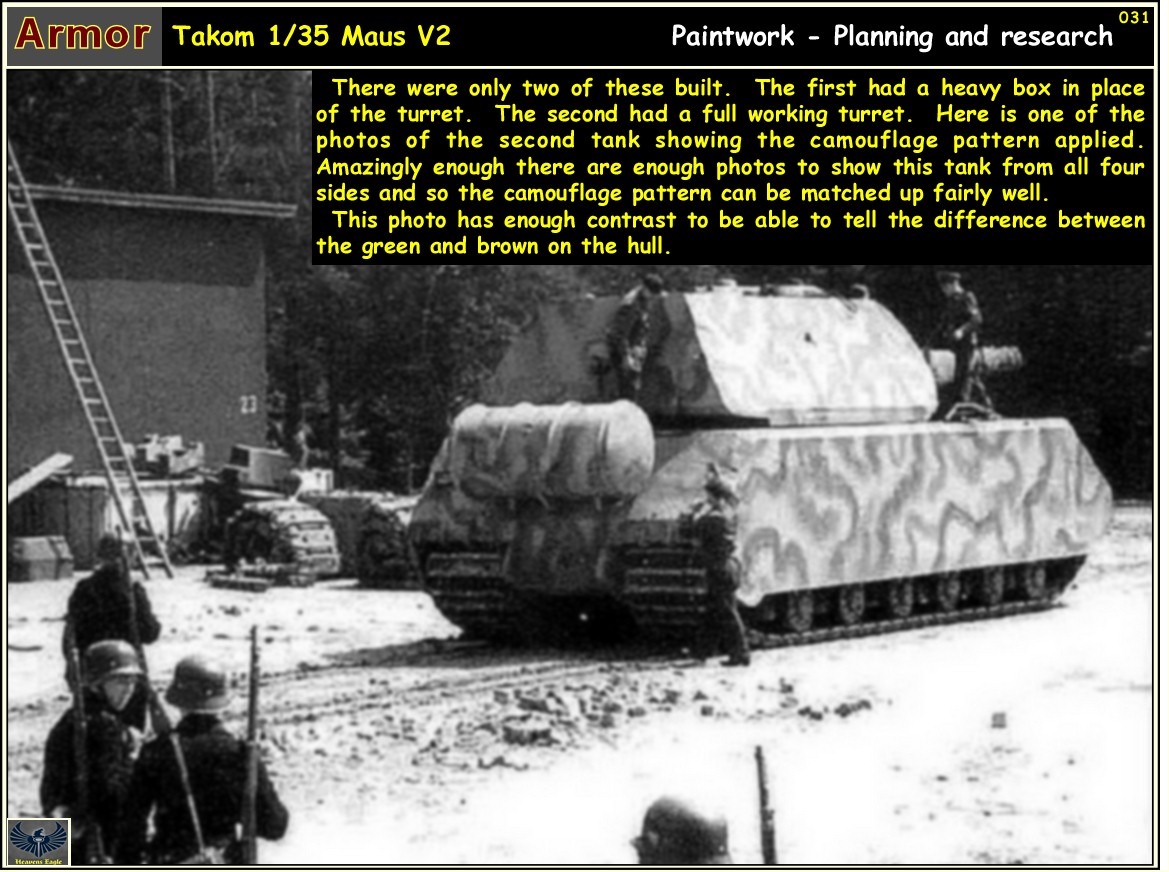
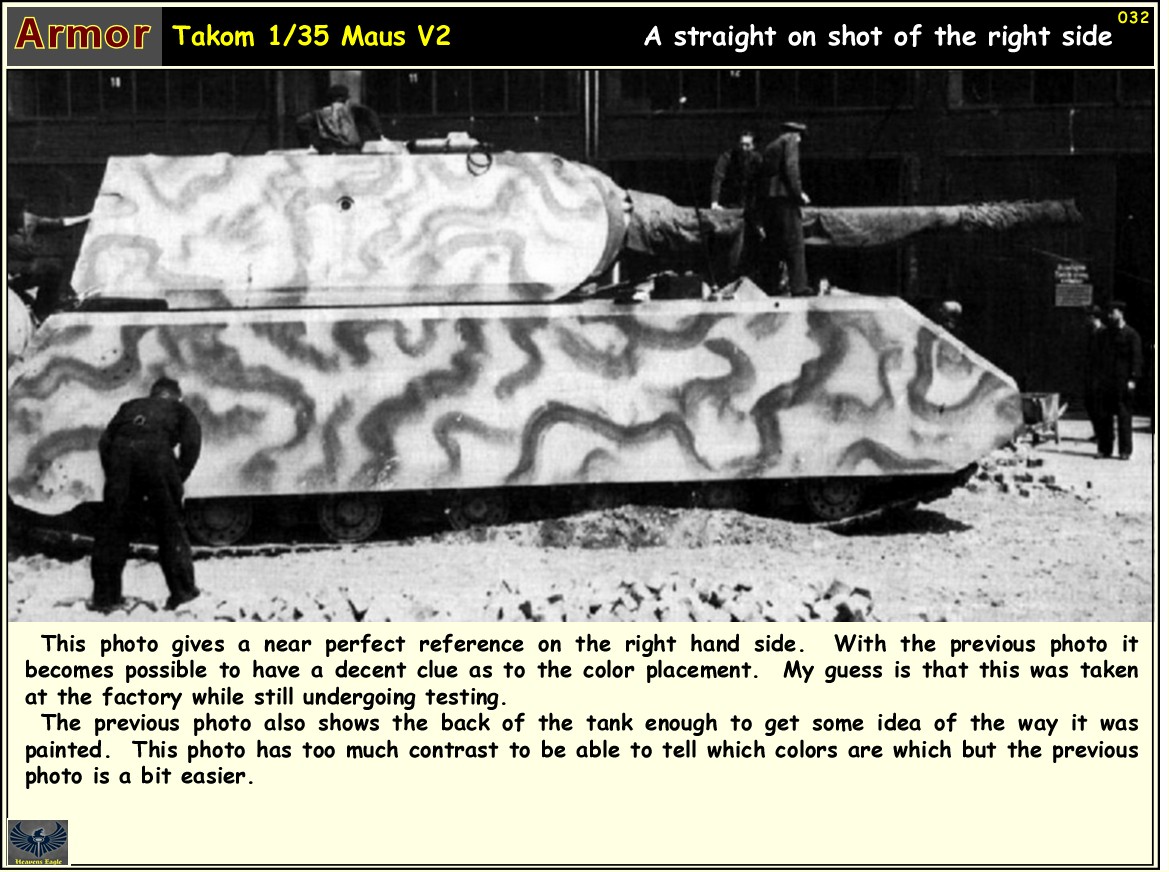
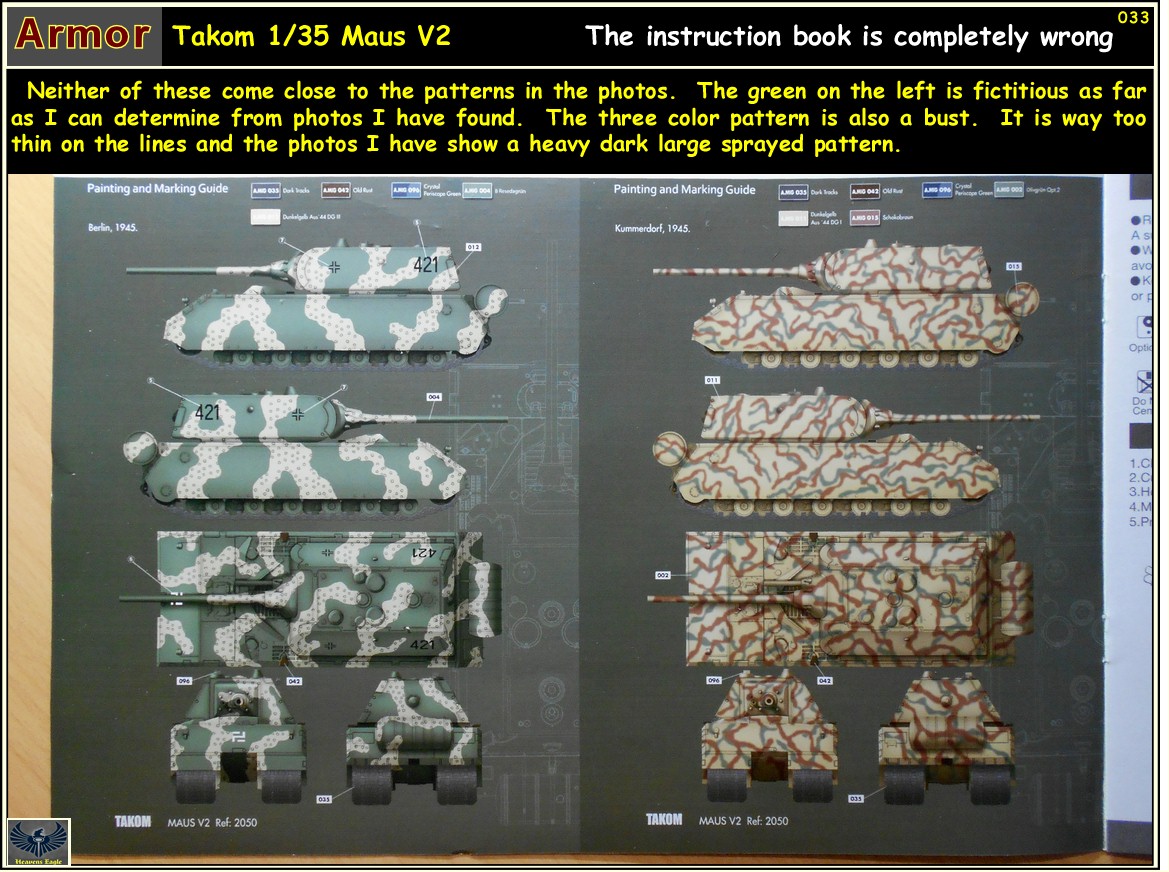
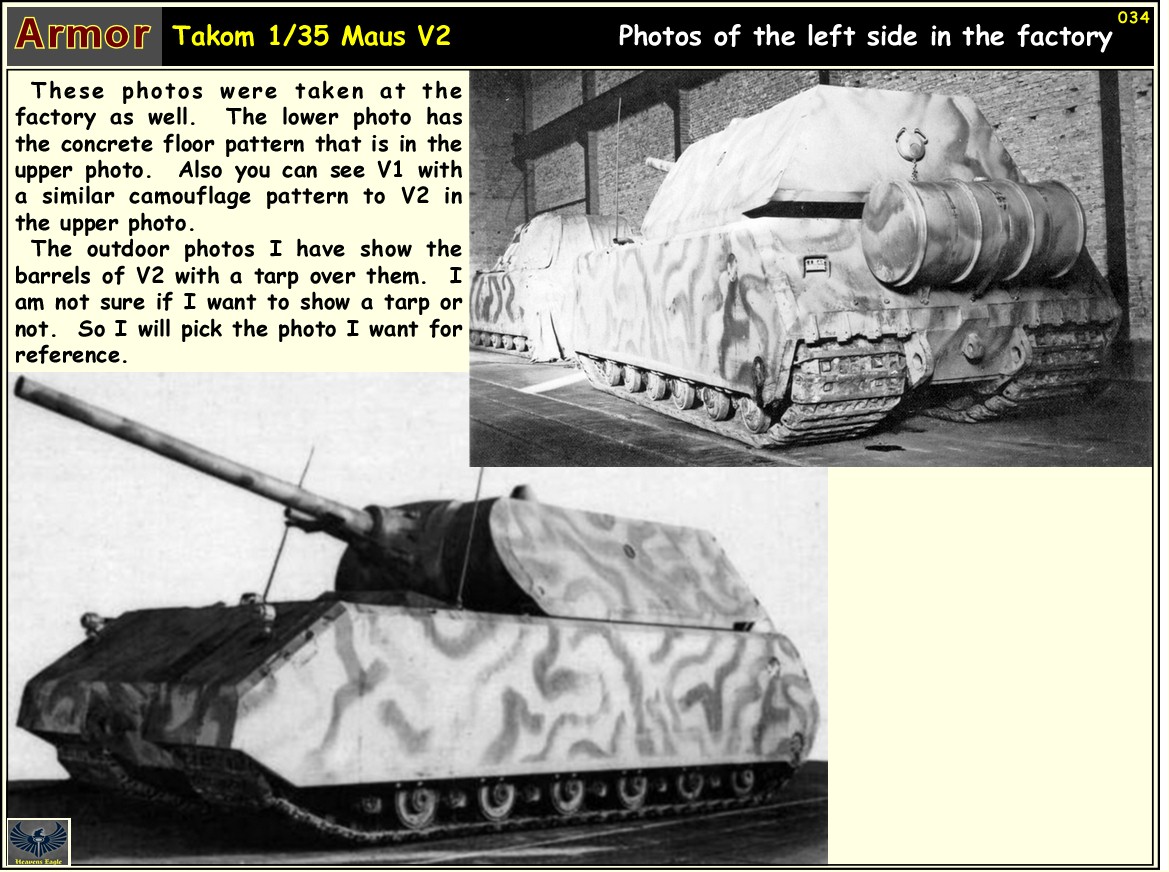
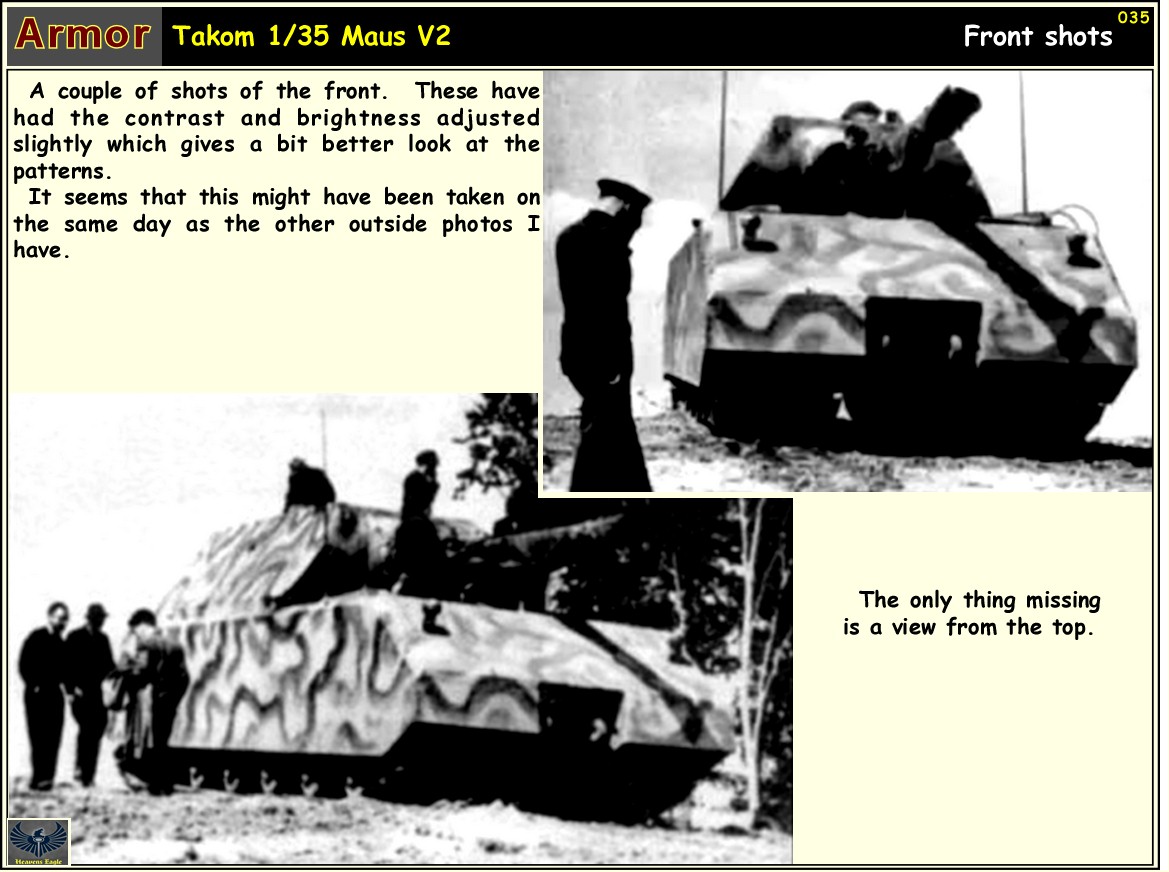
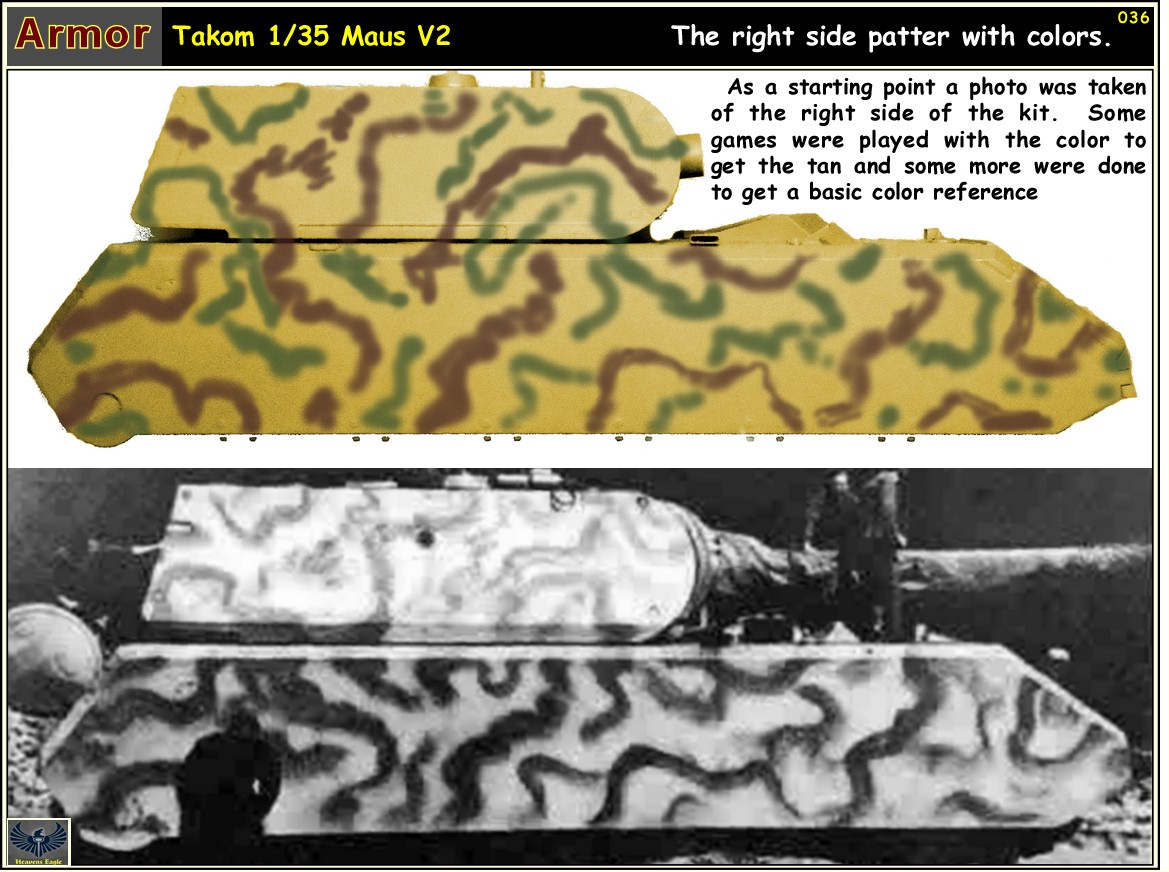
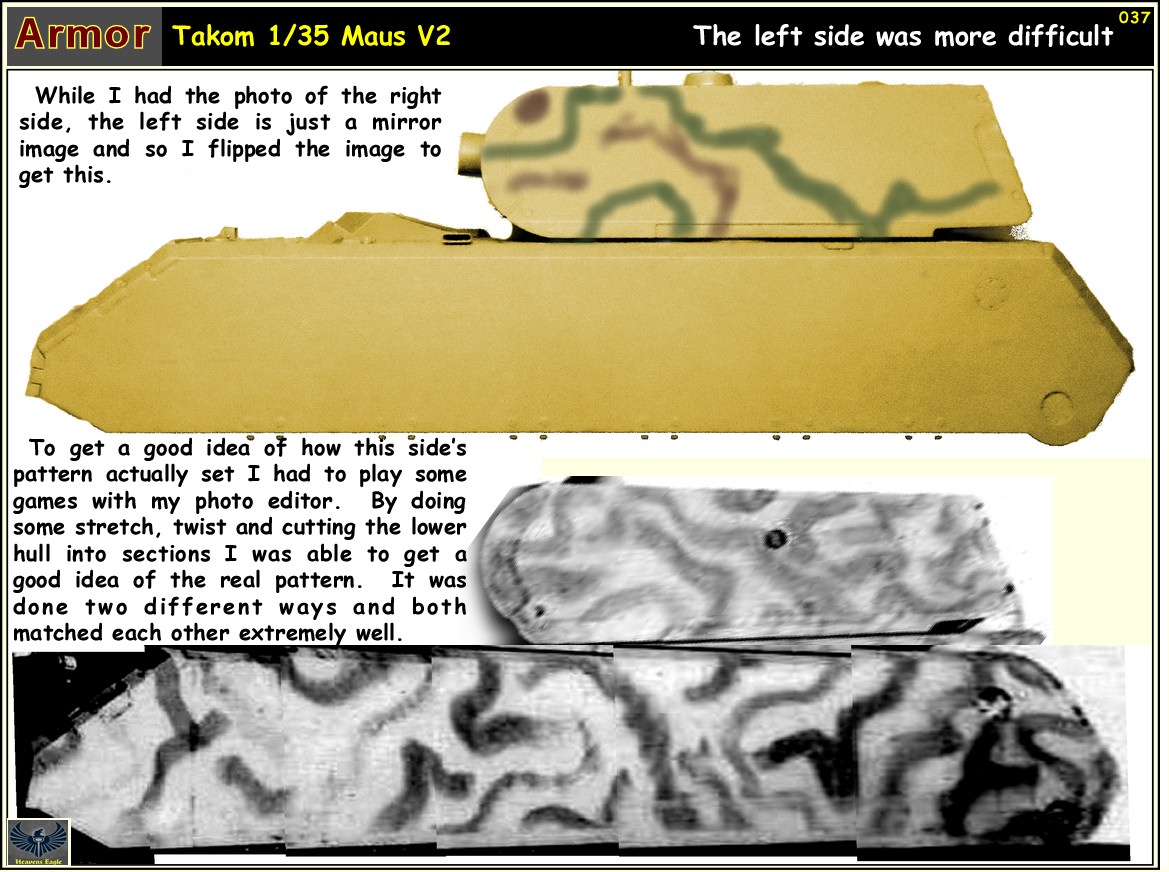
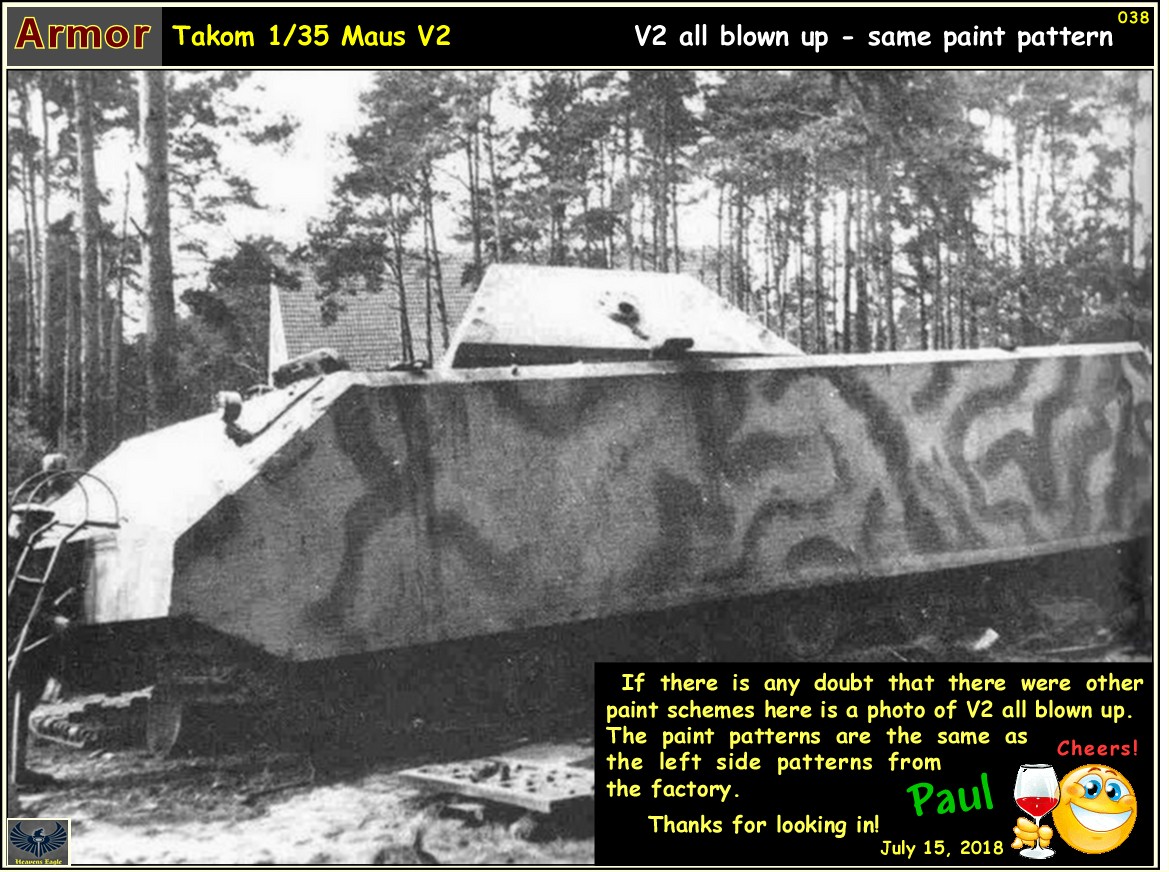
Then it is time for paintwork on this to begin. The instructions in the manual for the camouflaged versions are totally bogus. Both the V1 and V2 were done up in a 3 color camo pattern, but what was in the instructions isn't even close. The photos I have located on the internet pretty much give a decent walk around on the pattern for both sides and the front and back. The photos of the blown up V2 show the top of the turret and it almost looks like there wasn't any camo on it at all, just the sides.

Here is this installment:

Maus_V2-028.jpg


Maus_V2-029.jpg


Maus_V2-030.jpg


Maus_V2-031.jpg


Maus_V2-032.jpg


Maus_V2-033.jpg


Maus_V2-034.jpg


Maus_V2-035.jpg


Maus_V2-036.jpg


Maus_V2-037.jpg


Maus_V2-038.jpg


I also ran across photos where the Germans were building a flatbed to haul this thing on the railroad. There are photos of a hull without turret being used to test loading and unloading the flatbed. It was probably the V2 hull in red primer looking at the dark grey color in those photos. There are then some other photos that show a heavier camouflage pattern on the hull. Those photos are showing the V2 turret on the V1 hull after being captured and assembled by the Russians.

Until next time.
drinking-red-wine.gif
 
A Juggernaut to be sure! One might think the camouflage might be most important on the horizontal surfaces. Roving Jugs, Stormoviks & Rocket Tiffies would have had a Party if they found one of these oozing down a road!
From the air, everything looks like a Target!
 
Thanks Piet!

All those photos are from the internet. All it takes is looking at the details around them to put the pieces together.

To tell the green from the brown I look at the contrast in the different angles. The brown should be a bit darker with a little more contrast than the green. The green and mustard yellow should be similar enough with black and white to reduce the contrast a little.

While it will be a bit of a challenge to get the line work reasonably close to the photos, it shouldn't be too hard as the lines are fairly large and simple. The real trick will be getting the shadings and nuances shown in the photos.
 
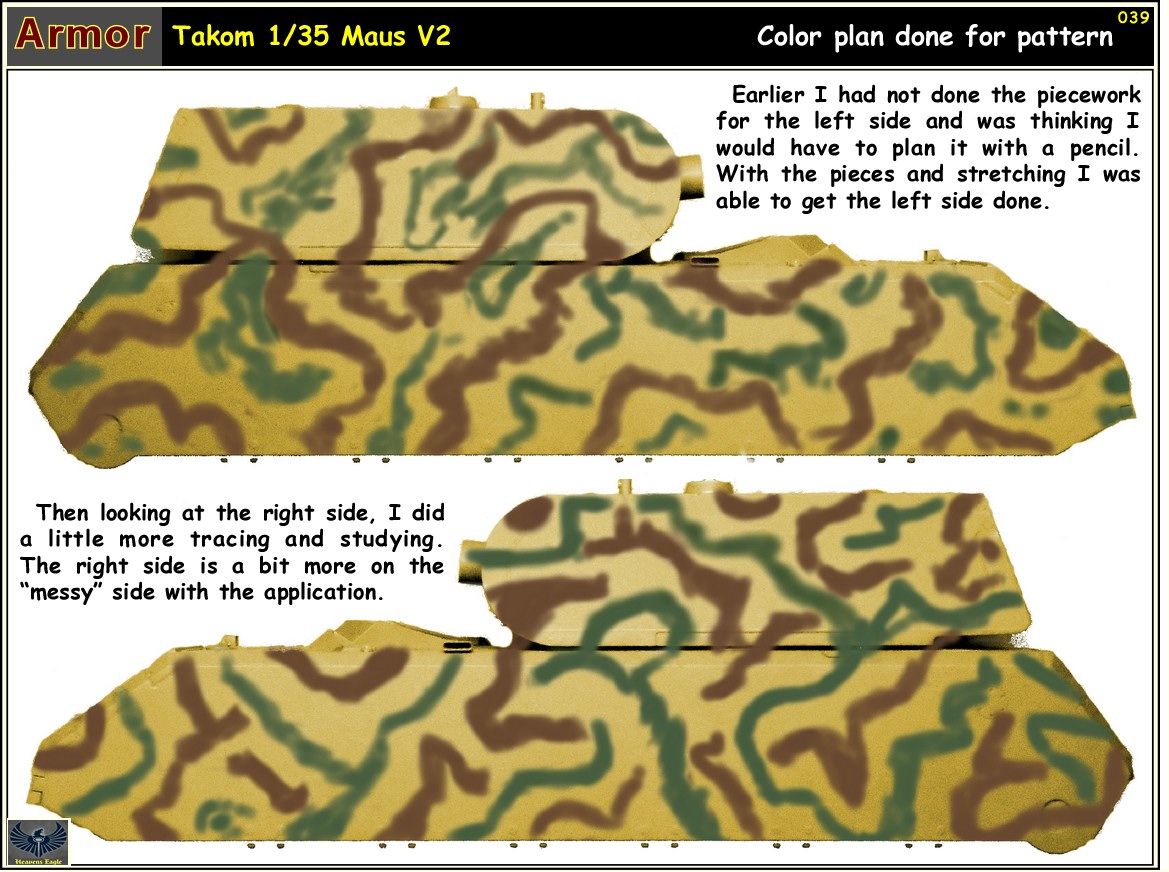
I went ahead and did the final color planning on this and ended up with the following. There will be more for the front and back but for now this is a start.

Thanks for looking in everyone.

Maus_V2-039.jpg
 
Umm, I am not sure if anyone was aware, but the color tests are all in the computer done with software. No paint has been put on the model yet outside of the primer base.

Just letting you know. :hmmm
 
Back
Top