• Modelers Alliance has updated the forum software on our website. We have migrated all post, content and user accounts but we could not migrate the passwords.
    This requires that you manually reset your password.
    Please click here, http://modelersalliance.org/forums/login to go to logon page and use the "Forgot your Password" option.

Scrap Heap Cuban M4A3 (76) HVSS

Sharkmouth

Information Overload
Staff member
Counting all my Shermans, I realized I needed seven kits of the 76mm armed M4A3 variant for the five Easy 8 Korean Tigers, Hyzer's TigerII (VVSS), and the Cuban M4A3E8. I only found six kits. The tigers win so they all were allotted and and I ended up needing one more for the Cuban tank.

Truth be told, I have an ancient M4A3E8 from Dragon when most of the parts were based on Italeri originals. Luckily, the newer DML kits have spare turret shells so an idea hatched in the pea within my head.
M4A3E8_Scrap_001.JPG

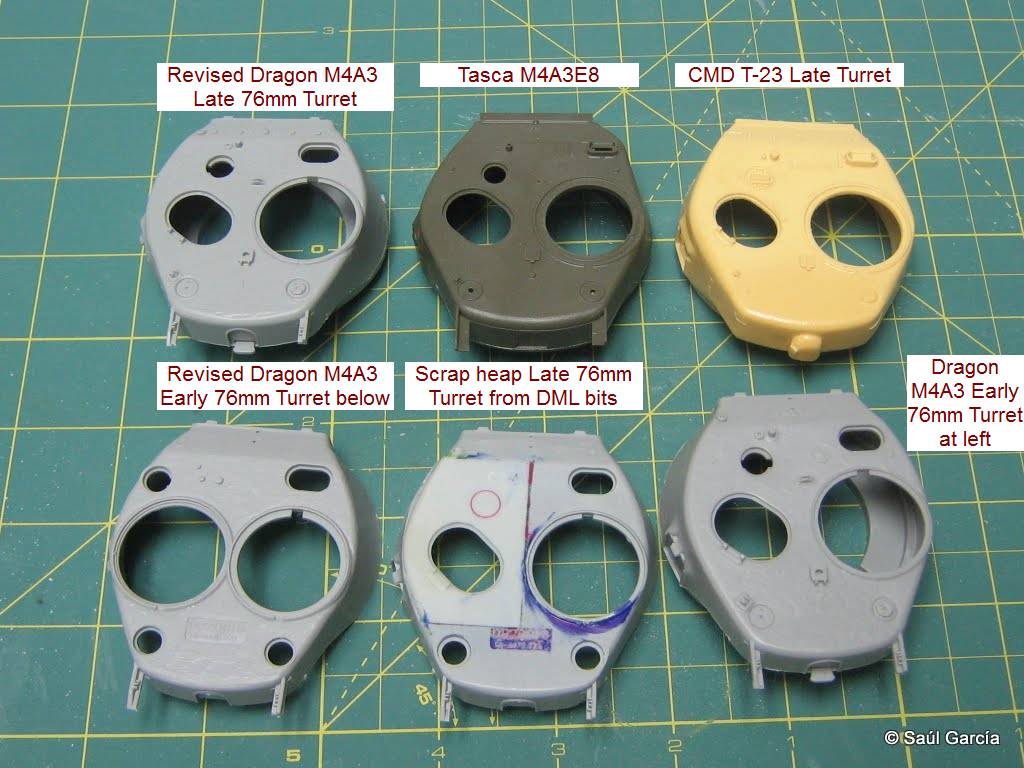
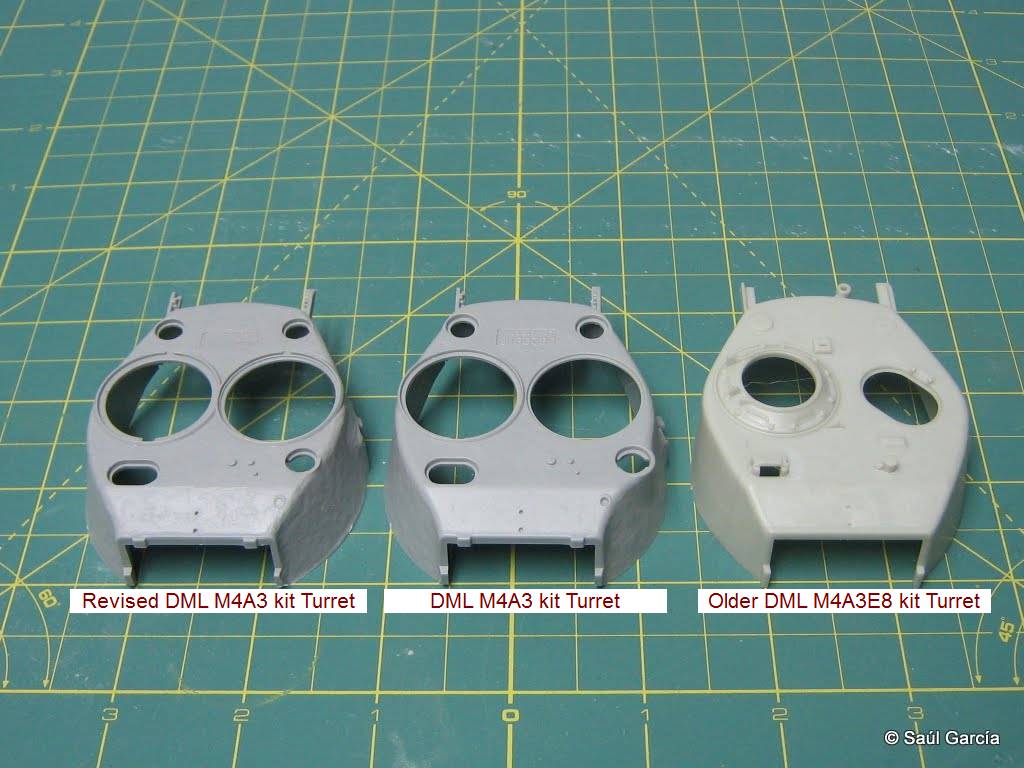
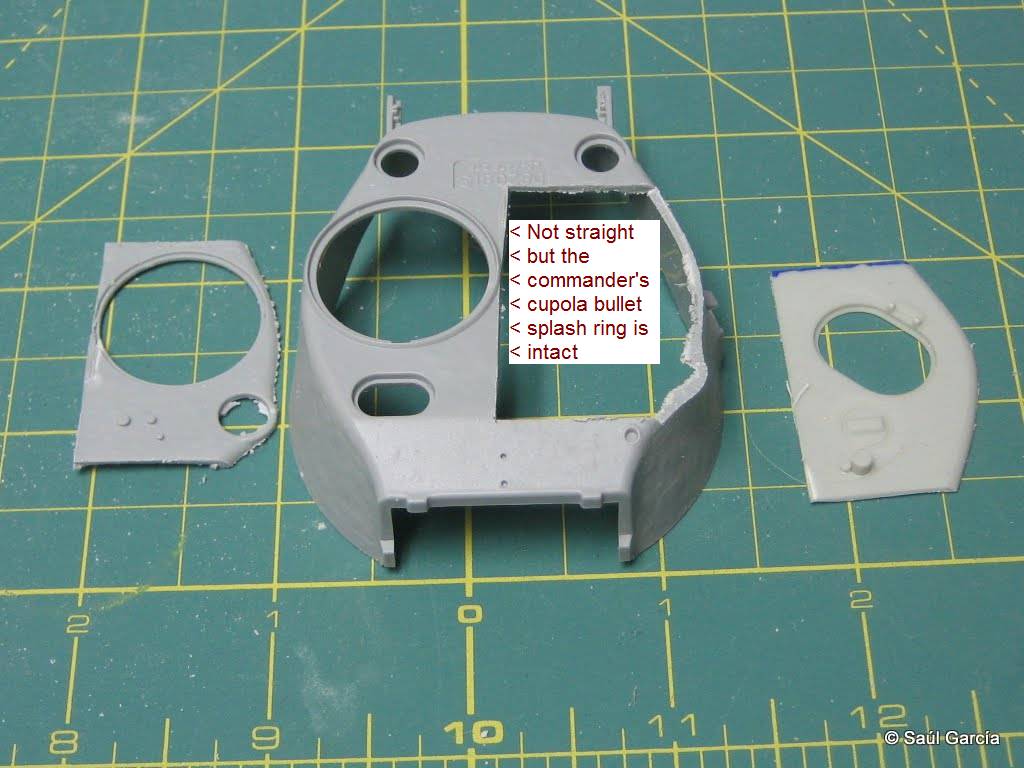
I found two suitable Early 76mm turrets and the old Dragon M4A3E8. Left to right, the turrets are from kits 6183, 6255, and 9009.

A close examination showed me that Dragon revised the early turret and corrected the bulging side so this incorrect one from kit 6255, along with the ancient M4A3E8 turret from kit 9009, would be the donors.
M4A3E8_Scrap_002.JPG

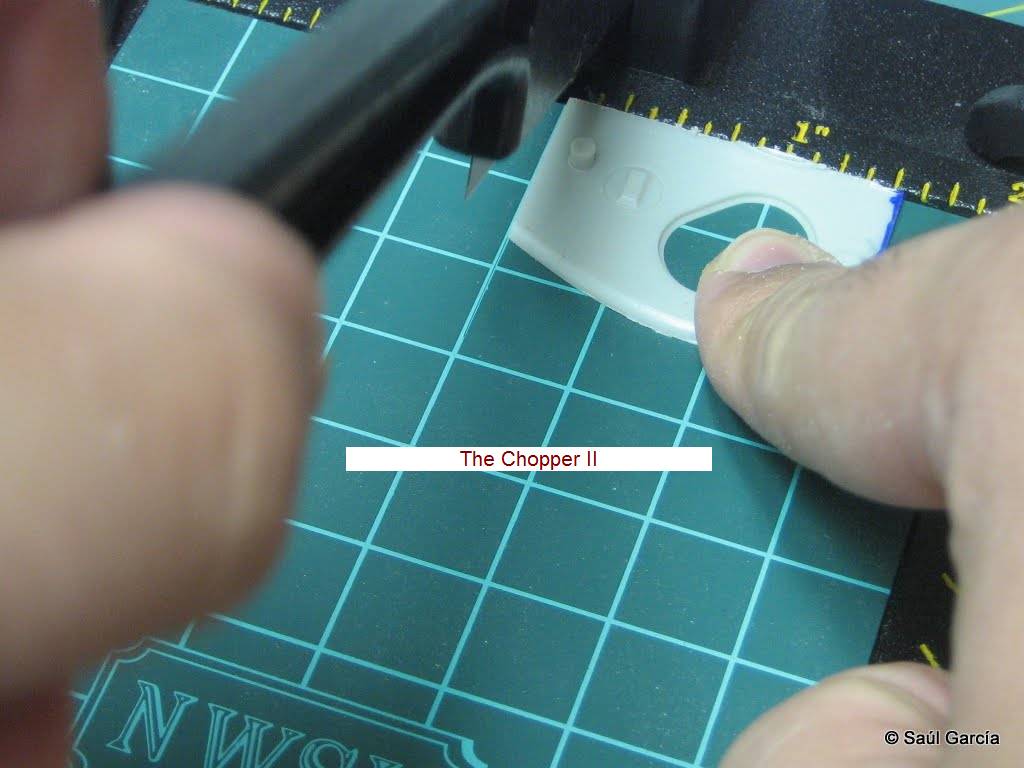
After removing the top section of the older turret (kit 9009), I used my NWSL Chopper II to square up my cuts.
M4A3E8_Scrap_003.JPG

Sharp blades are necessary but saws are faster. Sadly, they flex and are hard to keep straight.
:(

M4A3E8_Scrap_004.JPG

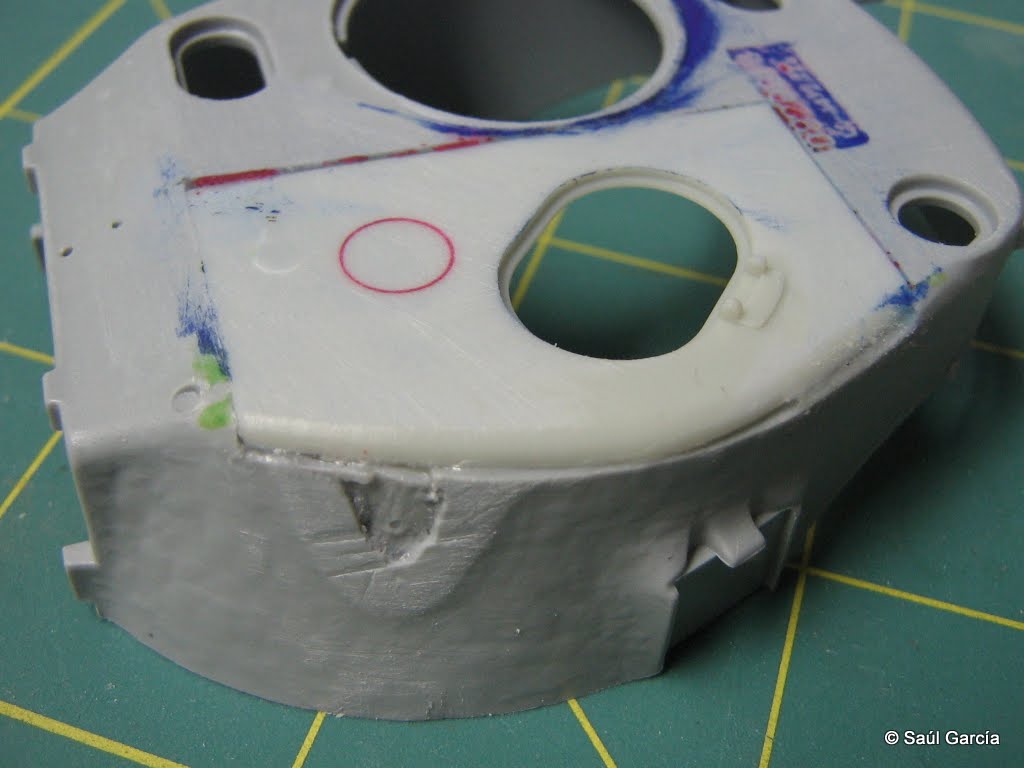
I used Cyrano-acrylate cement to fill all gaps and erased all raised detail other than the loader's hatch hinge.
M4A3E8_Scrap_005.JPG

The turret is now ready for two part epoxy putty to fill and reshape the contours.
M4A3E8_Scrap_006.JPG

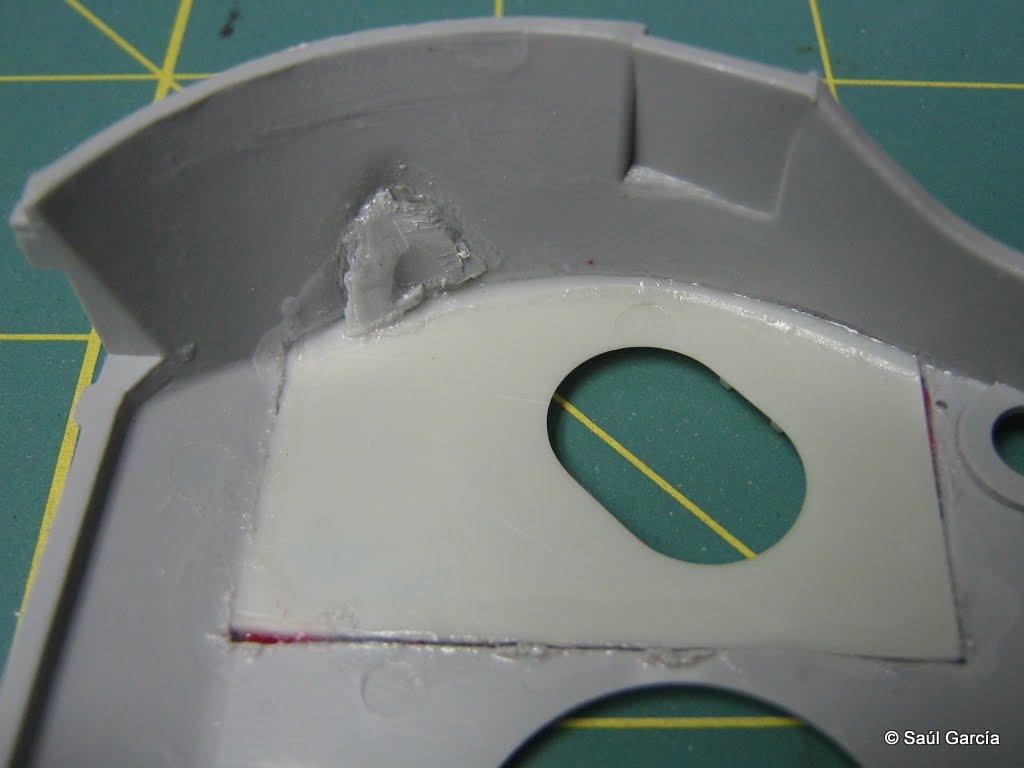
The inside of the turret shell showing where I used the cut off bulge to fill the depression within.

It is now washing in my ultrasonic cleaner to ensure adhesion of the epoxy putty (I plan to use Aves) and then it is time to replace details sanded off such as casting marks (Archer Surface Details) and mounts for the periscope, gun, searchlight, and plug.

Regards,
 
Re: Scrap Heap Cuban M4A3E8

7 gets you 5? I don't follow...what are you doing? Other than schooling us, nicely I may add, on how to chop and fill?
 
Re: Scrap Heap Cuban M4A3E8

...I needed seven kits of the 76mm armed M4A3 variant for the five Easy 8 Korean Tigers, Hyzer's TigerII (VVSS), and the Cuban M4A3E8. I only found six kits. The tigers win so they all were alloted and and I ended up needing one more for the Cuban tank...

I lost me...
:mpup

I thought it would be clear that I needed 7 76mm armed tanks but only had six. 5 easy eights and one VVSS. So I had to make my own seventh.

Like I wrote, I confused myself!
:bm:

Regards,
 
Last edited:
Re: Scrap Heap Cuban M4A3E8

You guys into the egg nog again??? Looks like a great start, Saul!
 
Re: Scrap Heap Cuban M4A3E8

:laugh: :laugh: :laugh: :hmmm maybe I should have a swig of egg nog to get this.

Nice chopping Saul. looking forward to seeing the 6, umm is that 5, or was it 7 shermans. wait let me get the nog.

:ro:

Rob
www.scratchmod.com
 
Re: Scrap Heap Cuban M4A3E8

Well,

My session with the epoxy putty went well. Aves mixed nicely, was used to contour the lower edges of the newer (and wider) Dragon turret to the old P.O.S. turret from their Korean War M4A3E8 set. Sculpting tool of choice is a moistened aluminum dowel from The Small Shop's Brass Assist set. This method of rolling the epoxy putty leaves a fabulous impression of rolled steel.

Sadly, batteries need recharging on my camera so I will try to post tomorrow morning the images.

Rob, the other six (5 M4A3E8 and 1 M4A3 76mm armed tanks) are for my Korean Tigers. This is simply an exercise on old school kit bashing to get the best of the leftovers.

Regards,
 
Re: Scrap Heap Cuban M4A3E8

:eek:hyeah

You can never have to many Shermans. I like what your doing. Can't what to see more!
 
Re: Scrap Heap Cuban M4A3E8

The promised photos:
M4A3E8_Scrap_011.JPG

First application of epoxy putty

M4A3E8_Scrap_008.JPG

Fairing the wider (and correctly so) turret to the narrower base

M4A3E8_Scrap_007.JPG

Allowed putty to dry

M4A3E8_Scrap_012.JPG

Sanded the epoxy down with a sanding stick

M4A3E8_Scrap_016.JPG

Prepared to finish filling the top... note the cellophane packing tape

M4A3E8_Scrap_014.JPG

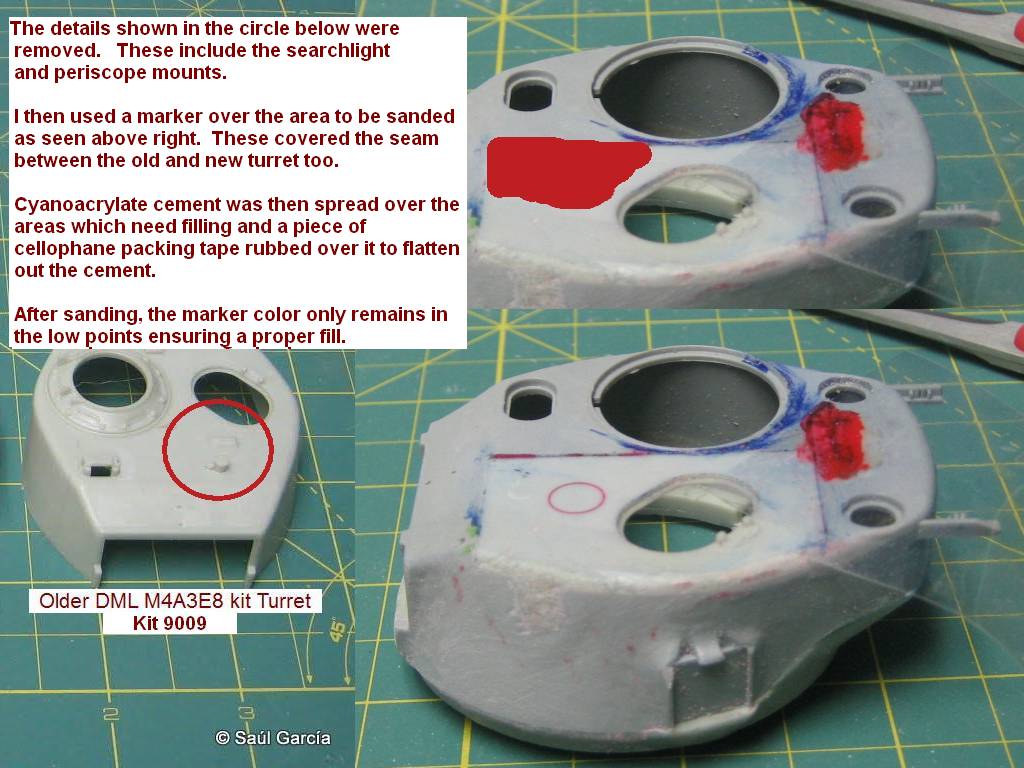
I did not cut myself, I used red permanent marker over which I flooded some cyano-acrylate cement

The cellophane packing tape is placed over the wet cyano-acrylate cement to allow me to use a roller and flatten out the tape. This minimizes the amount of sanding needed. Cyano-acrylate cement does not glue to the adhesive on the cellophane.

I have started stiffening the lower hull to get it ready for chamfering then detailing. I will be using a Tamiya hull which is bare of any details.

Regards,
 
Re: Scrap Heap Cuban M4A3E8

Use CA to fill in gaping holes and use clear packing tape to flatten it. Rock on Saul! I like that. I gotta break out that notebook I had around here somewhere...
 
Re: Scrap Heap Cuban M4A3E8

Hi Saul, I don't quite understand the relationship of the red marker to the super glue. Is that to keep it from totally curing before you roll it out ?

Cheers, Christian
 
Re: Scrap Heap Cuban M4A3E8

I don't quite understand the relationship of the red marker to the super glue.

Hi Christian,

The markers I use (all different colors and rotated after each session) are to gauge my sanding or filing work. There isn't a direct relationship to the cyanoacrylate cement other than the cement dries clear to a plastic like hardness after approximately one hour.

The best way to explain it would be to consider the filled in periscope mount as seen below:
Sanding_Ex_1.jpg


So the marker remains in the filled areas and indicate any high points which require additional sanding. The seam between the new and old turret has remnants of two sessions (red and blue) showing. The third one (black) does not show as my sanding completely removed it indicating that there were no low points, pits, or seams left.

M4A3E8_Scrap_018.JPG


As stated, I prefer cyano-acrylate to other mediums because it dries clear, reaches a plastic hardness in about an hour, then dries rock solid when fully cured.

Regards and hope this helps explain my process,
 
Re: Scrap Heap Cuban M4A3E8

Hi Saul, and thanks for the very good explanation of how to do that. I am sure that will come in handy sooner or latter.

Chrisian B)
 
Re: Scrap Heap Cuban M4A3E8

Some great progress and I really like the how-to part, explains a lot and most helpful.

Rob
www.scratchmod.com
 
Re: Scrap Heap Cuban M4A3E8

A simple update. I plan on using a Tamiya M4 lower hull tub. This is not an issue as many of the early Dragon M4A3 use a radial engine hull tub which is now in the Tamiya box. I also found (left over from the TMD and Formations conversions which replaced these kit parts) a spare Tamiya M4A3 upper hull. This means I will not be using the Italeri upper hull as planned.

Photos will follow to show the simple modification done to the Tamiya upper hull to get the older Dragon (Italeri pedigree) turret to fit correctly.

Regards,
 
Re: Scrap Heap Cuban M4A3E8

Found an extra set of Formations Models M4A3 sponson fillers for the Tamiya kit! Doing inventory, it seems I will be using Academy's HVSS set (from the M4A3 (105mm) kit (which I took the dozer blade for Hyzer's Tiger II) with spare DS100 T-80 tracks from one of the Dragon kits (which received AFV Club T-80 tracks).

Regards,
 
Re: Scrap Heap Cuban M4A3E8

ok now - do i get it right? do i actually watch and reply to a build from you saúl?

do i witness a premiere? really?

i mean ... errrrrrrr ... :unsure: ... i sat in front of this thread for minutes, rubbed my eyes and couldn't believe what i saw - in both accounts, your rework (marvellous) and the sheer fact that i see you building a kit!

and what a build that is! WOW!
 
Re: Scrap Heap Cuban M4A3E8

It is a quick build to keep my mind off things and at the same time fix a spare turret for someone I made a trade with.

I have a set of Bison Decals too for which I helped research so no one complain when I put one of the tracks backwards as this was actually the case!
:eek:

BISON35098-2.jpg

decals to be used, marking is on the upper right.
BISON35098-3.jpg


21Cuban_havana-tank.jpg

The tracks in question...

Regards,
 
Re: Scrap Heap Cuban M4A3E8

Cool! How about the track on the right side - backwards and forward.

This has been fun to watch.
 
Back
Top