
-
Modelers Alliance has updated the forum software on our website. We have migrated all post, content and user accounts but we could not migrate the passwords.
This requires that you manually reset your password.
Please click here, http://modelersalliance.org/forums/login to go to logon page and use the "Forgot your Password" option.
You are using an out of date browser. It may not display this or other websites correctly.
You should upgrade or use an alternative browser.
You should upgrade or use an alternative browser.
russian sherman...finished
- Thread starter fightnjoe
- Start date

russian sherman
You'll enjoy it as it is a good base kit.
Regards,
You'll enjoy it as it is a good base kit.
Regards,
russian sherman
i am looking forward to this as it will be a test of sorts to get me back on track, painting wise.
last night i took some photos of the work that had been done to this point.
backstory:
about ten years ago i bought my boys some kits as they seemed to be interested in building. i bought both boys this kit. both boys started it but didnt get very far. this one is the one that has the least done to it.
so with that being said, if something is wrong to this point i doubt i will go back to fix it. i want to work on my abilities not make this a long term project. from this point on though i will be posting up my work and working on my abilities.
those pics will be up soonish.
joe
russian sherman...starting point
ok here is the starting point.
remembering the work to this point was done by my son. he could be a talented builder if he wished. he did go on to build several cars but has not done any building in many years.


and away we have gone. i did some last night but not much. i will update as needed.
also remember i know very little about shermans.
all comments, critiques, and criticism are encouraged.
joe
ok here is the starting point.
remembering the work to this point was done by my son. he could be a talented builder if he wished. he did go on to build several cars but has not done any building in many years.
and away we have gone. i did some last night but not much. i will update as needed.
also remember i know very little about shermans.
all comments, critiques, and criticism are encouraged.
joe
russian sherman...just for the hull of it
well for my first work on this i continued where my boy left off.
he had basically finished the lower hull.


so with that in mind i started to work on the upper hull. he had begun the work but didnt seem to go very far.
so off we went.


now that is finished minus the tools. so the next step called for in the instructions is to mate the upper and the lower.


and there we are. next up is the turret.
all comments, critiques, and criticism are encouraged.
joe
well for my first work on this i continued where my boy left off.
he had basically finished the lower hull.
so with that in mind i started to work on the upper hull. he had begun the work but didnt seem to go very far.
so off we went.
now that is finished minus the tools. so the next step called for in the instructions is to mate the upper and the lower.
and there we are. next up is the turret.
all comments, critiques, and criticism are encouraged.
joe
russian sherman...just for the hull of it
Not a bad start Joe.
Not a bad start Joe.
russian sherman...just for the hull of it
I know this is your son's doing but, what are these things in the circle?
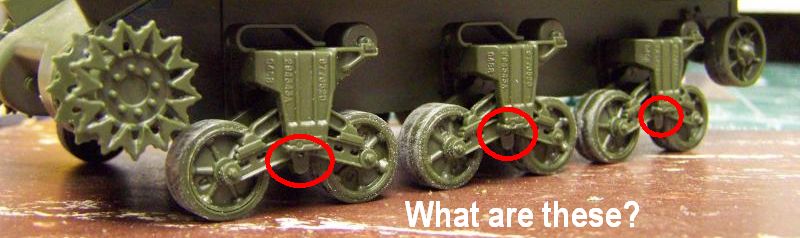
Look at this comparison on PMMS and see what it should look like:
http://www.perthmilitarymodelling.com/reviews/vehicles/misc/vvss/vvss.htm
Regards,
I know this is your son's doing but, what are these things in the circle?
Look at this comparison on PMMS and see what it should look like:
http://www.perthmilitarymodelling.com/reviews/vehicles/misc/vvss/vvss.htm
Regards,
russian sherman...just for the hull of it
saul i missed that. cant tell you what it is unless my son assembled the boggie wrong. havent had a moment to go to look at it yet. but regardless they are one piece now. he used a bunch of glue and those hummers are rock solid now. looks like they stay.
all thanks for the kind comments. honestly i am finding myself with kind of a blah feeling. just making the motions with this build. going to have to pull out another challenge build to get my juices flowing again.
joe
russian sherman...well shoot
well dang it this has been an interesting build so far. some stuff just ....................well dont look right.
this update begins with a step back. i was working on the turret and got the barrel together, horrible seam. did a little sanding and then looked to see how it was coming and noticed the barrel was oblong in shape. first i tried to sand it to the right shape, no go.


with that i figured why not. it isnt like it is the end of the world right.
nah...................i cannot let it stay like that.
before i knew it............


and as you can see i put some putty on the turret. there was a major seam. my sanding removed the molded texture so i tried to mimic what i had seen on how to fix it.


i know it isnt the greatest but it is what it is.
all comments, critiques, and.............................criticism (might regret that this time) are encouraged.
joe
well dang it this has been an interesting build so far. some stuff just ....................well dont look right.
this update begins with a step back. i was working on the turret and got the barrel together, horrible seam. did a little sanding and then looked to see how it was coming and noticed the barrel was oblong in shape. first i tried to sand it to the right shape, no go.
with that i figured why not. it isnt like it is the end of the world right.
nah...................i cannot let it stay like that.
before i knew it............
and as you can see i put some putty on the turret. there was a major seam. my sanding removed the molded texture so i tried to mimic what i had seen on how to fix it.
i know it isnt the greatest but it is what it is.
all comments, critiques, and.............................criticism (might regret that this time) are encouraged.
joe
Sherman 18
Master at Arms
russian sherman...well shoot
")
Looking good.
Don't forget to mold in the pistol port.


Also on Shermans it is okay to have the seem on the turrets, the were made with a seem from the mold
Looking good.
Don't forget to mold in the pistol port.
Also on Shermans it is okay to have the seem on the turrets, the were made with a seem from the mold
russian sherman...well shoot
I always thought that was where they chunked out spent shells. :facepalm
Looking good.
Don't forget to mold in the pistol port.
Also on Shermans it is okay to have the seem on the turrets, the were made with a seem from the mold
I always thought that was where they chunked out spent shells. :facepalm
russian sherman...turret work
james thanks for stopping by.....
the update.....
work commenced to get the texture better.
sanding and more sanding led to this.......


better i think.
then construction commenced and was completed on the turret.


and that my friends brings the construction of this to a finish i think. at least the destructions dont show anything else but tools and the ma duce left.
with your ok on this i will now move forward with primer.
all comments, critiques, and criticism are encouraged.
joe
james thanks for stopping by.....
the update.....
work commenced to get the texture better.
sanding and more sanding led to this.......
better i think.
then construction commenced and was completed on the turret.
and that my friends brings the construction of this to a finish i think. at least the destructions dont show anything else but tools and the ma duce left.
with your ok on this i will now move forward with primer.
all comments, critiques, and criticism are encouraged.
joe
Similar threads
- Replies
- 0
- Views
- 512