iambrb
Well-known member
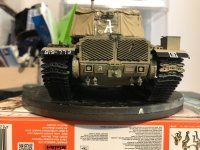
Well, I guess I got a bit too cocky, and made a mistake! I wanted to make the tracks and running gear removable, but had already attached the return rollers. So I figured I would just paint the lower hull and the tracks to make it easier. OOOF, not a good idea! The paint was the old Model Masters Enamel IDF Sand Grey, and upon further investigation, it appeared that this may not be the right color – ARGH! Also, as I am sure most of you know & I just learnt the hard way, painting means t you have to turn around and remove any paint on a surface you intend to have adhesive. So I spent the last 1.5 days, maube 10 hours total, fixing the issue. I also built up the tracks. The tracks are 101 links per side, and they require 5 cuts per link to remove from the sprue, so you’re looking at a handy 1002 cuts to ge them off, less any cleanup, plus the pins (see below)

Here I did not care for the little jig that Meng provides. I found it simpler to do them three at a time. Just attach the ‘nub inside that one track, rock together, and pin as shown:
[URL='https://i.imgur.com/Yt1TG5Z.jpg%5b/img']https://i.imgur.com/Yt1TG5Z.jpg[/img[/URL]]
[img][URL='https://i.imgur.com/xhTDIwf.jpg%5b/img']https://i.imgur.com/xhTDIwf.jpg[/img[/URL]]
[img][URL='https://i.imgur.com/xHpRwZn.jpg%5b/img']https://i.imgur.com/xHpRwZn.jpg[/img[/URL]]
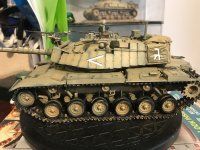
Really built up pretty easy. Next I had to then all the mounting points for the running gear, then mount/remove as needed to determine where wheels fit on the track, then get that attached. As you can see, one side, no prob, but another fell apart when I tried to remove it for pictures, so I get the fun of that repair.
[img][URL='https://i.imgur.com/w6ZZZKB.jpg%5b/img']https://i.imgur.com/w6ZZZKB.jpg[/img[/URL]]
[img][URL='https://i.imgur.com/CiD31f5.jpg%5b/img']https://i.imgur.com/CiD31f5.jpg[/img[/URL]]
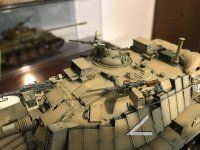
I can’t fault Meng for me being a knuckle head. And in retrospect, had I followed the instructions, I would be ready for paint, so anyone thinking of doing this kit, keep that in mind. So for the next day or so it’s all about the repair and getting the upper hull on and ready for paint. Till then!
Here I did not care for the little jig that Meng provides. I found it simpler to do them three at a time. Just attach the ‘nub inside that one track, rock together, and pin as shown:
[URL='https://i.imgur.com/Yt1TG5Z.jpg%5b/img']https://i.imgur.com/Yt1TG5Z.jpg[/img[/URL]]
[img][URL='https://i.imgur.com/xhTDIwf.jpg%5b/img']https://i.imgur.com/xhTDIwf.jpg[/img[/URL]]
[img][URL='https://i.imgur.com/xHpRwZn.jpg%5b/img']https://i.imgur.com/xHpRwZn.jpg[/img[/URL]]
Really built up pretty easy. Next I had to then all the mounting points for the running gear, then mount/remove as needed to determine where wheels fit on the track, then get that attached. As you can see, one side, no prob, but another fell apart when I tried to remove it for pictures, so I get the fun of that repair.
[img][URL='https://i.imgur.com/w6ZZZKB.jpg%5b/img']https://i.imgur.com/w6ZZZKB.jpg[/img[/URL]]
[img][URL='https://i.imgur.com/CiD31f5.jpg%5b/img']https://i.imgur.com/CiD31f5.jpg[/img[/URL]]
I can’t fault Meng for me being a knuckle head. And in retrospect, had I followed the instructions, I would be ready for paint, so anyone thinking of doing this kit, keep that in mind. So for the next day or so it’s all about the repair and getting the upper hull on and ready for paint. Till then!


")