• Modelers Alliance has updated the forum software on our website. We have migrated all post, content and user accounts but we could not migrate the passwords.
    This requires that you manually reset your password.
    Please click here, http://modelersalliance.org/forums/login to go to logon page and use the "Forgot your Password" option.

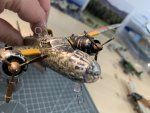
Ki-49 Donryu "Helen" in 1/72 - Finished

Flyingbabydoc

Well-known member
Hi again,

This is more of a long-term project with a Hasegawa 1/72 Ki-49 with lots of PE from Eduard and ground crew from CMK kits.

Still not sure which version to make, kinda leaning towards this one:

Ki-49 - II.jpg


But these two are still an option.

Ki-49 - I.jpg
Ki-49 - III.jpg


What do you think?

Here the initial pictures:

IMG_4137.jpg
IMG_4138.jpg
IMG_4139.jpg

Thanks for looking,

Cheers

Alex
 
Thanks again Paul I dread working the seams because of the dust. With knife-chipping it is a bit better.

Which cammo do you prefer?

Cheers

Alex
 
Great subject!! I like the first one you picked. That second camo job is just nuts...wow...nuts.
Remember go slow and test fit everything again and again before gluing. When painting divide the plane into small sections such as top of the wing from the root to just past the engine nacelle, and then from the engine nacelle to the wing tip. That should help in preventing large brush storks in the paint.

Looking forward to seeing this one come together.
:victory:
 
Thanks Master that is an idea but I have tried once and the whole plane became, sort of, muddy... I will give it another go.

Cheers

Alex
 
Just do what your comfortable with but try a few new tricks to push yourself a little.
 
I understand the dust. Something I use is metal files. I stroke them until they load up then wipe the "dust" out on a towel that is on the seat of my chair. Something else to do is fit the parts carefully and do a fair amount of test fitting. On some kits I remove the alignment pins to get a better alignment, Once done you could take a sharp scraping blade and shave the seam down. You can also fill the seam with CA and add accelerant to it, Keeping the fine dust in the air down is of the most importance to you I am sure. I do a lot of scraping and carving which makes shavings but not necessarily dust. Something to ponder.

As to the pattern, it is really up to you and what you really want to attempt. They all look interesting. The squiggle one would be one heck of a challenge on a 1/32 scale plane. On 1/72 it would be insane.

Hey Eric! We need a video demonstrating wet sanding. Yeah it can make mud, but the point is to keep adding water and rinsing and wiping away the "mud". If it is so thick that that it is like a paste you need to dip the paper in the water bowl and rinse it out. Also it is ok to take a paper towel or other item to wipe off the "mud" as it gets thick.

The trick is to use a fair amount of water. The water carries away the "dust" rather than blowing it into the air. Hold the model so the extra water with mud in it drips into the bowl of water and keep dipping the sandpaper into the water to keep the area VERY wet.

Also a couple of drops of dish soap in the water will help.
 
I only do a small section at a time . Repeat if necessary . Rinse under a faucet when ready to paint .
The water also neutralizes the static charge caused by sanding .

Cheers, Christian
 
Hey Eric! We need a video demonstrating wet sanding.

Actually I've been thinking of starting a video series on "TTPs" (Techniques, Tips and Paint). So this would make for a good episode on sanding, making your own sanding sticks and wet/dry sanding. :hmm:
 
Last edited:
Nice Alex!!

I personally vote for the 3rd option!

That Hasegawa kit looks to be better than the old Revell kit I built a year or two ago!
 
Personally , I would do the wave pattern . No one ever does that and I don't think you could go wrong .
Cheers, Christian
 
Alex I just got caught up with this. I'm eager to see what you decide to do.

Also congrats! This is one plane I don't have in my extensive collection!
 
Hi Friends,

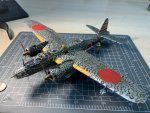
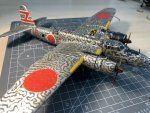
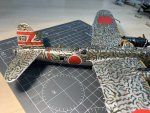
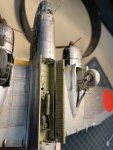
So after a long pause I am back. The Helen is almost completed, I won't bother you with the whole construction pictures just show you the pre-final result without the weathering and with the masks still on.
I did the squiggly line, if you look it is one continuous line from one end of the aircraft over both wings to the other end. It took me a loooooong time to finish. But I am happy. I will post pictures of the diorama as soon as it is finished.

Thanks for looking. I will try to come to the forum more often. It has just been sooo hard with the SARS-CoV-2 pandemics.

Cheers

Alex
IMG_4199.jpg
IMG_4201.jpg
IMG_4202.jpg
IMG_4203.jpg
IMG_4204.jpg
IMG_4205.jpg
IMG_4208.jpg
IMG_4209.jpg
IMG_4210.jpg
IMG_4211.jpg
IMG_4212.jpg
IMG_4213.jpg

IMG_4199.jpg
IMG_4201.jpg
.
 
Thanks a lot Bob, Erik and Gary. Much appreciated. It was a bit of a challenge to keep it all under one line. I had fun with it - good mental gymnastics.

I will fast forward and show you the finished model. I quite like it although the glassing was a pain to get as clean as possible - the masking did not work as well as I wanted.

I have built a small diorama for that one, the link is here:

Thanks for following. Cheers!

Alex

IMG_4436.jpgIMG_4437.jpgIMG_4438.jpgIMG_4439.jpgIMG_4440.jpg
IMG_4436.jpg
IMG_4437.jpg
IMG_4438.jpg
IMG_4439.jpg
IMG_4440.jpg
 
Back
Top