• Modelers Alliance has updated the forum software on our website. We have migrated all post, content and user accounts but we could not migrate the passwords.
    This requires that you manually reset your password.
    Please click here, http://modelersalliance.org/forums/login to go to logon page and use the "Forgot your Password" option.

Hansa-Brandenburg W.12

Thanks everyone. Okay fuse together and floats decalled. Second treatment done on second float. Started engine and I must say I'm not thrilled with it. Seems to be very simplistic and not up to the usual WNW standards. Also top wing together and now I just need to fill gaps and get ready to paint. Engine and rad just sitting there to see what it will look like.

DSC05073.JPG


DSC05074.JPG


DSC05075.JPG


DSC05076.JPG


James
 
That's looking beautiful James!!

So, I have a question for the W.12. Did HB just pull that top wing off for the W.29 or did they actually make the lower wing larger (i.e. increase the chord length)??
 
Well it is basically the W.12 minus the top wing. It is based on the later W.12 with longer fuselage.. Looking at it they also deleted the pilots side doors and added some struts. As far as I can ascertain.
James
 
Got the floats and cabanes and struts painted. Looks pretty sharp if I do say so myself. Just dryfitting them in this pic.

DSC05077.JPG


DSC05078.JPG


DSC05079.JPG


James
 
:hmmm :pinch: oops.
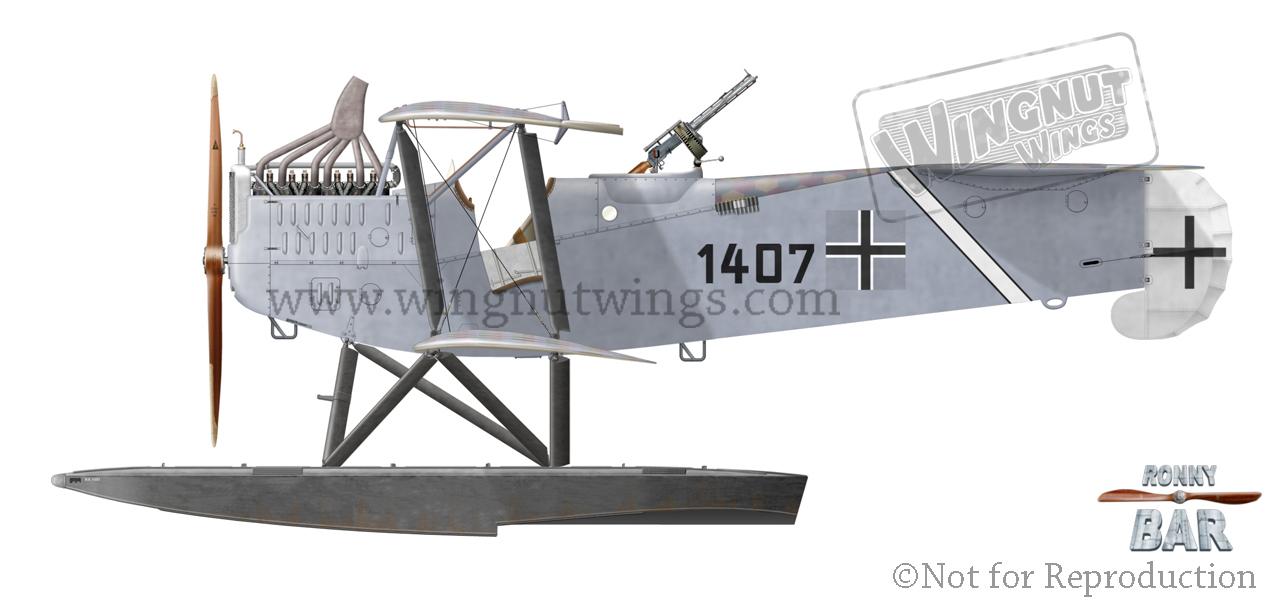
Okay a major problem as far as I can see is the decals for the floats. They do not settle very well. Another fellow also had the same issues. For and aft there are sharp close spaced ridges. The other fellow tried heat I tried Mr Mark Softener which is the hottest solvent I am aware of for decals. I got the first float okay but on the fourth treatment on the second float I killed the decals. So I ended up removing what I could and then cleaning up. Then I when for scheme D

D-Hansa-Brandenburg%20W.12%201407%20C2MG,%20Norderney,%20July%201918.jpg


It ends up being a bit more colourful in that it has a white tail and bitumen coated floats cabanes and braces. It also has the option of a lighter belly. Not the crested one I wanted, but c'est la vie.
Now I am wondering if I should try and make masks and paint the wings instead of decals.
James


Oh James, I feel your pain with the decals . It just seems that some should be kept off market.

Never the less I think this will be a very interesting airplane to see completed (y)

Cheers, Christian
 
Well 0dark30 this morning went and worked on exhaust. Cut it to size as per instructions then drill a couple of holes and then used the new flash sanding bits I got to hollow it out. Not a great picture but I had a tough time just taking it.

DSC05080.JPG


Also in for a penny in for a pound. I started shaving off the push rods on the engine. Now I just need to clean it up and then scratch new ones.

DSC05082.JPG


Unfortunately went out shopping and managed to aggravate my neck enough that I cant do much of anything right now. At least the T3 and heating pads helped some and I can feel the pins and needles in my hand. I hope tomorrow I can do more.
James
 
Well had a tough time the other day and my airbrush spit all over. Then the bottom seam sprung. I put this away and sat there dejected. Today felt better and I tried again. I sanded the splatters down and resprayed. I rigged the floats but you cant even see it. And I started decaling. So here is were I am right now.

DSC05091.JPG


DSC05090.JPG


One thing I have to figure out is the cross on the side. Looking at the instructions colour plate and at a black and white picture, it looks like the old cross was painted out in a box and the new cross put on. The instructions dont say anything. So wondering if I should mask a box and hope its in the right place or apply the old style cross and then mask and paint it out, then apply the new cross. Will think a bot. The wings are just loosly fitted because I lack this thing called patience and wanted to see what it looked like.
James
 
Looks very nice James!

I have to say I like this scheme better but it would have been nice to use that crest on the fuselage!
 
Why not just overlay the newer decal on top of the old. Maybe it's opaque enough to get the effect you're looking for.
 
Okay will reserect this one. Got the new Hex decals from Aviattic last friday and today I stripped the old hex decals off the wings. I hope to put the new decals on this weekend. I also have the new Pheon decals and was kind of toying with making a subject change. Instead will go ahead with my original plan and ordered a new HB W.12 so in the near future I can build 2 more of these gorgeous birds. So there is where I stand on this at the moment.


James
 
Back
Top