• Modelers Alliance has updated the forum software on our website. We have migrated all post, content and user accounts but we could not migrate the passwords.
    This requires that you manually reset your password.
    Please click here, http://modelersalliance.org/forums/login to go to logon page and use the "Forgot your Password" option.

Finished Build 1/48th KV-1

RRiviezzo

New member
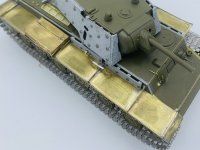
This was a build I finished a couple of months ago. It is Tamiya’s 1/48th scale KV1 with Appliqué Armor. It was a fun project and went surprising well. As with many Tamiya 1/48th scale kits, the detail was very soft on some areas. I added the flame cuts to the whole kit as well as weld beads as they are not represented on the kit. I decided to use stretched sprue to save myself some time. The flame cuts were made using the side of an Xacto blade and blended in with Tamiya extra thin. The armor texture was done using Mr. Surfacer 500, stippled with a brush and sanded down. The fenders, tool boxes, air intakes and other details are from Aber. I was going to use the Aber barrel but it is grossly under scale from what I can see, so I went with the kit barrel. I also added the lifting handles to the rear deck using .32 wire. The bolts on the fenders were done using RP Toolz punch and die set. They are slightly out of scale but look good to me. I made the headlight bulb by melting solder on the soldering iron and allowing it to ball up. I also added the air intake louvers with plastic strip. Lastly I used Fruil Model tracks. Thanks for taking a look and any comments and critiques are appreciated. 265DA737-47F5-4A4B-8FAF-86BDB2E9BC0E.jpeg4E97EA13-344E-4CD5-A4AE-79C284F0CA11.jpegBF83828B-9516-41C2-B2E3-79836F2A8135.jpegAC73502E-F33D-4B63-8CEB-206FC5D2A8E7.jpegB910309A-AFF1-46E2-B970-06AC922B3224.jpegF1C77BF0-168A-4C21-A56E-A84C3F5BE333.jpegB5883911-A13C-4486-B7F1-CCF886D05902.jpeg9B9AF01B-76B2-49B1-8FC9-11D57C392117.jpeg5FF98D18-4DE6-4031-9EAC-4E867D42B654.jpegF3BC528A-84E3-422A-8547-57232F444C3C.jpeg031FC2DB-AE18-440B-921D-5A9CE2A18D4D.jpegD1113A45-EB05-48A6-8244-505D3945150E.jpegF2CF4A0C-5692-426C-99B7-C239D7735012.jpeg02E2AB90-0388-4A0F-9998-FF6DB4BEA8B9.jpeg282B9B0E-1C08-47CD-990F-D44AB22226C1.jpeg88B82322-C459-4B7E-94EC-121E19CFB80F.jpeg2CDB849E-785F-4BFB-850B-8BB717A5F543.jpegE3ED98DA-65AC-4070-86EB-00195146AE1D.jpeg
 
Nice! love the brass works. I think you're soldering brass on brass but I can't tell what you're fixing it to the plastic with. Looks grey?
Thanks MP, It’s all soldered up. The photoetch fenders were first glued to .5 plastic card then glued to the model. The grayish blue color is the mr. surfacer to blend the photoetch and plastic card together and to give it more scale thickness.
 
What tool do you use for soldering? I like the idea of the plastic card as a medium between brass and the kit. And in 1:48!! :notworthy
 
Lots of metal going on,looks great,have not done a 1/48 tank in awhile but they are what got me started in armor again
 
Great work there Rob! Love the detail!

I have to ask though as I am curious, why build naked models?? I haven't heard of anyone building in this way and have only seen naked models to say show off the construction or to show how after market items fit.

It's a new, refreshing way to see a completed model. Really shows off the building skill.
I do paint, but I do prefer to build more. I do like to show the model in its build form to show the work that sometimes goes into the construction. I’ve made a 2021 resolution to try and get I then spray booth more this upcoming year...
 
Back
Top