• Modelers Alliance has updated the forum software on our website. We have migrated all post, content and user accounts but we could not migrate the passwords.
    This requires that you manually reset your password.
    Please click here, http://modelersalliance.org/forums/login to go to logon page and use the "Forgot your Password" option.

Ferrari 312T FINISHED

paddy

Well-known member
s-l1600.jpg


So..off we go then. I have to say for the first time in ages i am really looking forward to this build. :)
Looking in the box things look very promising for a 50 year old kit. I tend to think with tamiya that a 1970s kit is on a par with your average 1990s kit from most other makers.
This one, on the face of it looks like it will reach that expectation and even surpassed it....we shall see :)

_DSC0071.JPG


Where to start when in aircraft mode still ?? Well its got wings, a cockpit, an undercarriage of sorts :)
I had planned to start on the cockpit tub


_DSC0075.JPG


this is just 2 parts, what you see and a base/underside. The finish should be alloy. The options are

A/ Aftermarket PE panels ( the set is over the cost of the kit and well over $100) so thats not going to happen
B/ Make your own metal panels from thing gauge alloy sheet
C/ Paint it
D/ Bare metal foil
E/ A mix of above.

Well the jury is out because if you fit all the body panels nothing of the tub will be seen. I have ordered some very thin alloy sheet and i have some bare metal foil so i am keeping my options open...for that reason i will start with the engine.

_DSC0077.JPG


These are the basic parts above

_DSC0079.JPG


The fit is so good they basically snap together


_DSC0082.JPG


I painted it what MRP call dark aluminium, this doesnt really look right, i should have used a dark primer rather than light grey


_DSC0083.JPG


Here it is with a dust coat of MRP steel over the top which has darkened it

_DSC0084.JPG


And here it is with a flat coat which has darkened it a bit more.

Thats it, we are up and running. :cool:
 
Last edited:
Do you hear that sound? A faint whirring, humming noise from across The Pond?
This Ferrari powerplant is about to be Paddy-fied!
 
first problem or rather . challenge
Later versions of this model have mesh filters for the trumpets but this early version doesn't.

1975-Ferrari-312T-engine-scaled.jpg


any thoughts :) ??
 
A quick experiment shows i can make the mesh but stamping out a mesh disc with a hollow punch and shape them but it leaves a really messy edge
_DSC0085.JPG
_DSC0086.JPG

For scale the trumpet is 5mm across at the widest point
 
I built this one back in the 80's and then kept all the bits for some scifi conversion stuff - nice kit and way ahead of the pack for its day and should still holde its ground even now!
Good luck.
:popcorn
 
I'd say that's a fix. Can you trim up the mesh a bit now it's in place? Maybe a small piece of wire around the bottom to simulate a support frame?
 
Maybe a small piece of wire around the bottom to simulate a support frame?
Seconded as it works. Did that ages ago for a T-50 Russian tank which had the mesh in a strange shape to keep leaves fouling it. For the 7TP Polish tanks, same thing, but I was lucky enough to have the plastic part from the Mirage kit, to form the mesh over.

In other words, you don't need us as you did it!
:good:
 
Wow lan that is Great!

Worthless factoid of the day. The Ferrari V12’s used in racing are different that that used for road going cars, BUT. The F50 did sport the correct race program V12, albeit tuned for road use
 
I did some plumbing today, electrical and fuel but strangely it didnt really look right.
I checked the plug lead dia and the fuel pipe dia in 1/12 scale and they are spot on. It was only after i took a picture i realised its the red sleeving ;)
It would look OK in the back of a 1/1 radio but its not 1/12

_DSC0103.JPG


So i carefully cut it off and now it looks 100% better

_DSC0108.JPG


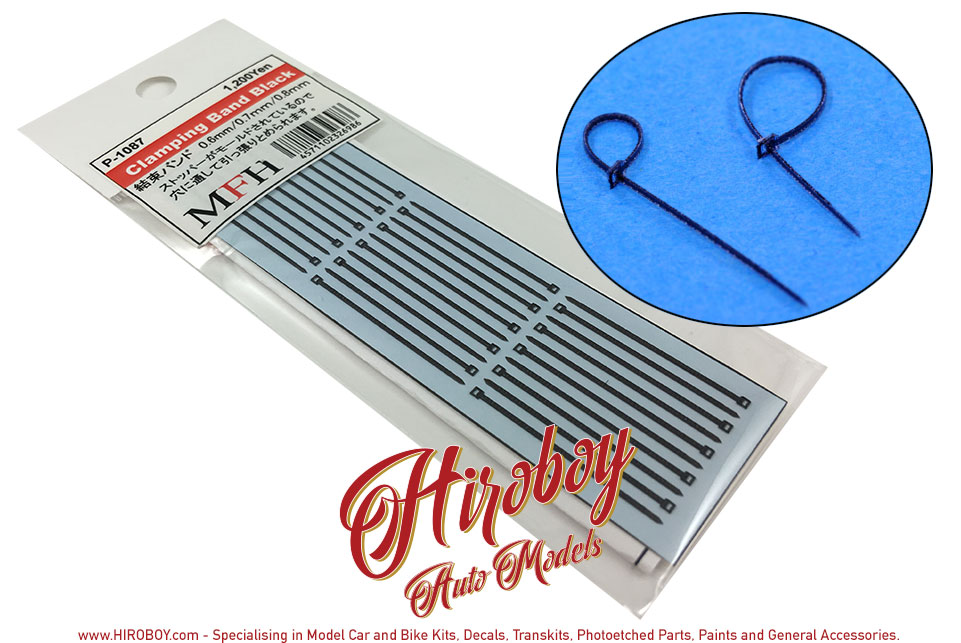
one thing i had trouble with on my vintage race cars was bunching cables , i tried all sorts to replicate cable ties like bits of scrap PE and Bare metal foil but i never got it sorted ? any thoughts ?
 
Yea i know what you mean but this stuff is 0.7mm which x12 , is 8.4mm true size and that exactly what i sell for motorcycles.

The fuel pipe is 1mm so 12mm in real life and again thats standard on a Ducati

May be they made the engine too small :)
 
i tried all sorts to replicate cable ties like bits of scrap PE and Bare metal foil but i never got it sorted ? any thoughts ?
Something like this? By the way, it is in stock even though it is made by Hiro Boy... SHOCKING! :wow:
1728847506724.png

Strips of plastic, since ties aren't thin, but the buckle you'd need to make one and squash cast the rest. Since they're small, even slightly blemished casts can be used as you simply rotate them out of clear view!
 
Cheers Saul i have put a set in my basket for my next order

I Think "Model Factory Hiro" MFH are not the same as the UK seller HiroBoy, fortunately spot model, although in Spain deliver within the week to the UK anyway and are way cheaper than HiroBoy

Hiroboy £11.98
Spot model £6.81

 
Last edited:
Last edited:
@jknaus, you have just solved my fabric mesh dilemma for the AH-1G Cobra intakes! All the PE is too coarse and the metal ones have wires that are too thick! Cool! I need to raid my wife's tea box before she comes home. :yipee: :good::shark:
 
Back
Top