
White_Wolf
Master at Arms
For the past two months I have been working on a little project that took most of my time. Life has been totally mad since the beginning of May, little have I imagined it would be like that. Mind you, I had been warned .... on Chinese New Year we went to a nice RSL club (veterans' club) where a Chinese guy read our fortunes using their magic. I swear to God he was right. Anyway, enough with the whinging ...
The idea of this little thing is a diorama to show the 1914-2014 now and then kind of a thing. I am using the Rolls Royce 1914 pattern that appeared at the show in May and the Humvee to illustrate the 2014 side of things. By the way, that Rolls will appear in the ModelArt magazine soon - very surprised hmy: hmy: hmy:
The bit in the middle is a Roman aqueduct that is still being built. I have used Bob's technique, well, I tried to. The structure is corrugated cardboard, matt board over it, then plaster of paris. I haven't been able to follow Bob's "stone painting" style because I have not been able to get the same consistency in the mixture :smack . So, I have used the old faithful Dremel. It would have been great to paint the stones, but .... it will happen with my next project.
As of now, it's almost ready to paint, also had to make another base, the initial one was too small.Working on the terrain is going to take another massive chunk of time, but that's the only way to get it right.
Several photos below.
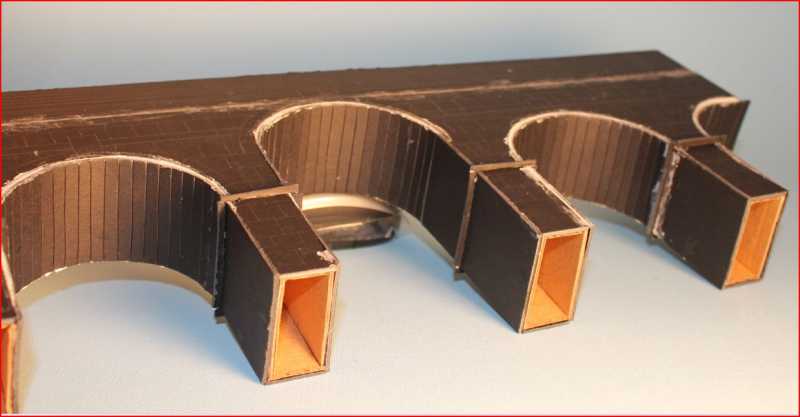
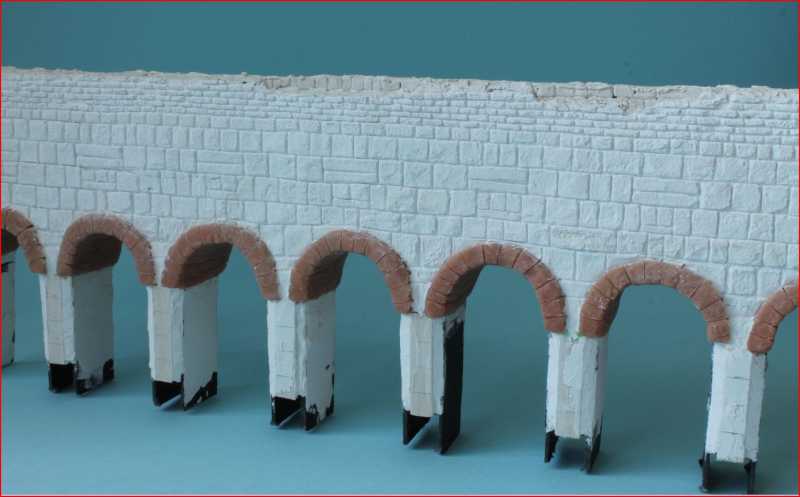
This is one side of the lower tier

Lower tier almost done, matt board is black, some pencil tracing of the stones there. Arches - strips of cardboard and then a long piece of matt board that was cut to fit (several cuts across so it takes the desired shape)
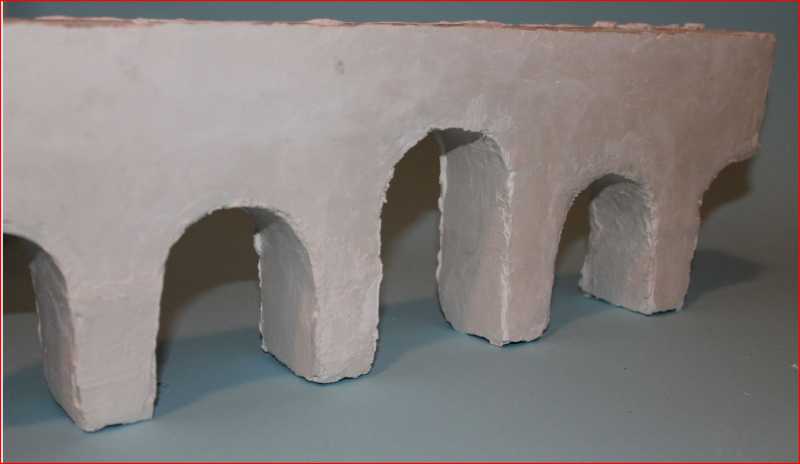
Next, lower tier plastered, awaiting scribing and sanding :S :S :S
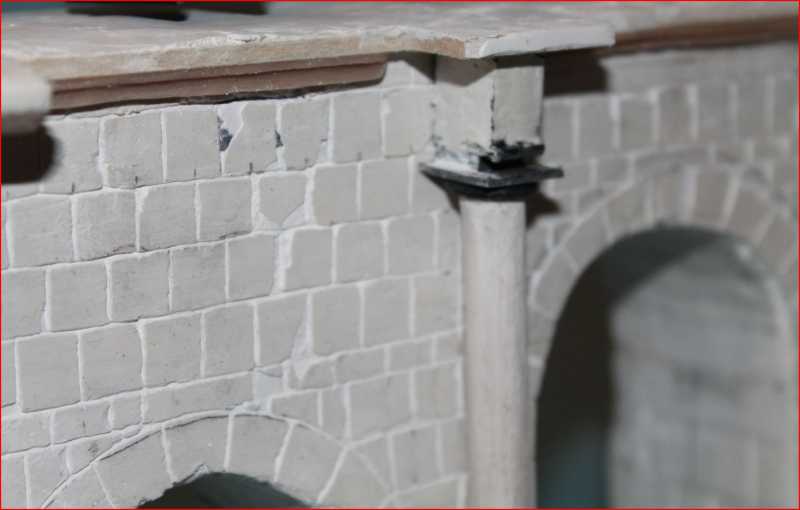
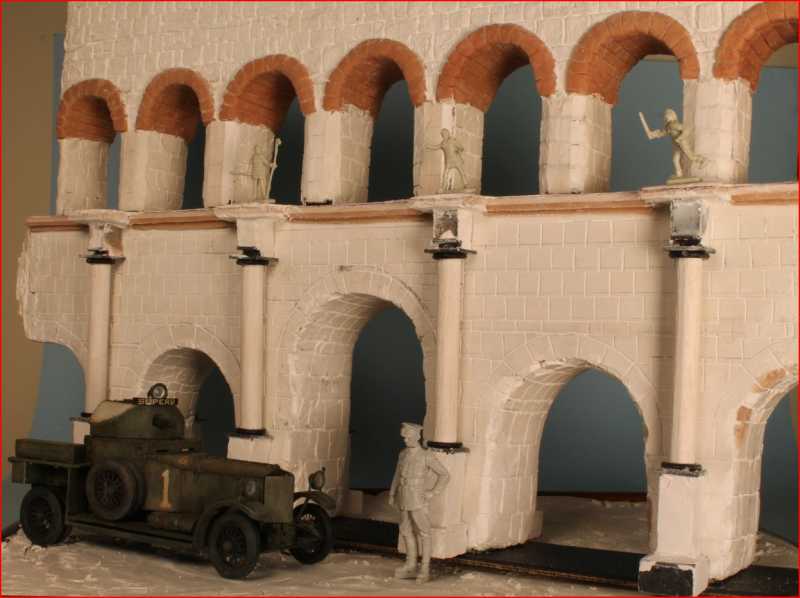
Next, upper tier done the same way, lower tier sanded. I decided to add some columns there, 4 on each side, all scratch built using matt board and balsa. The statues are 1/72 roman soldiers, a horrible plastic thing that you cannot glue with normal glue or CA. Had to use the soldering iron
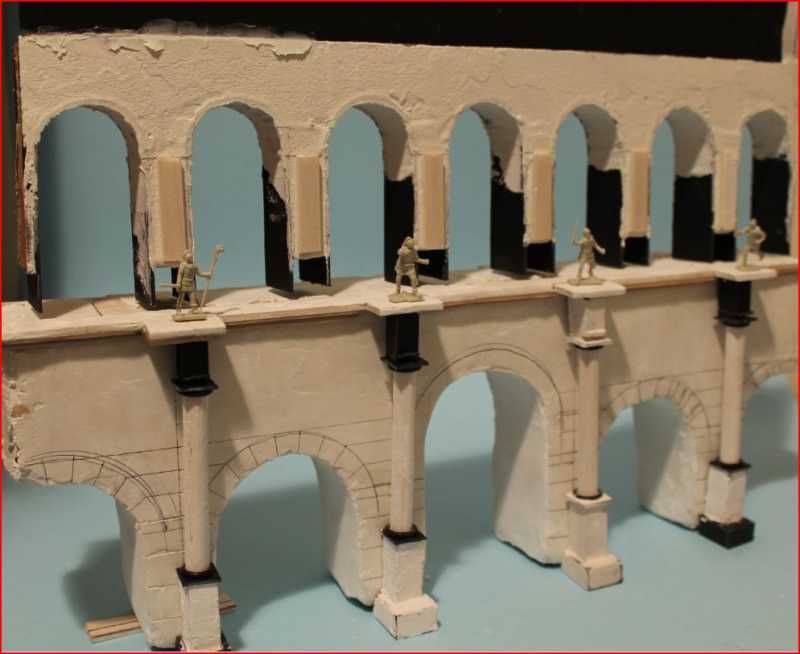
Next - detail of the scribed stones on the lower tier. These are all "machined stones" much smoother than the upper tier.
Next - upper tier plastered and scribed. The stones are much more rugged and of different sizes. Some stick out more than the others, same for the few rows of "bricks" at the top. The arches were made with Sculpey.
Next - the envisaged 1914 side. This will contain the Rolls, a Tommy's War figure. I have to scratch a 1900's camera with another figure taking the photo.
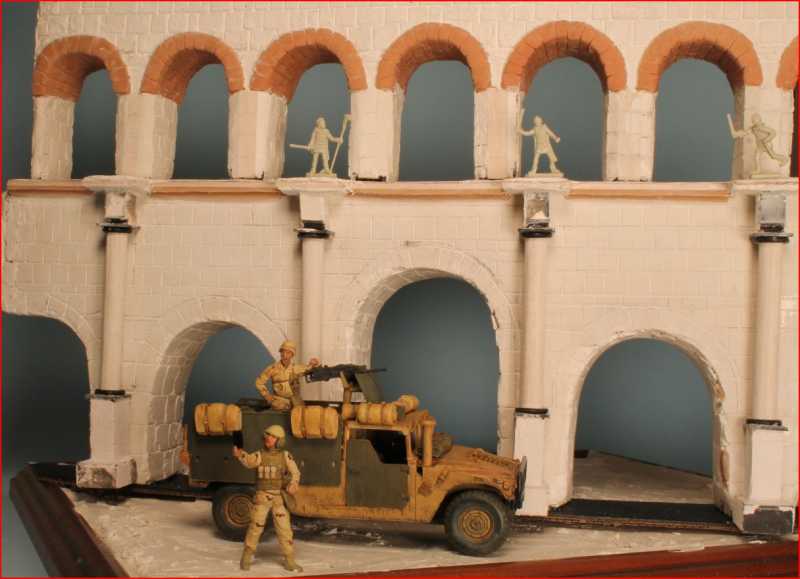
Next - the envisaged 2014 side. The humvee and two figures, one taking a selfie. Technological progress
Over the past few days, more sanding, detail sanding, fixing bits here and there and so much more to be done.
Could have never done this without Bob's SBS on his Roman arch
Cheers,
Laurence
The idea of this little thing is a diorama to show the 1914-2014 now and then kind of a thing. I am using the Rolls Royce 1914 pattern that appeared at the show in May and the Humvee to illustrate the 2014 side of things. By the way, that Rolls will appear in the ModelArt magazine soon - very surprised
hmy: hmy: hmy: The bit in the middle is a Roman aqueduct that is still being built. I have used Bob's technique, well, I tried to. The structure is corrugated cardboard, matt board over it, then plaster of paris. I haven't been able to follow Bob's "stone painting" style because I have not been able to get the same consistency in the mixture :smack . So, I have used the old faithful Dremel. It would have been great to paint the stones, but .... it will happen with my next project.
As of now, it's almost ready to paint, also had to make another base, the initial one was too small.Working on the terrain is going to take another massive chunk of time, but that's the only way to get it right.
Several photos below.
This is one side of the lower tier
Lower tier almost done, matt board is black, some pencil tracing of the stones there. Arches - strips of cardboard and then a long piece of matt board that was cut to fit (several cuts across so it takes the desired shape)
Next, lower tier plastered, awaiting scribing and sanding :S :S :S
Next, upper tier done the same way, lower tier sanded. I decided to add some columns there, 4 on each side, all scratch built using matt board and balsa. The statues are 1/72 roman soldiers, a horrible plastic thing that you cannot glue with normal glue or CA. Had to use the soldering iron
Next - detail of the scribed stones on the lower tier. These are all "machined stones" much smoother than the upper tier.
Next - upper tier plastered and scribed. The stones are much more rugged and of different sizes. Some stick out more than the others, same for the few rows of "bricks" at the top. The arches were made with Sculpey.
Next - the envisaged 1914 side. This will contain the Rolls, a Tommy's War figure. I have to scratch a 1900's camera with another figure taking the photo.
Next - the envisaged 2014 side. The humvee and two figures, one taking a selfie. Technological progress
Over the past few days, more sanding, detail sanding, fixing bits here and there and so much more to be done.
Could have never done this without Bob's SBS on his Roman arch
Cheers,
Laurence
