• Modelers Alliance has updated the forum software on our website. We have migrated all post, content and user accounts but we could not migrate the passwords.
    This requires that you manually reset your password.
    Please click here, http://modelersalliance.org/forums/login to go to logon page and use the "Forgot your Password" option.

AFV M109A2 Doher Or how to Overcomplicate a Model!

Bruce, I just found this and read through it. I want to do one of these in 1/72 scale with the Riich Models M109A2 that I have so I'm watching this closely now.
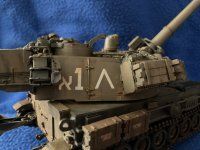
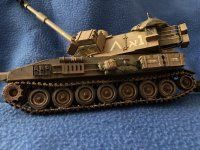
 
Well I only got a few hours on it over the weekend…but it’s not looking bad at all!

Tarps mostly on the rear of the turret, but still a HUGE amount of detail paint to go before Dee-cals (deck-ulls to you peeps across the pond) and weathering can start, but now I’m starting to get pumped over this!
IMG_7336.jpeg
IMG_7341.jpeg
IMG_7340.jpeg
IMG_7339.jpeg
IMG_7338.jpeg
IMG_7337.jpeg
IMG_7335.jpeg
 
Really coming a long way. Need to flatten out those stowage bags, tarps and stuff. Don't think they would be shinny.
 
Stunning work! I want to copy and save these pics for my M109-A6 in 1/72 scale! I need one of these for my Israeli army!
 
SO DOES IT NEED STREAKS AND MUD SPLATTERS?

Kinda on the fence aboot (as they say in Canada) this. Besides some powders (& the MG’s of course), please tell me what other weathering it needs!

IMG_7774.jpeg
 

Attachments

  • IMG_7775.jpeg
    IMG_7775.jpeg
    2.1 MB · Views: 2
  • IMG_7778.jpeg
    IMG_7778.jpeg
    3.3 MB · Views: 2
  • IMG_7777.jpeg
    IMG_7777.jpeg
    2.9 MB · Views: 4
  • IMG_7776.jpeg
    IMG_7776.jpeg
    3.2 MB · Views: 4
  • IMG_7779.jpeg
    IMG_7779.jpeg
    3.2 MB · Views: 4
  • IMG_7780.jpeg
    IMG_7780.jpeg
    3.5 MB · Views: 4
  • IMG_7781.jpeg
    IMG_7781.jpeg
    3 MB · Views: 4
  • IMG_7785.jpeg
    IMG_7785.jpeg
    3.5 MB · Views: 3
  • IMG_7783.jpeg
    IMG_7783.jpeg
    2.5 MB · Views: 3
  • IMG_7782.jpeg
    IMG_7782.jpeg
    2.9 MB · Views: 3
On my little Leopard I went a bit old school. I first gave it a thin wash of Ivory/Buff to blend things together and provide a first later of dust. That was followed by dark brown pin wash around details and panel lines. Next was a series of light dry brushing with the Ivory/Buff to bring out the details, deepen the shadows and smooth things out. The key is to build it up with a light touch so it doesn't look "frosted". You will get some "happy accidents" while doing this, some areas getting heavier dusting than others. The heavier mud and dirt on the lower hull was done with layers of Ivory dust feathered out and a darker earth tone by dry brushing and stippling. The final step was an overall spray matt coat. I should mention I used Vallejo paints for this.

(No pigments were harmed in the making of this model. :bigrin: )

IMG_1408.JPG


IMG_1409.JPG


Cheers,
RichB
 
Start with some light (when I say light I mean a light coat/layer) pigments on the running gear and see how you like it.
 
Back
Top