• Modelers Alliance has updated the forum software on our website. We have migrated all post, content and user accounts but we could not migrate the passwords.
    This requires that you manually reset your password.
    Please click here, http://modelersalliance.org/forums/login to go to logon page and use the "Forgot your Password" option.

1/18 scale Wallis WA-116 Agile scratchbuild model

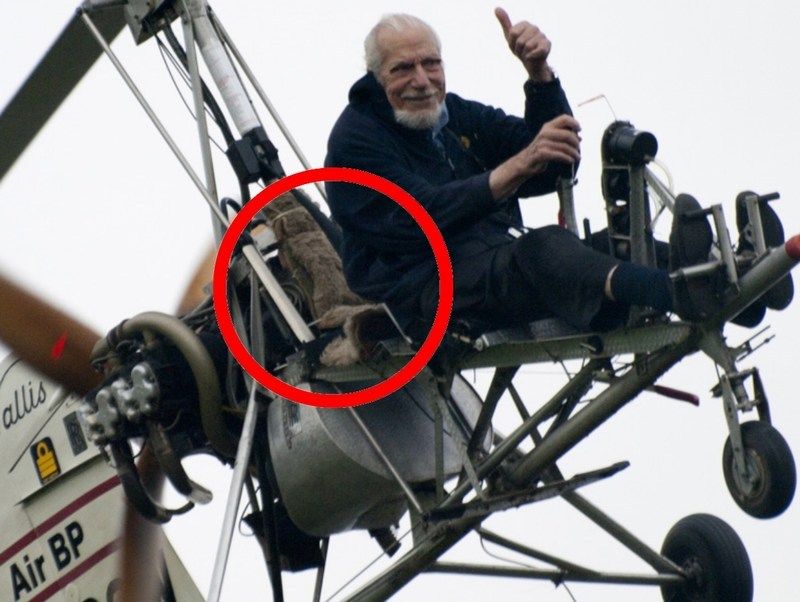
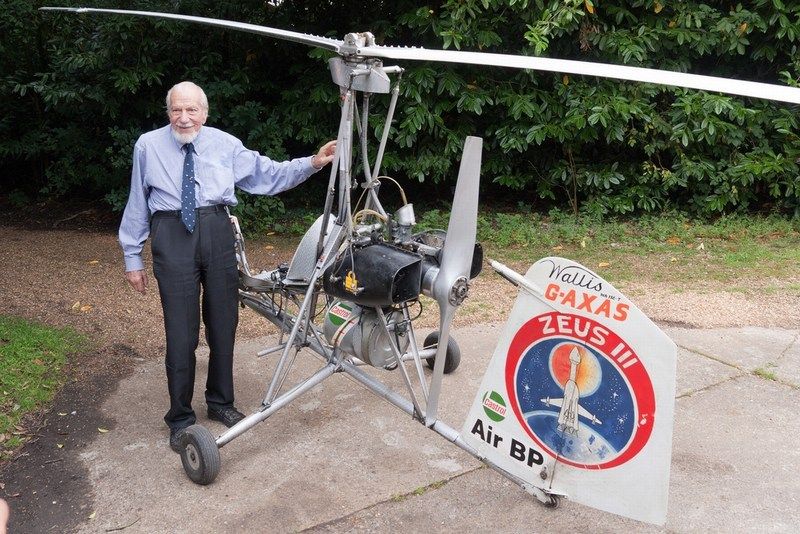
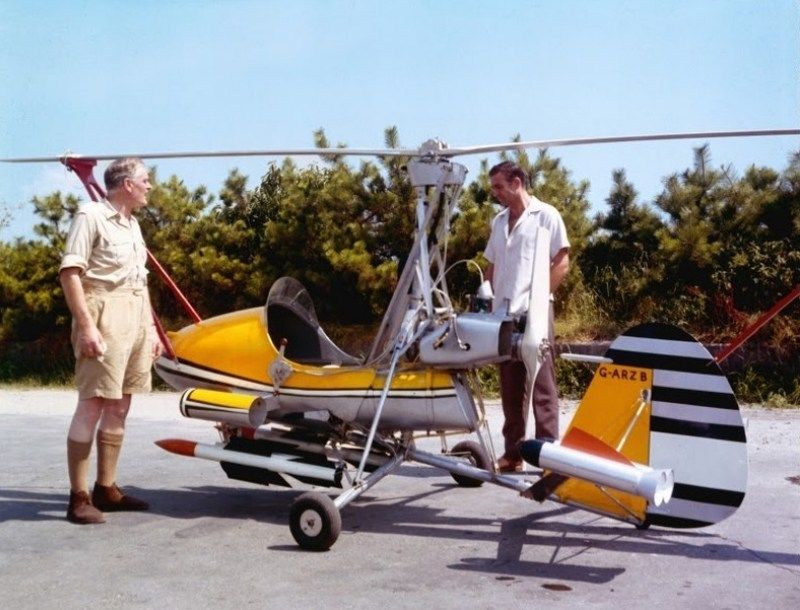
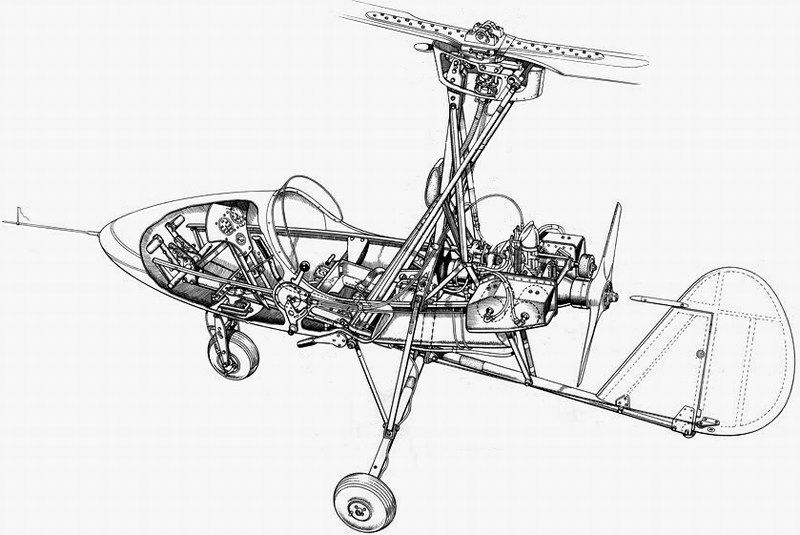
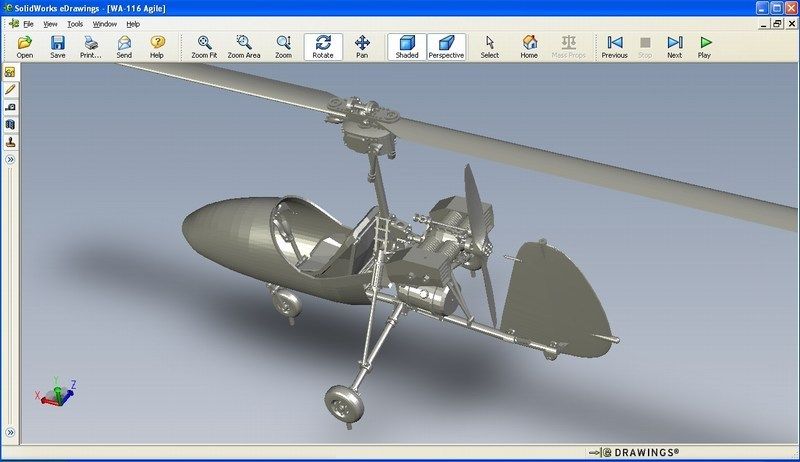
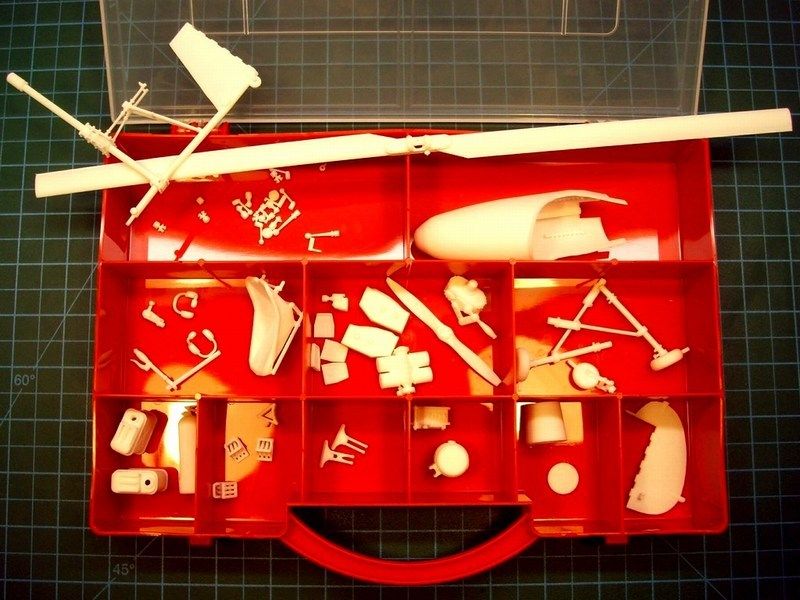
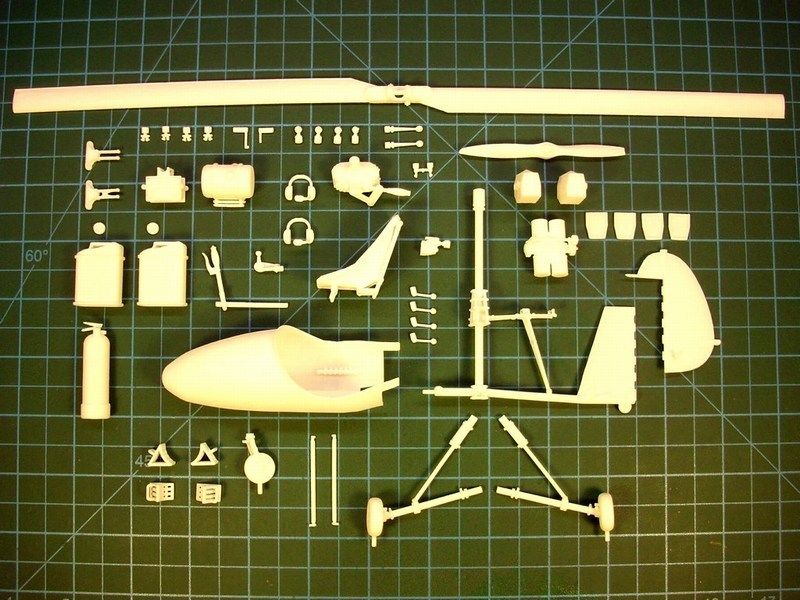
1/18 scale Wallis WA-116 Agile autogyro scratchbuild model

The following construction is a tribute to RAF Wing Commander Kenneth Horatio Wallis DSO MBE CEng FRAeS PhD, a pioneer gyrocopter aviator, who passed away early on Sunday morning, September 1st 2013. Ken was 97 years old. During the WWII, Wallis served in the Royal Air Force as Westland Lysander and Wellington pilot and flew 28 bomber missions over Germany. After the War, he flew the massive Convair B-36 and later involved in research and development, before retiring in 1964. He later became one of the leading exponents of autogyros and earned 34 world records, still holding eight of them at the time of his death. He was an inspiration to us all and we shall greatly miss him. A local hero and a national treasure.

IMAGE_0001_zps4tuyupxn.jpg


IMAGE_0002_zpsfbw5cati.jpg

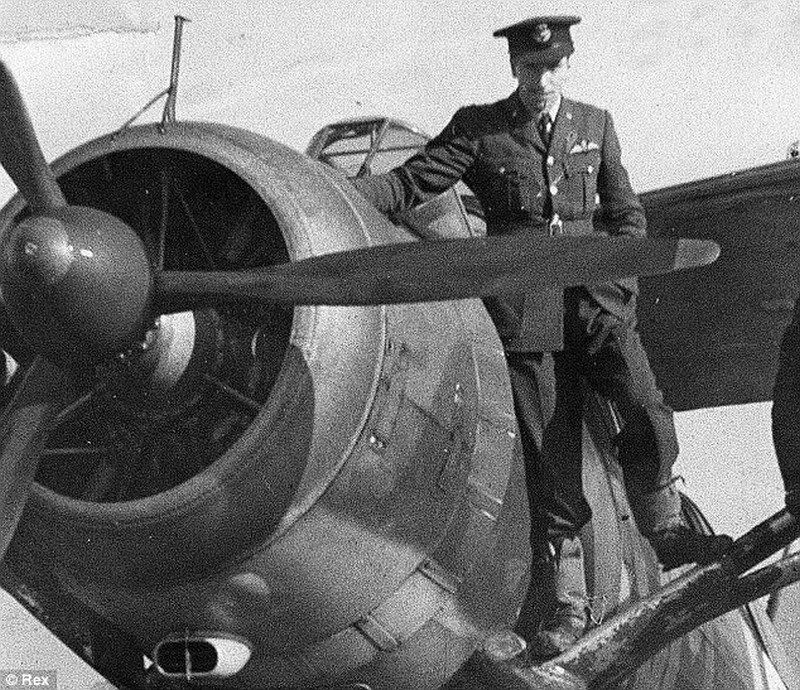
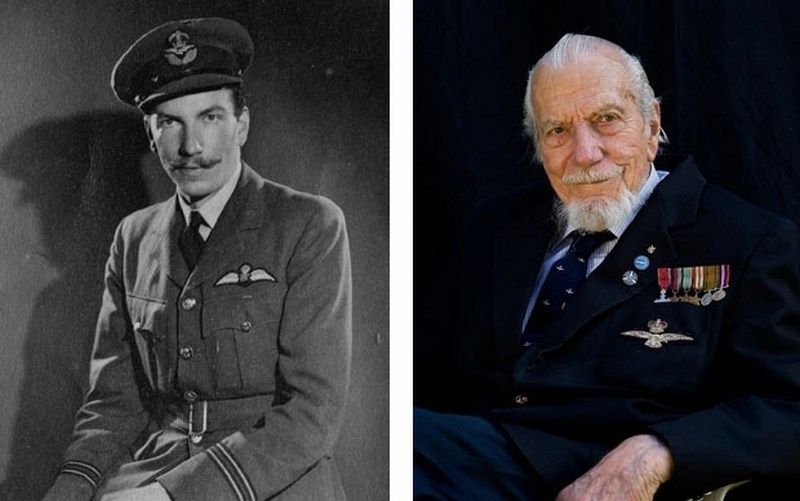
He was born on the 26th April 1916, at Ely in Cambridgeshire. With his father and uncle having built an aeroplane in 1908 to fly the channel in a competition that was eventually won by Louis Bleriot, Ken Wallis acquired an interest in practical mechanics at an early age and by the time he was eleven years old had built his own motorcycle. He eventually turned his attention to aviation following a flying demonstration he watched in 1936 of the Henri Mignet HM-14 Flying Flea / Pou Du Ciel.

IMAGE_0003_zpsgqghbphq.jpg


IMAGE_0004_zpszgafkaef.jpg

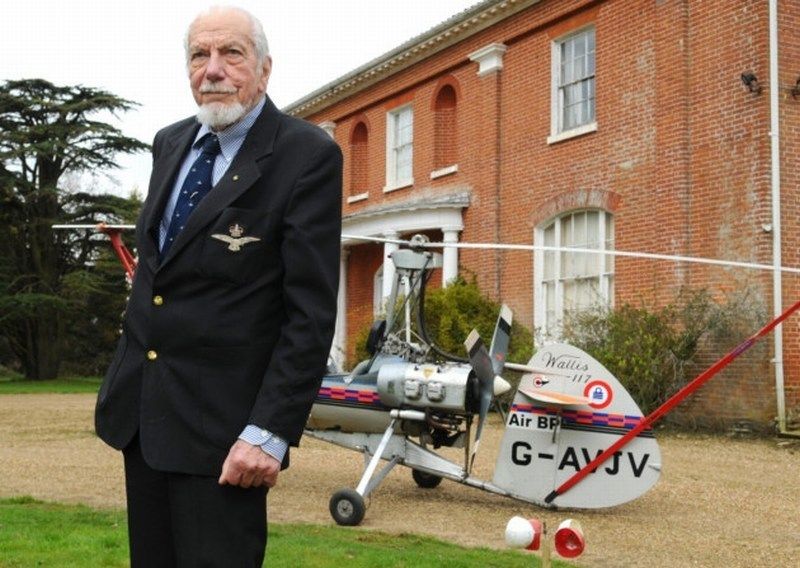
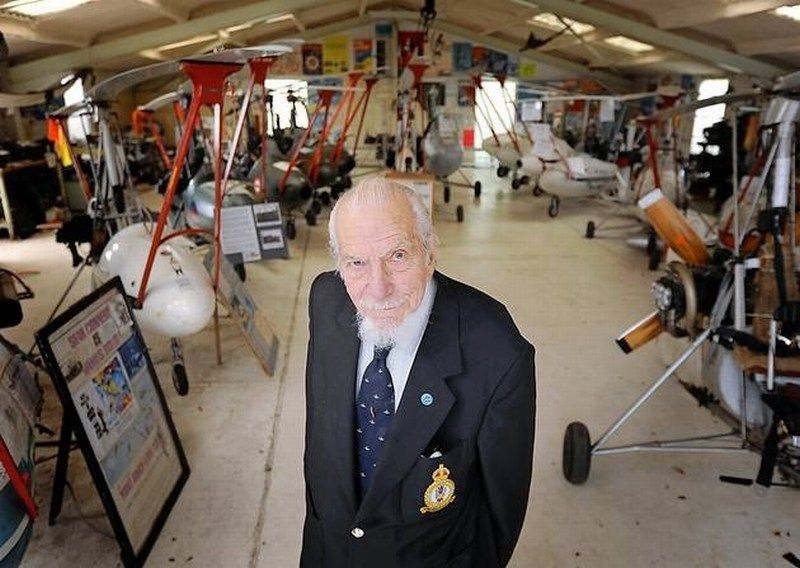
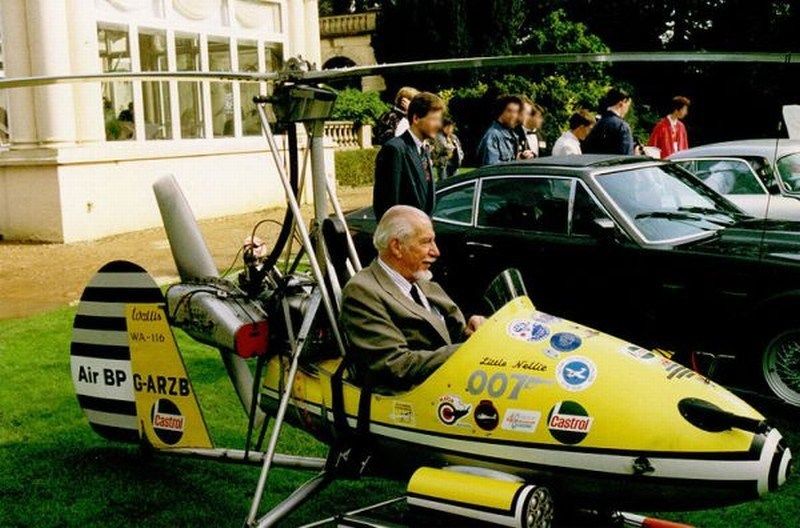
Ken will be greatly missed by the Flixton museum members. He was a frequent visitor, generous fundraiser and a great ambassador. In addition to the numerous professional institutions who welcomed Ken as a member and the vast number of clubs who regarded him with great respect and fondness, many ordinary people will also feel a loss in one way or another. Even a short chat with him left the individual feeling that it was something special and his warmth made them feel that he would remember them! Ken was recognised wherever he went. Admirers would soon gather and he would usually produce a small clipboard from a pocket, to sign and give away autographed postcards of him flying the “Little Nellie”. I am sure that many a childless adult has asked for a card to give to their “offspring”. Ken was inspirational, a great role model and possessed a rare old-world charm plus the impeccable manners of his age; all without a hint of grandeur. I am not alone in thinking that he was probably the grandfather figure we would all have liked to have had at some time. Norfolk was Ken’s home from 1963 and I venture to think he was appreciated by such a large part of its population that he was likely a close second to its most revered inhabitant: Horatio Nelson.

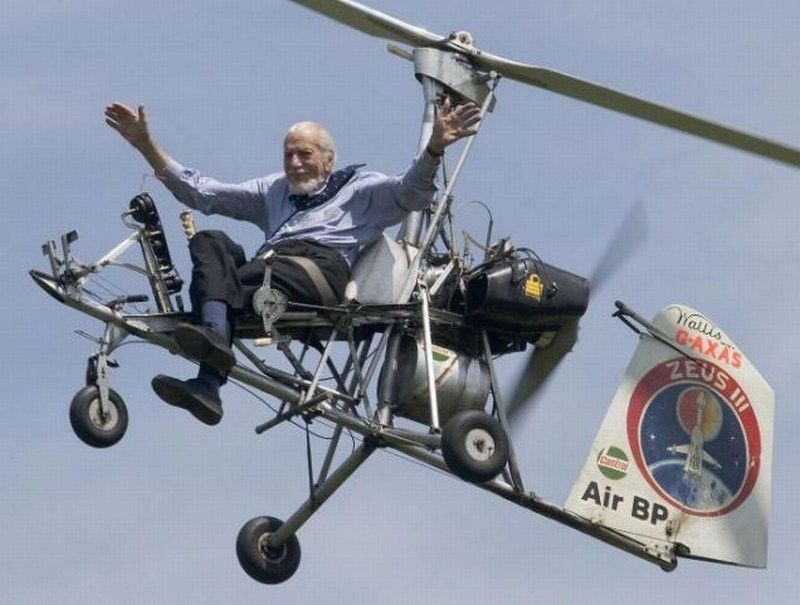
Goodbye Ken - our gyrocopter aviation hero and national treasure.

IMAGE_0005_zpsk9anusc5.jpg


IMAGE_0006_zpsg64dma2s.jpg


IMAGE_0007_zpstcvvuiah.jpg


IMAGE_0008_zpscjasp8wn.jpg
 
CHAPTER I - Little Nellie only lives twice

The autogyro differs from the helicopter in that it has a upwards thrusting propeller and a second prop to drive the forward. The gyro's upward’s prop lifts air much the same as a glider. The autogyro's roots go back in 1921 when it was invented by Juan De la Cierva, when he was looking to develop a light and fast bomber for the Spanish military. Development continued over the years and during WWII both Germany and Japan built their own autogyro versions. Wallis Autogyros Ltd was founded in 1961 by RAF Wing Commander Kenneth Horatio Wallis and has produced an extremely wide range of special purpose autogyros. The Wallis WA-116 Agile created by Wallis runs on the same principles as that built by Cierva but it much smaller and more nimble. The first prototype, registered G-ARRT, was a single seater ultralight autogyro first flown on 2 August 1961 and being developed with different models over the years, with such uses as military training, police reconnaissance and survey work. It could lift twice its own weight, fly 210 km/h and rapidly climb to 4100 m, even though it weighed 110 kg. This aircraft could take off in 30 yards of space at a minimum speed of approximately 20 km/h. In 1962, five WA-116s were built by Beagle Aircraft at Shoreham, three of which were for evaluation by the British Army Air Corps.

IMAGE_0009_zpsrzkutmuz.jpg

In 1966, one of the Beagle built WA-116s, registered G-ARZB (nicknamed as “Little Nellie”), was modified for use in the 1967 James Bond film “You Only Live Twice”. Few Wallis autogyros have been operated privately, with nearly all of them being used for research and demonstration flying by Ken Wallis himself.

IMAGE_0010_zpsr9e2zbrv.jpg


IMAGE_0011_zps0c8tlpp1.jpg

The Wallis WA-116 Agile was powered by a McCulloch Model 4318A four cylinder horizontally opposed air cooled engine, providing a top speed of 185 km/h and a range of 225 km. After building nine single seaters, the construction of a two seat variant the WA-116T was begun in 1969; Ken Wallis tested a four blade rotor and finally produced the WA-116F with which he won the closed circuit world record in 1974 in the 670.26 km category. Wallis autogyros have been powered by various types of engines, within the range 72 hp to 160 hp (the latter is used in the two seat Wallis WA-122) and have been employed for research programmes, including one promoted by Sperry Radar. In 1983 development of a production version, powered by a Weslake engine, was under way in association with Vinten Ltd. Intended primarily for paramilitary use, including policing and survey work, the definitive aircraft is due to be certificated in 1984. Ken Wallis, developed a number of improvements to the autogyro design, including the offset gimbal rotor head which gives the autogyro hands-off stability.

IMAGE_0012_zpshtdnexih.jpg

Technical data & general characteristics:

  • Type designation: Wallis WA-116 Agile,
  • Manufacturer: Wallis Autogyros Limited,
  • Usage: Reconnaissance / recreational autogyro,
  • Crew: 1 pilot,
  • Year of first construction: 1961,
  • Year of first flight: 1962,
  • Country of production: United Kingdom,
  • Length: 11 ft (3.38 m),
  • Height: 6 ft 1 in (1.85 m),
  • Rotor diameter: 20 ft 4 in (6.20 m),
  • Empty weight: 255 lb (116 kg),
  • Gross weight: 550 lb (249 kg),
  • Maximum speed: 100 mph (161 km/h),
  • Rate of climb: 1071 ft/min (5.44 m/s),
  • Service ceiling: 10000 ft (3048 m),
  • Range: 130 miles (209 km),
  • Flight endurance: 2.5 hours with 58 lb fuel,
  • Powerplant: 1 x Wallis McCulloch 4318A piston engine, 54 KW (72 hp).

IMAGE_0013_zpsxiha13g5.jpg


IMAGE_0014_zpsbqr41vg9.jpg
 
CHAPTER II - Converting Mbytes into actual model parts

Before start building a new scale model, I always try to study as much as possible the object of construction. Any available technical manuals and detailed walkaround photos, always help during model building process. As previously described into my previous WIP (feel free to have a look on the 1/18 scale Instytut Szybownictwa IS-A Salamandra 53 scratchbuild model, already uploaded into the present forum), the plan is to design a CAD file and then print it, on a 3D replicator. This method, helps a lot and gives the opportunity to scratchbuild almost anything, under any scale, within only few minutes. The 3D printing technology introduction into scale modelling and free access to the average modeller is a great evolution in the hobby and a creative tool that helps us to build better and more realistic models. Certainly the new technologies and gadget tools in the hands of talented enthusiasts open new horizons and provide wide potentials on scale model building.

IMAGE_0015_zps2yfv3nra.jpg

It took a couple of hours of CAD work on my laptop, to 3D design, scale into correct 1/18 size and then digitally cut the autogyro’s compartments into virtual pieces, having always in mind that the later printed parts, should perfectly fit and finally become a fine scale model. And voilà, we have a winner! A new Wallis WA-116 Agile autogyro virtual model, is ready to be forwarded to the 3D printer and become an actual object under 1/18 scale, within short time.

IMAGE_0016_zpsxq20oce4.jpg


IMAGE_0017_zps2pkep31i.jpg

After building the 3D model and double check for possible mistakes, I saved it as a digital file and forward it on a 3D printer to start generating the individual parts of the autogyro scale model. Shortly thereafter, the printing proceeding outcome pleased me, while watching the Mbytes, magically converting into actual items. Once again, the 3D printing technology on scale modeler’s service. As seen in the following pictures, as soon as the produced parts were cleaned, I checked for broken parts & imperfections. The model now consists of only a few parts, found into basic frame sections. Some additional details such as supporting rods, control bars & wires etc made of styrene, will be later added.

IMAGE_0018_zpsbocqjtvu.jpg


IMAGE_0019_zpswwxxtzgh.jpg
 
CHAPTER III - Attempting to join the basic parts

As soon as the individual scale model’s parts were already produced, cleaned & dry fit tested, I had to assemble everything as one piece, without damaging the frame construction. The plan is to assemble all model’s parts first, sand if required and later apply paint and weathering effects as a final touch. During assembling process, everything was secured in place & glued with CA liquid adhesive superglue, which does bonds in only few seconds, reaches extremely strength at room temperature and it is suitable for materials such as wood, rubber, plastic, metal, ceramics, leather, marble, polyethylene, polypropylene, teflon etc. Some tiny gaps were filled with putty, applied with an old brush. As soon as the joints were securely glued with CA superglue and later filled with putty on tiny gaps, it was carefully sanded with nail files & sanding sponge block. When it looked OK to me, the whole model was sprayed over with Humbrol acrylic primer to spot any mistakes and placed into a box to wait the final paint applying.

IMAGE_0020_zpslathmrra.jpg


IMAGE_0021_zpsjlkxtxzu.jpg

After my sweetheart wife (aka “4-star General in home” & “family's financial director”) conducted a strict quality control and result evaluation, she smiled & proudly signaled green light for further building & painting. Each section was dry fit tested to ensure that anything can be combined together as one piece, the parts forwarded for assembly.

IMAGE_0022_zps8ciia5sd.jpg


IMAGE_0023_zpsbdx9gics.jpg
 
It looks like the challenges of scratch building has been moved to the challenges of 3D rendering. :popcorn
 
It looks like the challenges of scratch building has been moved to the challenges of 3D rendering.
To answer to your question, please free to read the "CHAPTER I - Today, the scratch building died" text found into my previously uploaded 1/18 scale Instytut Szybownictwa IS-A Salamandra WIP. I 'm sure that you'll find it interesting.

Oh no, don't get me wrong, I understand the challenges of 3D modeling having attempt it, miserably, in the past. I know there's challenges in the virtual world making points on a 3D grid line up and join one another. I also think there's limits in what the 3D printer can produce that will have to be supplemented by the skill of the modeler, you Nick, in this case.


So... :popcorn

BTW, where are the rear firing flame throwers? :eek:hyeah
 
Awesome. I just cant think of another word. I really enjoyed seeing these gyrocopters in JAmes Bond. I really really enjoy seeing you take a concept and build it up from just a drawing to a rendered and printed product. Cant wait to see this one all painted up. Will you make these for sale? I would be interested in one of these for sure.
James
 
That is really cool!

Does this mean the mainstream manufacturers will have even more competition now? The limits are endless I guess, as long as you can get someone to do the model rendering for you!

Kinda outs some rare float planes I'd like to see in 1/48 in reach!
 
I really really enjoy seeing you take a concept and build it up from just a drawing
I always try to combine step-by-step building WIP presentation, with useful tips & techniques. I guess its the first of my projects you find. Feel free to check my previously uploaded articles by clicking on the following thumbnails and have fun.


[ul][li]Some of my already finished models[/li][/ul]


[ul][li]Still WIP at present time or not released yet[/li][/ul]


Will you make these for sale?
All the projects I have built (already printed or still CAD files at the moment), are designed in such way to ensure that anything can be combined together as one piece and become a scale model. Nevertheless, because scale modeling is just an enjoyable hobby for me and because my main profession prevents me to engage in other activity, I am not interested for the moment to become a professional modeler.


Does this mean the mainstream manufacturers will have even more competition now? The limits are endless I guess, as long as you can get someone to do the model rendering for you!
That means, that thing are going to change. It is very likely that the model kits you buy from your local hobby shop, will not continue exist in their present form in few years. Have you ever thought, that future shopping will not include visiting your local hobby shop to pick your favorite model kit from the shelves? Have you ever thought, that it is likely to buy your Hasegawa 3D file online and later print it on our home 3D printer, wearing your 3D printed slippers & drinking your coffe into a 3D printed mug same time?
 
Have you ever thought, that it is likely to buy your Hasegawa 3D file online and later print it on our home 3D printer, wearing your 3D printed slippers & drinking your coffe into a 3D printed mug same time?

It's really just around the corner. Quick look shows some "home" 3d printer devices are still over the $1,000.00 mark I could see 3-5 years down the road it being far more common. Yeah we'll be purchasing licenses for the files then print them out at home.

Still up to us to assemble, detail, clean up, paint and then...strip it then paint again cause you screwed up the first time... :rotf

Sorry for the hijack of your thread Nick. :drinks
 
Just saw one for $499 that prints 6x6x6 inches. Wish I could draw, I would love to print my own stuff.
JAmes
 
Just saw one for $499 that prints 6x6x6 inches.
6[sup]3[/sup] That's pretty big!
Printing area 6x6x6 inches is big? If my calculations are not wrong, you could only print a FW-190 or a Spit fuselage under 1/72 scale. Unless you want to invest such money just to print wheels, jerrycans and small sized stuff.

I can put alot of engines, seats, landing gear, gun bays......etc....etc in that space though. Having been in this business the cost of the machine is not your only consideration. The cost of the material to keep the machine going may be your biggest expense. Then there is the clean up process that you may have figure out for yourself. Add to that the cost of the CAD software and a work station to put it on. The training in the softwares use is yet another factor. This is not something you pick up at the discount store run through the tutorials and takeoff. In the end I think I will leave it up to some of these vendors to make parts for me.

Terry B)
 
Just saw one for $499 that prints 6x6x6 inches.
6[sup]3[/sup] That's pretty big!
Printing area 6x6x6 inches is big? If my calculations are not wrong, you could only print a FW-190 or a Spit fuselage under 1/72 scale. Unless you want to invest such money just to print wheels, jerrycans and small sized stuff.

For that price I would think so yes. This is emerging technology so no telling where it will go next.

Terry has a good point also, just in the printing material alone it could be costly. Think of your cheap throwaway inkjet printers where the ink cost about half of what the printer cost.

Terry I could see free lancers doing pretty good making stuff for the startups who don't have a design team on staff.

:rotf Yeah right! People have lots of things they want you to do, but most don't provide detail information. So you are left to do all the research yourself. Oh and by the way can you do that for $5.00.

No I'm not bitter. :rotf

Terry
 
CHAPTER IV - Wool flock covered seat

While studing on Wallis autogyros photos, I noticed that Ken had covered the Wallis WA-122 G-BGGW passenger's seat with wool flock fiber stuff. To be honest, I 've never seen any of the Wallis WA-116 autogyros having seats covered with this way, but I thought it was a good idea to replicate under scale and maybe possible to have happened in real gyro.

IMAGE_0024_zpsskmovgx7.jpg


IMAGE_0025_zpsxgdhxkeq.jpg

Using a small amount of Milliput putty, I made a small ball, dust it with talcum powder and pressed it against the working bench with a roller until it becomes about 0.5mm thin. The use of talcum powder is necessary to avoid Milliput sticking on roller or fingers and get easier to handle without tearing to pieces. While Milliput putty was still soft, I cut it into shape and placed it on pilot's seat, to form into a right to scale blanket cover.

IMAGE_0026_zpsrlvbzmmk.jpg


IMAGE_0027_zpsijcmnfun.jpg


IMAGE_0028_zps92ig1cts.jpg


IMAGE_0029_zpsqbkecmep.jpg


IMAGE_0030_zpsporaeanv.jpg

Then, seat covered with masking tape in such way to leave only the Milliput blanket area vissible. To recreate the seat cover, I used the #KF-00017 flocking powder product by KA Models, which is commonly used by scale car modelers to represent carpets. As you can see in the following photos, the flocking powder sprinkled through a sieve, over the Milliput blanket. When it looked OK to me, the powder secured in place, by airbrushing hairspray over the result.

IMAGE_0031_zpseum0jctx.jpg


IMAGE_0032_zpsts3kfsqv.jpg


IMAGE_0033_zps16k4quwv.jpg
 
Back
Top