
-
Modelers Alliance has updated the forum software on our website. We have migrated all post, content and user accounts but we could not migrate the passwords.
This requires that you manually reset your password.
Please click here, http://modelersalliance.org/forums/login to go to logon page and use the "Forgot your Password" option.
You are using an out of date browser. It may not display this or other websites correctly.
You should upgrade or use an alternative browser.
You should upgrade or use an alternative browser.
RA-5C...Finished at last !
- Thread starter Old Dog
- Start date
Old Dog
Well-known member
RA-5C..epsode 1 After market...the agony of defeat
In order to assess the impact of the Nautilus brace set I went ahead and assembled it. The set recommends using carpenters glue but I didn't want to wait for it to set up so I used gap filling CA instead. The finished assembly looks like this...
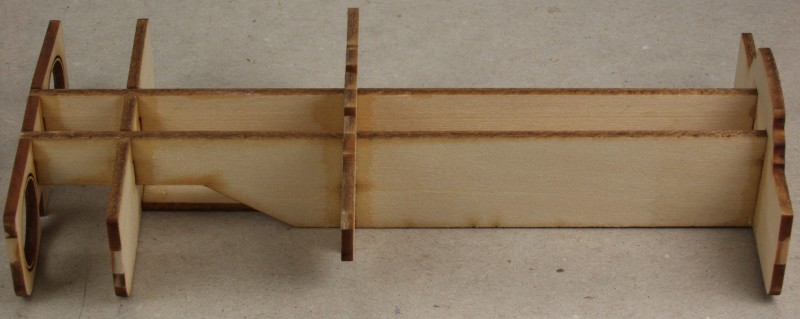
The most important part is the keel that runs down the bottom and supports the bottom fuselage seam...
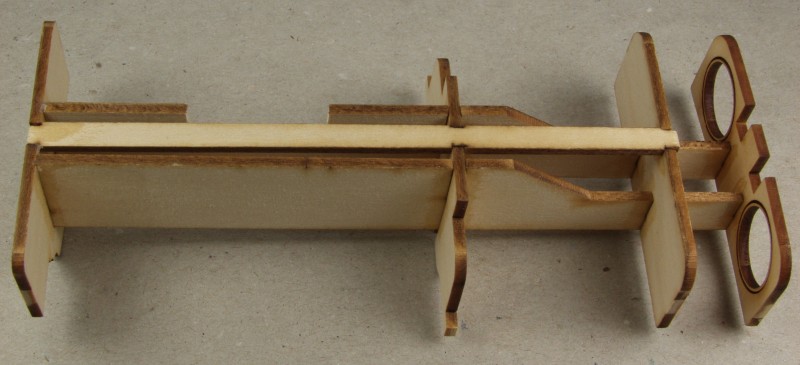
As you could see in the last photo I have already cut a notch in one side to clear the Aires wheel bay part. It just looks so much better than the kit part I couldn't leave it out. Eddy had already given me a heads up on the interference fit so it was just a matter of measuring and cutting...
It did require that I remove a bit from the Aires parts as well but these really have no use anyway...
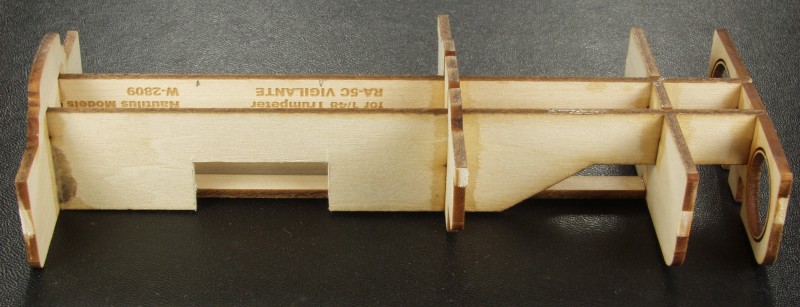
Here is how the Nautilus part fits into the fuselage...
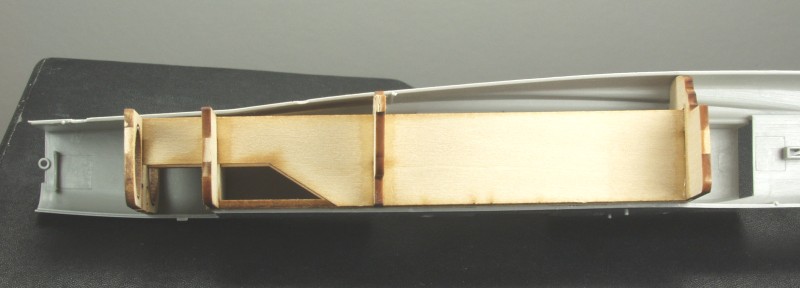
And a view from the bottom shows how the bottom keel provides a nice flat support surface for the bottom seam...
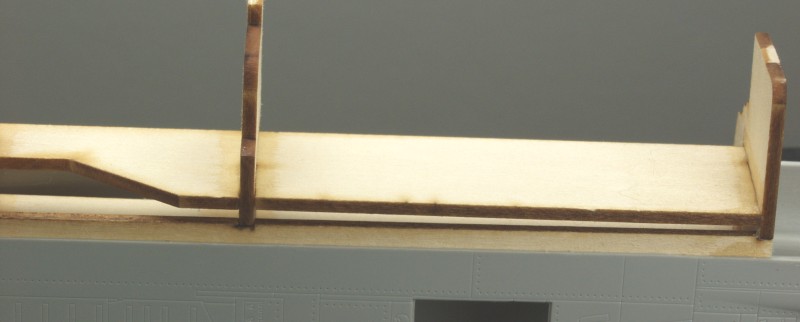
Without this the bottom seam wants to sag inward when the bottom of the fuselage should be flat. Are there other ways one could do this ? Yes but this way required no engineering on my part and provides a place to hang the burner cans on the back end. Use of the brace will not allow using the kit supplied engines but they can't be seen anyway so why bother.
Next up I'm going to take a hard look at the nose issue and decide whether a rhinoplasty is really necessary. Warning: I may be posting drawings with red lines. These will not be coming from GM.
Thanks for looking !
In order to assess the impact of the Nautilus brace set I went ahead and assembled it. The set recommends using carpenters glue but I didn't want to wait for it to set up so I used gap filling CA instead. The finished assembly looks like this...
The most important part is the keel that runs down the bottom and supports the bottom fuselage seam...
As you could see in the last photo I have already cut a notch in one side to clear the Aires wheel bay part. It just looks so much better than the kit part I couldn't leave it out. Eddy had already given me a heads up on the interference fit so it was just a matter of measuring and cutting...
It did require that I remove a bit from the Aires parts as well but these really have no use anyway...
Here is how the Nautilus part fits into the fuselage...
And a view from the bottom shows how the bottom keel provides a nice flat support surface for the bottom seam...
Without this the bottom seam wants to sag inward when the bottom of the fuselage should be flat. Are there other ways one could do this ? Yes but this way required no engineering on my part and provides a place to hang the burner cans on the back end. Use of the brace will not allow using the kit supplied engines but they can't be seen anyway so why bother.
Next up I'm going to take a hard look at the nose issue and decide whether a rhinoplasty is really necessary. Warning: I may be posting drawings with red lines. These will not be coming from GM.
Thanks for looking !
RA-5C..epsode 1 After market...the agony of defeat
Man that's some nice supports.
Man that's some nice supports.
RA-5C..epsode 1 After market...the agony of defeat
Watching with interest as it is one of the few aircraft I find thatl ooks great (even without a shark mouth scheme... shhhh
 ).
).
Cutting Edge crap? Unbelievable...
Regards,
Watching with interest as it is one of the few aircraft I find thatl ooks great (even without a shark mouth scheme... shhhh
Cutting Edge crap? Unbelievable...
Regards,
Old Dog
Well-known member
RA-5C..epsode 1 After market...the agony of defeat
Before I start on episode 2, some background information just so you don't think that I have gone over to the dark side on this. This kit had been on the market about three years before I got back into modeling. Long enough for there to be some builds and reviews online as well as for the after market gurus to go to work. It was a must have kit for me so along with the kit I started grabbing up as much of the available AM as I could, knowing all too well that once a lot of it is sold out it becomes unobtanium.
Let me also say that I don't consider myself a nit picker or rivet counter. I also have come to the conclusion that I have no eye at all when it comes to shapes. I have read through countless blogs on misshapen kits and most of the time, red lines or not, I just don't see what the issue is. So when it comes to kits, it needs to be really wonky shape wise before I will spend any time trying to correct it.
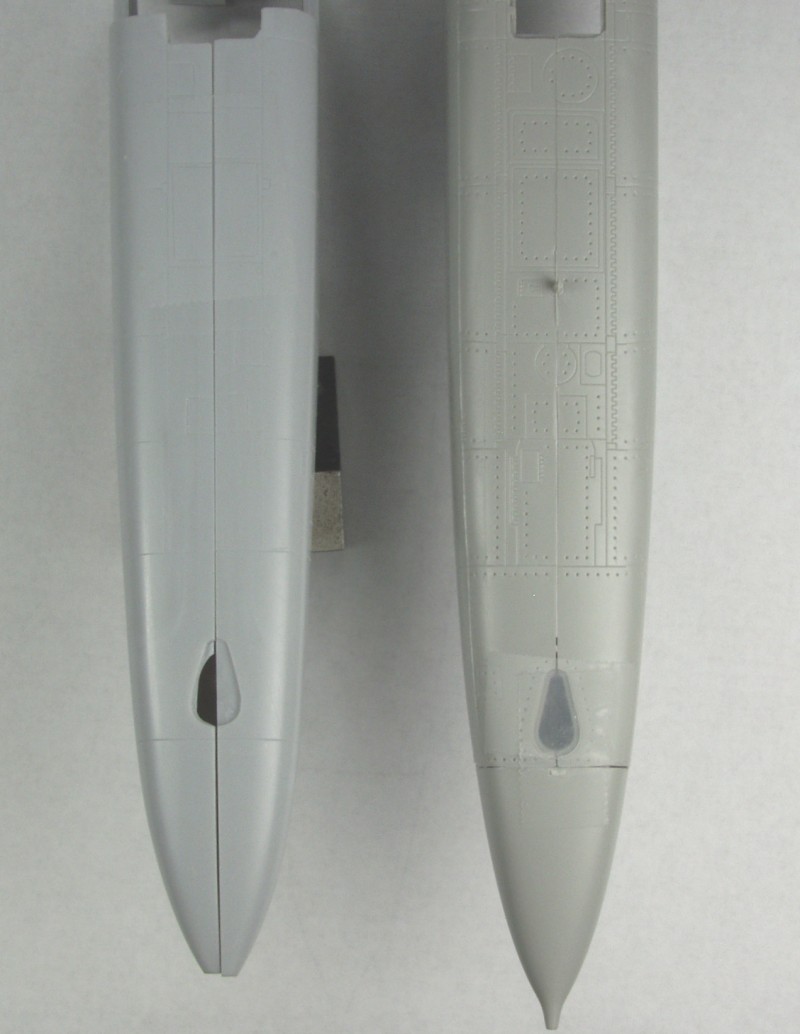
With all that said I need to decide whether or not it's worth the trouble to use the Cutting Edge set to fix the horribly misshapen nose on the Trumpeter kit. I started with drawings. The ones I have were included in the Warpaint series on the RA-5C. They were drawn by Richard Caruana who seems to get mixed reviews as far as accuracy goes but they were the only things I had. They are drawn in 1/72 so I scanned and enlarged them to 1/48. Yes, there is some chance that things got distorted here. Plans are shown below...


Setting the kit and CE parts on the drawings showed that they were both close but it's always difficult when placing a 3D part on a 2D drawing. Because of parallax photos were no help. Whether either was right wasn't so much a question to me as whether there was enough difference between the two to justify the extra grief involved. Placing the two side by side I found it hard to detect and real difference between but then I do have that inability with shapes so my next thought was measurements. The result is shown below...
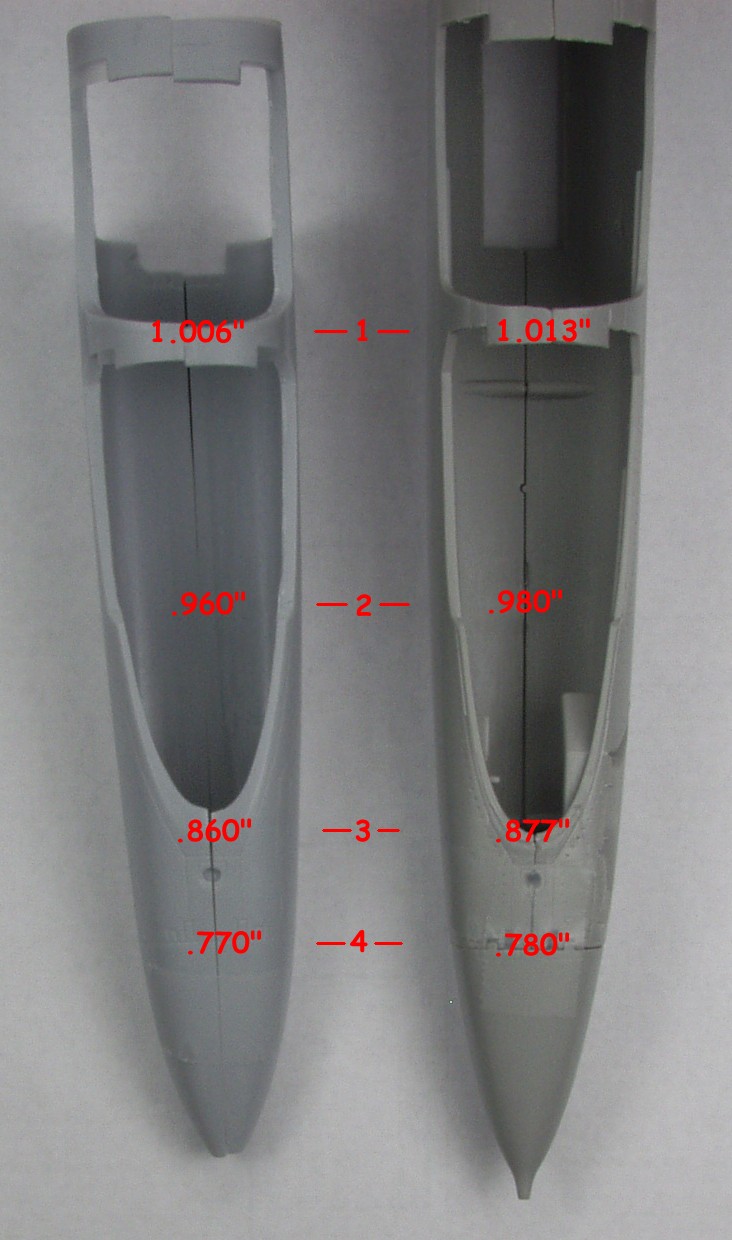
Well folks, that sort of made up my mind right there. The largest amount of discrepancy was .020", that's equal to the thickness of 5 sheets of the printer paper I printed the drawings out on. When compared to the down sides of using the CE part it was a no brainer to me. Side profile differences...
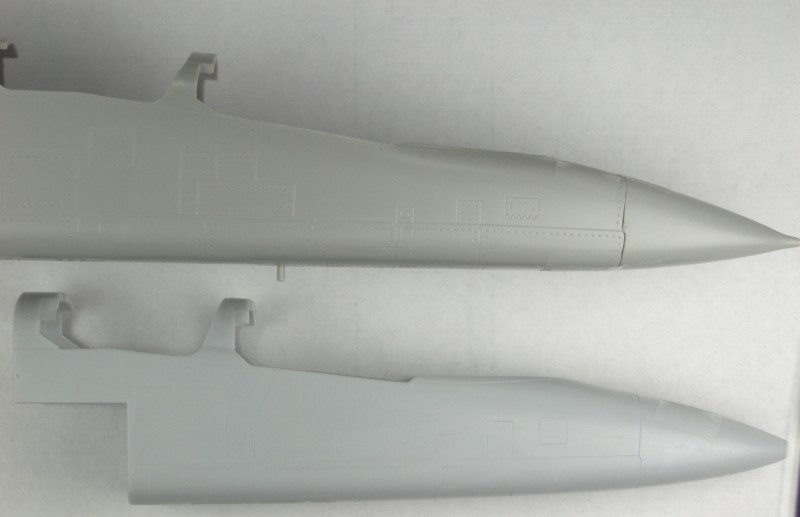
I don't see any, I didn't do any measurements as I had already made up my mind. A bottom view gives a bit better shape prospective but didn't change my mind either.
Other potential reasons for not using the set include the clear parts that come with the set, they are cast and quite nice castings but thicker than the kit parts plus they must be removed for their casting blocks. The kits parts might be made to work but I'm not going to find out.
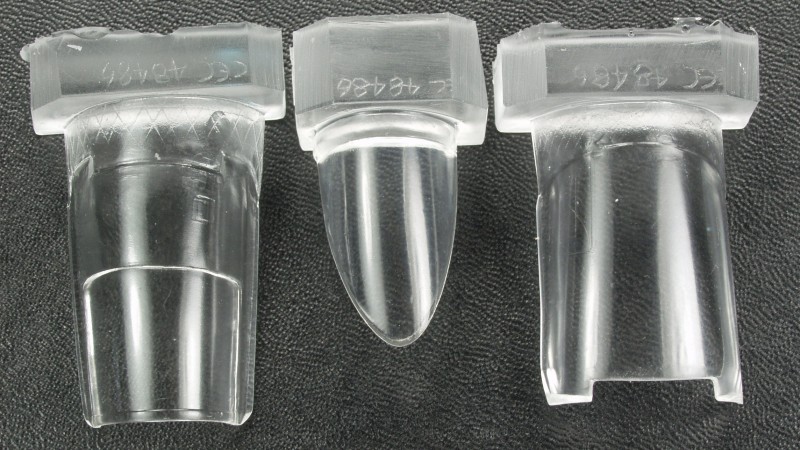
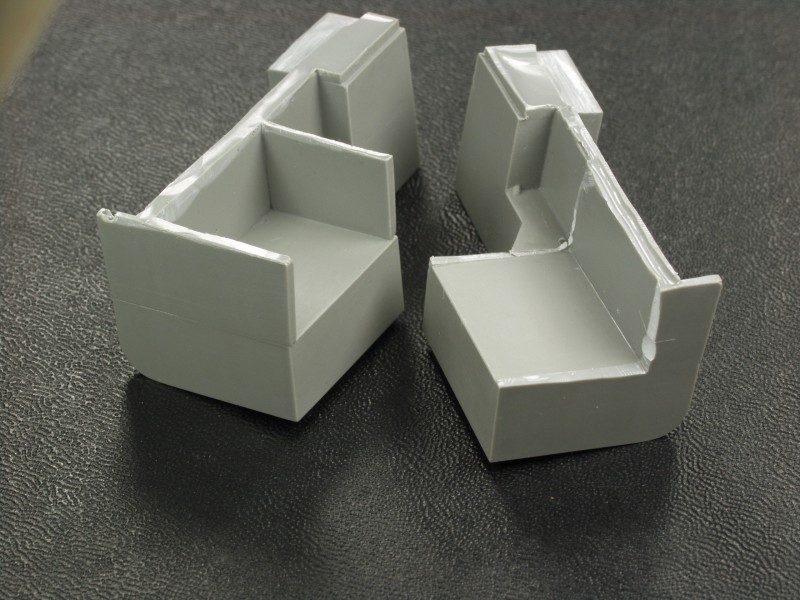
There are still unknown issues about fitting the kit pit in the CE nose. The side walls are much thicker than the kit parts so something has to give. CE tells you up front that the Black Box pit will not fit. So my mind is made up. CE parts for the nose go back in the box. Still up for grabs are the seamless intakes and the tail correction part.
Hopefully this will help make up the mind of anyone considering paying through the nose for this set.
Thanks for looking !
Before I start on episode 2, some background information just so you don't think that I have gone over to the dark side on this. This kit had been on the market about three years before I got back into modeling. Long enough for there to be some builds and reviews online as well as for the after market gurus to go to work. It was a must have kit for me so along with the kit I started grabbing up as much of the available AM as I could, knowing all too well that once a lot of it is sold out it becomes unobtanium.
Let me also say that I don't consider myself a nit picker or rivet counter. I also have come to the conclusion that I have no eye at all when it comes to shapes. I have read through countless blogs on misshapen kits and most of the time, red lines or not, I just don't see what the issue is. So when it comes to kits, it needs to be really wonky shape wise before I will spend any time trying to correct it.
With all that said I need to decide whether or not it's worth the trouble to use the Cutting Edge set to fix the horribly misshapen nose on the Trumpeter kit. I started with drawings. The ones I have were included in the Warpaint series on the RA-5C. They were drawn by Richard Caruana who seems to get mixed reviews as far as accuracy goes but they were the only things I had. They are drawn in 1/72 so I scanned and enlarged them to 1/48. Yes, there is some chance that things got distorted here. Plans are shown below...
Setting the kit and CE parts on the drawings showed that they were both close but it's always difficult when placing a 3D part on a 2D drawing. Because of parallax photos were no help. Whether either was right wasn't so much a question to me as whether there was enough difference between the two to justify the extra grief involved. Placing the two side by side I found it hard to detect and real difference between but then I do have that inability with shapes so my next thought was measurements. The result is shown below...
Well folks, that sort of made up my mind right there. The largest amount of discrepancy was .020", that's equal to the thickness of 5 sheets of the printer paper I printed the drawings out on. When compared to the down sides of using the CE part it was a no brainer to me. Side profile differences...
I don't see any, I didn't do any measurements as I had already made up my mind. A bottom view gives a bit better shape prospective but didn't change my mind either.
Other potential reasons for not using the set include the clear parts that come with the set, they are cast and quite nice castings but thicker than the kit parts plus they must be removed for their casting blocks. The kits parts might be made to work but I'm not going to find out.
There are still unknown issues about fitting the kit pit in the CE nose. The side walls are much thicker than the kit parts so something has to give. CE tells you up front that the Black Box pit will not fit. So my mind is made up. CE parts for the nose go back in the box. Still up for grabs are the seamless intakes and the tail correction part.
Hopefully this will help make up the mind of anyone considering paying through the nose for this set.
Thanks for looking !
phantom II
Master at Arms
RA-5C..epsode 1 After market...the agony of defeat
Maybe I misunderstood you Gary but I find the side profiles quite different.
The lower section of the nose has a definite upsweep on the lower one which does not correspond with the drawing.
A real shame
Cheers, Christian B)
Maybe I misunderstood you Gary but I find the side profiles quite different.
The lower section of the nose has a definite upsweep on the lower one which does not correspond with the drawing.
A real shame
Cheers, Christian B)
Old Dog
Well-known member
RA-5C..epsode 1 After market...the agony of defeat
See, that's another reason why I'm no good at shapes :gogo and another good reason not to use the CE set. I'm not at all sad as not using the set makes my life a whole lot easier. I can now proceed to work on the cockpit knowing it will fit when I'm finished and the decisions on the other issues are rather minor.
See, that's another reason why I'm no good at shapes :gogo and another good reason not to use the CE set. I'm not at all sad as not using the set makes my life a whole lot easier. I can now proceed to work on the cockpit knowing it will fit when I'm finished and the decisions on the other issues are rather minor.
RA-5C..epsode 1 After market...the agony of defeat
I'm with Chris on this, looks like the kit parts look more correct to the drawings than the replacement. I'd take path of least resistance Gary, When done it's still going to look like a RA-5.
I'm with Chris on this, looks like the kit parts look more correct to the drawings than the replacement. I'd take path of least resistance Gary, When done it's still going to look like a RA-5.
Old Dog
Well-known member
RA-5C..epsode 1 After market...the agony of defeat
For the past few weeks I have been struggling with this, after countless hours of assembling the 32 ill fitting parts that make up each of the left and right wings (talk about boosting the parts count, the wing was certainly thin enough it could have been cast in one piece) I then proceeded to fill rivet divots and other seams and issues, working as long as I could stand it before taking a break. I finally got the wings and tail surfaces all filled. I think I've already used more putty and sanding products on this than any kit I have ever built.

I then gave them a primer coat to check for stuff I missed and yes there is more to do.

I'm currently working on the fuselage as I want to get as much sanding done before joining the halves to keep from filling the cockpit with sanding debris. Along with the rivet divots there are a number of molding relics that need addressed as well.
I built up the cockpit all OOB except for the Eduard set which compared to the rest of the kit parts fit remarkably well. Yes they got the color wrong and the detail is too one dimensional but I'm not going to lose any sleep over it. I just can't paint raised detail anymore, hands aren't steady enough. The R/N position will be all but invisible with the canopy closed and the pilots stuff will look OK under glass.


I had to chose whether to use the Aires gear bays or the cutting edge intakes, using both was not an option as the Aires bays are the proper depth as opposed to the kits being too shallow and the intakes would not clear the Aires bays. I chose the intakes as I think they are more visibly noticeable so the stock bays will be used. I also had to modify the Nautilus internal brace to accept the intake trunks but not so much as to negate the purpose of it, hopefully more interesting photos tomorrow. It looks like this one is going down to the wire.
If anyone has a link to a font that mimics U.S. Navy serial numbers for the era I would appreciate it as none of the decal sets I have has all the numbers I need to the aircraft I'm doing so I'll need to make my own. Thanks for looking !
For the past few weeks I have been struggling with this, after countless hours of assembling the 32 ill fitting parts that make up each of the left and right wings (talk about boosting the parts count, the wing was certainly thin enough it could have been cast in one piece) I then proceeded to fill rivet divots and other seams and issues, working as long as I could stand it before taking a break. I finally got the wings and tail surfaces all filled. I think I've already used more putty and sanding products on this than any kit I have ever built.
I then gave them a primer coat to check for stuff I missed and yes there is more to do.
I'm currently working on the fuselage as I want to get as much sanding done before joining the halves to keep from filling the cockpit with sanding debris. Along with the rivet divots there are a number of molding relics that need addressed as well.
I built up the cockpit all OOB except for the Eduard set which compared to the rest of the kit parts fit remarkably well. Yes they got the color wrong and the detail is too one dimensional but I'm not going to lose any sleep over it. I just can't paint raised detail anymore, hands aren't steady enough. The R/N position will be all but invisible with the canopy closed and the pilots stuff will look OK under glass.
I had to chose whether to use the Aires gear bays or the cutting edge intakes, using both was not an option as the Aires bays are the proper depth as opposed to the kits being too shallow and the intakes would not clear the Aires bays. I chose the intakes as I think they are more visibly noticeable so the stock bays will be used. I also had to modify the Nautilus internal brace to accept the intake trunks but not so much as to negate the purpose of it, hopefully more interesting photos tomorrow. It looks like this one is going down to the wire.
If anyone has a link to a font that mimics U.S. Navy serial numbers for the era I would appreciate it as none of the decal sets I have has all the numbers I need to the aircraft I'm doing so I'll need to make my own. Thanks for looking !
phantom II
Master at Arms
RA-5C..epsode 1 After market...the agony of defeat
Wow, interesting words about eduard.... and 32 parts ??? Good grief :facepalm
Cockpit looks quite interesting
Cheers, Christian B)
Wow, interesting words about eduard.... and 32 parts ??? Good grief :facepalm
Cockpit looks quite interesting
Cheers, Christian B)
Old Dog
Well-known member
RA-5C..epsode 1 After market...the agony of defeat
OK, it appears that I exaggerated a bit, parts count was only 16 per wing, it just seemed like 32. For the price of the kit when it was released they should have provided a one piece casting as an option for those who don't want dropped slats and flaps and folded wing tips. (rant off)
OK, it appears that I exaggerated a bit, parts count was only 16 per wing, it just seemed like 32. For the price of the kit when it was released they should have provided a one piece casting as an option for those who don't want dropped slats and flaps and folded wing tips. (rant off)
helios
Well-known member
RA-5C...progress at last !
Git sum!
Glad to see you plugging away again. I hear you on all the filling & sanding... :frantic I'm starting to wonder if I made the right decision...oh well, too late now! I'll be coming down to the wire as well. Been hectic the past couple weeks...hope I can find enough time this weekend.
Git sum!
Glad to see you plugging away again. I hear you on all the filling & sanding... :frantic I'm starting to wonder if I made the right decision...oh well, too late now! I'll be coming down to the wire as well. Been hectic the past couple weeks...hope I can find enough time this weekend.
RA-5C...progress at last !
Whip it Gary!
Whip it Gary!
centaur567
Well-known member
RA-5C...progress at last !
It will be a cool looking plane when your done. Gary
It will be a cool looking plane when your done. Gary
Old Dog
Well-known member
RA-5C...progress at last !
Well, in order to finish by the deadline I would have needed to start the finish process by Friday morning at the latest but I'm still finding issues to deal with and had a fail on my first attempt at painting the insides of the seamless intakes. I'm still going to plug away at this till it's finished but that is probably still a week away if I allow proper curing time between paint and finish coats. Stay tuned !

Well, in order to finish by the deadline I would have needed to start the finish process by Friday morning at the latest but I'm still finding issues to deal with and had a fail on my first attempt at painting the insides of the seamless intakes. I'm still going to plug away at this till it's finished but that is probably still a week away if I allow proper curing time between paint and finish coats. Stay tuned !
RA-5C...progress at last !
You know how management is around here Gary, if the door is left open keep building.
You know how management is around here Gary, if the door is left open keep building.
Similar threads
- Replies
- 9
- Views
- 393