• Modelers Alliance has updated the forum software on our website. We have migrated all post, content and user accounts but we could not migrate the passwords.
    This requires that you manually reset your password.
    Please click here, http://modelersalliance.org/forums/login to go to logon page and use the "Forgot your Password" option.

CTA Entry Iron Mike Panther G

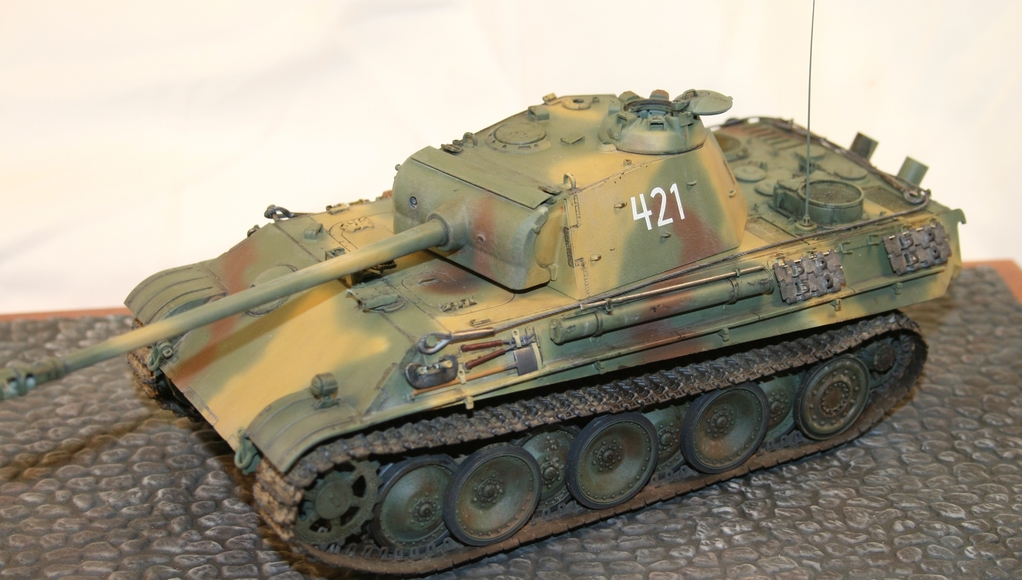
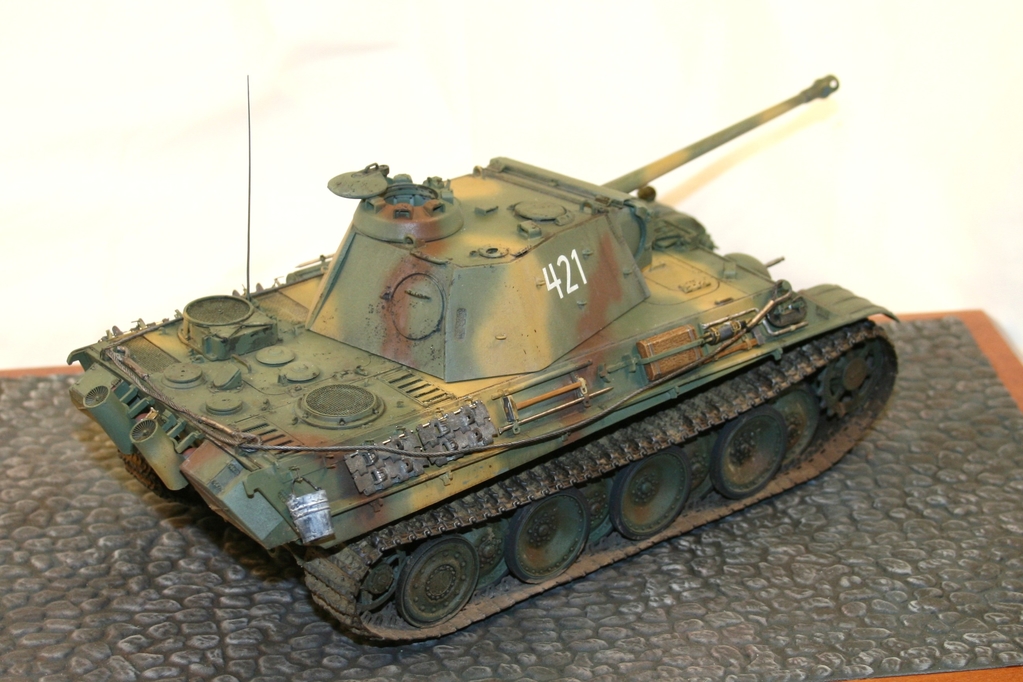
Thank you, friends! James, the tracks are the kit Magic Tracks. I used blue painter's tape, sticky side up to assemble the links. Once you get the number of links together, brush Testors Liquid Cement over the entire run. Don't get crazy with the cement, but you want enough to adhere the links. I wait about 10 minutes, then carefully pry the run from the masking tape. If the run comes apart, don't worry, just reglue and wait another 10 minutes. My method is to lightly prime the tracks with Tamiya spray primer, then force dry the primer with a hair dryer. Flip the run over and repeat the primer and drying. A light coat of flat black spray (I use cheap rattle can paint) on both sides, then I paint the track color with either Panzer Aces Track Primer or Tamiya Flat Earth. All the painting takes about 15 minutes, you have to work fast, because you will need to bend the tracks around the sprockets and returns before the glue hardens. The tracks stay malleable for about 45-60 minutes, so the paint just needs to be dry enough to handle. You can always touch up any spots that get rubbed off and I wash the tracks with AK Interactive's Track Wash, which helps add depth to the colors. More update pictures coming soon. :drinks
 
Thanks for the lesson professor Mike!
Always have a hard time doing magic tracks,think this is THE way to do them much easier! (y)

http://www.youtube.com/watch?feature=player_detailpage&v=26cSk60Aj3Y

Greetings,Ron.
 
Holy cow, it's been a month since the last update!!?? :eek:hmy: Yesterday, I broke out the oils and gave the beast the beginnings of a fade.

I had sealed the whole tank with Future for the MIG dark wash on the details, then started with various shades of oils, small dots all over!

IMG_6041.JPG


IMG_6040.JPG


IMG_6039.JPG


The dots are blended into the surface with a brush wetted with AK white spirits, I like to do mine in stages, that way I don't get carried away with the colors. This is the result of the first round, subtle fading.

IMG_6042.JPG


IMG_6043.JPG


IMG_6044.JPG


IMG_6045.JPG


I plan to hit it again in specific areas to enhance the effect and to blend a few of the areas that look stark. More to come!

:drinks
 
'Abteilung'oils...gotto love them. (y)
This will be great looking with the other colors on.

:soldier on,Mike.


Greetings,Ron.
 
Thank you, my friends! James, there are dots of all the colors on the palette, they are just small dots, but I took the picture before adding them all :blink . I used white, buff, faded dark yellow and shadow brown. I like the softness of the colors, like they are dusty and well used. Next will be some rain marks. :coolio
 
Finished at long last! The last bits came together slowly, as they always seem to do for me. I added some Friul spare track links, courtesy of a good friend of mine, a brass bucket from RB Model and lots of pastel dirt. The tow cables are Karaya, made of really soft copper stranded wire with resin ends.

IMG_6112.JPG


IMG_6113.JPG


IMG_6114.JPG


IMG_6116.JPG


The bucket was primed with Tamiya spray primer, brush painted with Model Color German Grey and then whitewashes with Model Color White Glaze. The pins holding the spare tracks and such are scratch made from brass wire, oxidized with Blacken It.

IMG_6121.JPG


IMG_6122.JPG


IMG_6117.JPG


IMG_6118.JPG


IMG_6120.JPG


This has been a fun build, challenging at times, but I hope a fitting tribute to our comrade, Tanktrax.

To John! :drinks
 
BAM! Nailed it, great effect on the bucket. Those Friuls for spares really help it out. Great finish Mike :notworthy

to John :drinks
 
Back
Top