
-
Modelers Alliance has updated the forum software on our website. We have migrated all post, content and user accounts but we could not migrate the passwords.
This requires that you manually reset your password.
Please click here, http://modelersalliance.org/forums/login to go to logon page and use the "Forgot your Password" option.
You are using an out of date browser. It may not display this or other websites correctly.
You should upgrade or use an alternative browser.
You should upgrade or use an alternative browser.
All Righty ... What's on the bench today?
- Thread starter panzerace007
- Start date


Duke Maddog
Well-known member
Nice Mike! Everything is looking great!
It feels great to clean the Hobby Room again doesn't it?
It feels great to clean the Hobby Room again doesn't it?

Duke Maddog
Well-known member
That looks great! Looking forward to seeing it in paint.


Nice Gerry. 
Heavens Eagle
Well-known member
My weekend ended up being "work on the vacuum table" weekend. While I have the wood table top with all it's goodies pretty much done, the cabinet is being a pain.
Rustolium Paint Sucks! Pretty much sums it all up. Didn't do anything it was supposed to do, but did all the crappy stuff you don't want it to do. Later in the week I will sand the cabinet back smooth and repaint with Krylon.
So far have redone the vac platorm with hardware, the vacuum gage with hardware has been redone and the wood cabinet top has been redone with the serial number plate. The bell jar which is hand blown glass has also been fully cleaned up and a box with styrofoam packing has been assembled to protct it. The glass bell jar would run about $400-500 to replace if it got broke.
Yeah there will be pictures, working on a thread on what and how I am doing it.
Rustolium Paint Sucks!
Pretty much sums it all up. Didn't do anything it was supposed to do, but did all the crappy stuff you don't want it to do. Later in the week I will sand the cabinet back smooth and repaint with Krylon.So far have redone the vac platorm with hardware, the vacuum gage with hardware has been redone and the wood cabinet top has been redone with the serial number plate. The bell jar which is hand blown glass has also been fully cleaned up and a box with styrofoam packing has been assembled to protct it. The glass bell jar would run about $400-500 to replace if it got broke.
Yeah there will be pictures, working on a thread on what and how I am doing it.
ernestsink
Member
:idonno Has anyone made a model of this KM Ekranoplan (Caspian Sea Monster)? :idonno
https://www.youtube.com/watch?v=DGjXSg45iSY
https://www.youtube.com/watch?v=DGjXSg45iSY
Heavens Eagle
Well-known member
I think there were several different versions of these. I know of one that was huge and another that had some missile launchers on it's back.
As to kits I am not sure if there any around.
As to kits I am not sure if there any around.
Duke Maddog
Well-known member
There was a 1/144 scale model of this aircraft done by someone some years back. I can't remember which company did it though. I've always wanted one in 1/72 scale, but that hasn't ever happened.
Duke Maddog
Well-known member
Today I finally had a chance to work on models for the first time in over a month. I've been overwhelmed with a whole mess of things coming at me all at once; including more work than I can shake a stick at. I'm thrilled to be working, yet was pleasantly surprised at the chance to take a day off today. This gave me a chance to get some modeling done and boy did it feel good!
This will be a short update given how little Ive been able to build as of late.
I'll start with a couple fun projects that had been delayed a bit too long. This first one is my SE-5A for the Canvas Eagles game. I finally pulled all the masking, added the propeller and front of the engine cover; and then added the landing gear and the top wing to this bird:


Next up I started to work on my Monkeemobile again, hoping to get to the point where I could finally close it up. I painted the interior and the roof cover, but I didn't get pics of them. Later, I started the top part of the engine and got it all completed:

Next I dry-fit that to the body after adding the headlights and split grill:

Looking pretty good. That's when I ran into a snag. The engine I built first has disappeared. Until I find it, I can't do much more to this. Hopefully I'll find it soon; it's not like it's a tiny piece for cryin' out loud!
Moving right along, I decided to try and get closer to my 700ct goal. Since I finally got the Pershing II missile system, I was eager to get started on it. The first thing I found was an interesting concept: the missile was broken down into six parts that had to be assembled:

I started by cementing two of the quarter sections together to make halves, then I cemented the two warhead halves together:

Next I put the whole thing together:

Not bad, but it's going to take a lot of cleanup. What an ordeal that was trying to get that all lined up!
Speaking of ordeals, next I started the chassis. This was not good: this kit went old school requiring you to take the chassis rails and cross braces and assemble them into a perfectly lined up and squared off chassis:

After that, I had enough. The rest of this went back into the box for another day.
I didn't stop there with the difficult builds. I pulled out the Russian Armored Train and went to work on two more of the quad maxims. What a mindbogglingly frustrating adventure that was! I did manage to finally get them assembled; after having them break apart numerous times every time I tried to adjust them or add something else. They are not perfectly aligned, but they are done!
First Part:

Second part:

Anyone who says anything about them being misaligned can assemble my last two for me and show me how it's supposed to be done!
Once the guns were done, I assembled and installed the mounting posts for these quads on the two places they needed to go. One goes on the little ZIS-5 truck:

Which then gets mounted on a flatcar:

The space in front of that truck will be holding a 47mm anti-tank gun.
The second quad gun goes on the engine and tender:

Once I get the rest of the P/E on the two long flatcars (one holds the truck and gun, the other holds the BT-5) and on the two smaller flatcars, this while thing will be ready for paint.
FINALLY!
After all this crap, I decided to go back to something simple. I pulled out the Command Boxer and started the second color on the three-tome camo pattern:


Later on I'll add the third color. Then I'll be able to clearcoat both Boxers and the Fuchs and decal them all, give them washes and then get them finished.
After this, I figured it was time to move on with my Japanese Patriot system. I finished off the trailer; adding the wheels later after these pics were taken:


Next I went back and painted the interior of the cab. Then I assembled the cab and added it to the main chassis:


I know it appears that the cab is leaning forward, but I assure you it is straight. The whole thing is an optical illusion. I should know; I kept checking the cab alignment every few minutes!
That being said, the cab is set up so it does tilt forward to show off the engine. I thought that was pretty cool!
Here's a couple shots of the whole thing put together. This is pretty impressive:


All I have now to do with this is assemble the Patriot missile boxes and mount them on the mechanism that raises them up to fire. I'm looking forward to getting this painted along with several other models.
That's all I have for this short update. It ain't much and probably will be the last for a while until I can get more of these jobs done. So enjoy them now and remember, comments are welcome. I probably won't be able to respond to anything until Sunday at the earliest, so don't worry if there's no replies by me. So let me say up front: Thanks for looking in.
This will be a short update given how little Ive been able to build as of late.
I'll start with a couple fun projects that had been delayed a bit too long. This first one is my SE-5A for the Canvas Eagles game. I finally pulled all the masking, added the propeller and front of the engine cover; and then added the landing gear and the top wing to this bird:
Next up I started to work on my Monkeemobile again, hoping to get to the point where I could finally close it up. I painted the interior and the roof cover, but I didn't get pics of them. Later, I started the top part of the engine and got it all completed:
Next I dry-fit that to the body after adding the headlights and split grill:
Looking pretty good. That's when I ran into a snag. The engine I built first has disappeared. Until I find it, I can't do much more to this. Hopefully I'll find it soon; it's not like it's a tiny piece for cryin' out loud!
Moving right along, I decided to try and get closer to my 700ct goal. Since I finally got the Pershing II missile system, I was eager to get started on it. The first thing I found was an interesting concept: the missile was broken down into six parts that had to be assembled:
I started by cementing two of the quarter sections together to make halves, then I cemented the two warhead halves together:
Next I put the whole thing together:
Not bad, but it's going to take a lot of cleanup. What an ordeal that was trying to get that all lined up!
Speaking of ordeals, next I started the chassis. This was not good: this kit went old school requiring you to take the chassis rails and cross braces and assemble them into a perfectly lined up and squared off chassis:
After that, I had enough. The rest of this went back into the box for another day.
I didn't stop there with the difficult builds. I pulled out the Russian Armored Train and went to work on two more of the quad maxims. What a mindbogglingly frustrating adventure that was! I did manage to finally get them assembled; after having them break apart numerous times every time I tried to adjust them or add something else. They are not perfectly aligned, but they are done!
First Part:
Second part:
Anyone who says anything about them being misaligned can assemble my last two for me and show me how it's supposed to be done!
Once the guns were done, I assembled and installed the mounting posts for these quads on the two places they needed to go. One goes on the little ZIS-5 truck:
Which then gets mounted on a flatcar:
The space in front of that truck will be holding a 47mm anti-tank gun.
The second quad gun goes on the engine and tender:
Once I get the rest of the P/E on the two long flatcars (one holds the truck and gun, the other holds the BT-5) and on the two smaller flatcars, this while thing will be ready for paint.
FINALLY!
After all this crap, I decided to go back to something simple. I pulled out the Command Boxer and started the second color on the three-tome camo pattern:
Later on I'll add the third color. Then I'll be able to clearcoat both Boxers and the Fuchs and decal them all, give them washes and then get them finished.
After this, I figured it was time to move on with my Japanese Patriot system. I finished off the trailer; adding the wheels later after these pics were taken:
Next I went back and painted the interior of the cab. Then I assembled the cab and added it to the main chassis:
I know it appears that the cab is leaning forward, but I assure you it is straight. The whole thing is an optical illusion. I should know; I kept checking the cab alignment every few minutes!
That being said, the cab is set up so it does tilt forward to show off the engine. I thought that was pretty cool!
Here's a couple shots of the whole thing put together. This is pretty impressive:
All I have now to do with this is assemble the Patriot missile boxes and mount them on the mechanism that raises them up to fire. I'm looking forward to getting this painted along with several other models.
That's all I have for this short update. It ain't much and probably will be the last for a while until I can get more of these jobs done. So enjoy them now and remember, comments are welcome. I probably won't be able to respond to anything until Sunday at the earliest, so don't worry if there's no replies by me. So let me say up front: Thanks for looking in.
") Mark
MarkLike the SE5.
Duke Maddog
Well-known member
Thanks guys! I'm happy with this so far. I was hoping I'd be further along on some of these, but I'm thrilled to be working again!
Heavens Eagle
Well-known member
Today I have been basically benched. The store where I work moved to the new digs Friday and Saturday. This next week is putting things away, cleaning, setting up equipment, figuring out where to put all the merchandise in the new display cases, and all that bit.
The other watchmaker and I have our own office now with a huge window looking out on the street next to the store and the park like church parking lot across the street (has a LOT of trees and stuff) Gorgeous new building, nice office, and wonderful folks to work with. Have tried to not overdo it and mess my back up again. So far so good! Legs are a little sore as well as other parts, but none of the usual signs where my back will be giving fits. :woohoo:
The other watchmaker and I have our own office now with a huge window looking out on the street next to the store and the park like church parking lot across the street (has a LOT of trees and stuff)
Gorgeous new building, nice office, and wonderful folks to work with. Have tried to not overdo it and mess my back up again. So far so good! Legs are a little sore as well as other parts, but none of the usual signs where my back will be giving fits. :woohoo:I did a bunch of chores around the house today. Mostly on the ol' pickup truck.
Those of you all who've ridden with me lately know my instrument panel is shot, problem with those '03 GMC, recall went out on them but when I got the notice it was too late. Long story short, $35 gets you 6 stepper motors to replace or you can buy the full IP for like $450 with a $250 return core. I figure try to replace the motors first.
Had to warm up the soldering iron and find the desolder wick. Didn't get action shots but here's what was on the bench today.
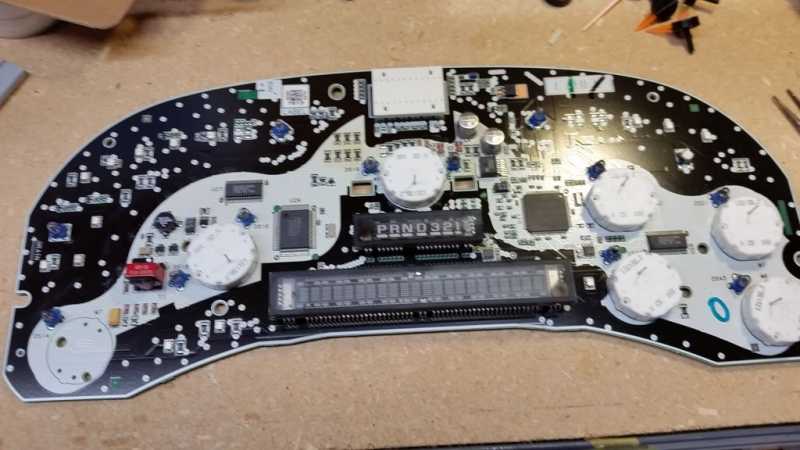
Had to desolder the contacts, pry the motors off and replace with the new ones, resolder. By the time I got the 5th one done I was an ol' pro. Only replaced 5, the tach was still good.
Nice to know how much gas you really have and how fast your going. It is hard to gauged your speed with only the tach.
BTW, Mission accomplished. All the gauges work again.
Those of you all who've ridden with me lately know my instrument panel is shot, problem with those '03 GMC, recall went out on them but when I got the notice it was too late. Long story short, $35 gets you 6 stepper motors to replace or you can buy the full IP for like $450 with a $250 return core. I figure try to replace the motors first.
Had to warm up the soldering iron and find the desolder wick. Didn't get action shots but here's what was on the bench today.
Had to desolder the contacts, pry the motors off and replace with the new ones, resolder. By the time I got the 5th one done I was an ol' pro. Only replaced 5, the tach was still good.
Nice to know how much gas you really have and how fast your going. It is hard to gauged your speed with only the tach.
BTW, Mission accomplished. All the gauges work again.
Swordsman
Active member
Nice work there Mark ... I likey ... now that I see the monkeee mobile guess I need to change my 61 failane a bit looks very close in the front ....
Glad you fixed the IP in your truck MP ... Mines in the same shape .... I have one light that works so I hate night driving ...
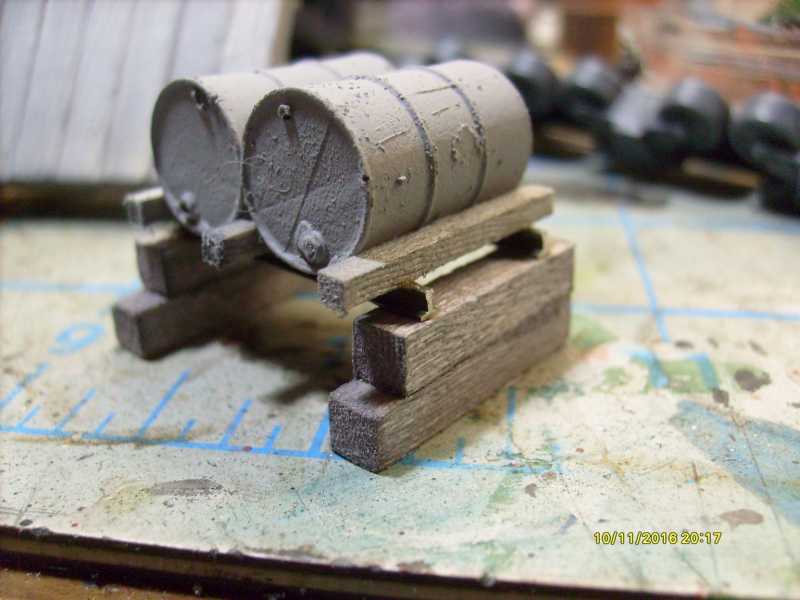
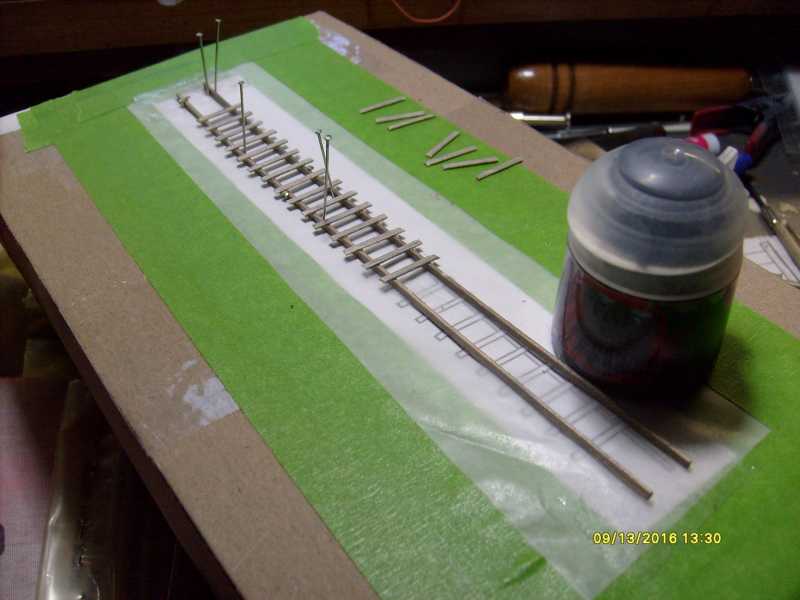
I've been working on this Barrel Rack ...

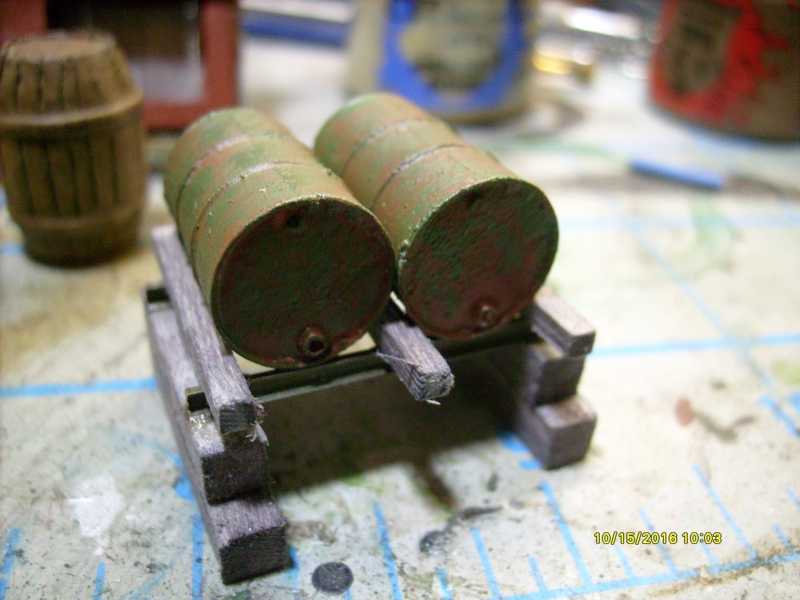
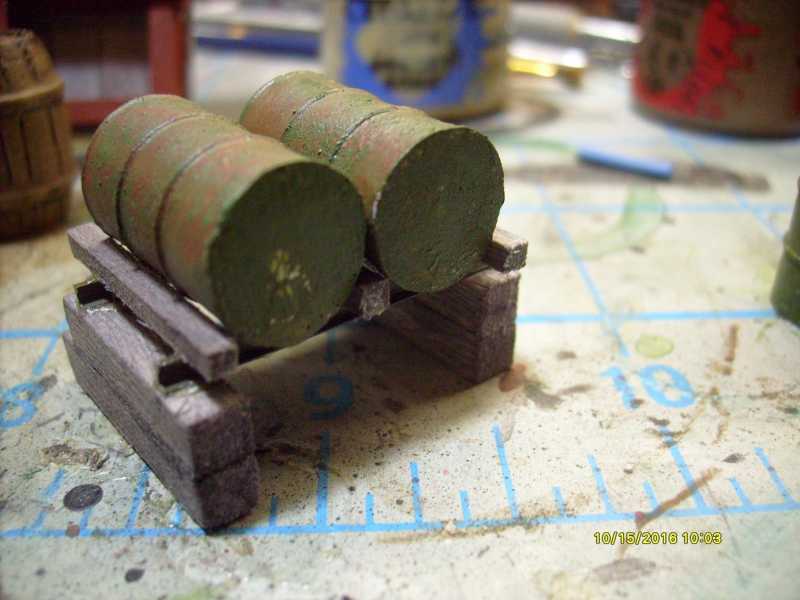
I just need to add some Bragdon's powders to tone the shine down ....
Glad you fixed the IP in your truck MP ... Mines in the same shape .... I have one light that works so I hate night driving ...
I've been working on this Barrel Rack ...
I just need to add some Bragdon's powders to tone the shine down ....