
-
Modelers Alliance has updated the forum software on our website. We have migrated all post, content and user accounts but we could not migrate the passwords.
This requires that you manually reset your password.
Please click here, http://modelersalliance.org/forums/login to go to logon page and use the "Forgot your Password" option.
You are using an out of date browser. It may not display this or other websites correctly.
You should upgrade or use an alternative browser.
You should upgrade or use an alternative browser.
Adam Baker: Befehlsjager 38 (Complete!)
- Thread starter Adam Baker
- Start date
Adam Baker: DML 1/35 Befehlsjager 38 Ausf.M

Adam Baker
Active member
Adam Baker: DML 1/35 Befehlsjager 38 Ausf.M
We got color! Today I decided I was far enough along to put down some color. Went with Tamiya Nato Green.
After getting it all painted, and looking at things, I dont know that I like it. I knew that when its closed up, the drivers compartment is going to be fairly dark, but now its so dark it's almost impossible to see anything.
Problem I have is conflicting info all over the place. I've seen images that show both green as well as tan/buff/dark yellow for the drivers compartment, and green and red oxide for the engine compartment.
I've decided that I'm going to go w/ either Tamiya Buff or Tamiya Dark Yellow for the drivers comparment. The Buff is a little bit whiter than the Dark Yellow, but I'm leaning toward DY. For the engine compartment I'm leaning toward going w/ the red oxide. I dont have that shade in my Tamiya colors, so not sure what I'll use. The colors may not be totally accurate, but from what I've read, both colors were used, just possibly maybe not w/ this particular variant, but both colors will make seeing into both compartments a bit easier.
Adam Baker: DML 1/35 Befehlsjager 38 Ausf.M
Go Buff, can't go wrong.
Go Buff, can't go wrong.
Adam Baker
Active member
Adam Baker: DML 1/35 Befehlsjager 38 Ausf.M
Yea, that was the direction I was leaning Bob, but glad to get a 2nd opinion on it.
Do you know if Tamiya has a Red Oxide like color? Googled it and all I get is an actual Red Oxide primer that I don't remember ever seeing at the Hobby Town. Another thing I saw was someone going 50/50 w/ Red Brown & Flat to approximate a Red Oxide.
Adam Baker: DML 1/35 Befehlsjager 38 Ausf.M
Red Brown works for primer.
Red Brown works for primer.
Adam Baker
Active member
Adam Baker: DML 1/35 Befehlsjager 38 Ausf.M
Cool deal. I'll stop at the Hobby Town today and pick up a bottle of that then since I don't have any.
Cool deal. I'll stop at the Hobby Town today and pick up a bottle of that then since I don't have any.
Adam Baker
Active member
Adam Baker: DML 1/35 Befehlsjager 38 Ausf.M
Finally an update.
So after deciding I didnt like the green, I went w/ the Tamiya Buff and painted the interior, and now i"m much happier w/ how it looks. Interior is much lighter when the cover is on it, so maybe half of the work I did is visible, vs almost none when it was painted green, haha.
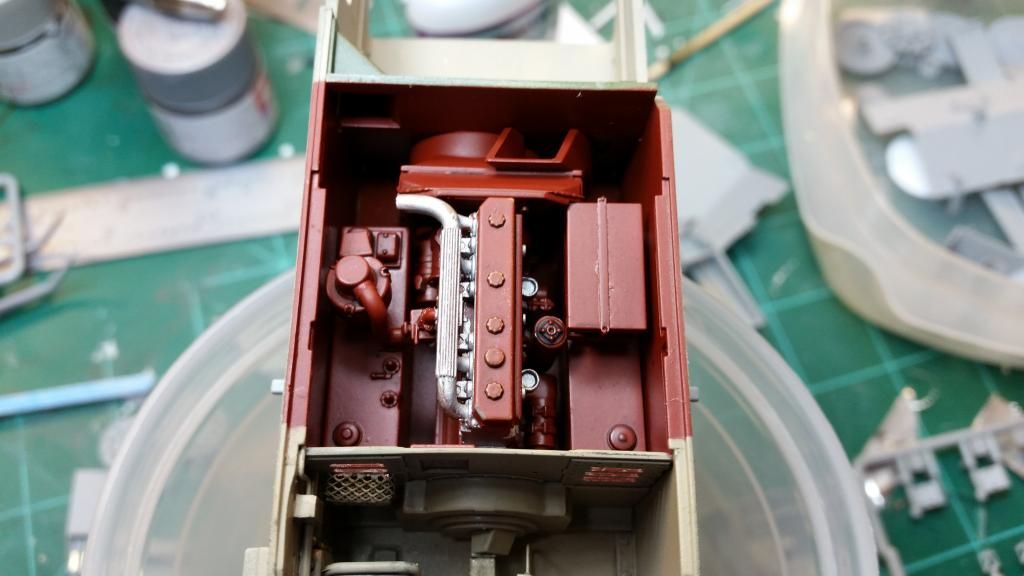
And then tonight I painted the engine compartment. I'd originally planned on going w/ the Tamiya Red Brown, but after looking at it, I just decided it was too brown. After doing some searching on the net for red oxide primer, I found someone somewhere that mentioned using Vallejo Cavalry Brown as a primer, so I gave it a shot, and I'm very happy w/ how it looks.
Now that the engine compartment is painted, I'm going to go back and seal all of it w/ Future so that I can start doing some detail washes & weathering to the drivers compartment. I'm also going to work on adding some details and color to the engine compartment. I'd originally planned on adding a ton of detail, but I just don't want to do that anymore. I think I was getting burnt out and overwhelmed with trying to add detail to the drivers compartment, and it just really turned me off to doing it. So I'll stick to some smaller stuff that will be more visible, and call it good with that.
Finally an update.
So after deciding I didnt like the green, I went w/ the Tamiya Buff and painted the interior, and now i"m much happier w/ how it looks. Interior is much lighter when the cover is on it, so maybe half of the work I did is visible, vs almost none when it was painted green, haha.
And then tonight I painted the engine compartment. I'd originally planned on going w/ the Tamiya Red Brown, but after looking at it, I just decided it was too brown. After doing some searching on the net for red oxide primer, I found someone somewhere that mentioned using Vallejo Cavalry Brown as a primer, so I gave it a shot, and I'm very happy w/ how it looks.
Now that the engine compartment is painted, I'm going to go back and seal all of it w/ Future so that I can start doing some detail washes & weathering to the drivers compartment. I'm also going to work on adding some details and color to the engine compartment. I'd originally planned on adding a ton of detail, but I just don't want to do that anymore. I think I was getting burnt out and overwhelmed with trying to add detail to the drivers compartment, and it just really turned me off to doing it. So I'll stick to some smaller stuff that will be more visible, and call it good with that.
Adam Baker: Befehlsjager 38 Ausf.M (Update 1/13)
Heavens Eagle
Well-known member
Adam Baker: Befehlsjager 38 Ausf.M (Update 1/13)
Looking quite nice Adam!")
Looking quite nice Adam!
Adam Baker
Active member
Adam Baker: Befehlsjager 38 Ausf.M (Update 1/13)
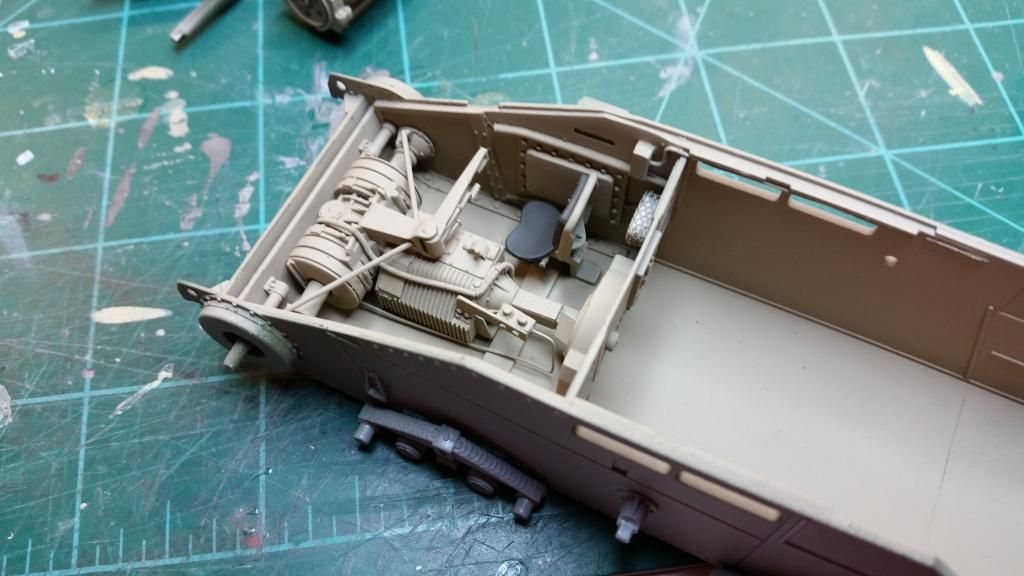
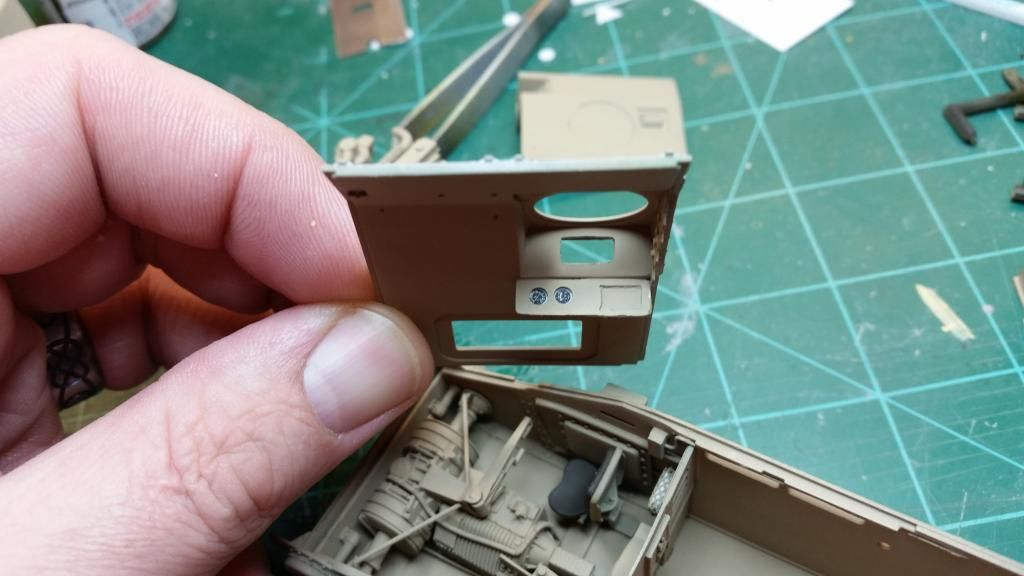
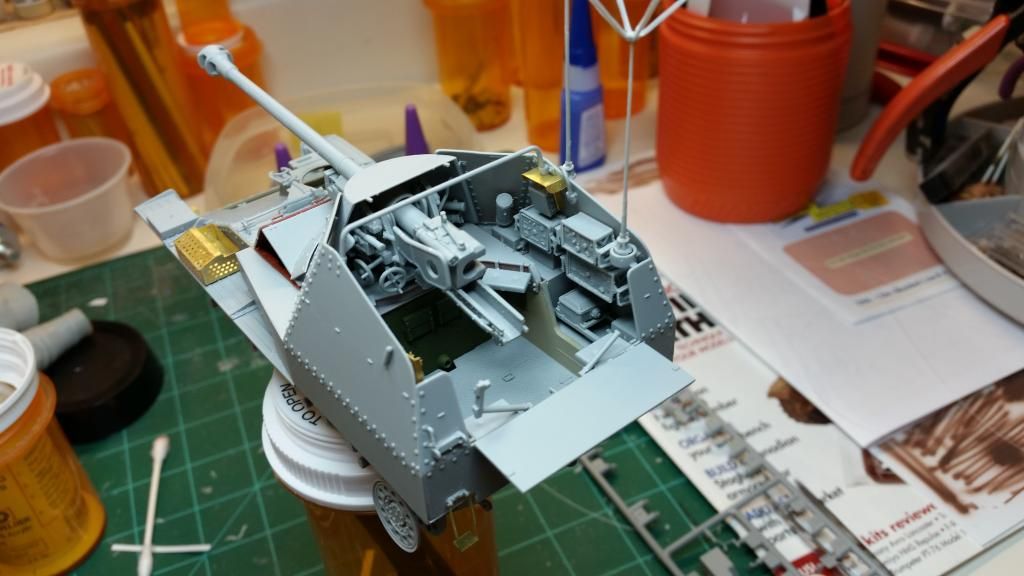
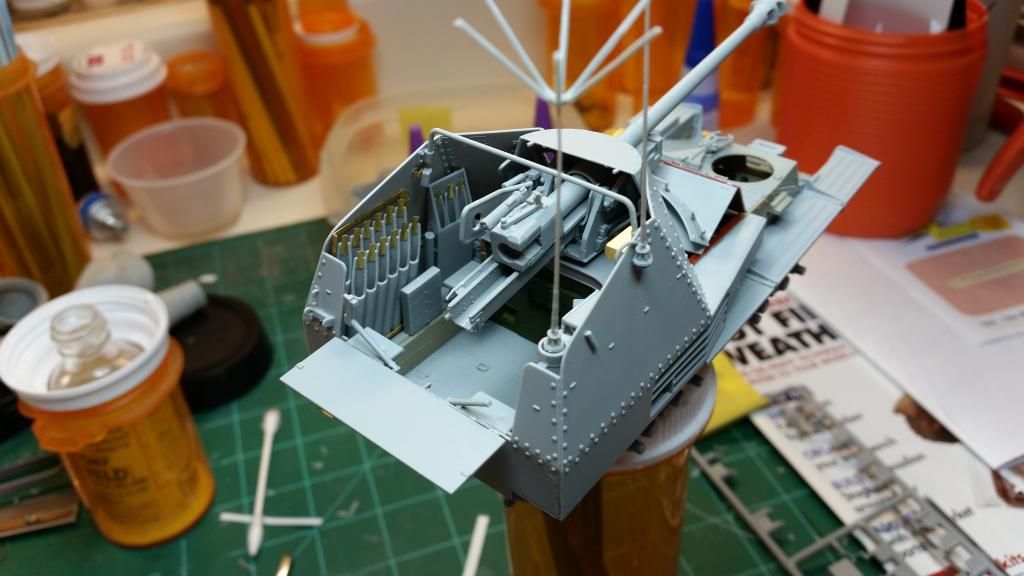
Been able to make some more progress over the last week or so.
I decided last week that I wasn't going to add any detail to the engine compartment. I think I got burnt out & overwhelmed w/ trying to add detail to the drivers compartment, and it just really bogged things down for me. So I decided to assemble the driver & engine compartments, and clear them so I could weather them some.
After a couple coats of future, I decided to try doing a pin wash w/ thinned Winsor & Newton black. Not 100% satisfied w/ how it came out, but it worked well enough so I went with it.
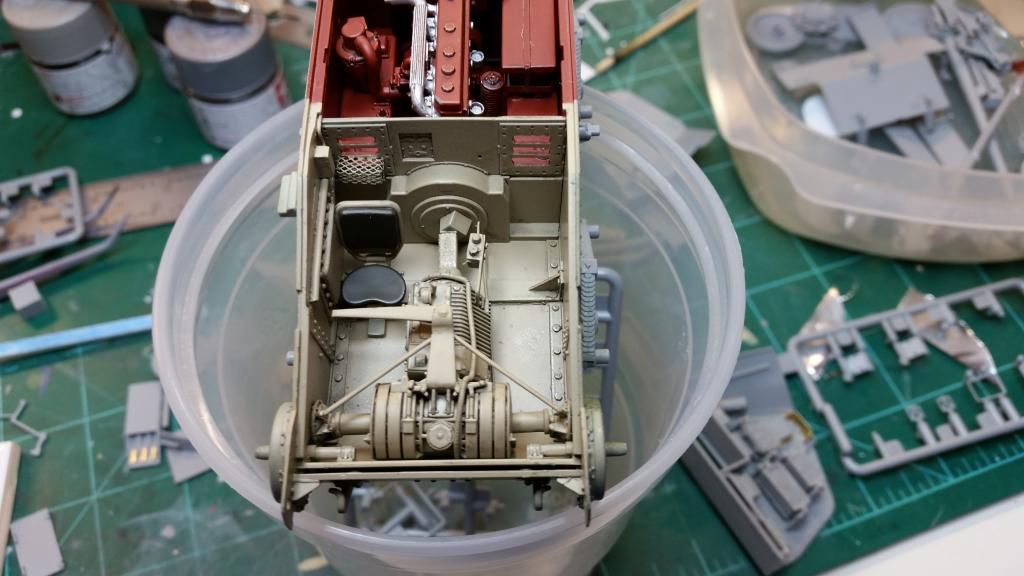
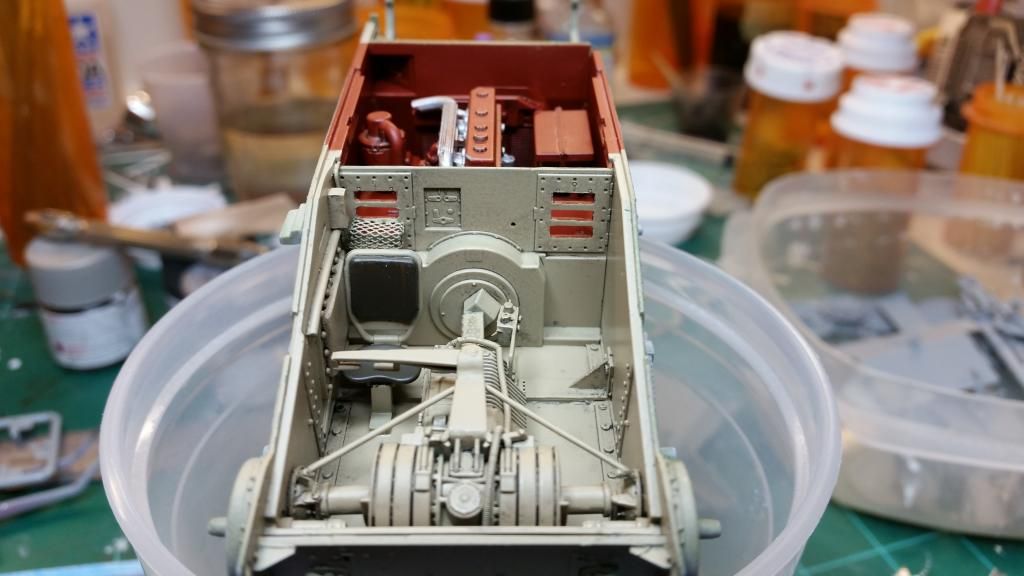
I then put down some Testors Dull coat to flatten it all out. I think I might have had some issues w/ the lacquer flat messing up the future, but I didn't really care. The one area I had problems isn't visible at all w/ the hull assembled, so I just moved on.
Tonight I dove into assembly work, and made some pretty nice progress, getting most of the exterior assembled.
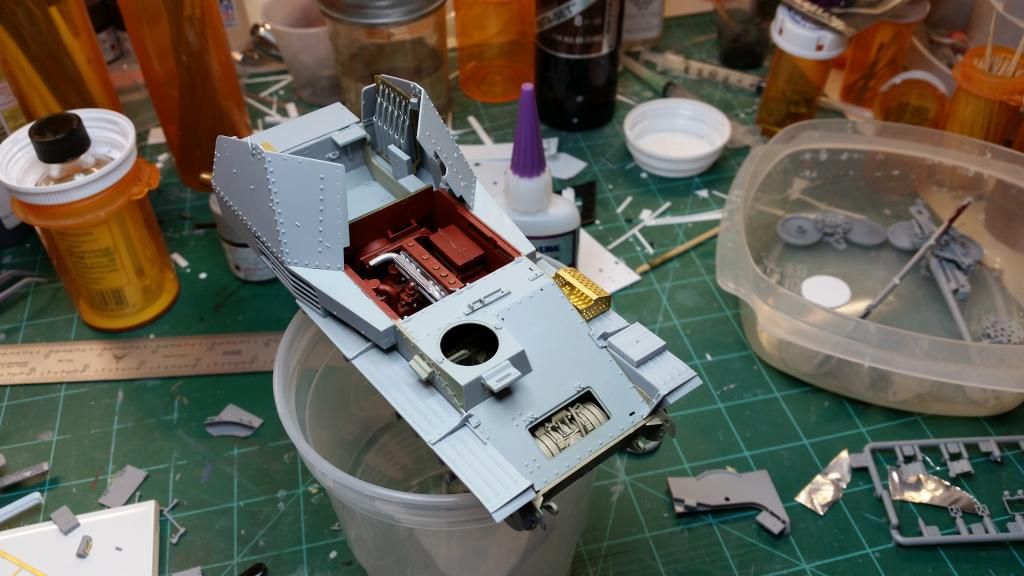
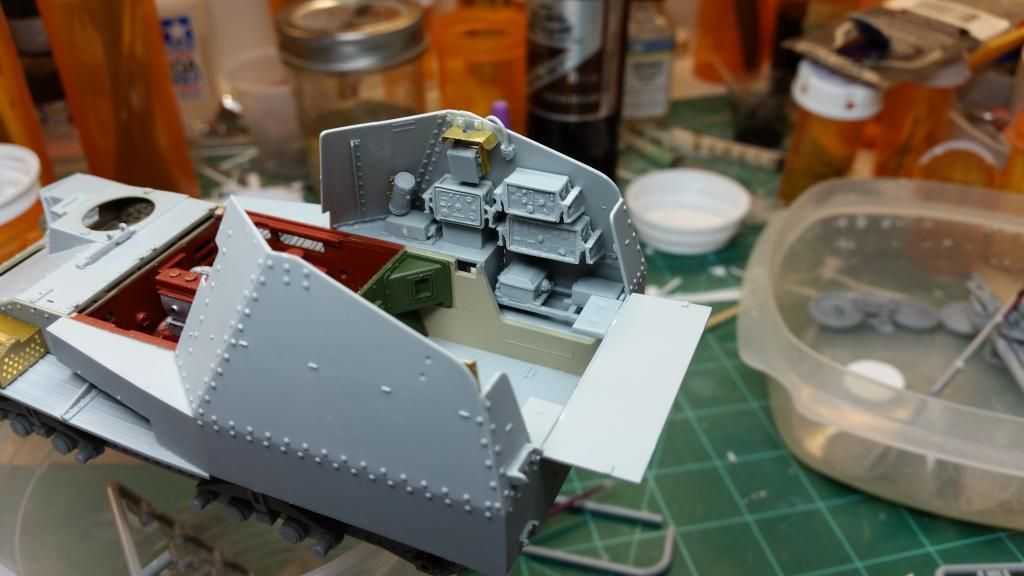
I had wanted to add detail around the radio's, wiring & such, but I just don't feel like doing that anymore. I just want to make progress and get things moving along.
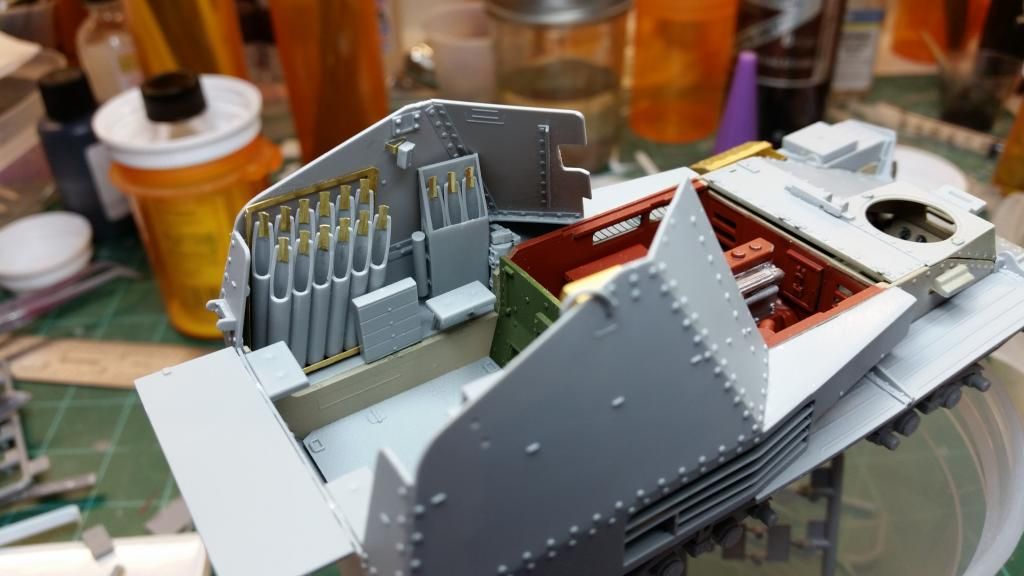
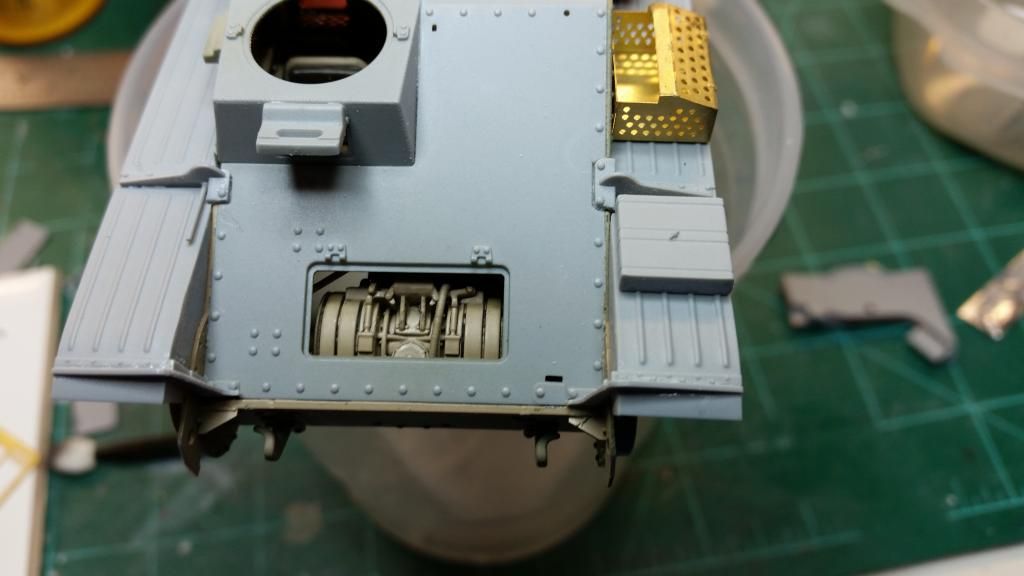
And here's what the transmission looks like w/ the hull assembled. Some nice detail showing, enough to make me happy.
Going to try to keep plugging away on this over the next few days. Work on cleaning up seams and anywhere I have issues, and then hopefully by next weekend I might be in a position to start laying down some color but we'll see. Things at work are really busy at the moment, so no idea how that might play into bench time.
Been able to make some more progress over the last week or so.
I decided last week that I wasn't going to add any detail to the engine compartment. I think I got burnt out & overwhelmed w/ trying to add detail to the drivers compartment, and it just really bogged things down for me. So I decided to assemble the driver & engine compartments, and clear them so I could weather them some.
After a couple coats of future, I decided to try doing a pin wash w/ thinned Winsor & Newton black. Not 100% satisfied w/ how it came out, but it worked well enough so I went with it.
I then put down some Testors Dull coat to flatten it all out. I think I might have had some issues w/ the lacquer flat messing up the future, but I didn't really care. The one area I had problems isn't visible at all w/ the hull assembled, so I just moved on.
Tonight I dove into assembly work, and made some pretty nice progress, getting most of the exterior assembled.
I had wanted to add detail around the radio's, wiring & such, but I just don't feel like doing that anymore. I just want to make progress and get things moving along.
And here's what the transmission looks like w/ the hull assembled. Some nice detail showing, enough to make me happy.
Going to try to keep plugging away on this over the next few days. Work on cleaning up seams and anywhere I have issues, and then hopefully by next weekend I might be in a position to start laying down some color but we'll see. Things at work are really busy at the moment, so no idea how that might play into bench time.
phantom II
Master at Arms
Adam Baker: Befehlsjager 38 Ausf.M (Update 1/13)
Glad to see some progress Adam
Cheers, Christian B)
Glad to see some progress Adam
Cheers, Christian B)
Sherman 18
Master at Arms
Adam Baker: Befehlsjager 38 Ausf.M (Update 2/2)
Looking very nice Adam
Looking very nice Adam
Adam Baker: Befehlsjager 38 Ausf.M (Update 2/2)
Good progress Adam
Good progress Adam
Heavens Eagle
Well-known member
Adam Baker: Befehlsjager 38 Ausf.M (Update 2/2)
Yeah I have the problem with over detailing myself into apathy too Adam. I try to keep it to the "can it be seen" rule these days and sometimes that doesn't even work.
The build is looking real good! Keep up the great work!
Yeah I have the problem with over detailing myself into apathy too Adam. I try to keep it to the "can it be seen" rule these days and sometimes that doesn't even work.
The build is looking real good!
Keep up the great work! Adam Baker
Active member
Adam Baker: Befehlsjager 38 Ausf.M (Update 2/2)
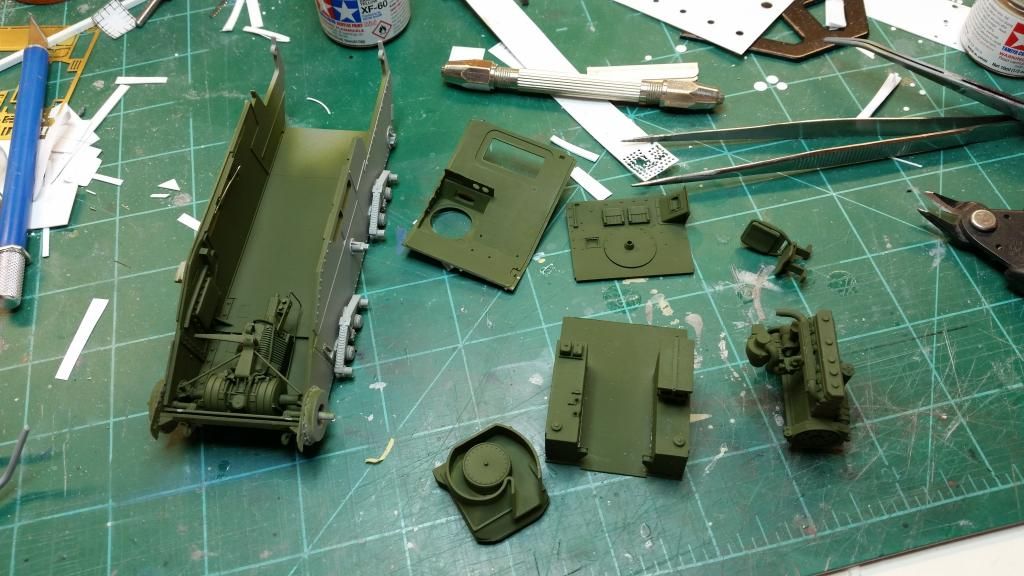
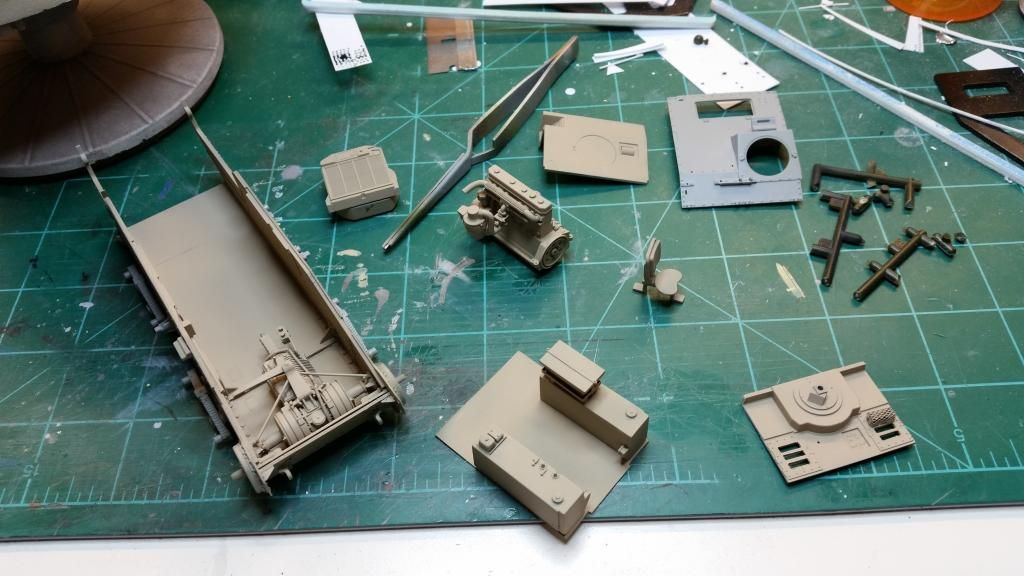
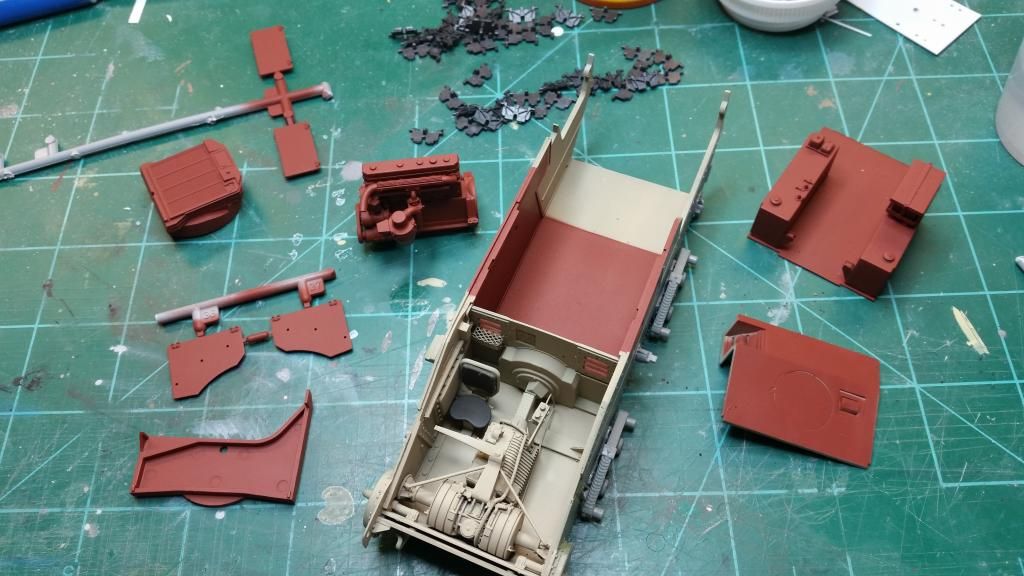
Actually managed to get motivated enough today to spend a few hours at my bench today working on this.
From what I can tell, construction of the main body is done, and now I'm ready for paint.
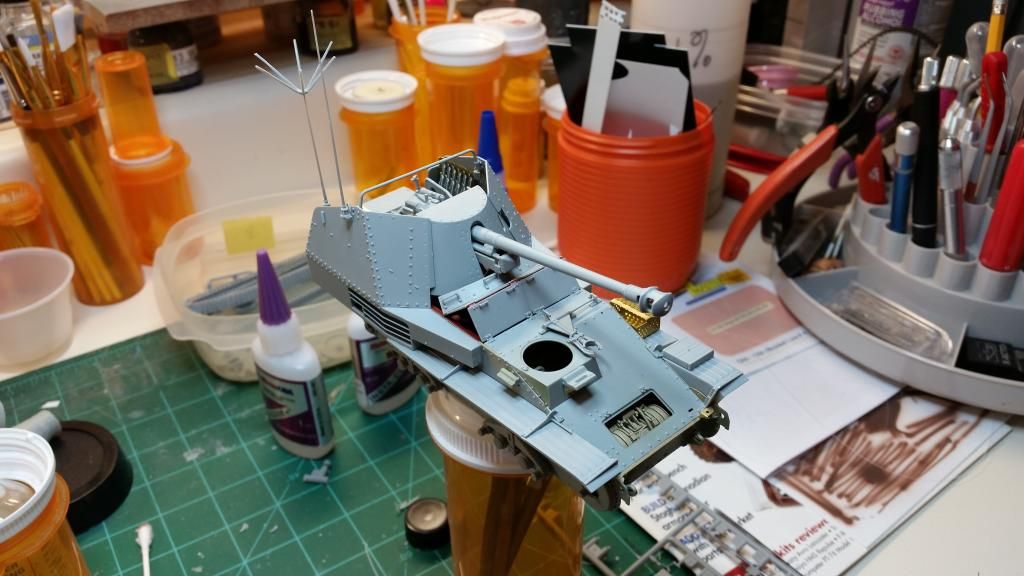
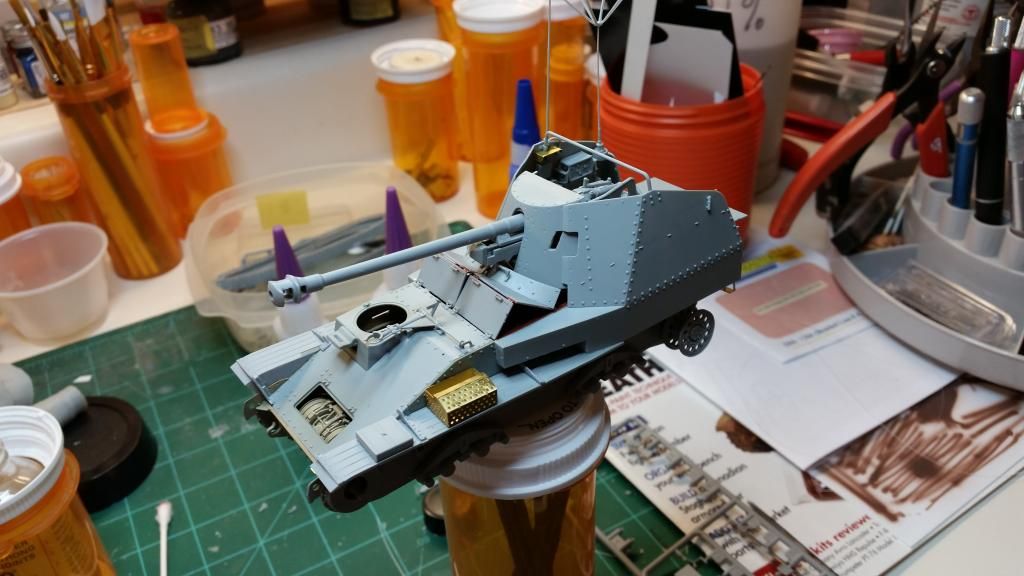
Engine cover hatches are glued together, but are only sitting in place, so I could see how it looked. At this point, I'm very glad I decided to skip adding any detail to the engine compartment, as it would be even harder to see than what I decided to add to the driver compartment.
Tracks are assembled as well, but I'm not happy at all w/ how they came out. Had a really difficult time getting them to lay down to the correct shape, so they dont look natural at all, but at this point I just dont want to deal with them anymore, so I'll paint them and put them on, and just live with it. I thought about getting Fruel tracks, but I dont want to spend the money on them for this build.
Still have to assemble the various tools & such that will go on the outside but those wont be put on until after painting & weathering is done. They are held down w/ photoetch straps, so I have to figure out how to do that part.
Actually managed to get motivated enough today to spend a few hours at my bench today working on this.
From what I can tell, construction of the main body is done, and now I'm ready for paint.
Engine cover hatches are glued together, but are only sitting in place, so I could see how it looked. At this point, I'm very glad I decided to skip adding any detail to the engine compartment, as it would be even harder to see than what I decided to add to the driver compartment.
Tracks are assembled as well, but I'm not happy at all w/ how they came out. Had a really difficult time getting them to lay down to the correct shape, so they dont look natural at all, but at this point I just dont want to deal with them anymore, so I'll paint them and put them on, and just live with it. I thought about getting Fruel tracks, but I dont want to spend the money on them for this build.
Still have to assemble the various tools & such that will go on the outside but those wont be put on until after painting & weathering is done. They are held down w/ photoetch straps, so I have to figure out how to do that part.